# Profuz LAPIS User Guide
User Manual for default LAPIS configuration
# Getting Started
Quick start guide
# Profuz LAPIS Getting Started
**Profuz LAPIS** is a Business Process and Information Management System. Its purpose is to bring under one roof all Processes and Data with which an organization operates.
**Profuz LAPIS** provides a central way and environment through which to control Management, Structure, Usage, Storage, and Security of various Data and Processes, and maintain Relationships with data and processes that come from and remain in different systems.
[](https://docs.profuzdigital.com/uploads/images/gallery/2024-11/image.png)
# How to log in?
**Profuz LAPIS** software works on server-clients basis. It means that clients must use web browsers to access the system. The following screenshot illustrates the Initial LAPIS login screen. The default login address is the IP address of the machine where LAPIS is installed. For internal private networks usually the address is the host address of the LAPIS server.
[](https://docs.profuzdigital.com/uploads/images/gallery/2024-11/wYCimage.png)
To log in please enter your designated **username and password.**
**Hint:** If you launch for first time the Profuz LAPIS, there is a default administrator account with following login credentials:
username: **administrator** password: **password**
Press the **Submit** button once login credentials are successfully entered. Profuz LAPIS will login to the main screen, which will show all available attributes available as operations to that user. Keep in mind that each main icon can be modified per customer's specific requirement for the desired workflow scenario. That is because LAPIS does not have hardcoded graphic user interface. It can always be modified. It is one of the important facts about the system.
# Application Interface
# Application Interface
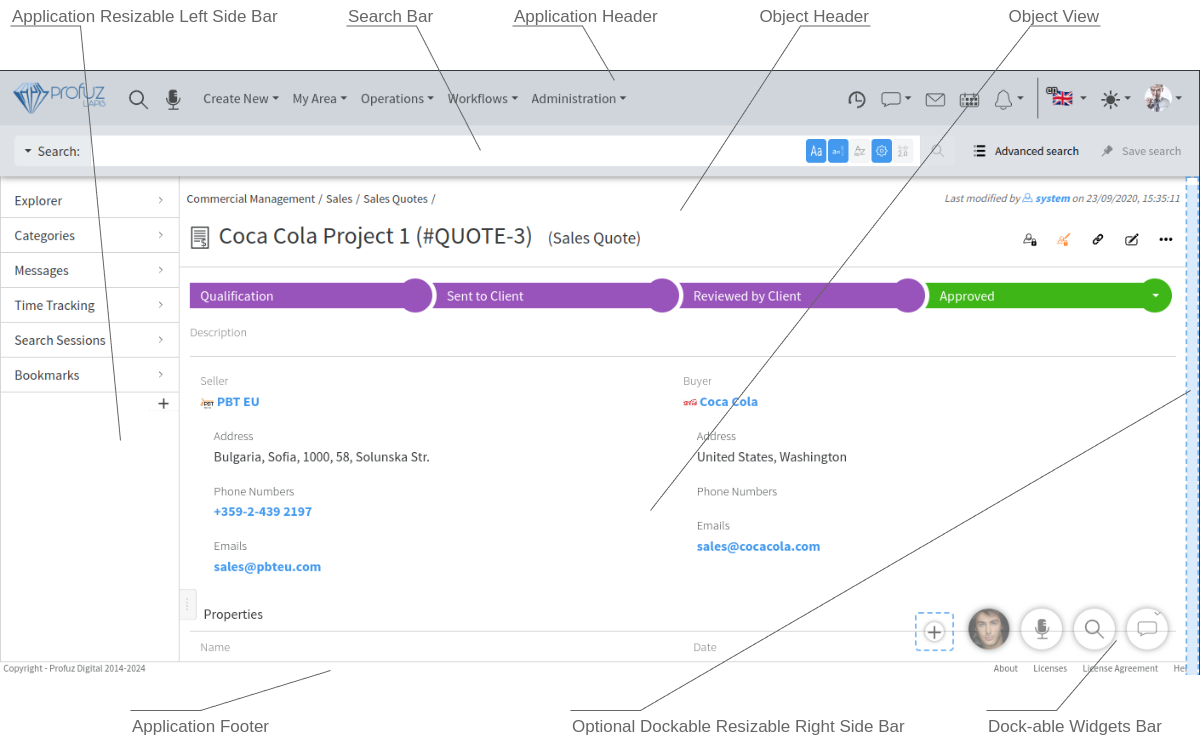
Clicking on an object will open a page with several menus, quick access links, viewer, properties and relations. The page is divided into the following sections:
1. **Application Header** - Shows overall LAPIS header with search, main menus, activities, messages, emails, calendar, notifications, language, and user info
2. **Search Bar** - Visible when toggled by the search button in Application Header or when search results are displayed
3. **Object Header** - Contains breadcrumb, object title, optional version information, object type, object menu, optional object quick actions buttons
4. **Object View** - Displays the current object with the view for its type
5. **Application Resizable Left Side Bar** - Shows default and custom application widgets
6. **Optional Dockable Resizable Right Side Bar** - Drag-drop any object or widget to the right of the screen to show it in the right side bar
7. **Dock-able Widgets Bar** - Drag-drop any object or widget to the bottom right of the screen for quick access (here are shown minimized objects and widgets)
8. **Application Footer** - General information about the licenses and quick access to Help
# Application Header
1. **Search** - Provides quick access to overall search of the system
2. **Dictation** - Allows voice dictations when enabled
3. **Create New Menu** - Access to a menu from where you can create new objects
4. **My Area Menu** - Lists all jobs and materials owned by you or assigned to you
5. **Operations Menu** - General ingest, archive and import operations
6. **Workflows Menu** - For creating new workflows and monitoring workflow instances and definitions
7. **Administration Menu** - For administration of system’ data types and permissions
8. **Activities** - Lists all activities of all users of the system
9. **Messages** - New and active chats
10. **Emails** - Quick access to received emails when the incoming email provider is activated
11. **Calendar** - Shows all projects, tasks or other events with start and end date
12. **Notifications** - Lists all notifications for everything your user is subscribed to be notified about
13. **Language** - Application’ UI language
14. **Display Menu** - select light/dark mode and themes
15. **User Menu** - Shows user profile, user's subscriptions and logout
# Search Bar
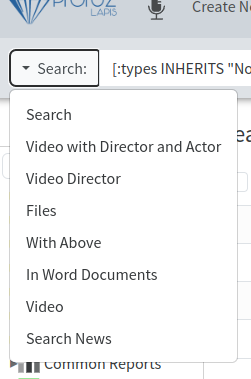
[](https://docs.profuzdigital.com/uploads/images/gallery/2024-11/h0Aimage.png)
Quick access to search templates
[](https://docs.profuzdigital.com/uploads/images/gallery/2024-11/ftSimage.png)
Free form search bar or search bar for typing any search using our search language
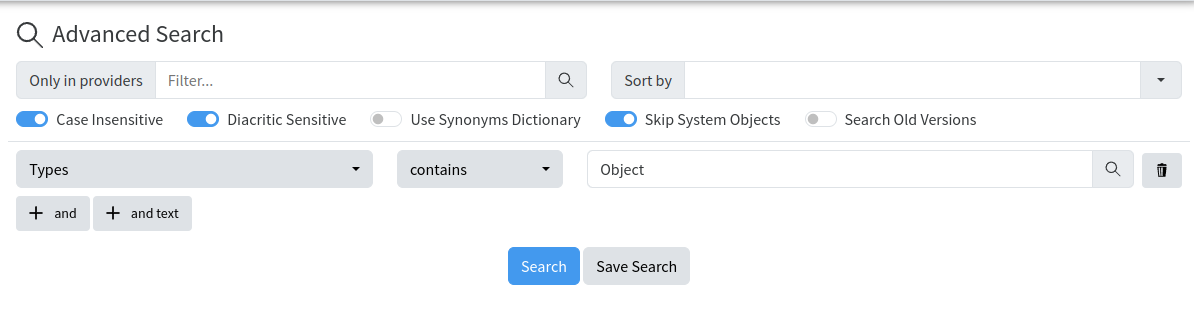
[](https://docs.profuzdigital.com/uploads/images/gallery/2024-11/gKgimage.png)
Advanced Search
[](https://docs.profuzdigital.com/uploads/images/gallery/2024-11/zpFimage.png)
Saves an advanced search selection for further usage
[](https://docs.profuzdigital.com/uploads/images/gallery/2024-11/8Mfimage.png)
# Object Header
### Breadcrumb
[](https://docs.profuzdigital.com/uploads/images/gallery/2024-11/Hw3image.png)
Breadcrumb - provides information about the path to the object
### Title
[](https://docs.profuzdigital.com/uploads/images/gallery/2024-11/X2Yimage.png)
Title, optional version number, quick switching between versions by clicking on the version and type of object
### Object’s Menu
[](https://docs.profuzdigital.com/uploads/images/gallery/2024-11/dWvimage.png)
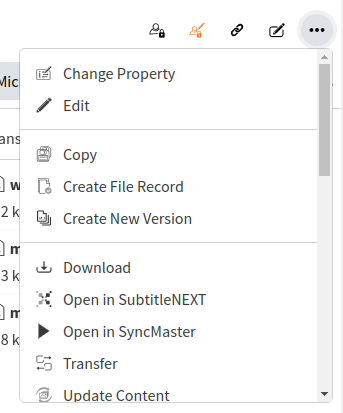
It displays all proper actions for the corresponding object type and varies depending on the type of object. The Media Actions are: Add Bookmark, Add Content, Archive, Attach File(s), Begin Versioning, Change Property, Copy, Create Marker, Create New Version, Delete, Download, Edit, Export, Import Metadata, Pop Out Window, Relate To, Transcode, Transcribe, Transcribe and Translate, DRM Encode, Transfer, Update Content.
### Quick Actions Buttons
[](https://docs.profuzdigital.com/uploads/images/gallery/2024-11/VlDimage.png)
Quick Actions Buttons - quick actions and custom actions buttons
# Object View
### Media Display
[](https://docs.profuzdigital.com/uploads/images/gallery/2024-11/s2nimage.png)
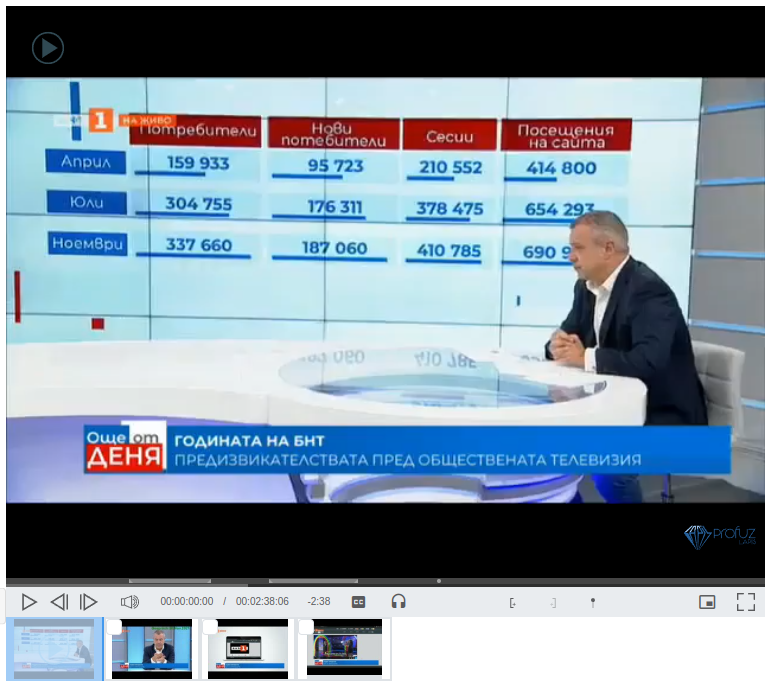
The Media controls are: play, previous frame, next frame, mute, volume, current position, duration, remaining time, subtitles/captions, audio streams, mark-in chunk start, mark-out and create a new chunk, create a point marker at current position, picture-in-picture and full screen
[](https://docs.profuzdigital.com/uploads/images/gallery/2024-11/vy6image.png)
Chunks and markers display
[](https://docs.profuzdigital.com/uploads/images/gallery/2024-11/Dyfimage.png)
Chunks Timeline
[](https://docs.profuzdigital.com/uploads/images/gallery/2024-11/nISimage.png)
Chunks and markers have their own properties, activities, views and actions and can also be treated separately. The available actions for them are: Add Bookmark, Attach File(s), Begin Versioning, Change Property, Copy, Delete, Edit, Export, Merge Markers, Pop Out Window, Relate to, Set In, Set Out, Split Marker, Transcode, Download, etc.
Audio display has the same content area and control bars as the video:
[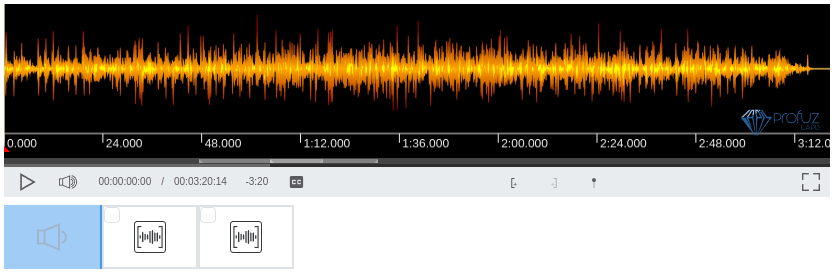](https://docs.profuzdigital.com/uploads/images/gallery/2024-11/FuYimage.png)
Audio waveform is generated automatically and displayed.
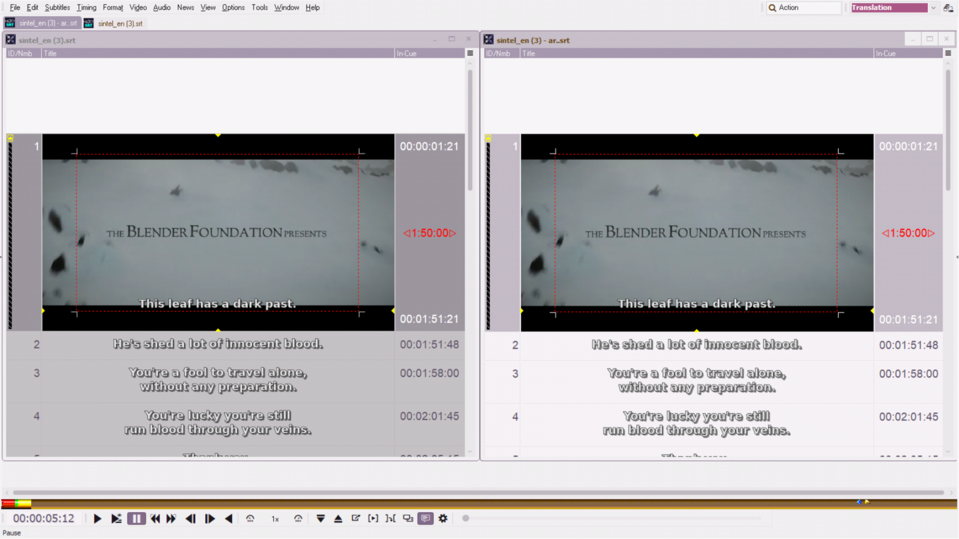
Subtitles viewer and editor looks like this:
[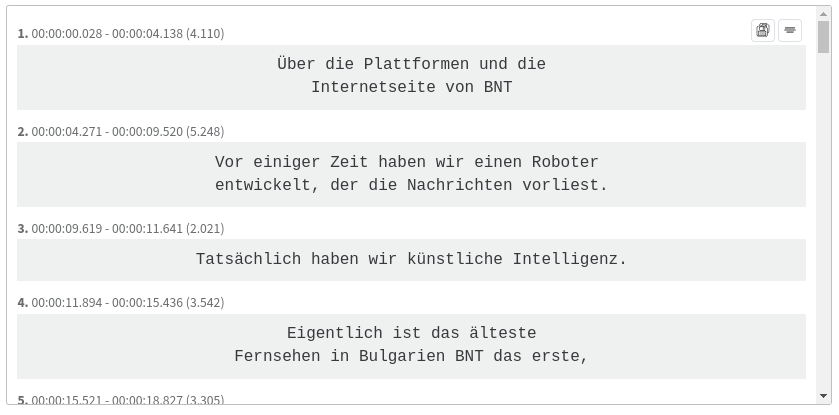](https://docs.profuzdigital.com/uploads/images/gallery/2024-11/otqimage.png)
Subtitles editor provides features for inserting, deleting, merging, splitting, timing, automatically translating and positioning subtitles/captions in SRT and WebVTT formats.
Other content types such as images, documents, excel sheets, presentations can also be opened with the viewer as shown:
[](https://docs.profuzdigital.com/uploads/images/gallery/2024-11/jKKimage.png)
[](https://docs.profuzdigital.com/uploads/images/gallery/2024-11/cOTimage.png)
### Activities
Activities are from two main types: comments and activity logs.
[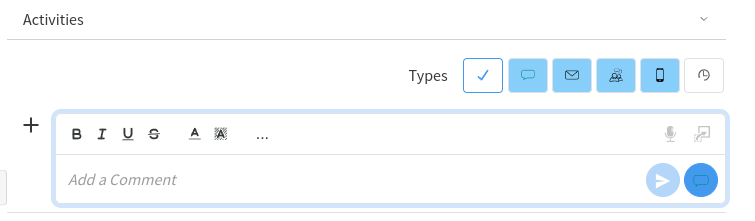](https://docs.profuzdigital.com/uploads/images/gallery/2024-11/uG8image.png)
Comments are used for real time comments and notes. They can be formatted with colors, fonts, styles, etc and edited if needed.
[](https://docs.profuzdigital.com/uploads/images/gallery/2024-11/dHwimage.png)
Activities are keeping track of the changes done to this object(file) as shown:
[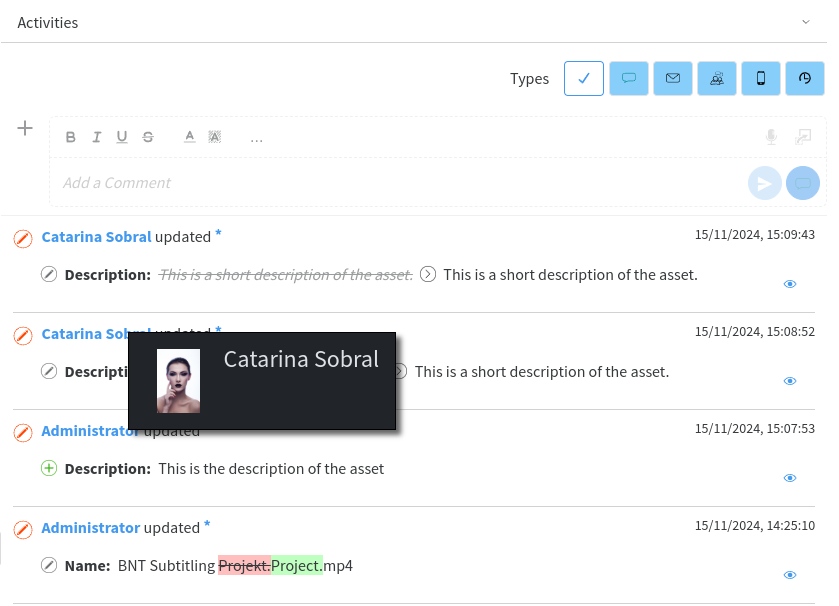](https://docs.profuzdigital.com/uploads/images/gallery/2024-11/crtimage.png)
When expanding the Contents list, you can see and have a quick access to all associated contents such as subtitles, audio streams, documents, videos, proxy, etc:
[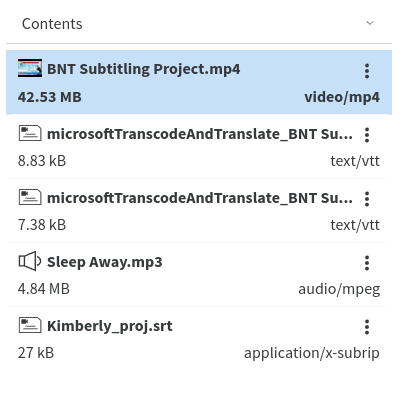](https://docs.profuzdigital.com/uploads/images/gallery/2024-11/7BPimage.png)
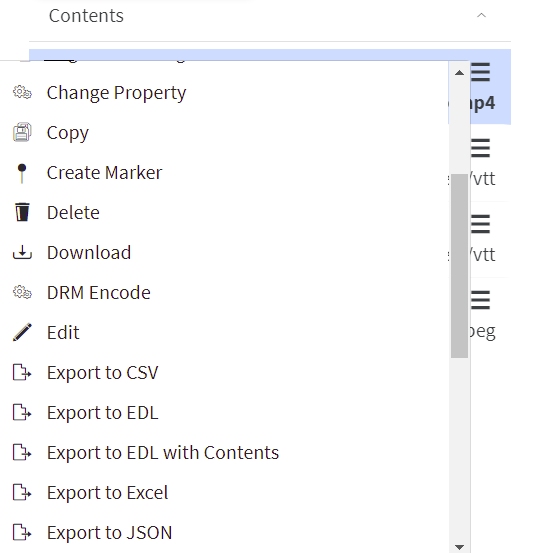
The contents have their own local menu with appropriate actions such as: Add Bookmark, Add Content, Archive, Begin Versioning, Change Property, Copy, Create Marker, Delete, Download, Edit, Export, Import Metadata, Relate To,, Transcode, Transcribe, Transfer, Update Content, Pop Out Window, etc.
When expanding the Transformations list, you have a list and quick access to all the transformations of this media such as thumbnails, preview, etc:
[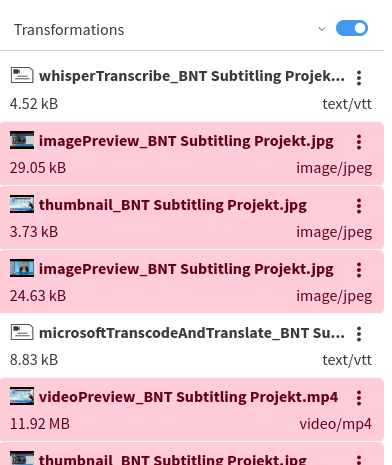](https://docs.profuzdigital.com/uploads/images/gallery/2024-11/Etiimage.png)
The transformations have their own menu with appropriate actions such as: Add Bookmark, Attach File, Begin Versioning, Change Property, Copy, Delete, Download, Edit, Export, Import Metadata, Relate To, Transfer, Update Content, Pop Out Window, etc.
Transformed From shows the original media from where the transformation has been initiated:
[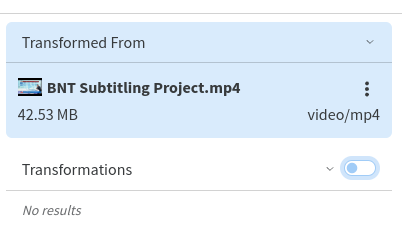](https://docs.profuzdigital.com/uploads/images/gallery/2024-11/JbZimage.png)
All contents and transformations have their own IDs, activities, views, properties, relations and actions.
### Relations
Relations are used to link information from various types as shown below:
[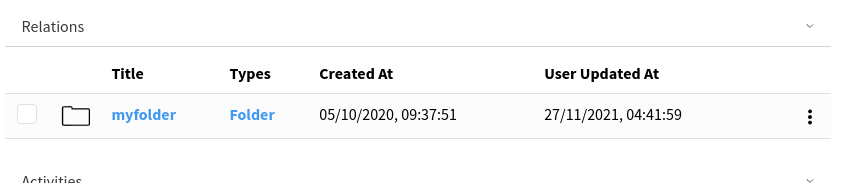](https://docs.profuzdigital.com/uploads/images/gallery/2024-11/8mFimage.png)
The relations can be in one direction or another. They can also be removed if not needed any longer.
### Properties
The properties are the metadata of the file. There are standard default properties and custom properties defined by the system administrator(s). The properties placement can be customized for New, View and Edit screens. For more information about how to create new properties and property placements, please consult the corresponding sections.
Properties have Quick Edit and Save as shown:
[](https://docs.profuzdigital.com/uploads/images/gallery/2024-11/eUEimage.png)
They can be localized in multiple languages and the localized versions can be added with the + as shown:
[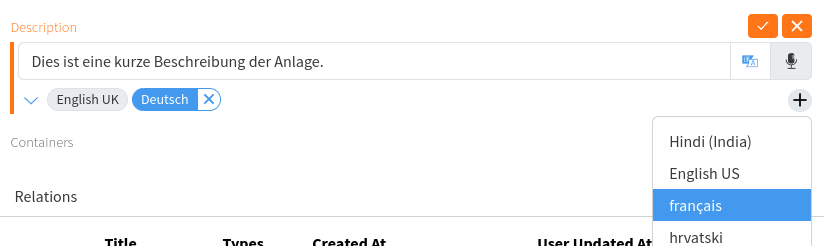](https://docs.profuzdigital.com/uploads/images/gallery/2024-11/uM2image.png)
Properties can be of various types such as text, integer, symbol, etc.
Container, tag, category are properties used for categorizing files.
Permissions can be set for an individual object (file) for individual users and user groups by allowing and denying operations as shown:
[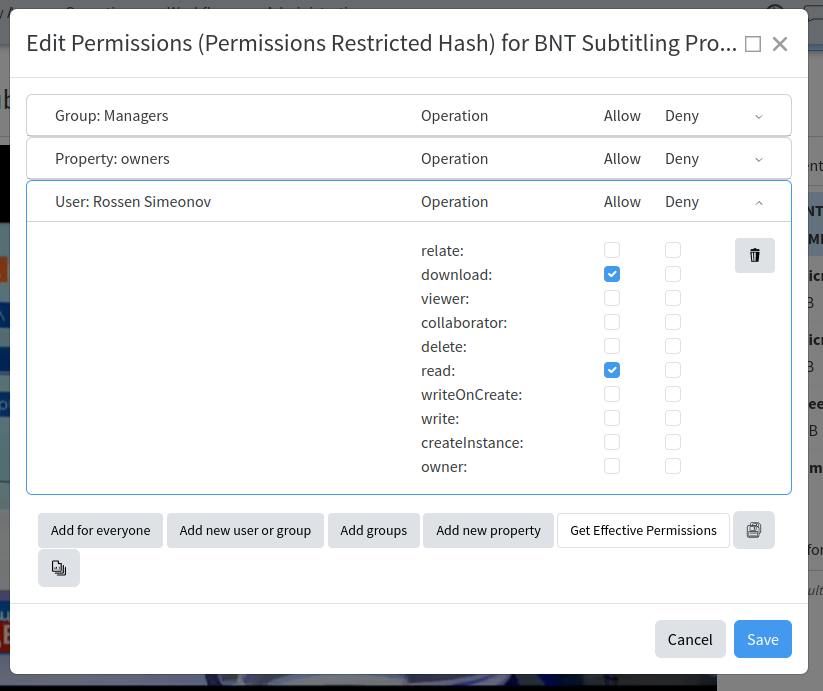](https://docs.profuzdigital.com/uploads/images/gallery/2024-11/nHLimage.png)
### Related Media Links Sidebar
Displays all contents, transformations and optionally a link to the original media
[](https://docs.profuzdigital.com/uploads/images/gallery/2024-11/Bhwimage.png)
When expanding the Contents list, you can see and have a quick access to all associated contents such as subtitles, audio streams, documents, videos, proxy, etc:
[](https://docs.profuzdigital.com/uploads/images/gallery/2024-11/7BPimage.png)
The contents have their own local menu with appropriate actions such as: Add Bookmark, Add Content, Archive, Begin Versioning, Change Property, Copy, Create Marker, Delete, Download, Edit, Export, Import Metadata, Relate To,, Transcode, Transcribe, Transfer, Update Content, Pop Out Window, etc.
When expanding the Transformations list, you have a list and quick access to all the transformations of this media such as thumbnails, preview, etc:
[](https://docs.profuzdigital.com/uploads/images/gallery/2024-11/Etiimage.png)
The transformations have their own menu with appropriate actions such as: Add Bookmark, Attach File, Begin Versioning, Change Property, Copy, Delete, Download, Edit, Export, Import Metadata, Relate To, Transfer, Update Content, Pop Out Window, etc.
Transformed From shows the original media from where the transformation has been initiated:
[](https://docs.profuzdigital.com/uploads/images/gallery/2024-11/JbZimage.png)
All contents and transformations have their own IDs, activities, views, properties, relations and actions.
# Types
# Create New Type
This system is going to work with information which can be categorized and described through **objects, types and properties.**
Usually this is called **"definition of taxonomies".** In practice, it is used for classification of things or concepts. As a typical object-based software application, LAPIS relies on the principles of taxonomy and applies to objects and concepts. In order to understand the logic of the system and to be able to configure your own taxonomies, you need to have at least a basic understanding of classification principles.
An „**Object “**is the most generic piece of information to describe something, such as person, company, asset, project, task, document, stock, etc.
**„Type“** is a categorization of an Object and holds the characteristics to uniquely describe a particular object, such as person's name, address, phone, age, etc.
The characteristics used to describe a Type are called **„Properties “.** Properties can hold different information such as numbers, dates, colors, texts etc.
## Get to know the default LAPIS Installation
The default LAPIS installation has only one user – the administrator. You can login to the system with username “administrator” and a password “password” at the URL provided by your company system administrator. LAPIS system administrator can login to this URL to start configuring the system.
[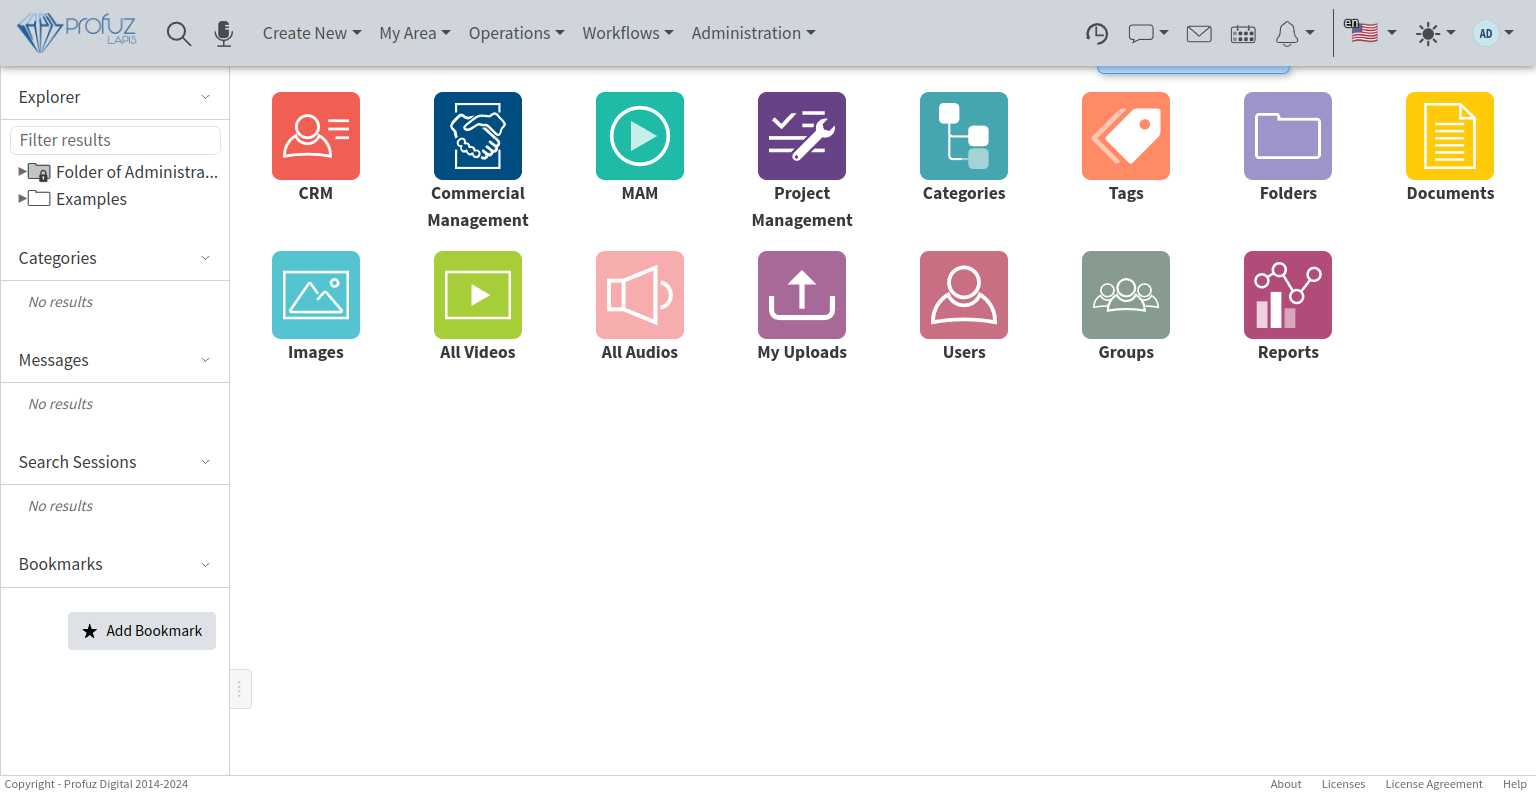](https://docs.profuzdigital.com/uploads/images/gallery/2024-11/Sdkimage.png)
Print screen from default installation with initial dashboard and administrator’s menu.
## Setup Types
If you go to Application Main Menu located in the header at the top of the page- > Administration -> Types
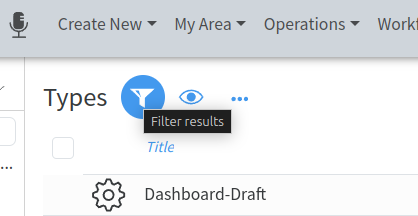
[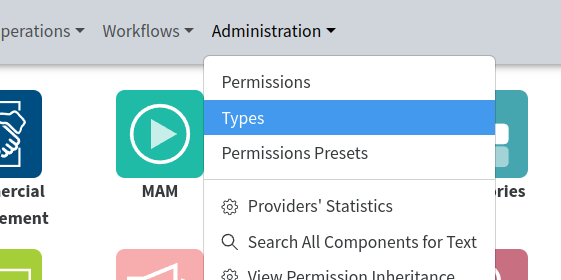](https://docs.profuzdigital.com/uploads/images/gallery/2024-11/cbkimage.png)
you will see a list of all types of data which were setup for you during system default installation and configuration.
All types are marked with the following **Gear Icon **.
Types can be used by the administrator to create similar types, but specific for your organization, with the properties and processes you are used to.
You can create **new types** and **new subtypes** from **Actions menu** in the Application Main Menu located in the header at the top of the page.
Your system is coming with default Types setup. If the Default Types are not enough for your needs, you can change, add new, rearrange or remove properties for every type of object which is not system default object (Object) or system default type (Type). They are locked for editing.
If you want to create a new type or subtype of data, you have to go to **Administration -> Types**, find and select the basic type you want to follow, using Filter, and choose from Actions the Create New or Create New Subtype operation.
[](https://docs.profuzdigital.com/uploads/images/gallery/2024-11/wkzimage.png)
[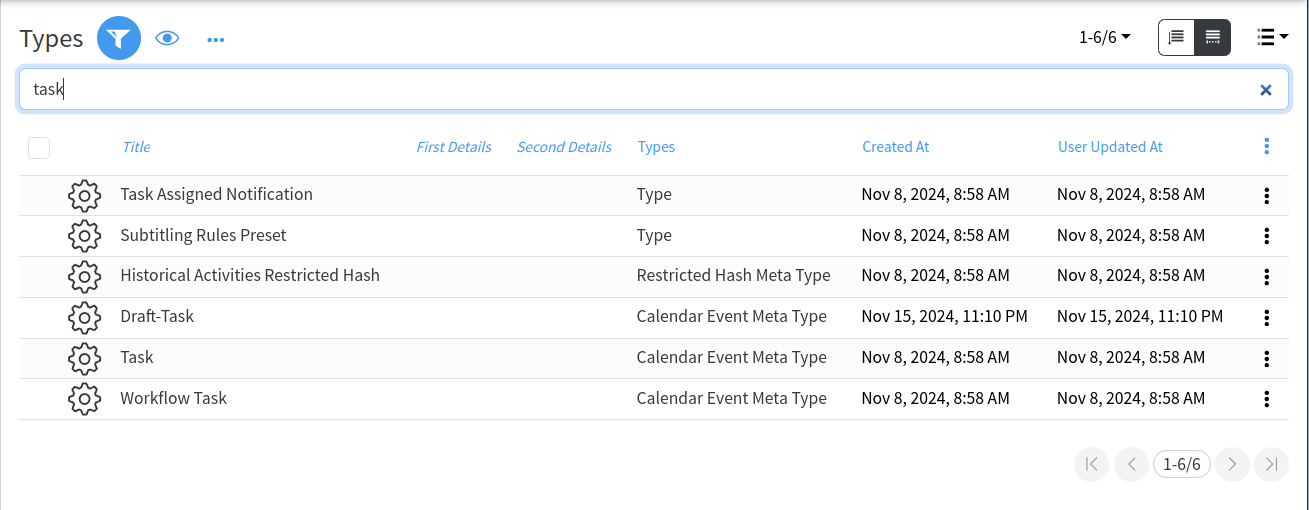](https://docs.profuzdigital.com/uploads/images/gallery/2024-11/Rqaimage.png)
For example, you want to create a new subtype of task which is specific for your business which is “Translation Task”. In order to do that, you have to find the type Task and from Actions you have to choose **Create Subtype**.
[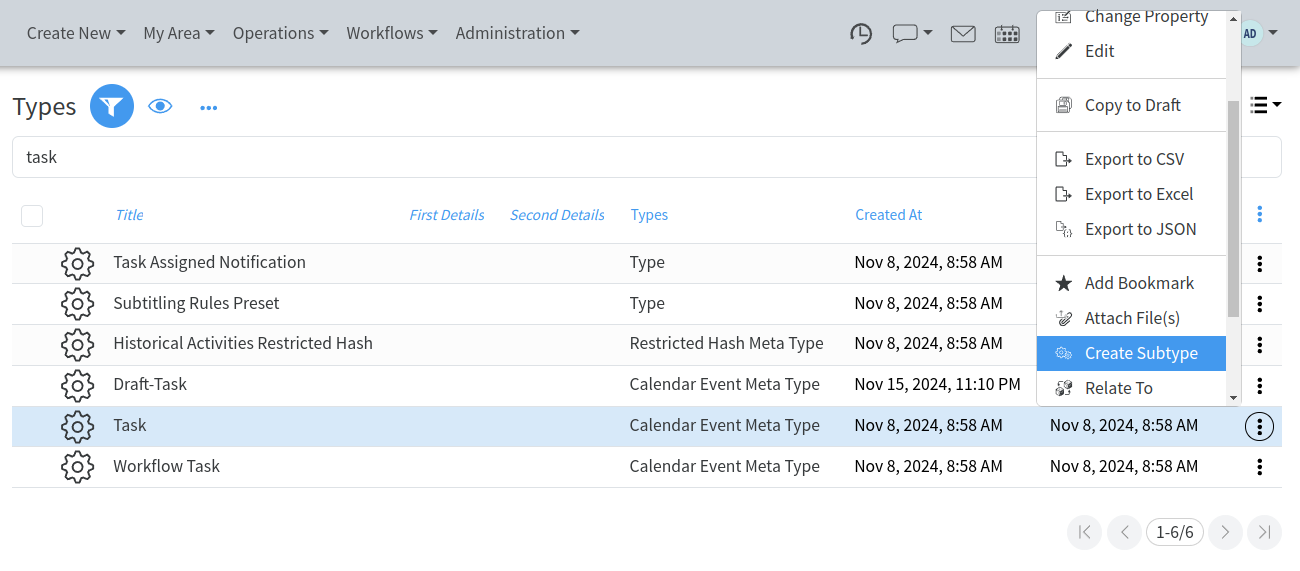](https://docs.profuzdigital.com/uploads/images/gallery/2024-11/6Loimage.png)
For example, you want to create a new subtype of task which is specific for your business which is “Translation Task”. In order to do that, you have to find the type Task and from Selected Actions you have to choose **Create Subtype**. When the page for creating new Subtype is displayed, first you have to name your new type.
[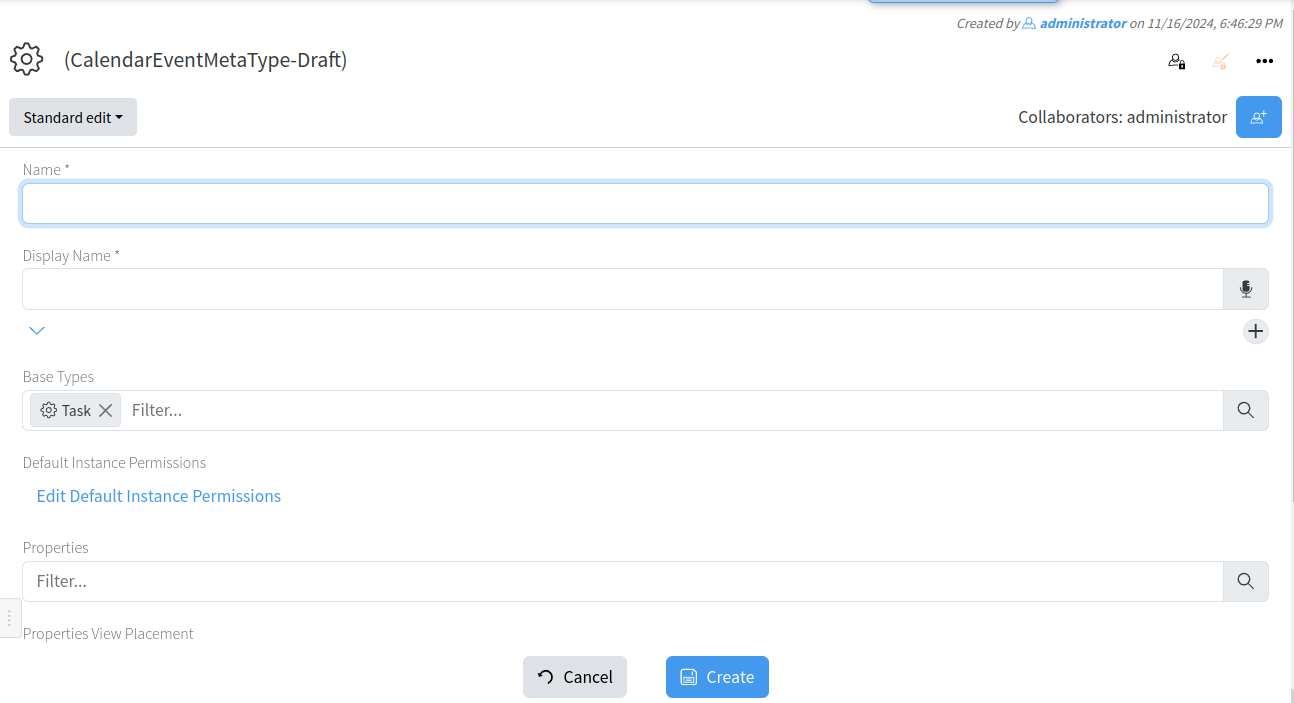](https://docs.profuzdigital.com/uploads/images/gallery/2024-11/WmIimage.png)
In the **Name field** you have to write a name without spaces (you can use also special characters as underscore, for example), which will be used as a unique type name in the system.
n the **Display Name field**, you can write the name which will be used by the users of the system to find this type of tasks and work with them, so it is good this to be as intuitive as possible for your organization’s business and culture. The Display Name can be in multiple languages. In the **Default Instance Permissions field**, you decide to whom you want to give access to this type.
This is finalized by pressing the button Create
[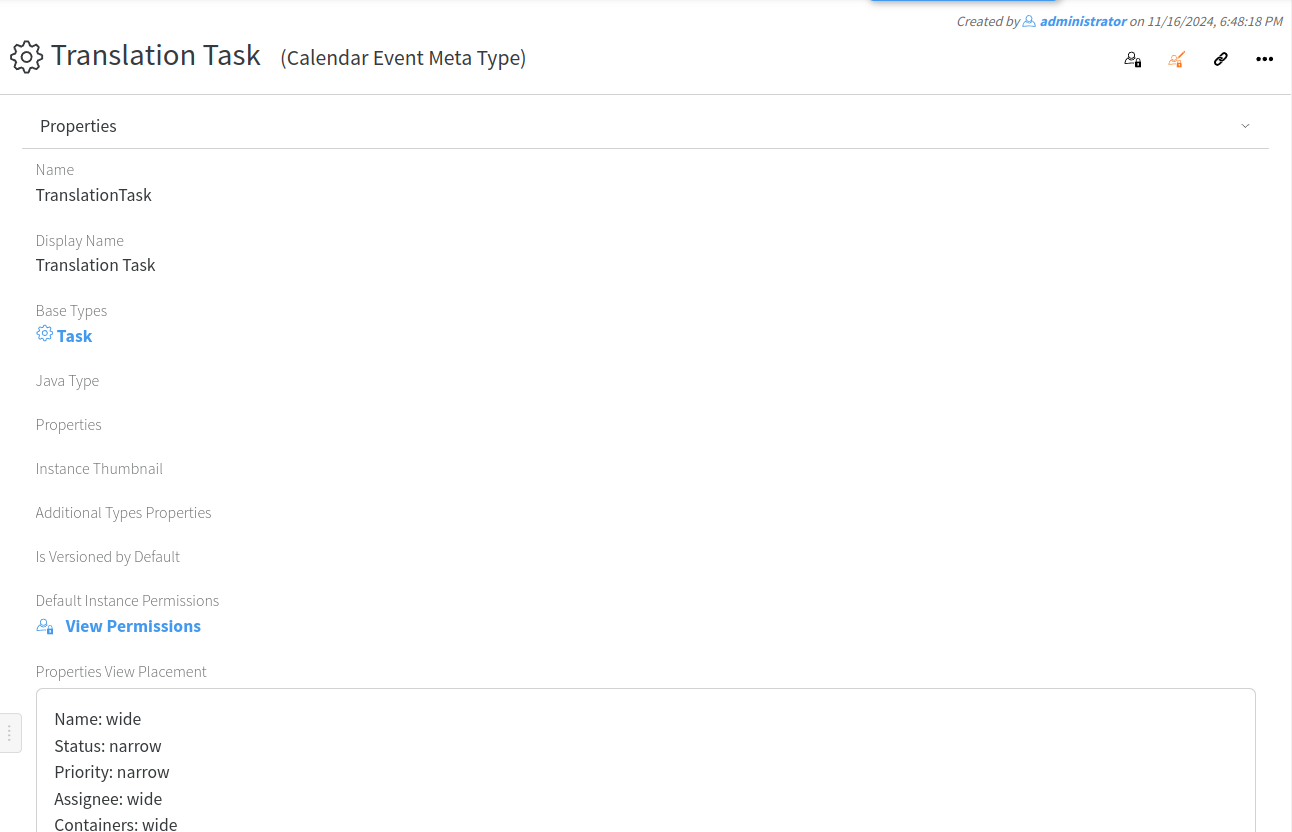](https://docs.profuzdigital.com/uploads/images/gallery/2024-11/24rimage.png)
In the **Properties Field**, you choose all additional properties you would like to add to this new Translation Task, in addition to the ones inherited from the Task.
**Property Placements**
A property placement is the way the properties are arranged and displayed in CREATE, VIEW and EDIT pages of the Objects of this Type. .
[](https://docs.profuzdigital.com/uploads/images/gallery/2024-11/XJGimage.png)
As shown in the example above, there are the following placements: Properties View Placement ( shows which properties are displayed in the main VIEW of the Object and in which order) , Properties Edit Placement (shows which properties are displayed during EDIT operation of the Object and in which order) and Properties New Placement (shows which properties are displayed when creating an Object of this type and in which order).
To ADD a new property in the placement list, when in Edit or Quick Edit mode, you have to click on the “+” button and select from the Select Name drop down list. This list contains all the properties defined for this Type (all the properties inherited from the Base Type, plus the properties defined for your Type).
In addition to the listing of the properties, you have to choose their width. This option is needed because of the responsive layout of the pages and takes care to list the properties in one (narrow) or two columns (wide) for desktop displays. On mobile displays they are always shown in a single column.
To rearrange your properties placements, drag and drop the vertical arrow button **↕** on the left to the desired position.
The Line Separator can be used to better separate and group properties visually.
[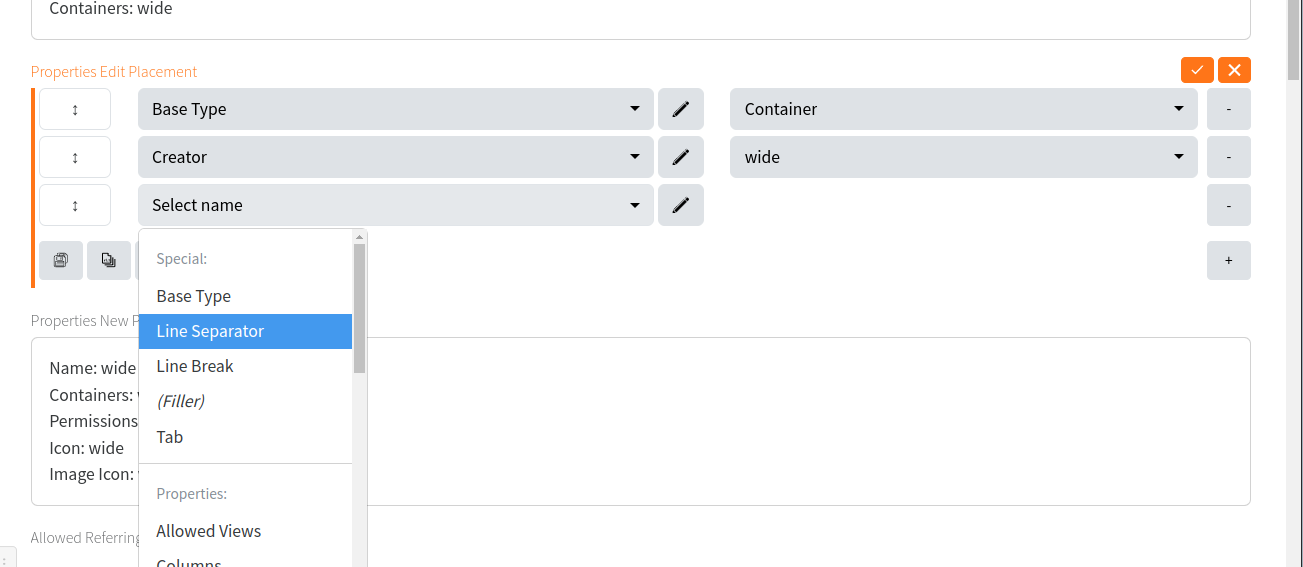](https://docs.profuzdigital.com/uploads/images/gallery/2024-11/RTZimage.png)
When viewing a Type, the Actions menu in the object's header contains all common actions and the following specific to the Type:
[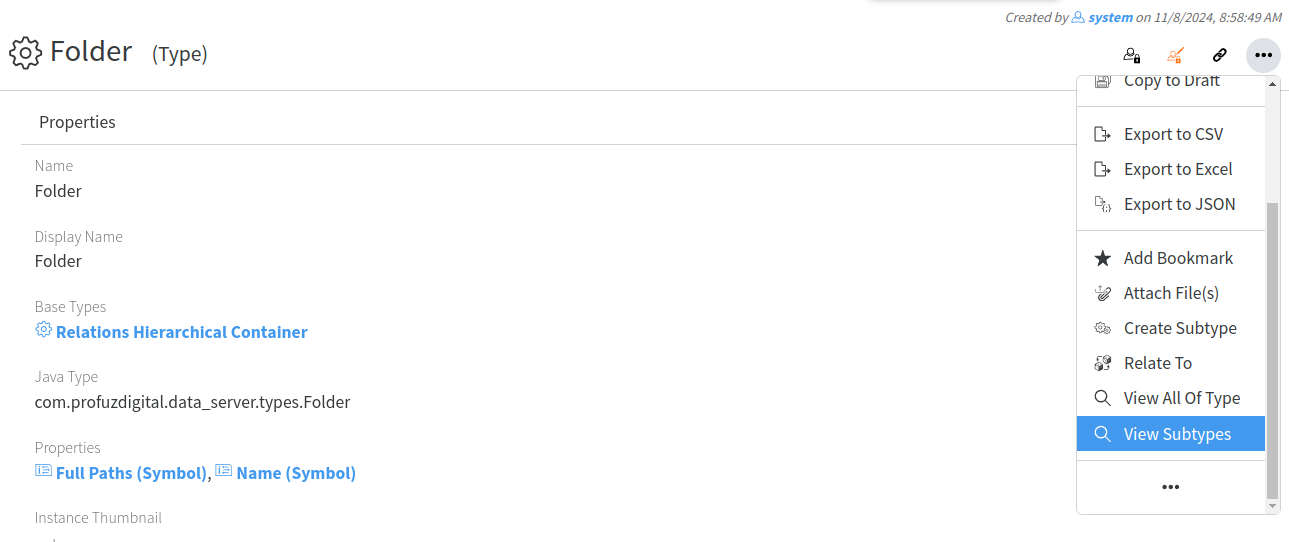](https://docs.profuzdigital.com/uploads/images/gallery/2024-11/44Zimage.png)
Create New: creates a new object of this Type; Create Subtype: creates a derivative of this Type; View All of Type: lists all the objects in the system which are of this Type.
These are just few examples of types and what you can do with them, but the same principles can be used to create other types of Objects, totally new (ex. Car, House, etc) or deriving from the default Types in order to make more detailed classifications (ex. Transcription Task, Production Task, Video Editing Task based on the Task; Movable Property, Immovable Property based on the Asset Type).
# Properties
# Create new property
#### Properties
Properties are the characteristics used to describe a Type of an Object. There are a lot of properties which are common and used to describe many Objects like Name, Address, Description, etc. A lot of those properties are already created in the default LAPIS installation. If the properties which were initially set with system default installation are not the ones you are used to or don’t describe the Types you would like to see in your LAPIS system, we allow you to change their possible values, to create new properties and to change the way they are listed on the page or to choose which property from the existing ones to assign to your type. So, before creating a new proper ty it is good to search your LAPIS database for the existing ones. All properties are marked with the sign listed here
[](https://docs.profuzdigital.com/uploads/images/gallery/2024-11/0xVimage.png)
The property holds different types of data such as Number, Strings, Date, Color, List, Symbol, Boolean and many more. Many types of data, as the ones listed here before, are already created in the Default LAPIS installation, but new ones can be defined by you or by us upon request. Usually, you will need to create a new property if there isn’t an existing one matching your needs for defining your specific Type(s).
#### Create New Property
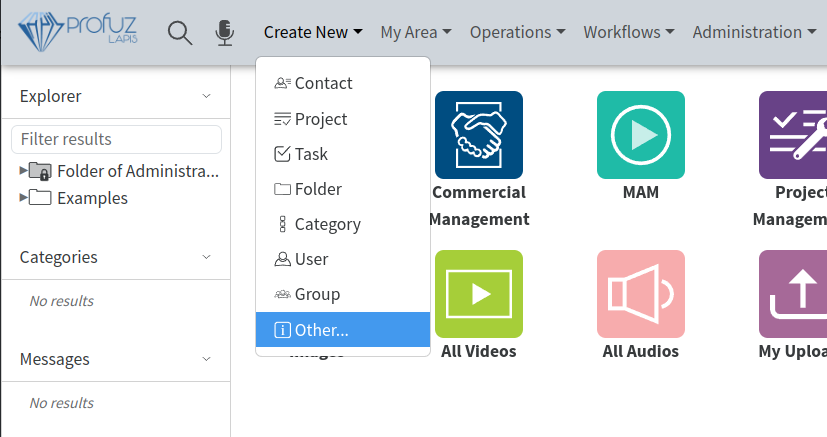
To create a new property, you will have to go to Application Main Menu, choose Create New -> Other
[](https://docs.profuzdigital.com/uploads/images/gallery/2024-11/4F2image.png)
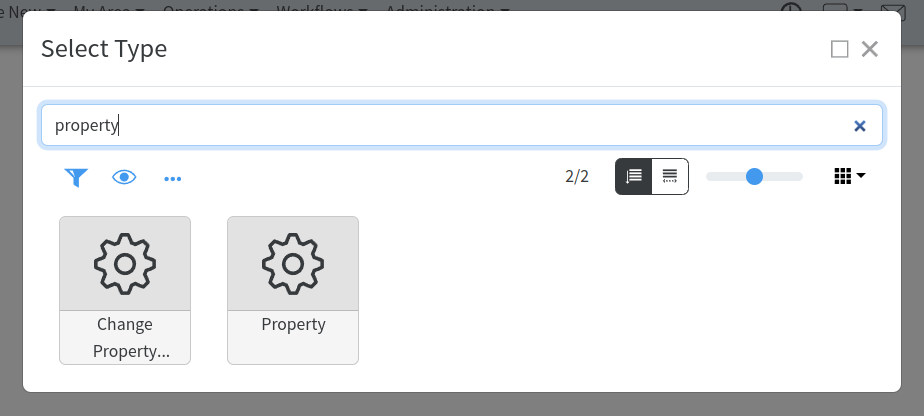
#### Search for type Property
Search for Property type select it and click Save.
[](https://docs.profuzdigital.com/uploads/images/gallery/2024-11/zKdimage.png)
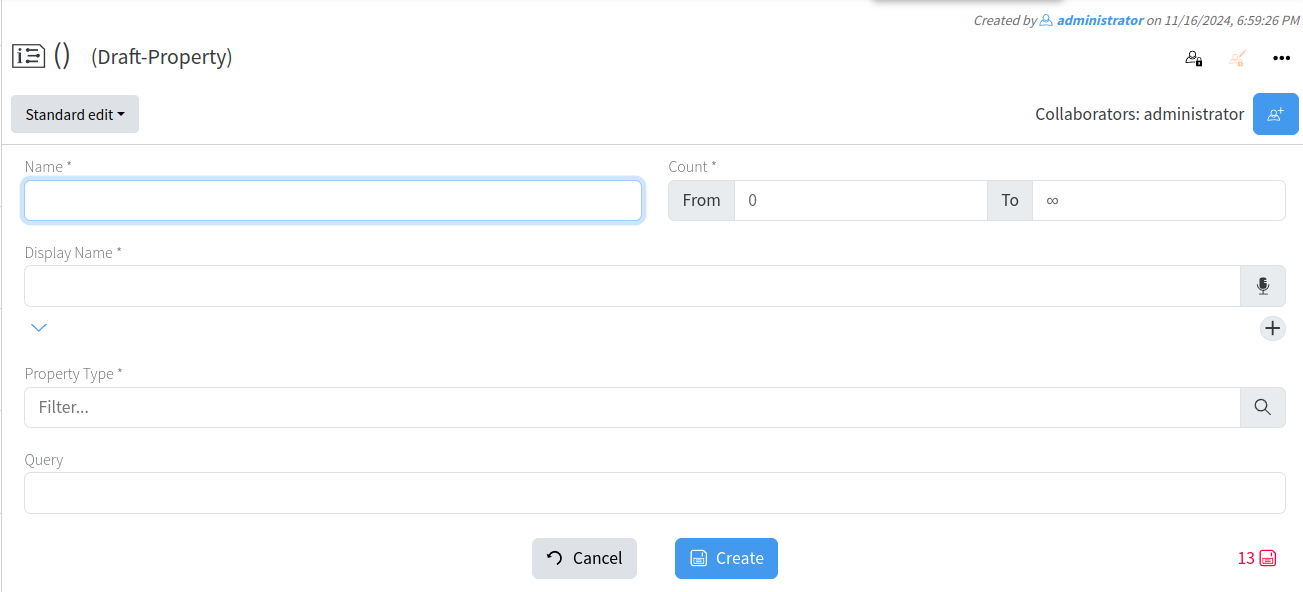
When you do it, the following page will open to fill in with your information:
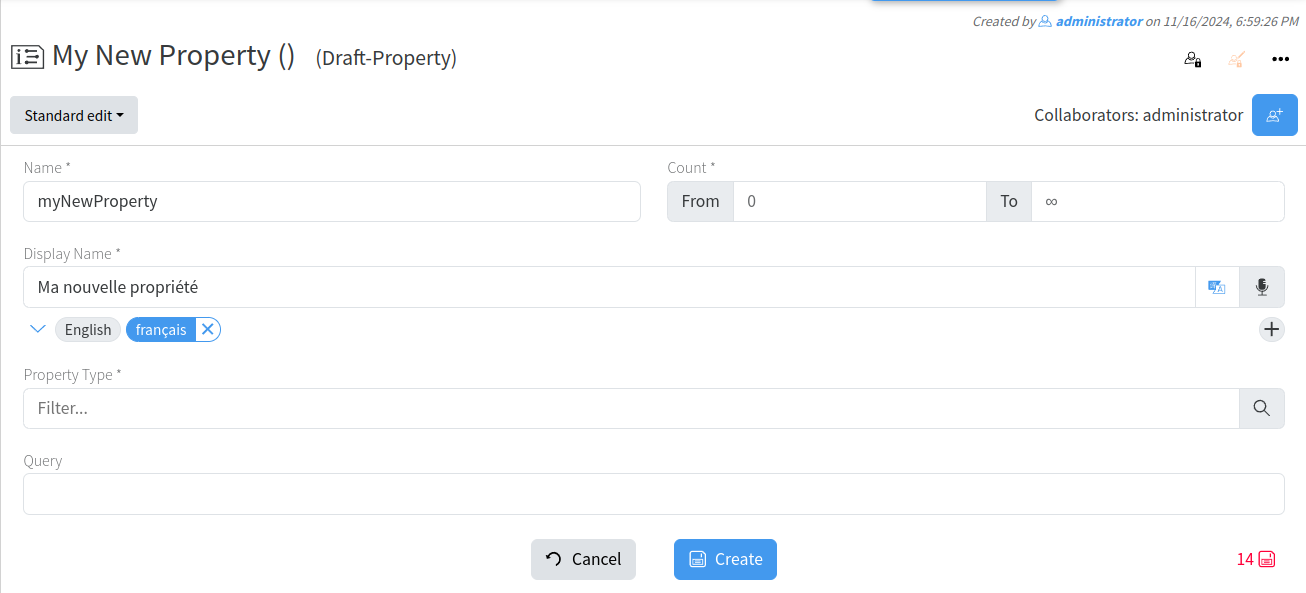
[](https://docs.profuzdigital.com/uploads/images/gallery/2024-11/djiimage.png)
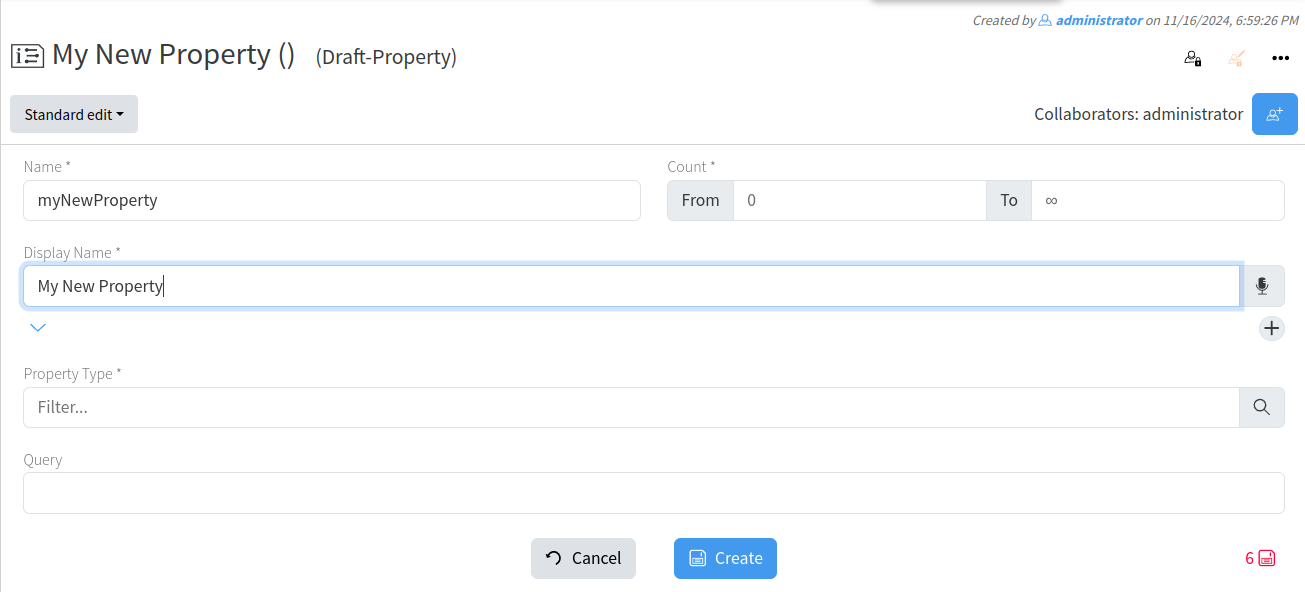
In the **Name** field, you have to define a name of the proper ty used to identify it. Usually it is a unique name, but if you chose an existing name, it is possible to overwrite a property used in some Type with your own property. The Name field must be written without any spaces. **Count** defines the number of values this property will contain as data. From 0 to 1 means that there can be no or one value. From 1 to 1 means that there will be only one value and this value is mandatory. If these fields are greater than 1, this property will contain multiple values. From 0 to ∞ means that there is no limitation on the number of values.
**Display Name** is used to define what you will see in the User Interface. Display Name can be defined in one or multiple languages. For adding Display Name in other languages, please click on the “+“ sign and chose the language(s) one by one.
[](https://docs.profuzdigital.com/uploads/images/gallery/2024-11/RP7image.png)
[](https://docs.profuzdigital.com/uploads/images/gallery/2024-11/meGimage.png)
[](https://docs.profuzdigital.com/uploads/images/gallery/2024-11/N4Simage.png)
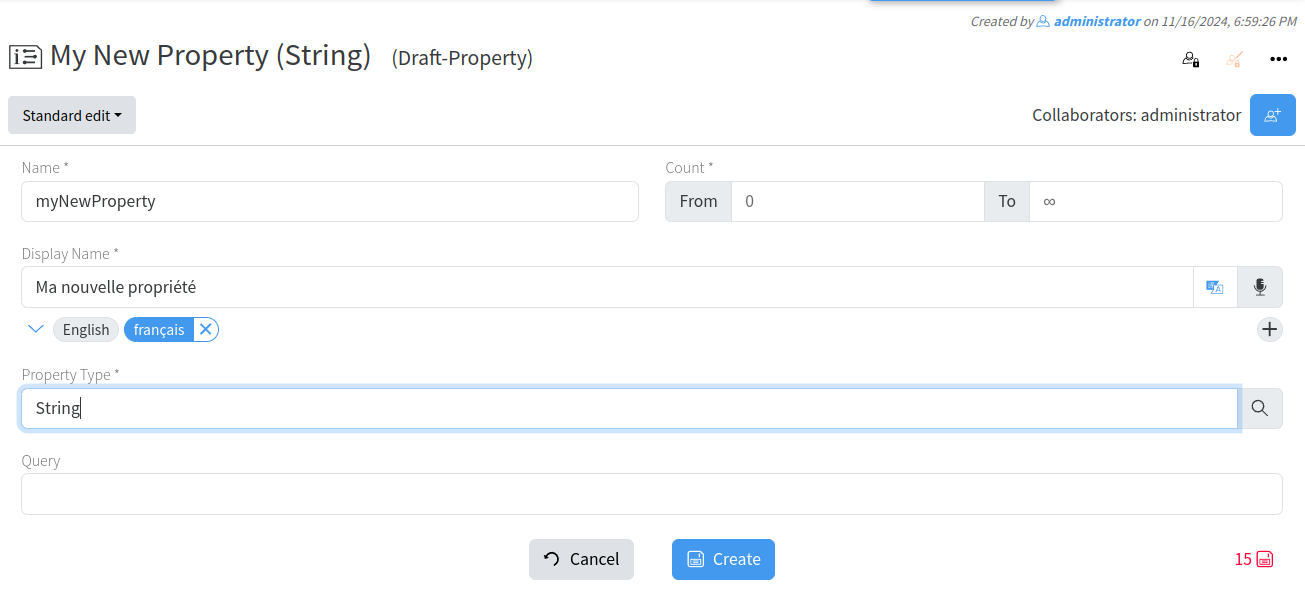
**Property Type** defines the format of the data and its interpretation. In the example above the chosen String property type allows textual data in multiple languages.
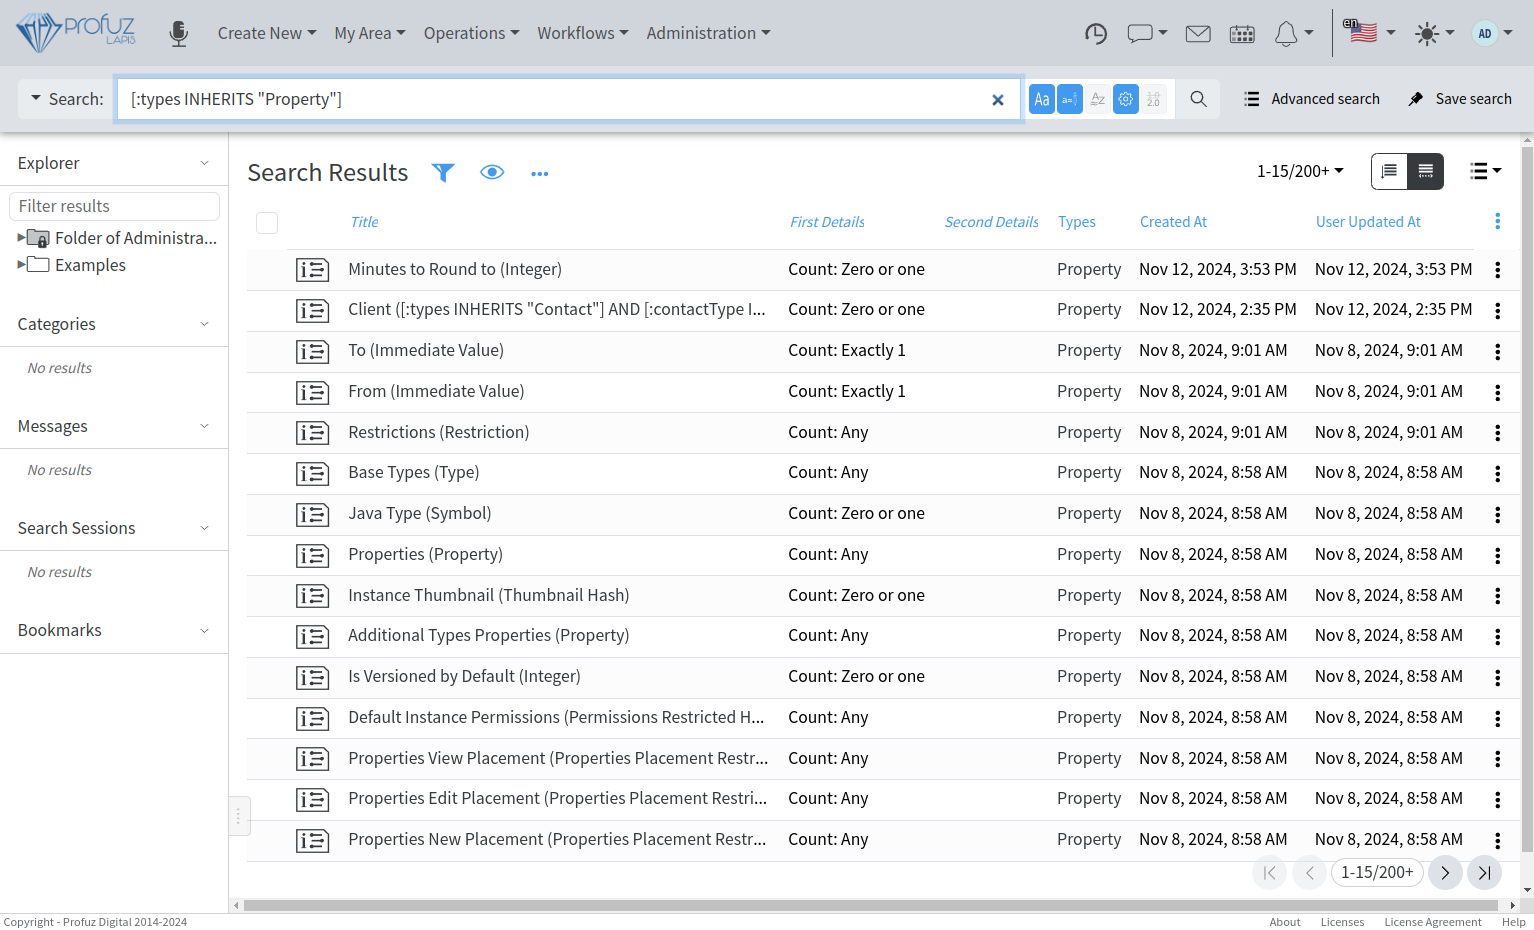
In order to see all default created properties, use the following search:
`([:types INHERITS "Type"] AND (([:baseTypes ( INHERITS "ImmediateValue" )]))) SORT BY :id`
# Containers and Searches
# Containers and Searches
## Containers
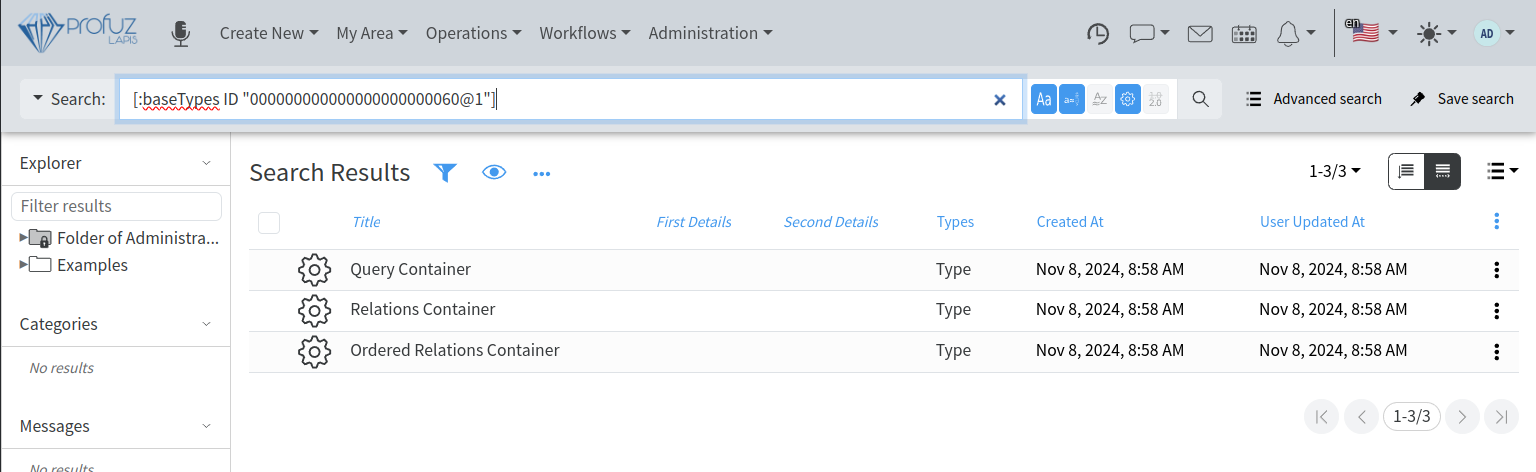
**Container in Profuz LAPIS** is a Base Type used to describe Objects which virtually contain other Objects. To view all types of containers directly deriving from Container Base Type, search for the following: \[:baseTypes ID "000000000000000000000060@1"\] The default Profuz LAPIS installation comes with the following types of Containers: Relations Container, Ordered Relations Container, and Query Container.
[](https://docs.profuzdigital.com/uploads/images/gallery/2024-11/hKBimage.png)
**Relations Container** and **Ordered Relations Container** keep links between Containers of those two types and other Objects of the system. The difference between them is that in Ordered Relations Container, the links are ordered. For example, Folder is a Relation Container and Dashboard is Ordered Relations Container.
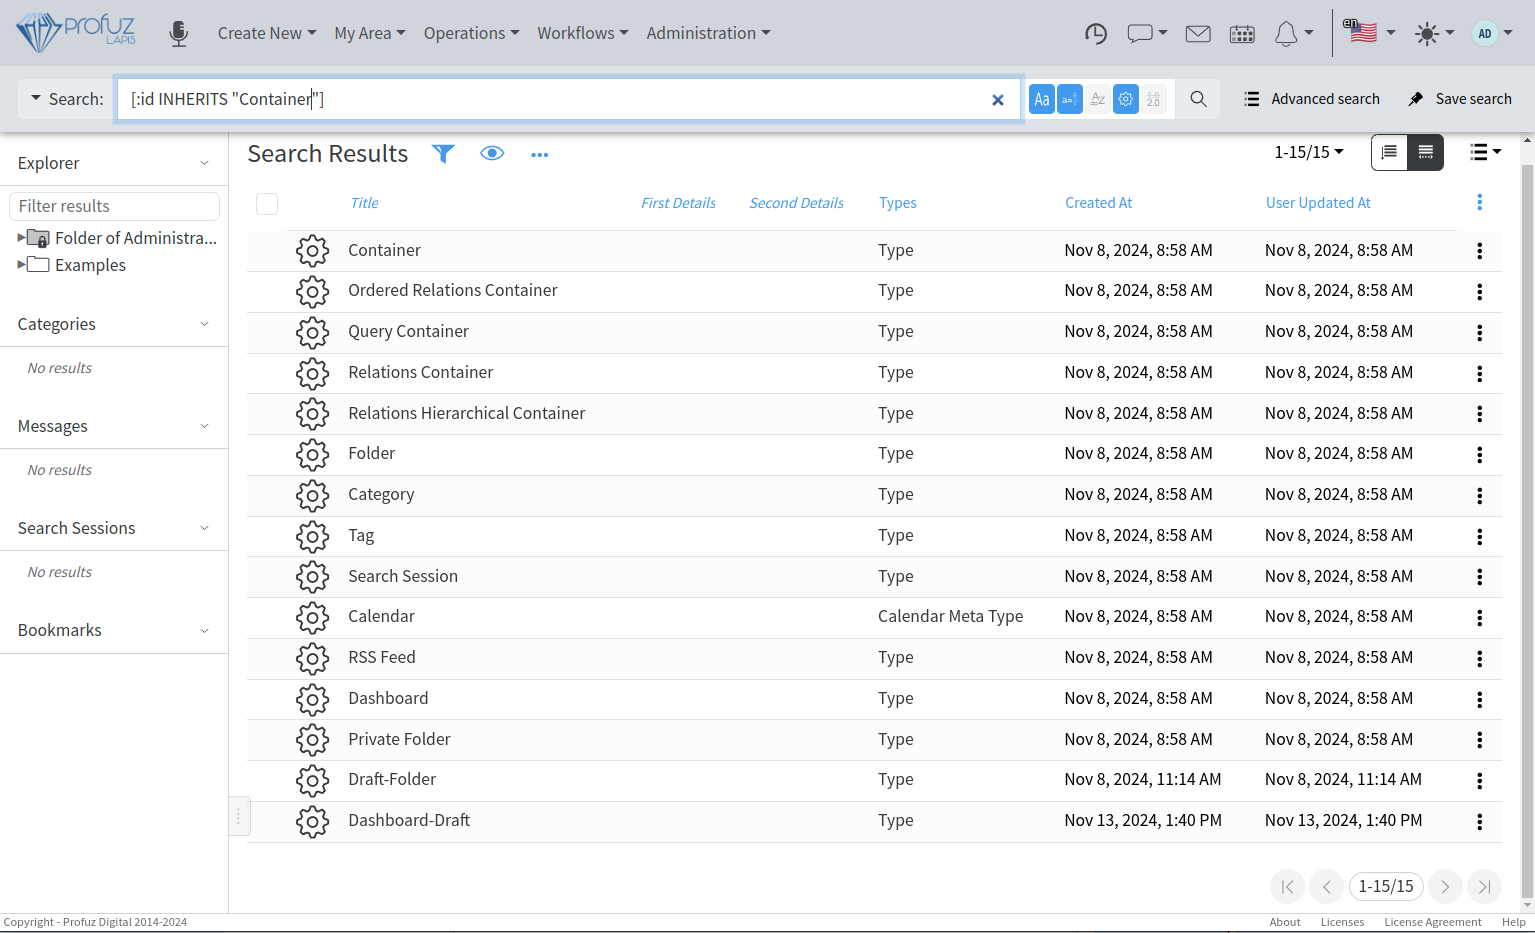
**Query Container** is a Container which links Objects based on a user-defined query. For example- list of objects of Type Task. As seen in the above examples and shown on the search below, there are some system default Containers - Folder, Category, Tag, Dashboard, Calendar, Search Session etc.
[](https://docs.profuzdigital.com/uploads/images/gallery/2024-11/2otimage.png)
They all derive from the base type Container. It is interesting to clarify the Relations Hierarchical Container and what it is used for. As its name shows, The Relations Hierarchical Container is used to create hierarchical structures, such as Folder and Subfolders, Categories and Subcategories, etc. These structures allow the definition of a “path” which shows all the steps through which a certain container is reached. The path is important, because it is used to inherit the permissions of the previous in the chain Container. This is a quick and easy way to provide permissions to a Folder, Category or other Container.
One Object can be linked to one or multiple Containers from a single or a variety of Types. For example, if you create an Object “Document 1”, you can link it to Folder 1, Folder 2, Category 1, Subcategory 2, etc.
## Searches
Profuz LAPIS has an intelligent search mechanism which gives the possibility to search in parallel in Profuz LAPIS internal database and all connected external systems.
Profuz LAPIS search is **Live** **Search** with real time results updates in contrast with static results approach used in other systems to return the search results in the moment of search execution. The Live Search always shows the search results corresponding to the current data, making it Live.
The search forms can be different. The simplest one is a **free text search** (FTS). The FTS searches in all Objects, Properties and Contents based on a textual representation of the data.
**Advanced Searches** are also supported and are used to narrow down the search criteria. The UI for advanced search allows to choose from a drop-down list of possible search criteria and their combinations, but in order to look for more specific properties and combinations, we allow the manual usage of the following syntaxes:
To search based on a Property:
\[:ProperyName OptionalComparisonOperator SearchOperand\]
PropertyName is the name of the property as defined in the system.
OptionalComparisonOperator is the comparison operation applying to the Search Operand. If missing, it means “=”, else it can be >, <,>=, etc
SearchOperand is the value to compare with and is surrounded by quotation marks.
In the following example
\[:createdAt < 2021-04-15\]
It searches all objects created before 15th of April 2021.
Another example is:
\[:status "Done"\]
and it finds all objects with property “status” and a value “DONE”
To exclude results from a comparison, you can use NOT in front of the parenthesis.
In the example
NOT \[:status "Done"\]
the results will list all of the object which have a property “status” and their value is not “DONE”.
You can combine searches on multiple queries using AND, OR and parenthesis () to group.
Here is one example where you can combine criteria and is used to search for TASKS with a STATUS different than DONE:
\[:types INHERITS "Task"\] AND (NOT \[:status "Done"\])
A search query can be saved as a **Search Session.**
**Search Sessions** are active searches which give notifications for changes in the search results. They can be used to monitor updates of the data. When a constant update on some data change is needed to be monitored, the user can save the search session for better visibility and quicker access.
The search queries can also be used in the Query Containers described here above.
The following example shows how to create a Query Container which will be shown in My Area and will list all tasks created by the current user last week. The following search query is used: `([:types INHERITS "Task"] AND [:creator ME] AND [:createdAt > NOW - 1 WEEK])`:
[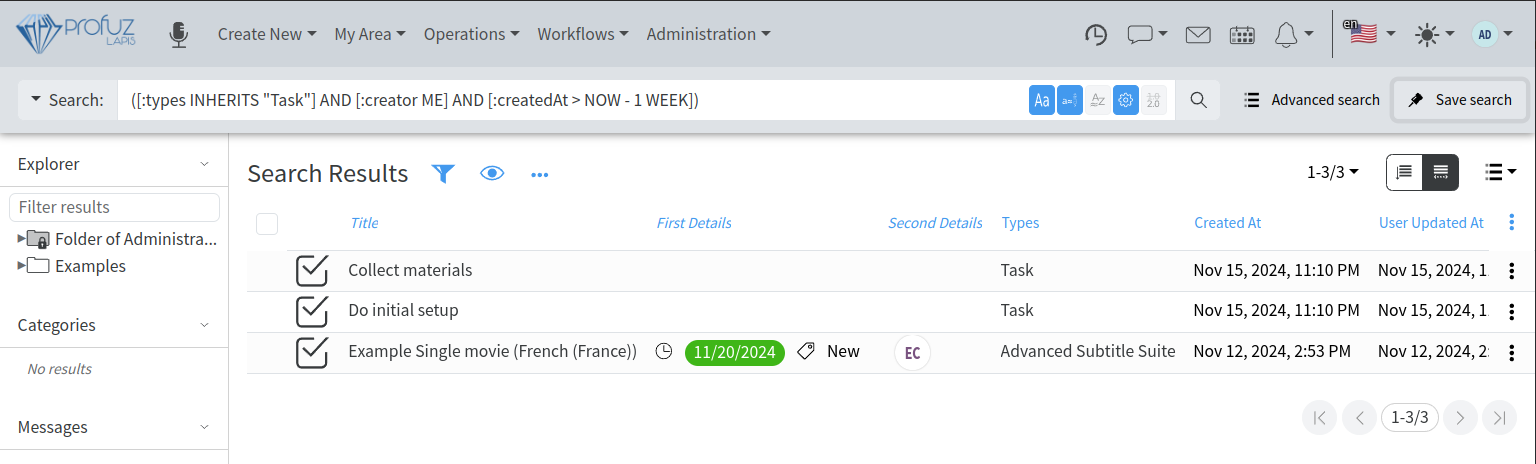](https://docs.profuzdigital.com/uploads/images/gallery/2024-11/NJuimage.png)
press **Save Search**, select **Query Container** and name it "*My Last Week Tasks*":
[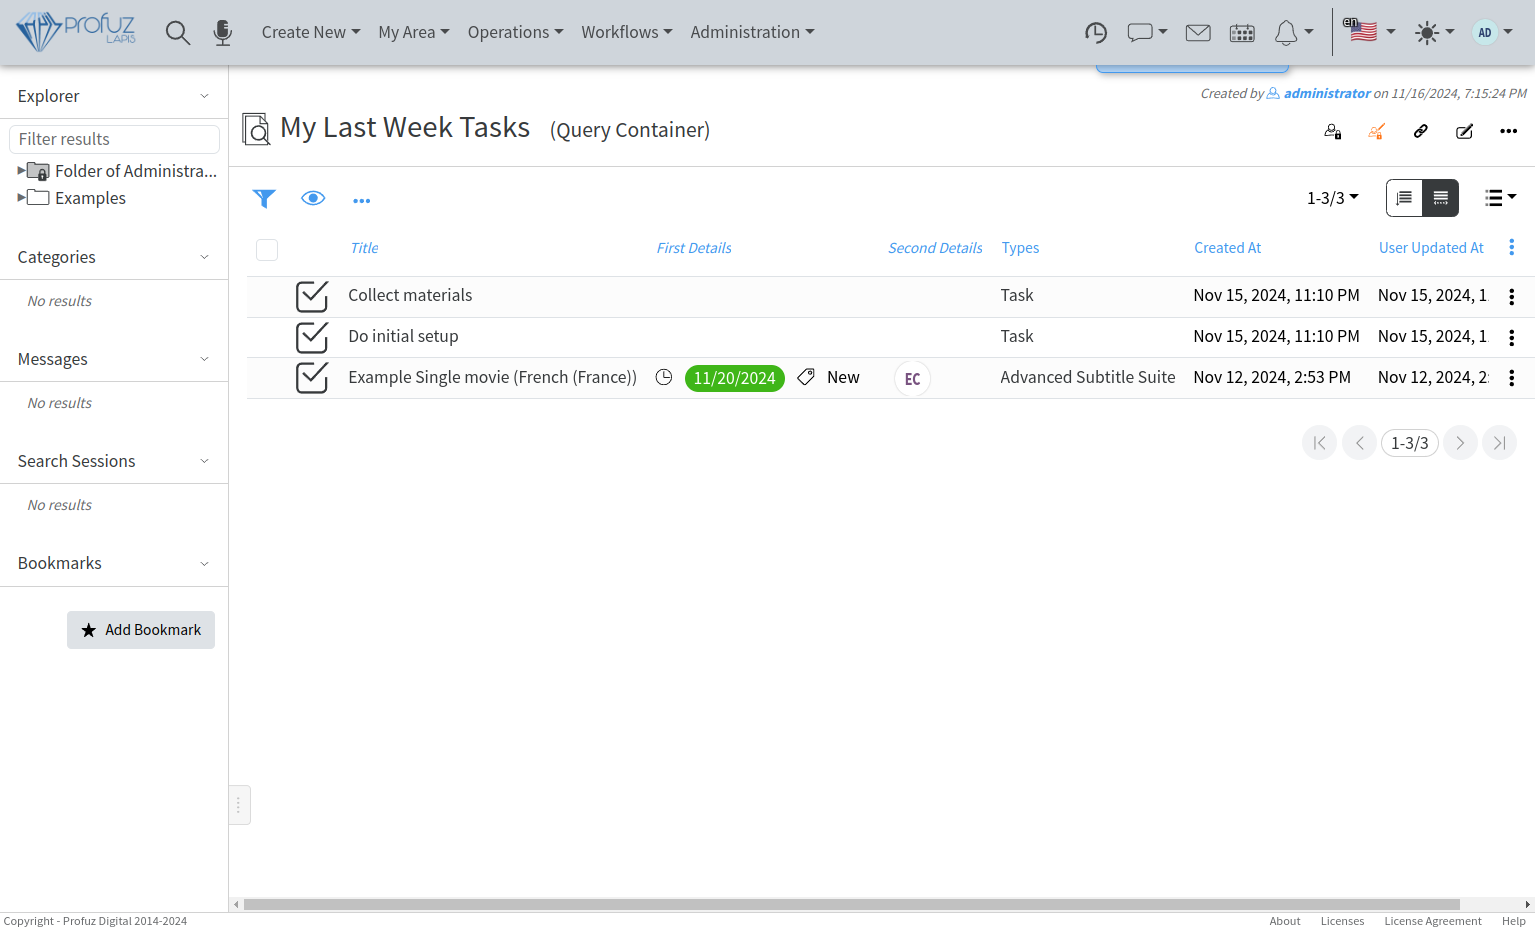](https://docs.profuzdigital.com/uploads/images/gallery/2024-11/RICimage.png)
You can Edit the so created query container and add **My Area** container to its **Containers** property:
[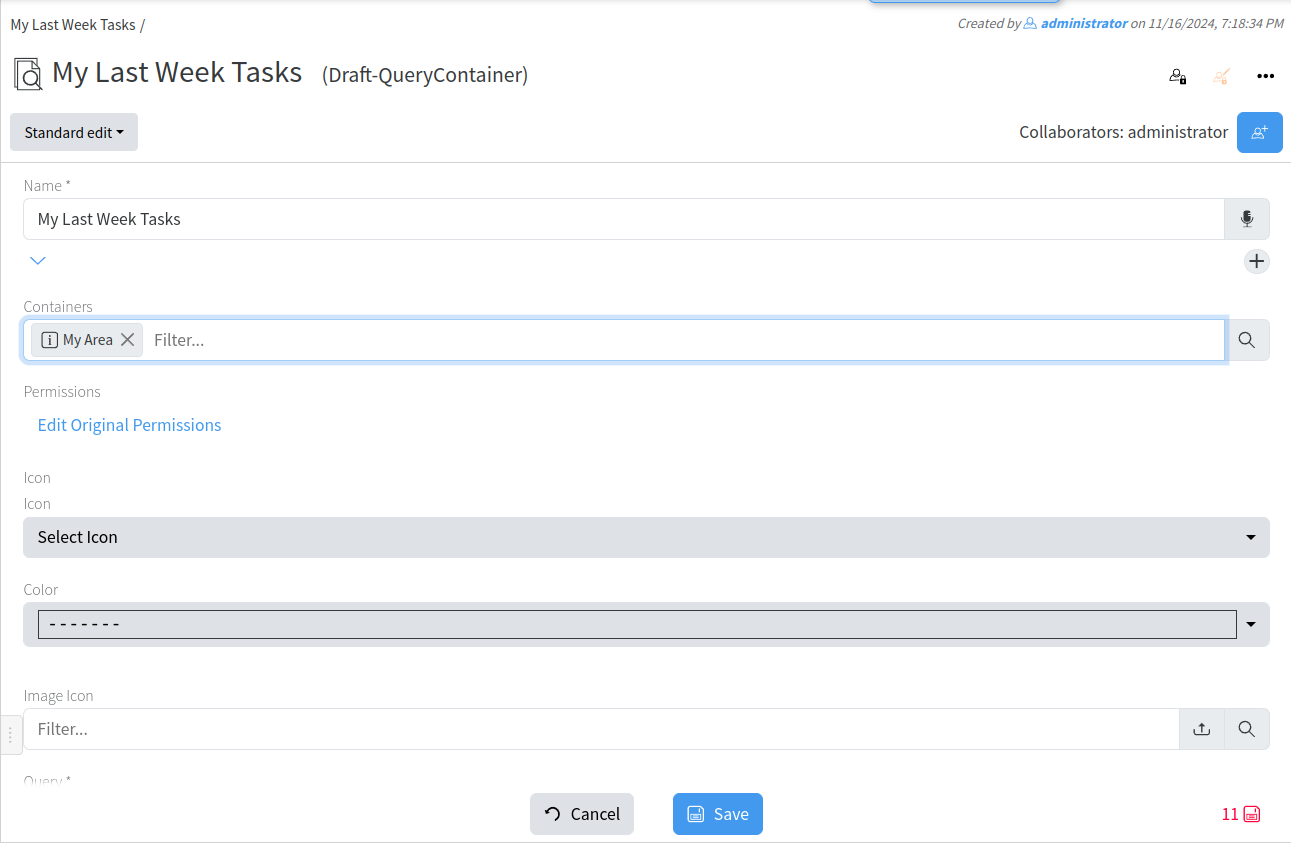](https://docs.profuzdigital.com/uploads/images/gallery/2024-11/BECimage.png)
After creating, it can be found in My Area Container
[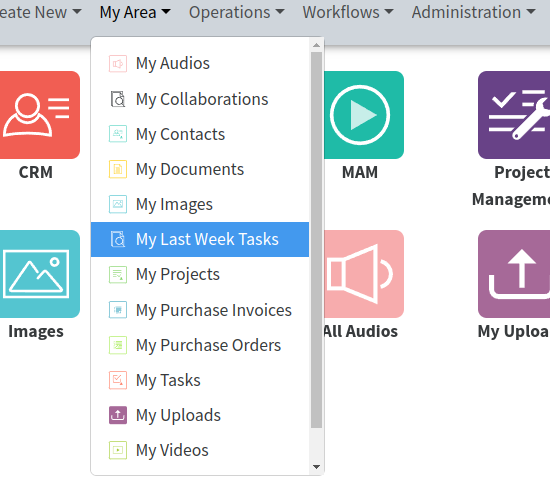](https://docs.profuzdigital.com/uploads/images/gallery/2024-11/J0Jimage.png)
# Media Asset management
# Media Asset Management introduction

Each global icon visible on the main dashboard leads to different pages aiming to handle different processes or data. When we select MAM a new sub web window will appear as shown on the Screenshot.
[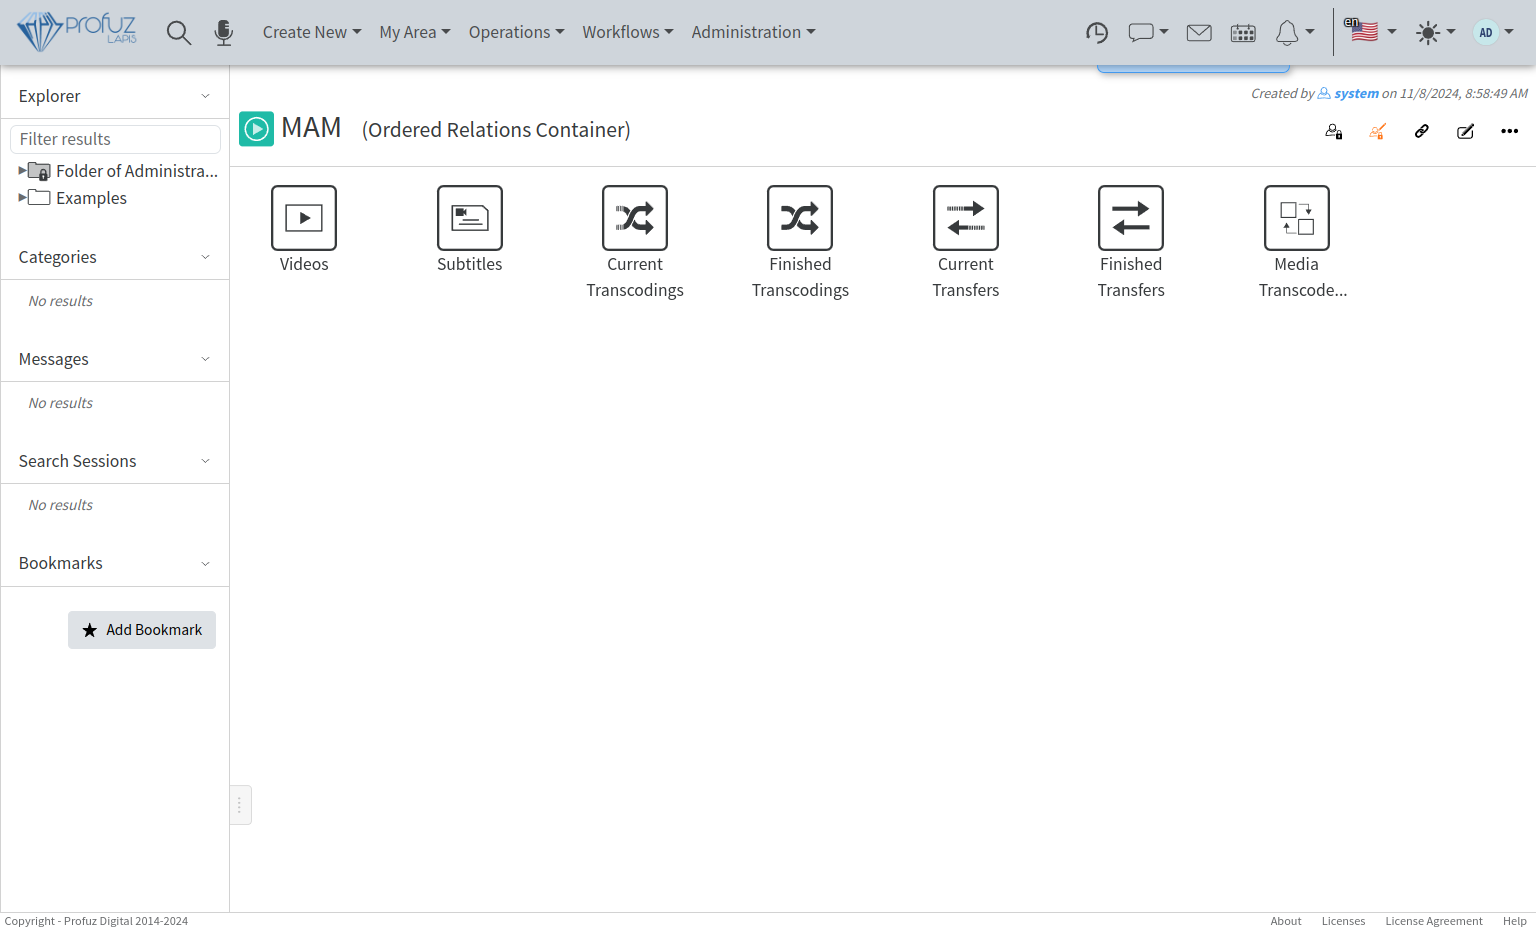](https://docs.profuzdigital.com/uploads/images/gallery/2024-11/8nbimage.png)
The default query containers are:
- **Storyboards**: Playlist management, creation, filtering and anything related to editing, exporting and scheduling.
- **Channels**: Here are mapped the tasks for handling broadcast - playlist, metadata, agenda and scheduling
- **Videos**: Database query for all video objects available for usage through Profuz LAPIS. This query will list all video files, virtual video contents and video assets.
- **Subtitles**: Database query for all subtitles available for usage through Profuz LAPIS. This query will list all subtitle files and subtitle suites.
- **Current Transcodings**: Here you can monitor the list of all ongoing transcodings of files
- **Finished Transcodings**: Here are listed all the transcoding processes which have been completed
- **Current Transfers**: Here you can monitor the list of all ongoing file transfers between storages
- **Finished Transfers**: Here are listed all the transfer ( movement) processes which have been completed
- **Video Transcode Templates**: Here are listed all available templates for transcoding of video files
**Hint**: All queries above can be modified per customer's specific requirements. This is only the default software view.
The most common way to list and edit media content or any other data accessed by Profuz LAPIS is to use the search and to select the result or to manually choose a specific grid designated for this particular data query e.g. media, subtitles, documents and so on.
**Hint**: By modified queries users may list and sort only specific data per format or containers. The example below shows how a query can display only mp4 media content.
Query: `[:types INHERITS "Video"] AND [:fileFormat "*mp4*"]`
[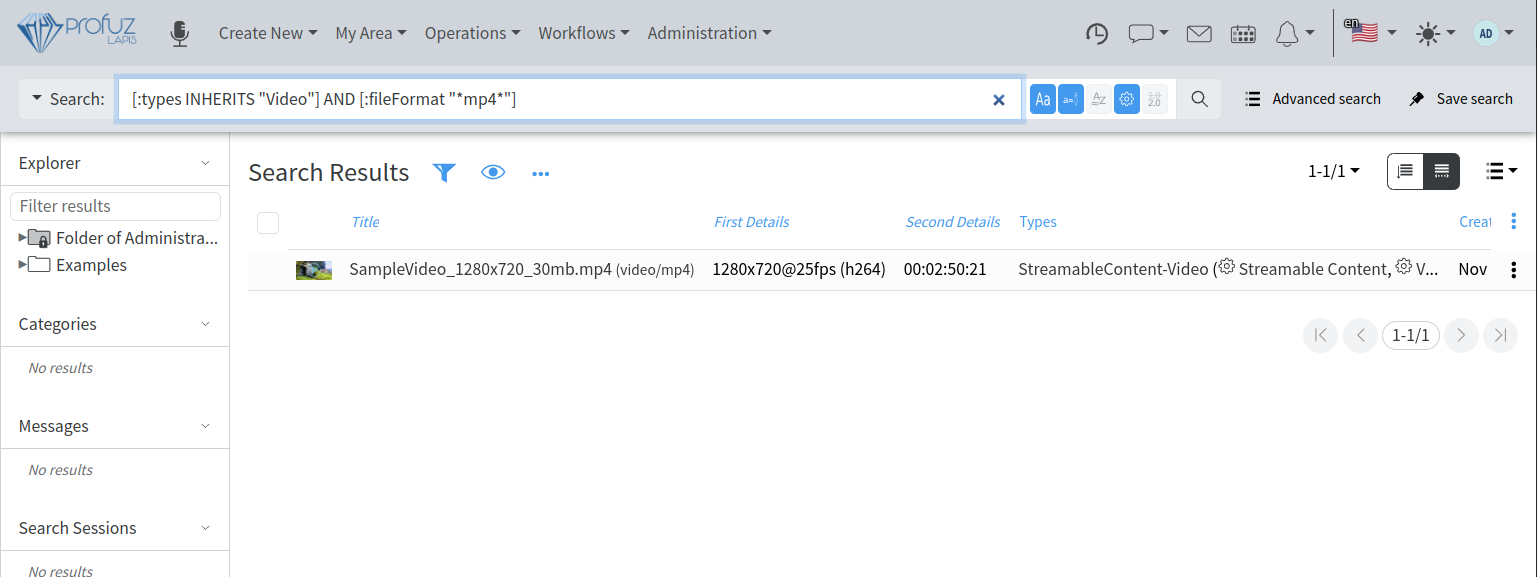](https://docs.profuzdigital.com/uploads/images/gallery/2024-11/GCKimage.png)
*Please contact your supplier if you need to modify a query as per specific workflow requirements.*
In Profuz LAPIS MAM there are 3 types of video objects:
- Video Files called “Streamable Content Video” are files or streams directly accessible from the connected storages or systems. If such file is deleted in the corresponding connected storage outside of LAPIS it will disappear from Profuz LAPIS, too.
- Virtual Video Content called “Virtual Streamable Content Video” is an object which keeps records with video metadata and links to 0 or more copies of the video files.
- Video Asset called “Asset Video” is an object which may combine several contents of different types in a single entry. Subtitles and audio contents which are present in a single asset are used as subtitles tracks and audio tracks respectively and can be selected for presentation in the player of the main video content.
The thumbnails of the 3 types of video objects overlay different icons to visually distinguish between them as shown on the screenshot below:
[](https://docs.profuzdigital.com/uploads/images/gallery/2024-11/C3fimage.png)
The first is an asset, the second is a virtual content and third is a video file.
Each video object has its own contents and transformations– such as thumbnails, proxies, transcodings, etc. In video assets, by clicking on a content, it will be displayed.
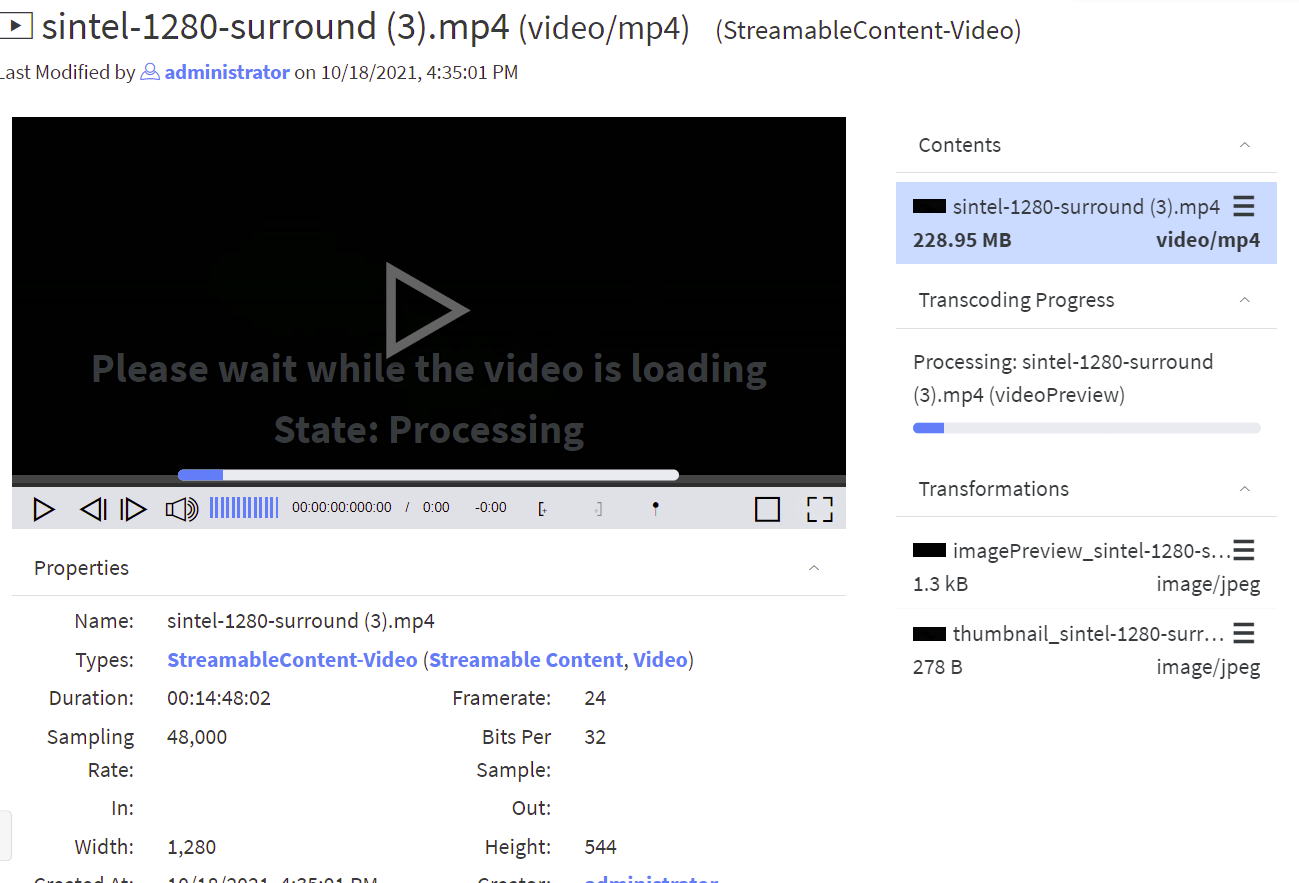
Each media asset has its own contents and transformations– such as thumbnails, proxy, transcodings, etc. By clicking on the media file, it will appear in the central section of the screen with all its metadata and with real time preview (as pictured below).
**Remark 1**: The preview comes from identical copies called proxies and their creation can be triggered in two different ways:
First (default): After media content is ingested or uploaded to a data folder when a user clicks “Play” in the video player.
Clicking “Play” will will provoke automatic proxy creation. A status bar will appear on the screen, which will show the progress and visualize how long the creation will take. After the process is finished the user will be able to play and edit the desired media asset.
Second: Proxy creation can be set to start automatically once media content is ingested/uploaded or appears in a connected storage.
**Remark 2**: An important factor about the configuration which can provoke lack of system response is the CPU load. We suggest considering carefully which way to choose depending on the capabilities of the hardware platform where Profuz LAPIS is running.
[](https://docs.profuzdigital.com/uploads/images/gallery/2024-11/Afjimage.png)
The available general commands are: Play/Pause, Stop, Fine seeking Frame by Frame, Volume adjustment, Start chunk, End chunk, Create point Marker, Picture-in-picture and Full Screen toggles. Below the preview window basic metadata fields (properties) are stored.
**Remark**: The screen above only illustrates the default view. It can be completely modified with different metadata fields.
Editing metadata fields is shown below and can be done by first adding metadata fields to the VIDEO Asset type of data.
Metadata storage is practically unlimited. It depends on the available system resources.
# Upload content to LAPIS
To manually upload content to LAPIS system, you can use the general operation Ingest via Upload as shown below
[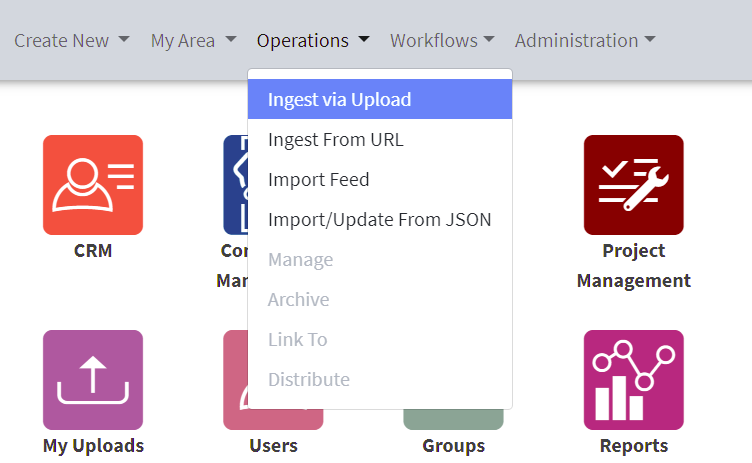](https://docs.profuzdigital.com/uploads/images/gallery/2024-11/z5wimage.png)
When you start the upload a notification and a progress bar in a separate window will appear as shown below:
[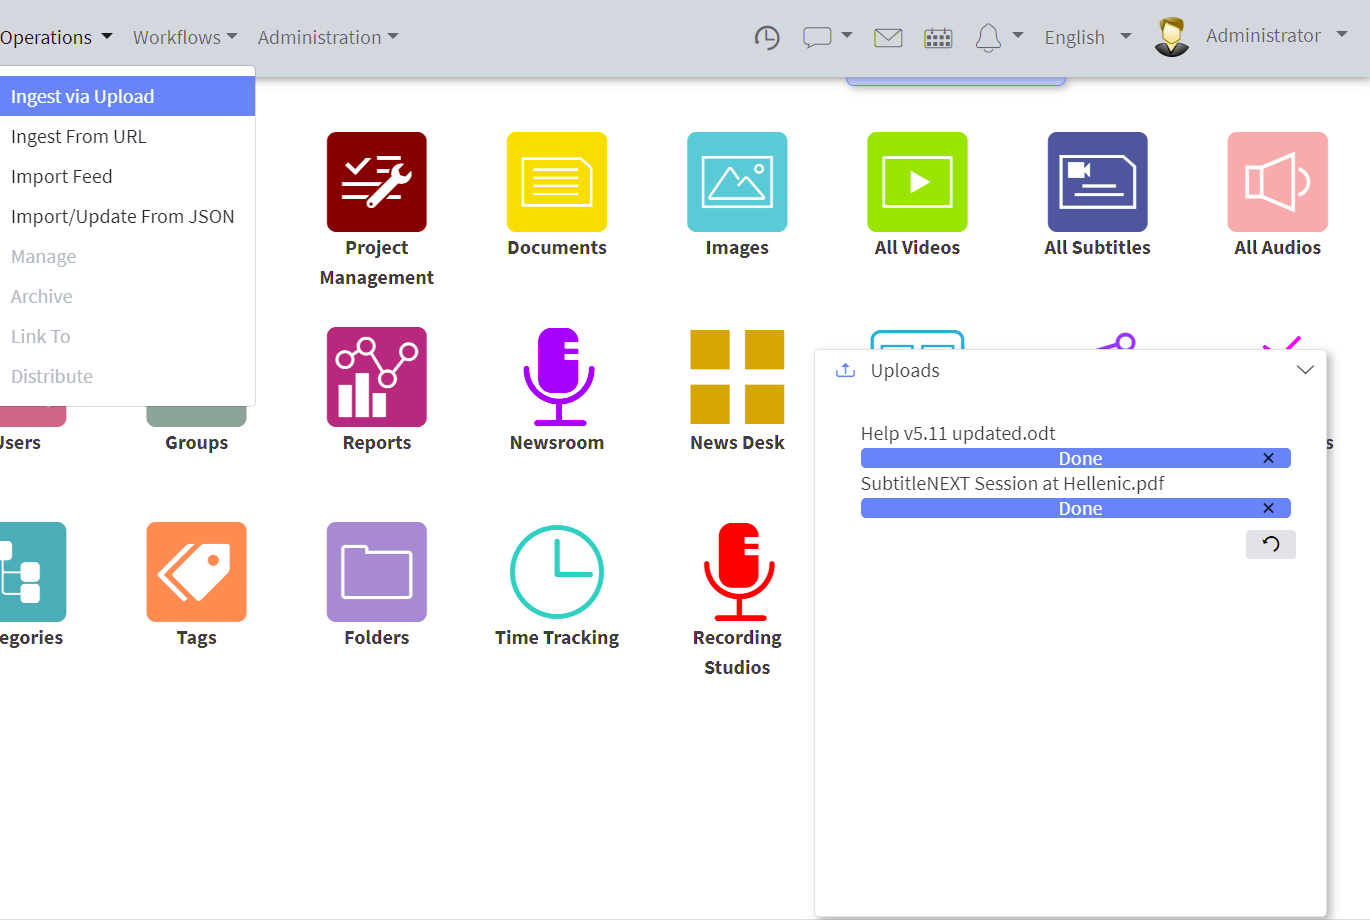](https://docs.profuzdigital.com/uploads/images/gallery/2024-11/jHDimage.png)
You can click on the uploaded media link to go to it. The uploaded through this operation media will have to be classified for further usage by you and your colleagues. If not classified, it will be listed into My Area -> My Uploads query container and depending on its type - in the corresponding query container on the Dashboard – All Videos, All Audios, Images, etc.
You can classify one media into multiple containers including containers from different types such as folders, categories, tags, providers, etc. LAPIS doesn’ create multiple copies of the same media, it just links it to these containers.
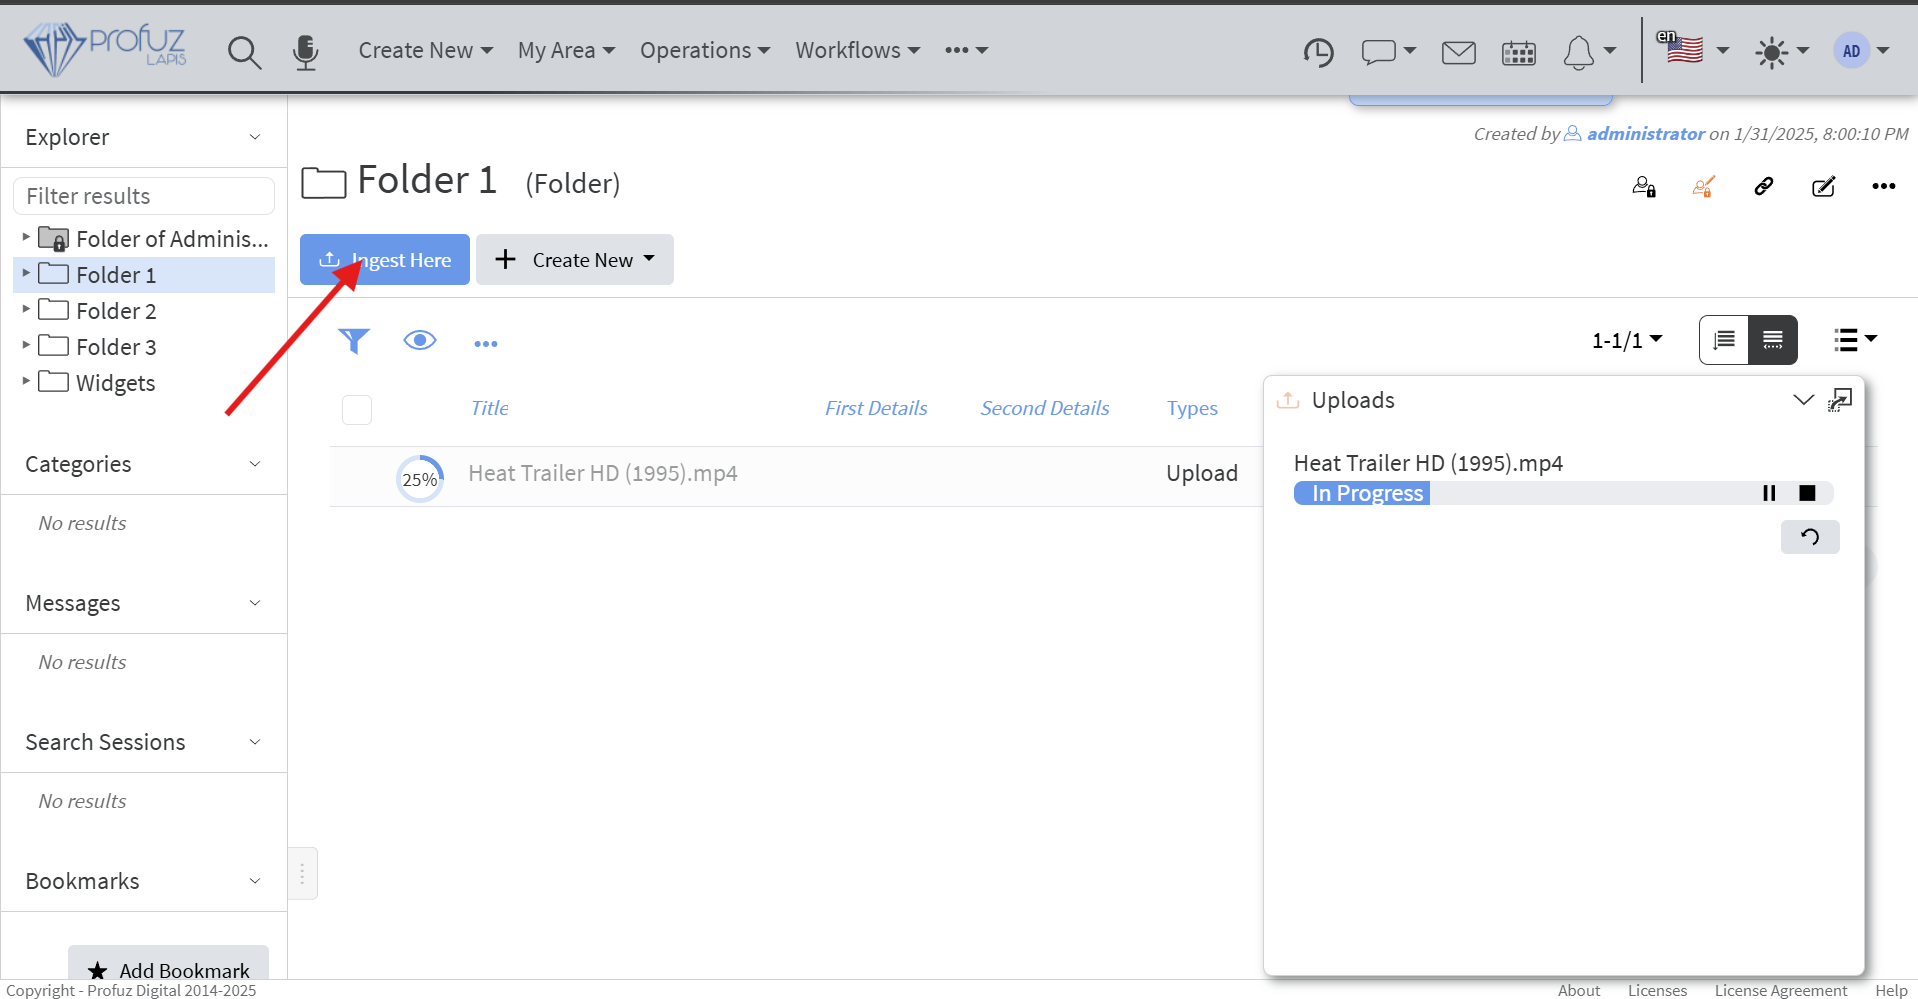
If you want to upload a content to a specific location in the system, please go to that location (folder, task, project, tag, category etc.) and use Ingest Here action from the local Actions menu as shown
[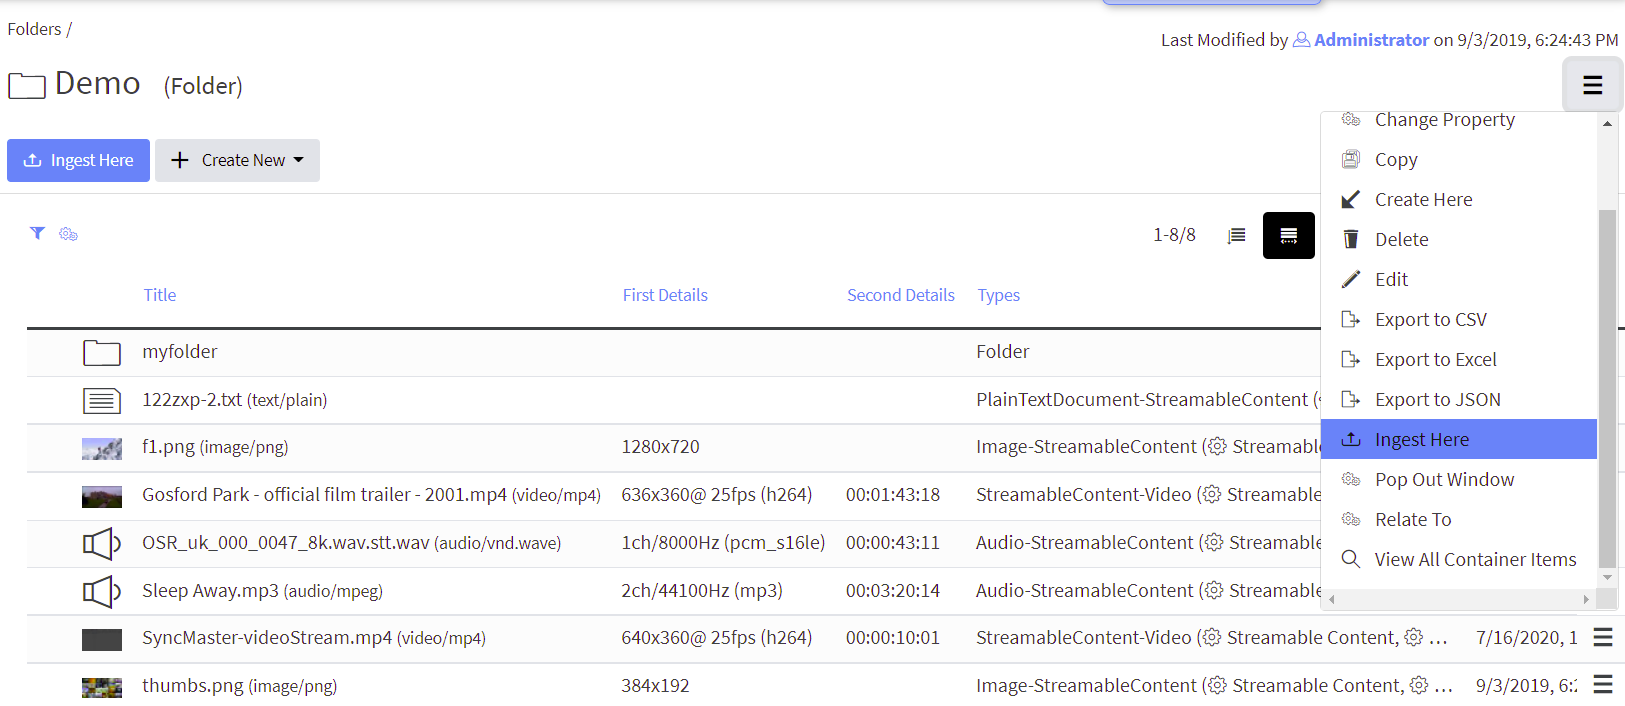](https://docs.profuzdigital.com/uploads/images/gallery/2024-11/Hgdimage.png)
You can also drag-drop a media from your PC to a Folder, Category, Tag or to the dedicated fields into the Project, Task or any other object containing such a field.
# Create Asset
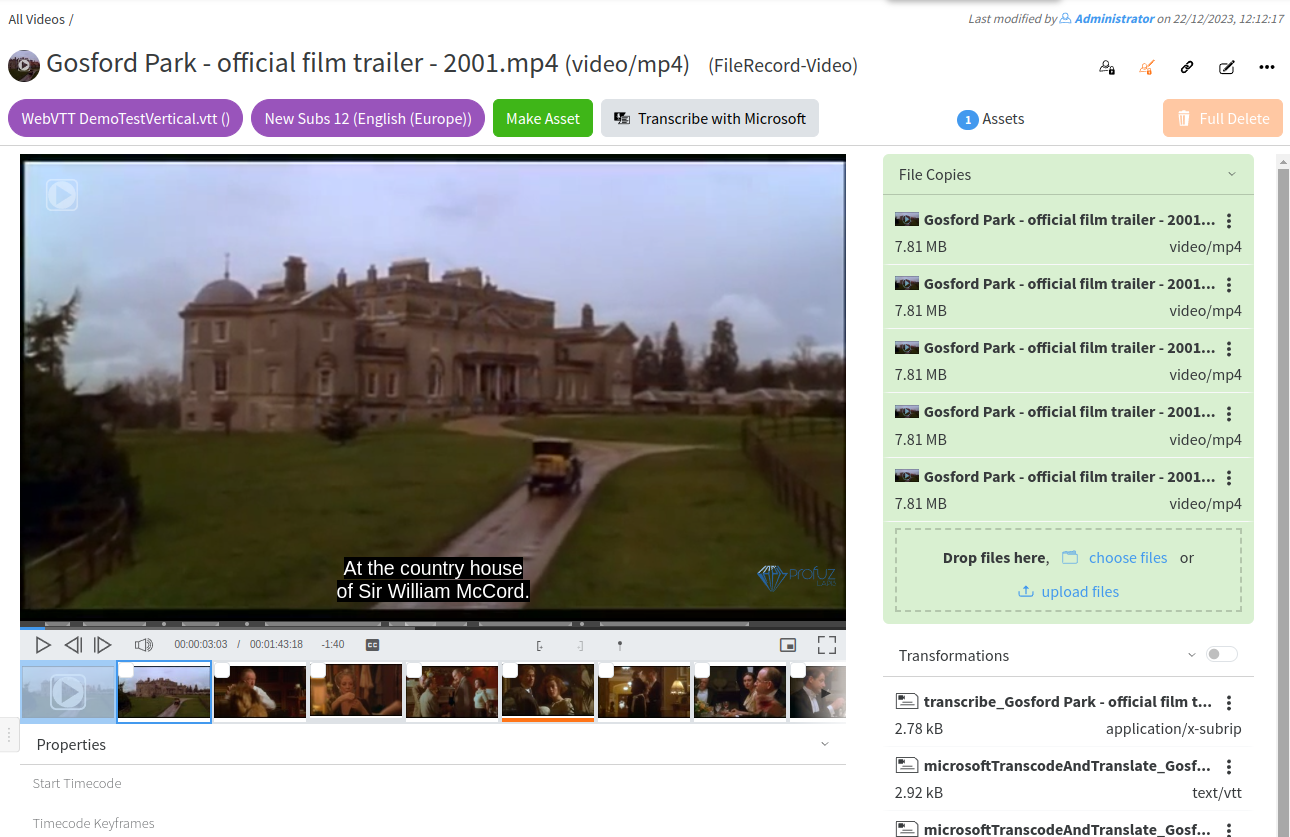
If you want to have a media asset containing multiple contents associated with it such as additional audios, subtitles, texts, multiple video resolutions or other media transformations, you have to create a video asset and add contents to it. You can do that by:
- Click “Make Asset” button on top of your media to create an asset as shown here:
[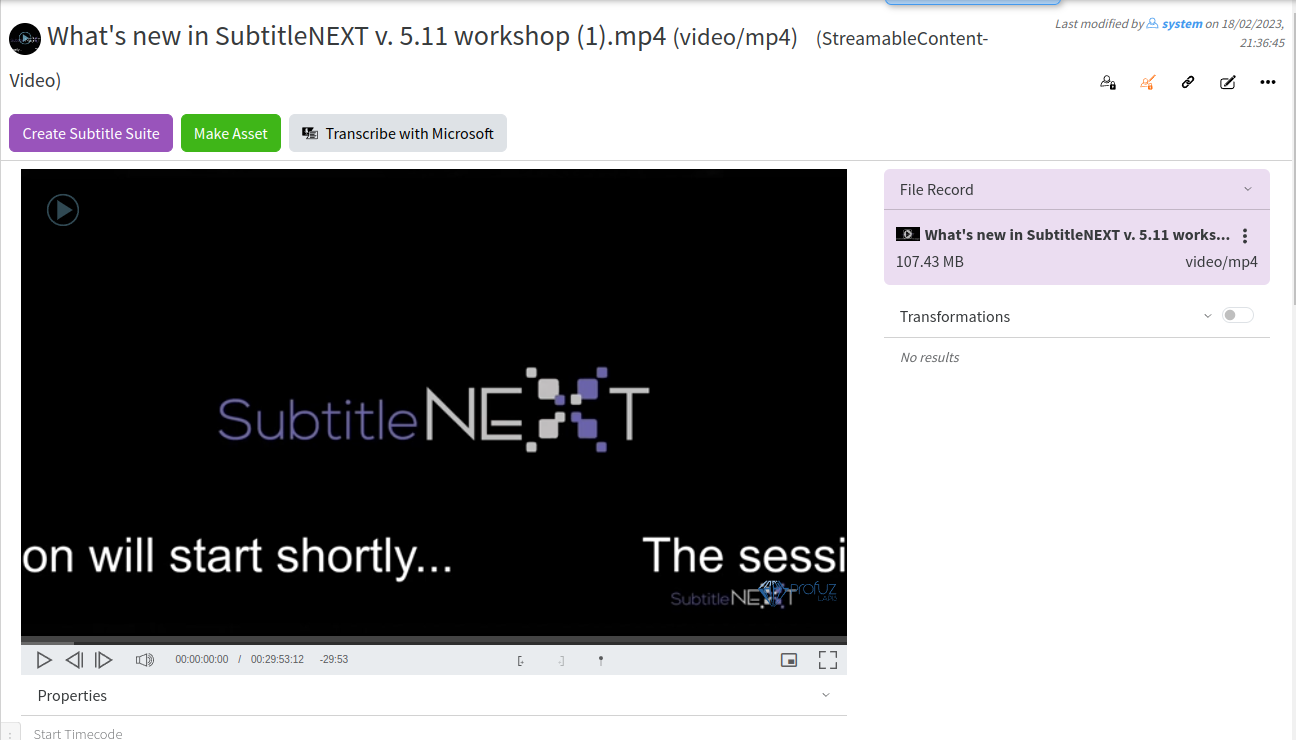](https://docs.profuzdigital.com/uploads/images/gallery/2024-11/vaEimage.png)
- Use the “Add Content” Action as shown here:
[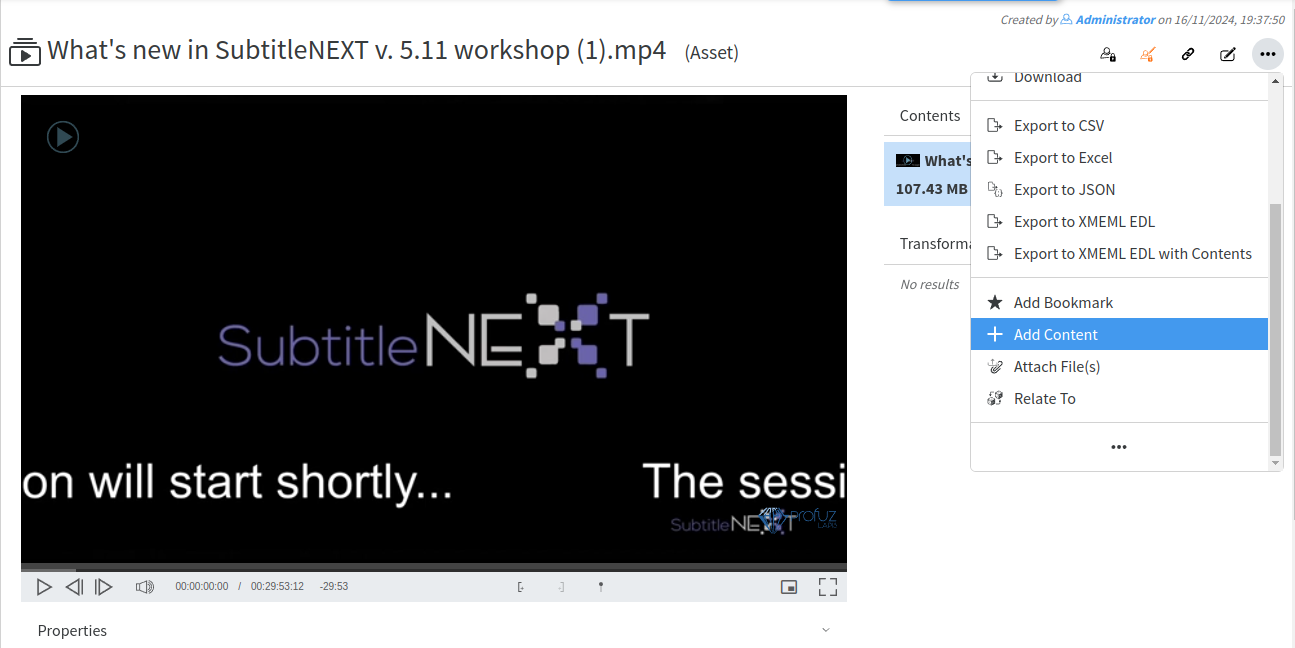](https://docs.profuzdigital.com/uploads/images/gallery/2024-11/Zv8image.png)
You can associate as many contents as you wish and Update the created contents if needed.
# Create and manipulate File Records (virtual contents)
You can create a File Record from a video file by using the Create File Record operation from the video file’s local actions menu as shown:
[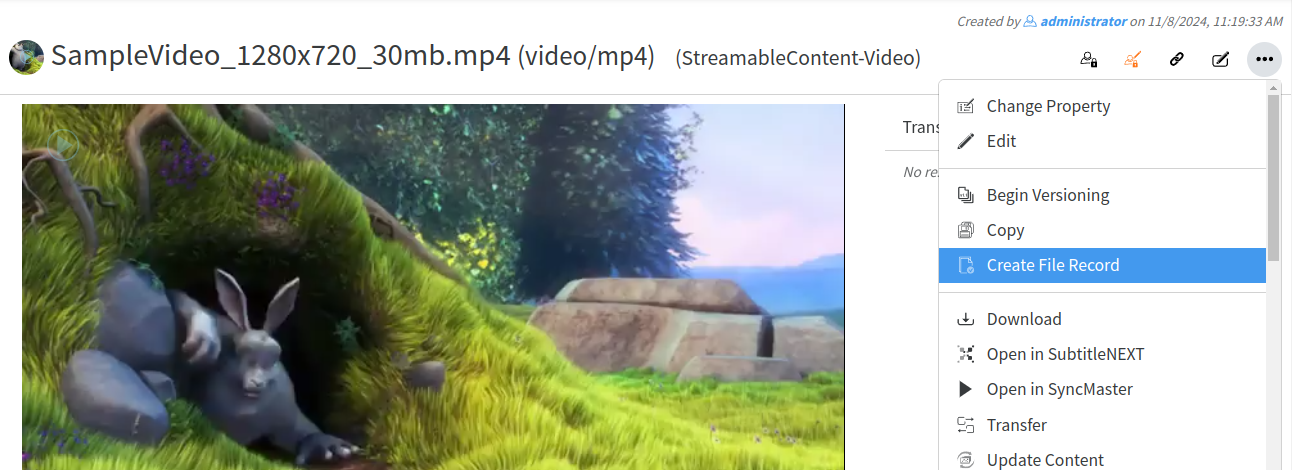](https://docs.profuzdigital.com/uploads/images/gallery/2024-11/V1Wimage.png)
The File Record looks like this:
[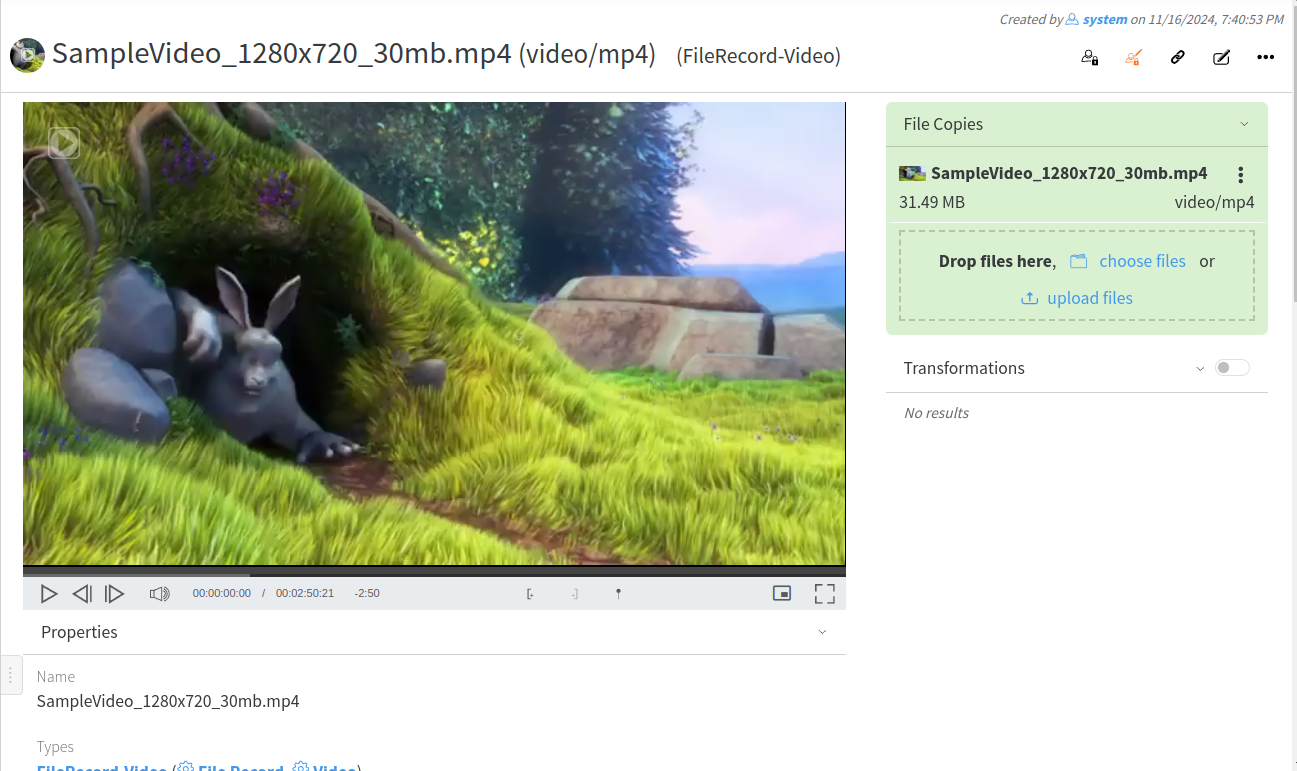](https://docs.profuzdigital.com/uploads/images/gallery/2024-11/Zacimage.png)
In File Copies you see the identical copies of this file. You can manipulate them separately from the local actions menu of every single file copy.
In Contents you see the files. You can also manipulate them separately from their local actions menu (transcode, archive, download, delete them).
In Transformations you see all the thumbnails, previews and conversions which have also their own local actions menu and can be manipulated separately.
You can add a video to the File Record by copying or transferring any of its existing contents:
[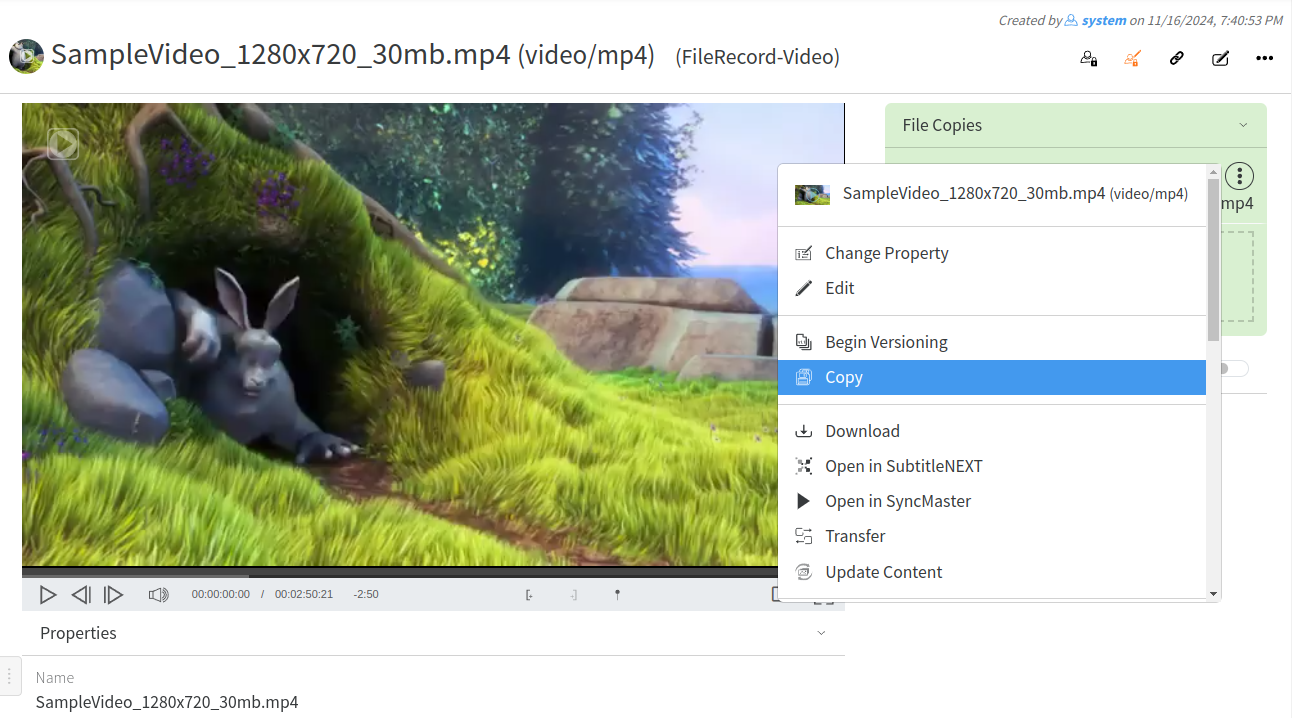](https://docs.profuzdigital.com/uploads/images/gallery/2024-11/W2gimage.png)
which results in showing both copies in the File Record:
[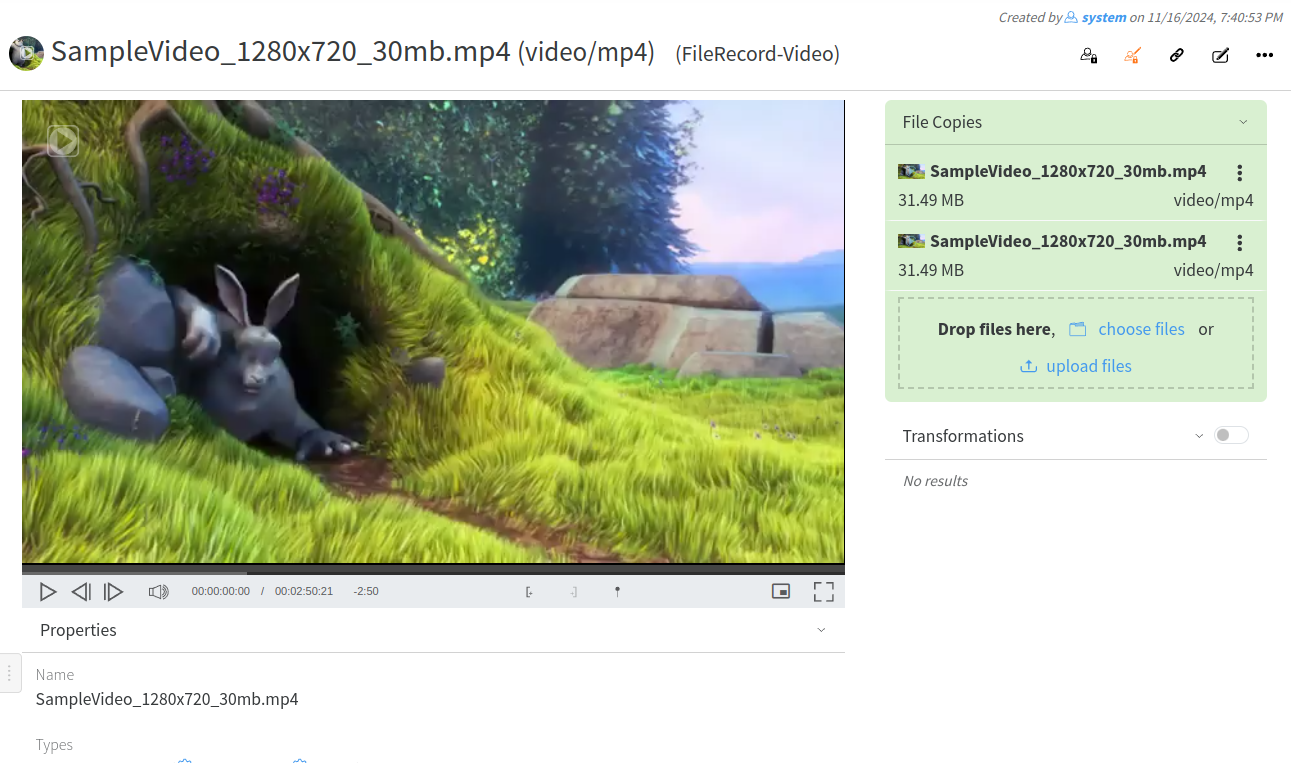](https://docs.profuzdigital.com/uploads/images/gallery/2024-11/vDoimage.png)
You can remove a video from a File Record by deleting it:
[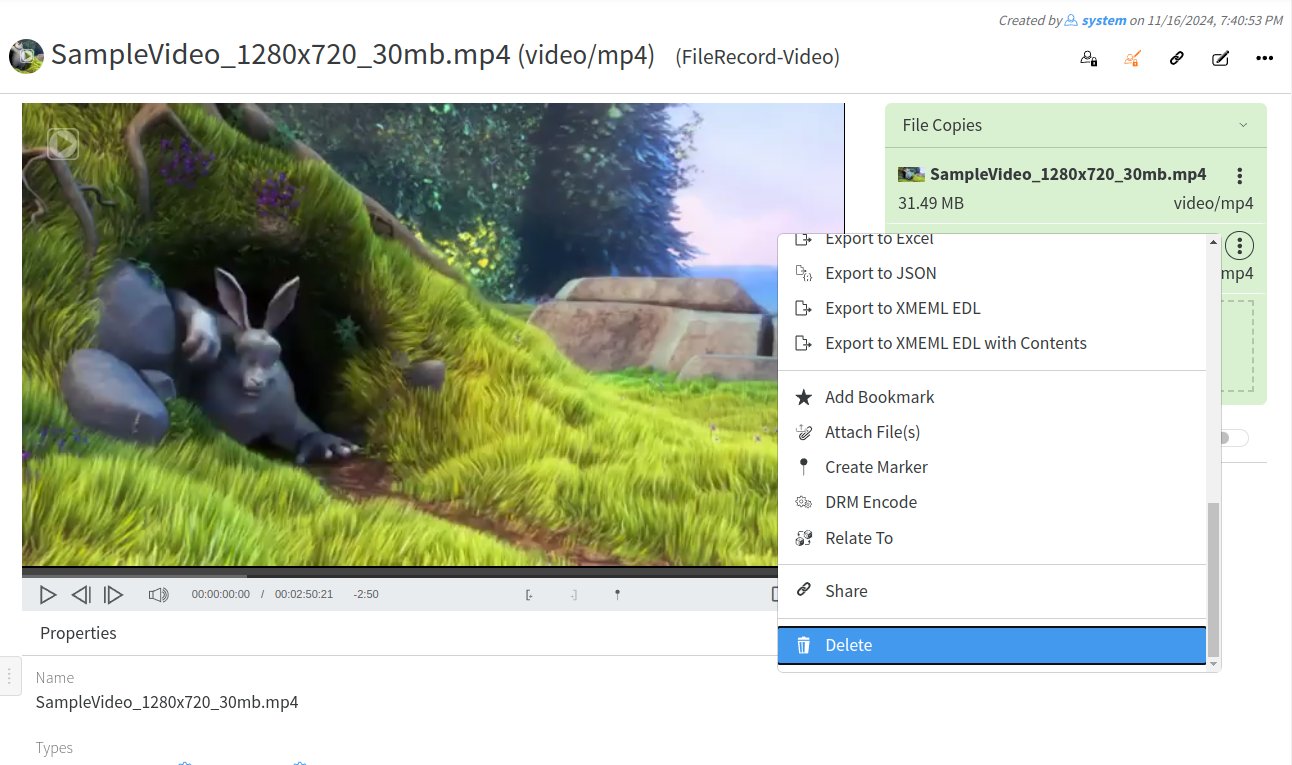](https://docs.profuzdigital.com/uploads/images/gallery/2024-11/xSuimage.png)
If all copies are deleted the File Record is transformed to Non Streamable File Record, i.e. File Record with only metadata and proxy of the video:
[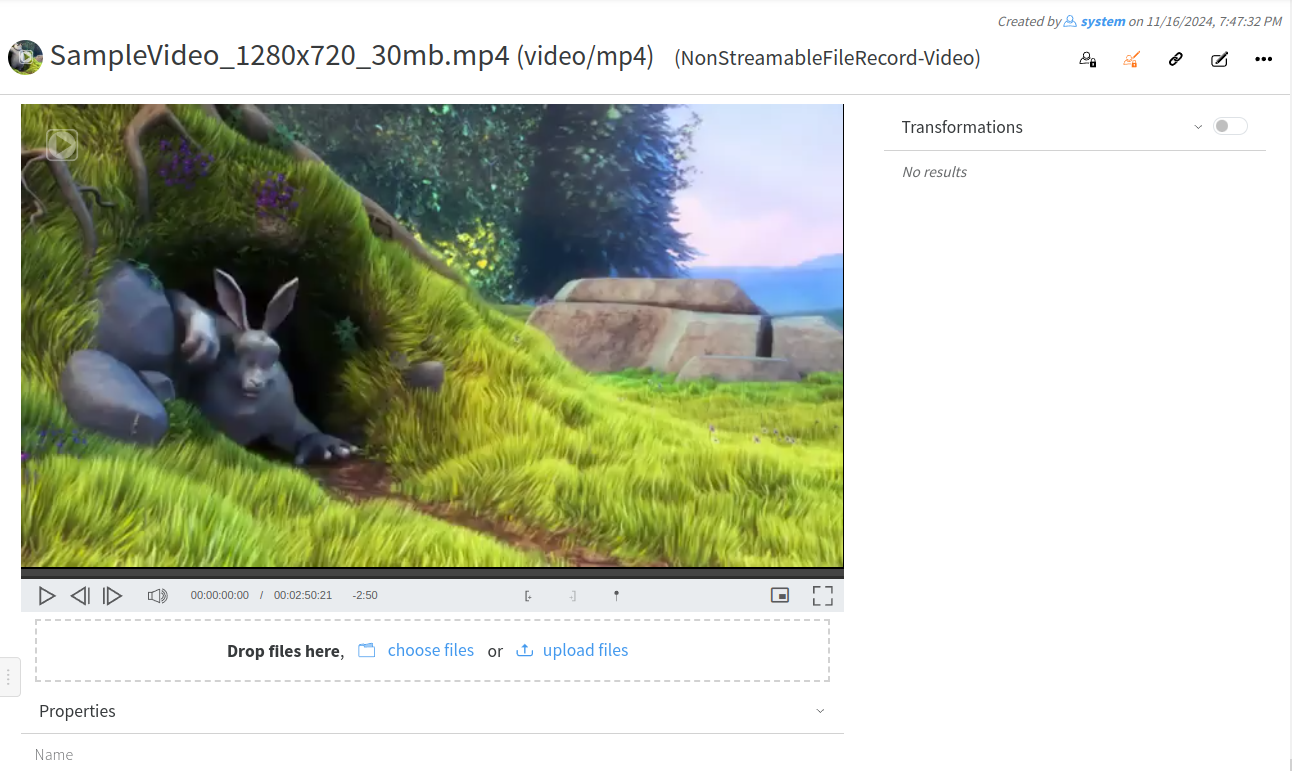](https://docs.profuzdigital.com/uploads/images/gallery/2024-11/y49image.png)
# Add Metadata
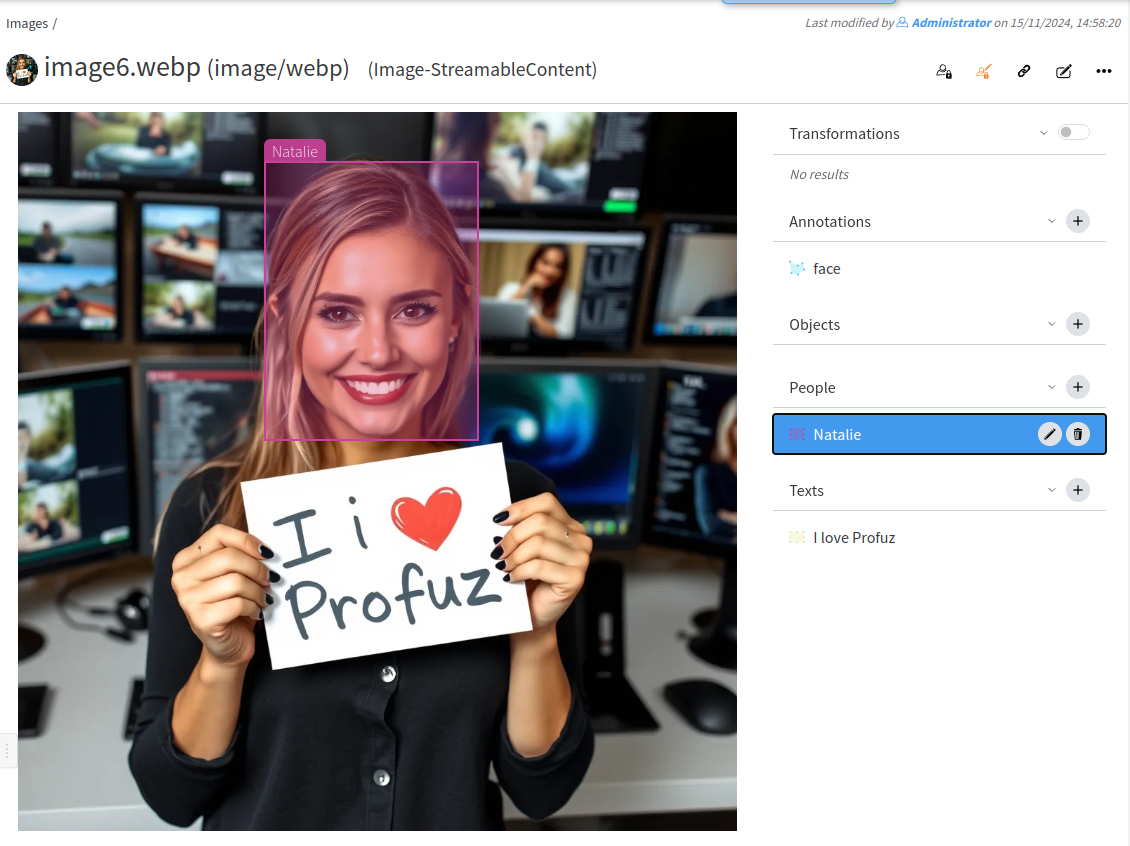
When you open a file, you can view and edit its metadata fields which are defined as properties in LAPIS. If you need more properties, you can define them. Check the corresponding section to learn how to create new properties ( metadata). To edit a property click on the edit icon next to its name and enter the value you wish to appear. Click the save icon next to the property name to confirm.
[](https://docs.profuzdigital.com/uploads/images/gallery/2024-11/9PZimage.png)
# Create user defined metadata fields
To Create user defined metadata field:
1. Press the “Create New” drop down menu from Profuz LAPIS header. Then select “Other”
2. In the newly appeared window type “property” as shown below:
[](https://docs.profuzdigital.com/uploads/images/gallery/2024-11/2ujimage.png)
3. In the newly appeared window input the desired new custom metadata and press “Create”as shown below:
[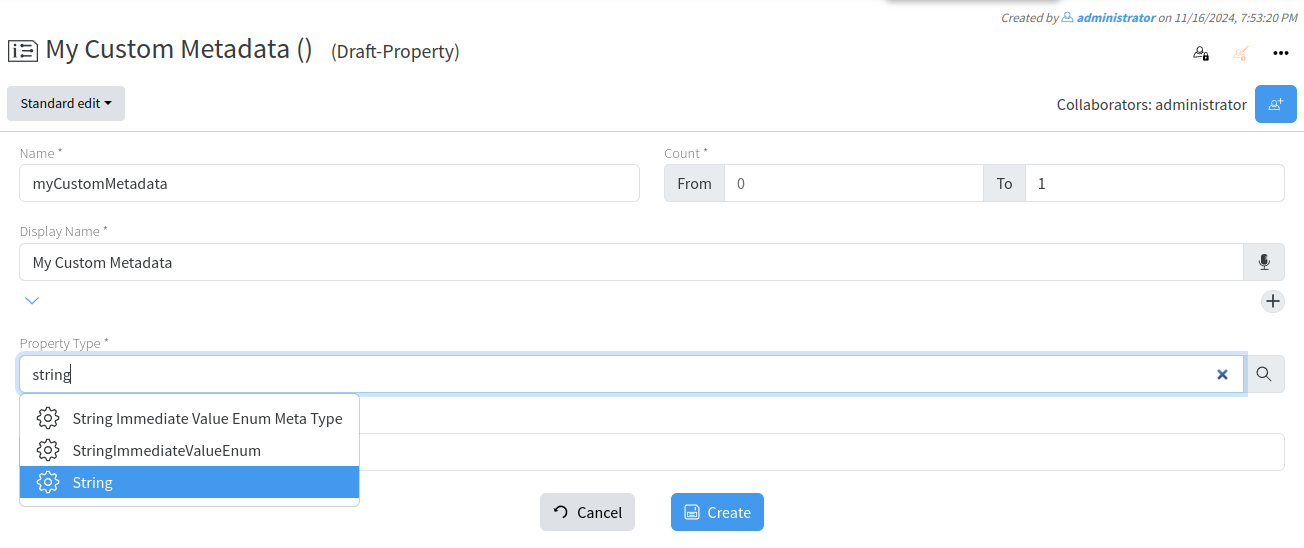](https://docs.profuzdigital.com/uploads/images/gallery/2024-11/Ejtimage.png)
**Hint**: Don't forget to set Count value, best practice is 0 to 1. Means field will have1 entry/value. If you would like it to have multiple values, set "from" to 0 and leave "to" empty. From Property Type select “String” if data will be added as normal text
NOW WE ARE READY TO ASSIGN THE METADATA TO ANY VIDEO MEDIA ASSET WHICH THE CUSTOMER ADDED BY FOLLOWING THE STEPS BELOW:
1. Type in search box: VIDEO
2. From results listed choose Video File Meta Type
[](https://docs.profuzdigital.com/uploads/images/gallery/2024-11/MV8image.png)
3. From taskbar select Actions→EDIT or click the edit button next to the properties field
4. From Properties window search and add already created custom metadata name.
[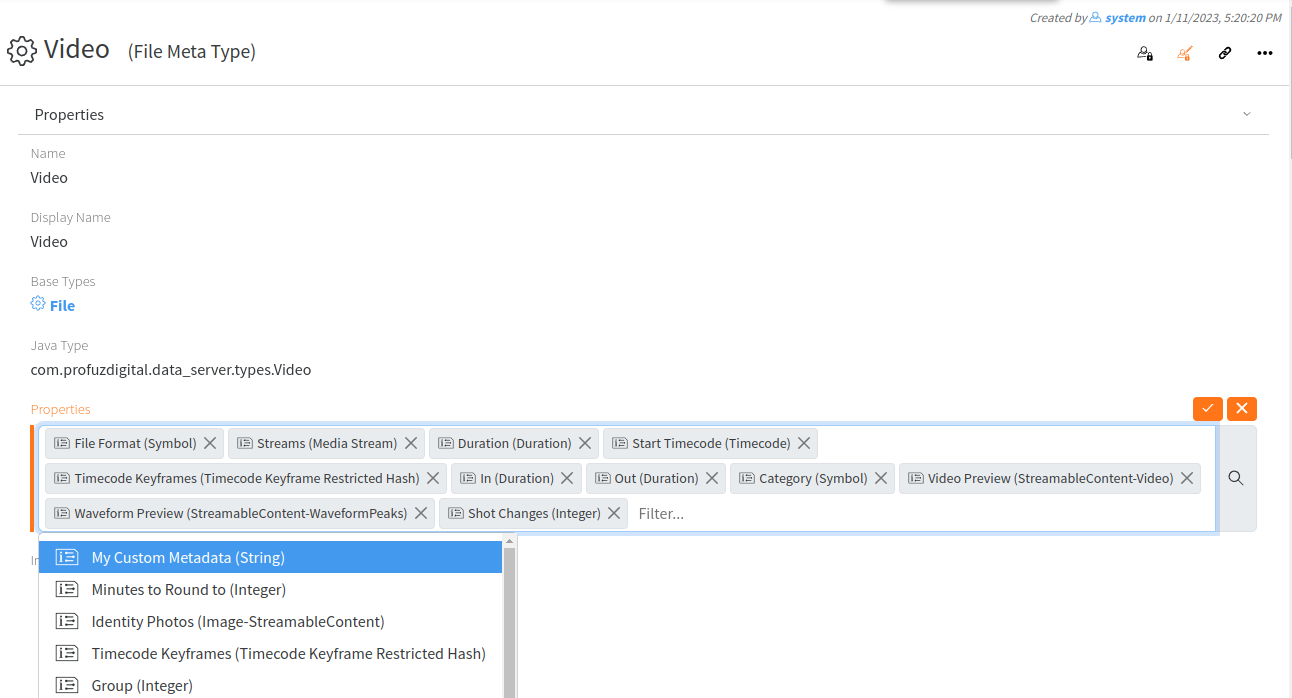](https://docs.profuzdigital.com/uploads/images/gallery/2024-11/RrWimage.png)
5. Go to the end of “Properties View Placement” list and press PLUS icon
[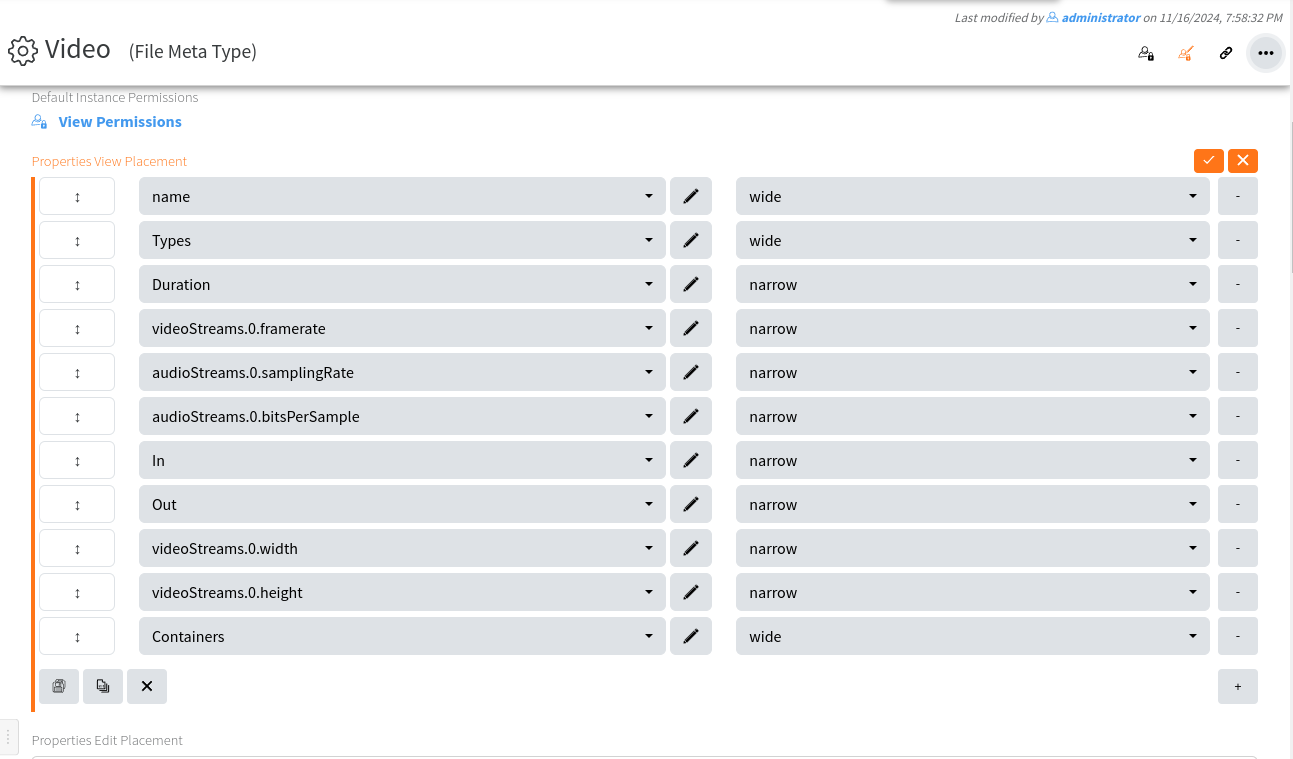](https://docs.profuzdigital.com/uploads/images/gallery/2024-11/7o8image.png)
6. From the menu select same name attribute NARROW and press the SAVE
[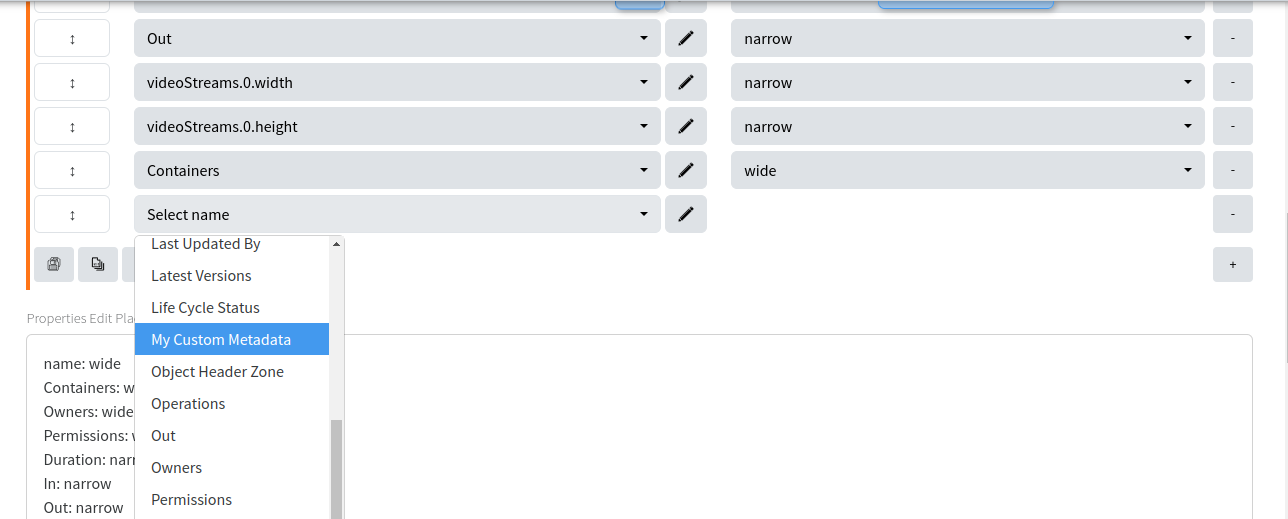](https://docs.profuzdigital.com/uploads/images/gallery/2024-11/AVLimage.png)
[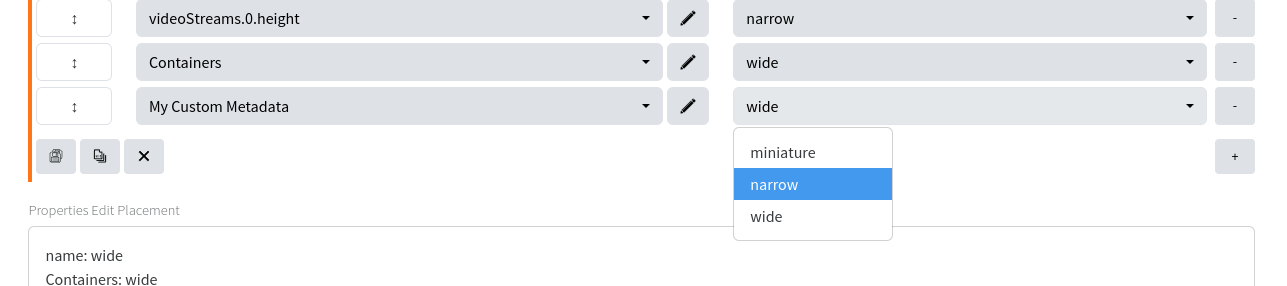](https://docs.profuzdigital.com/uploads/images/gallery/2024-11/kd9image.png)
7. Go to “Properties Edit Placement“ Repeat same as point 6.
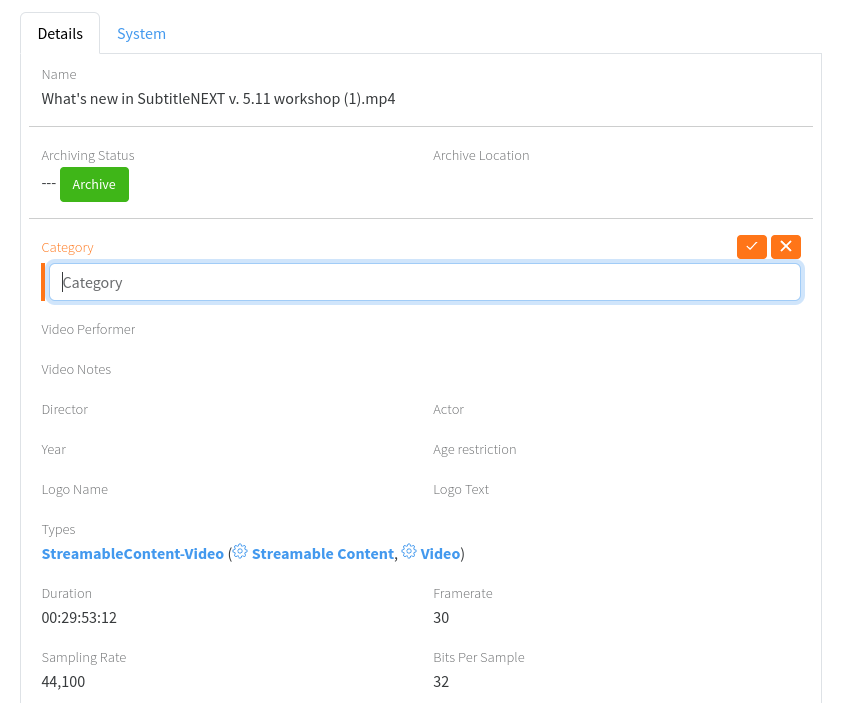
Editing metadata can be edited by selecting desired media then Actions and EDIT:
Example here illustrate how to add and modify a field called: My Custom Metadata. Attributes belonging to one media asset can be modified in the same way.
[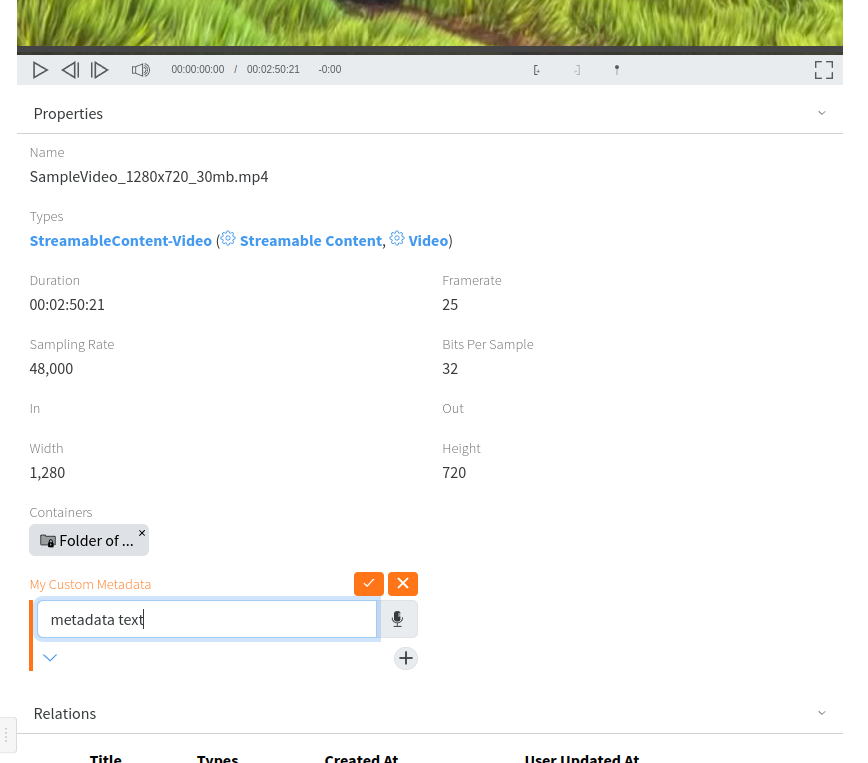](https://docs.profuzdigital.com/uploads/images/gallery/2024-11/4TQimage.png)
**Here is our data:**
[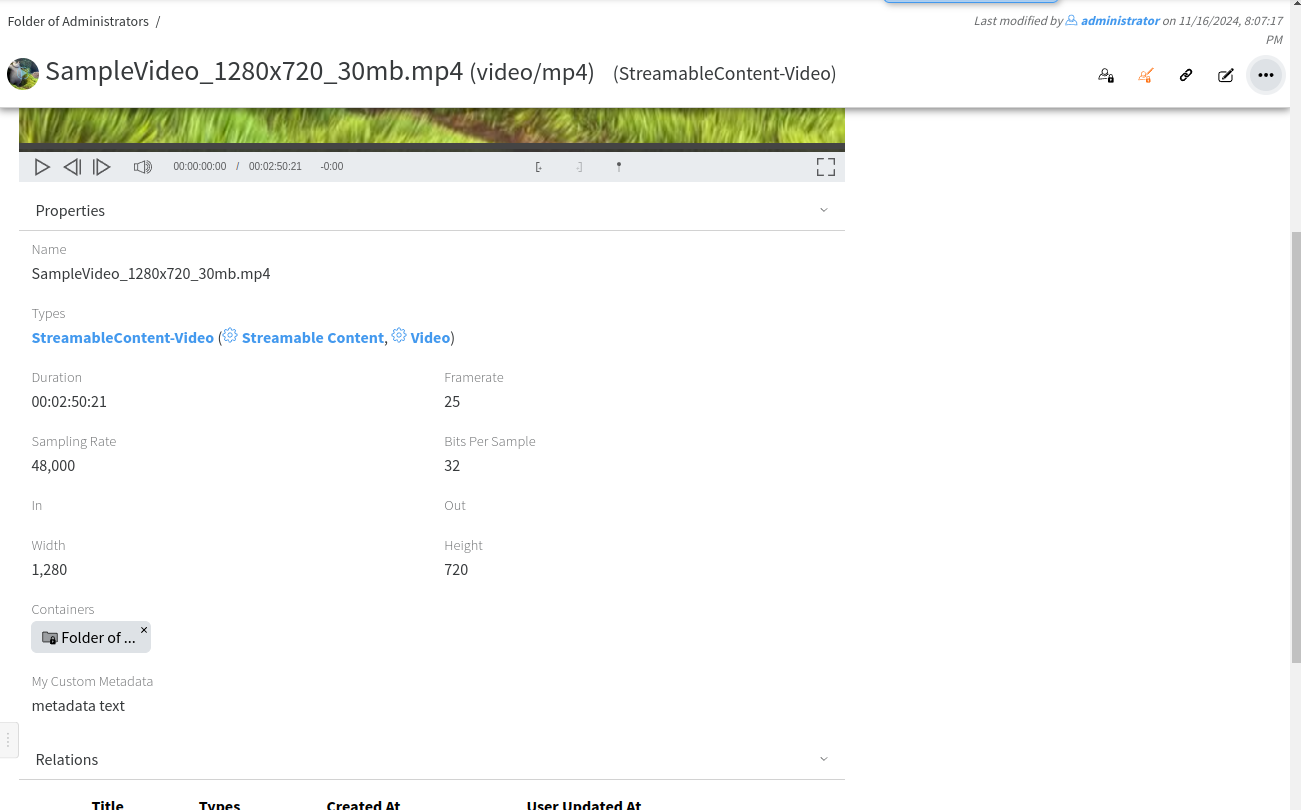](https://docs.profuzdigital.com/uploads/images/gallery/2024-11/Fdhimage.png)
# Transcode a file
If you want to manually transcode a file from one resolution to another or in different format you can use the Transcode operation from the local Actions menu of the file as shown below:
[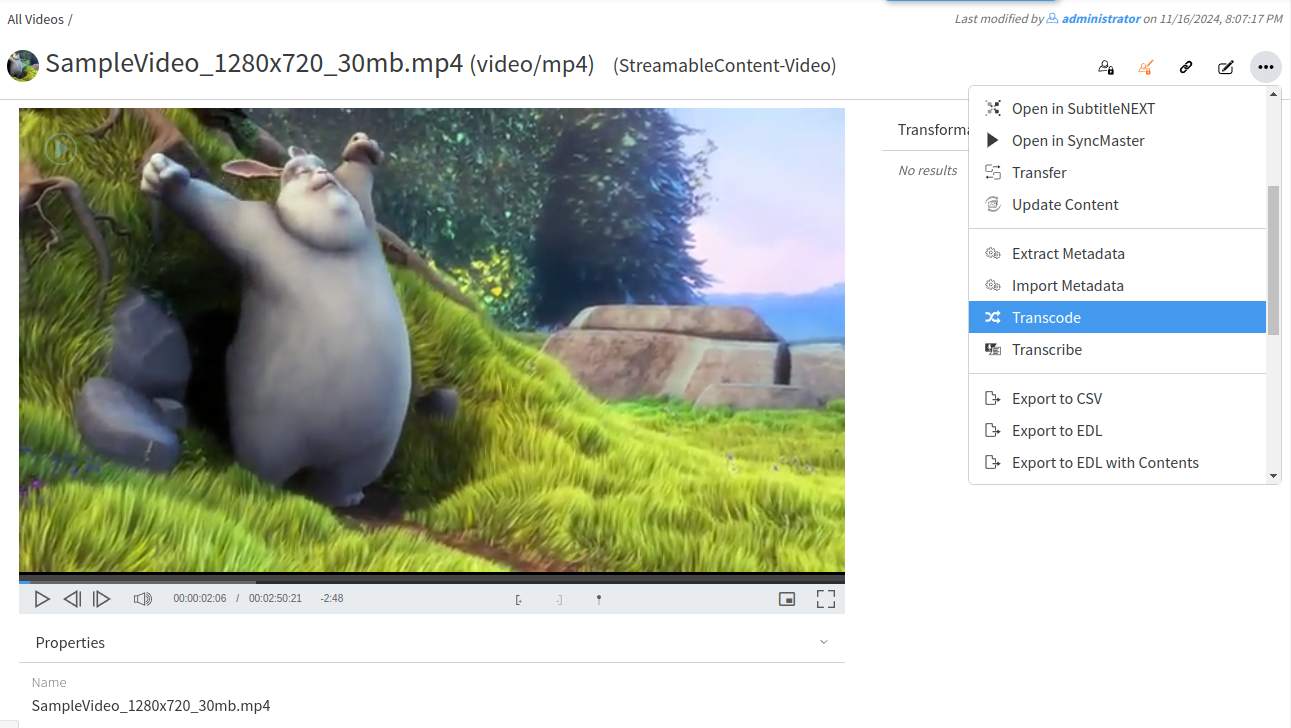](https://docs.profuzdigital.com/uploads/images/gallery/2024-11/e6Himage.png)
When you click the Transcode operation the following window will appear:
[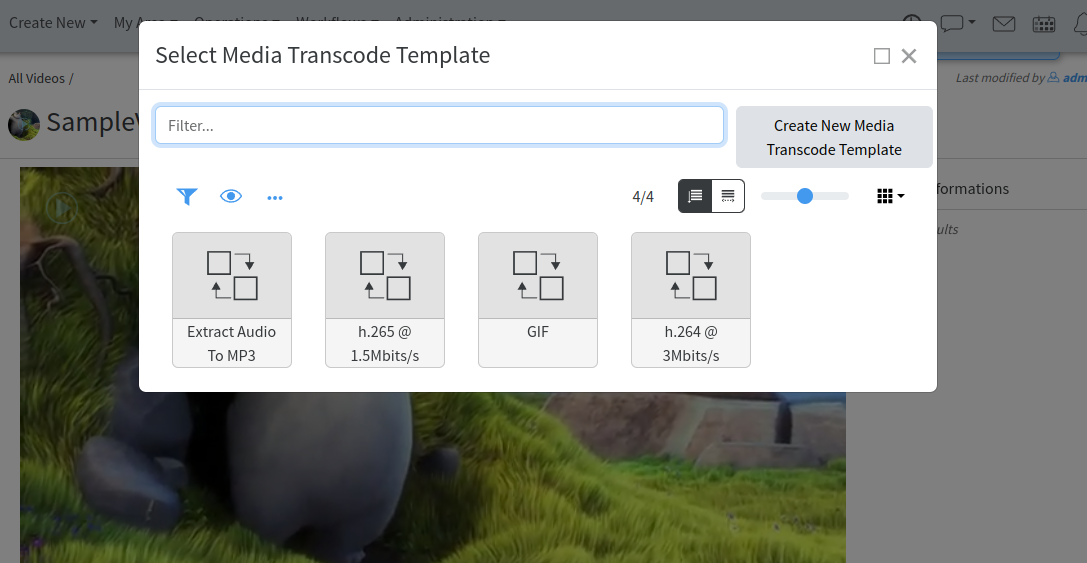](https://docs.profuzdigital.com/uploads/images/gallery/2024-11/kw5image.png)
You can select the corresponding transcoding (transformation) template or create e new one if needed.
Transcoding progress is shown at the right:
[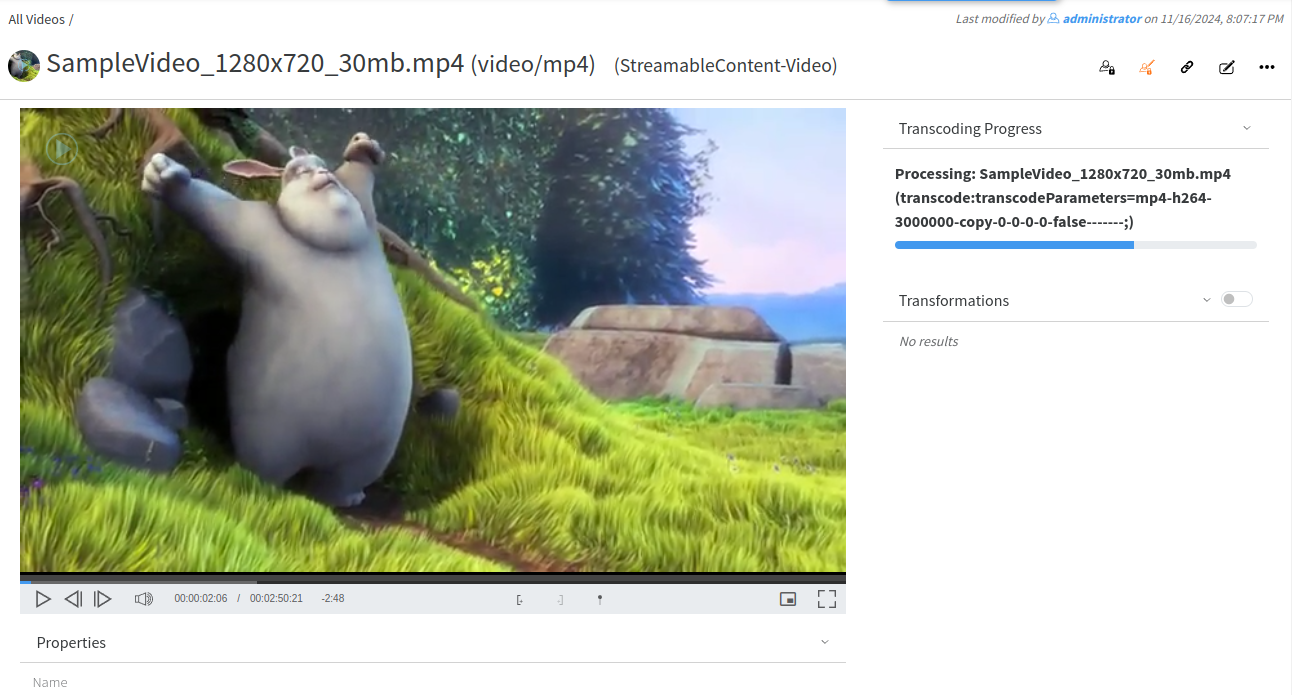](https://docs.profuzdigital.com/uploads/images/gallery/2024-11/FkOimage.png)
All ready transcodings are shown under **Transformations**:
[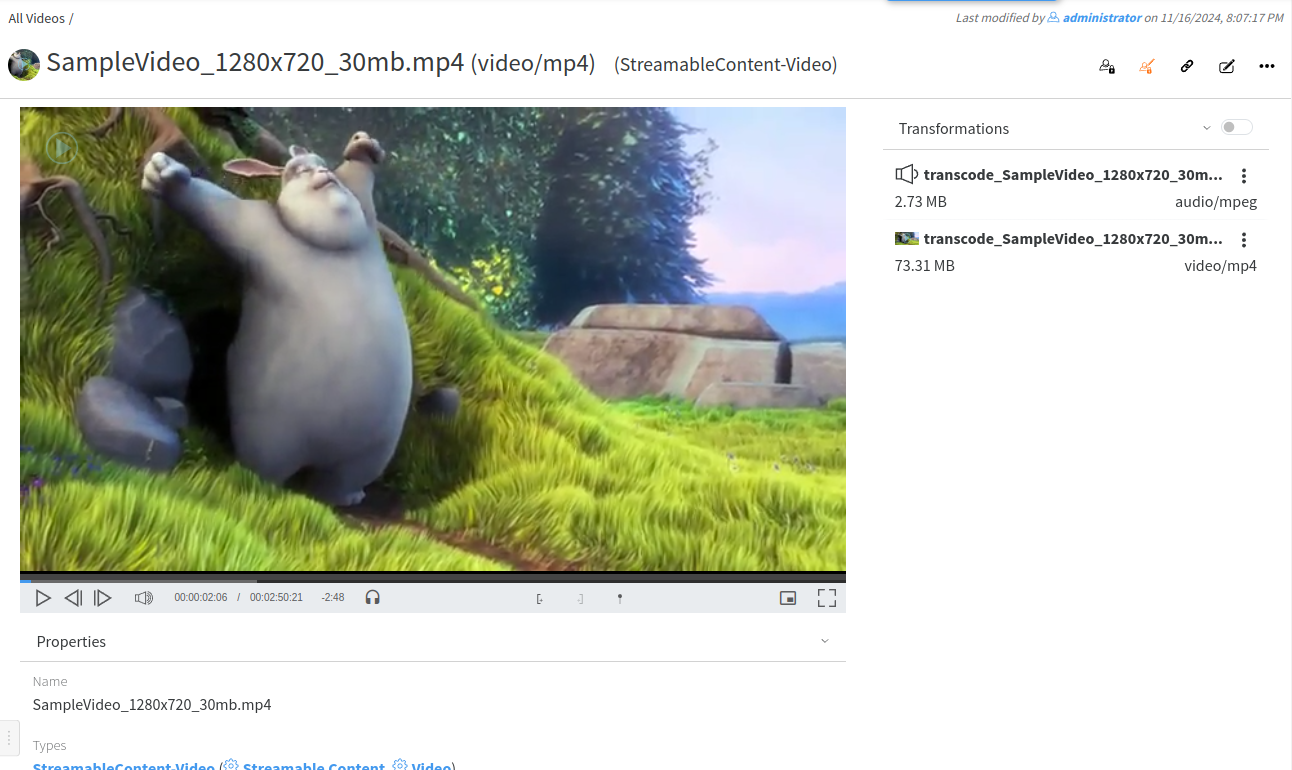](https://docs.profuzdigital.com/uploads/images/gallery/2024-11/ElRimage.png)
You can check "Show System Transformations" to list also the automatic transformations created by the system:
[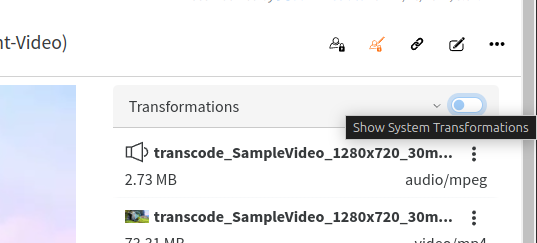](https://docs.profuzdigital.com/uploads/images/gallery/2024-11/qadimage.png)
All system transformations are shown in red:
[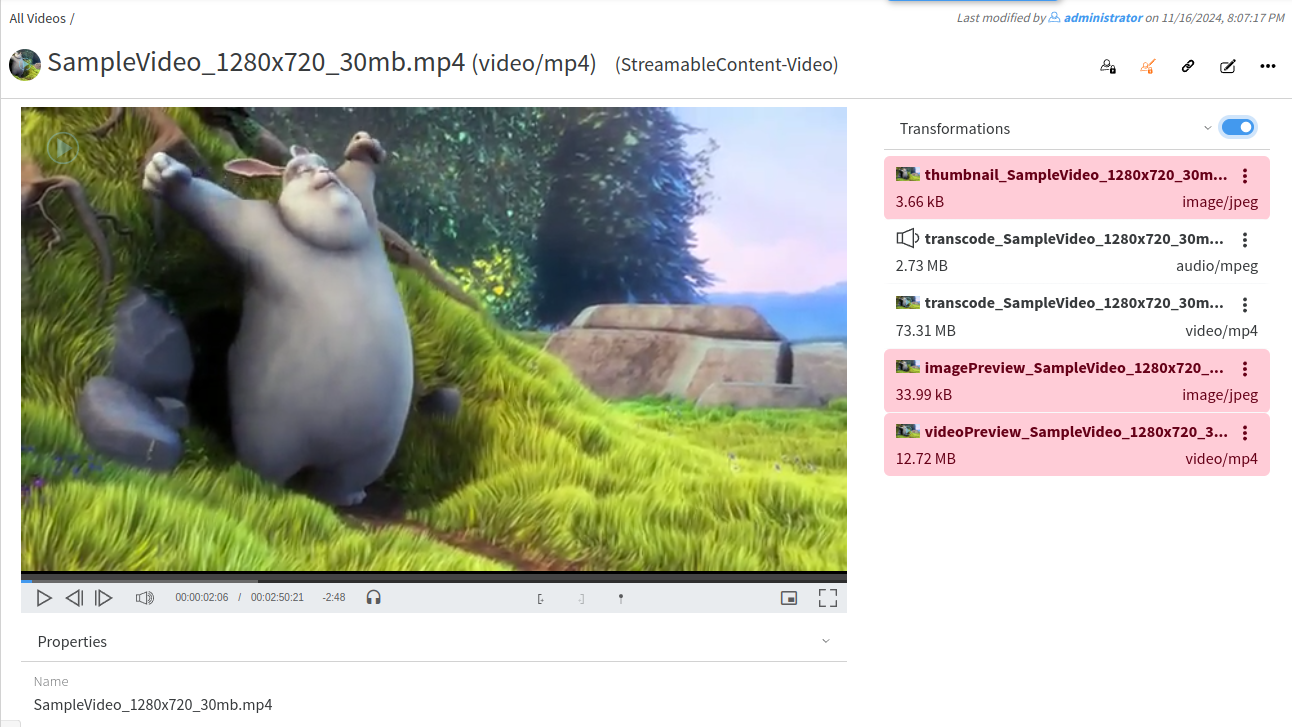](https://docs.profuzdigital.com/uploads/images/gallery/2024-11/3BNimage.png)
# Transcoding templates creation and editing
**Profuz LAPIS** can trigger automatically transcoding processes according to workflow scenarios. E.g. Media content being ingested/uploaded into media mapped folders into no-native for the customer profile formats. Profuz LAPIS will recognize the incoming media profile formats and will start a transcoding process based on created transcoding presets.
1. Create a new Transcoding template from Create New → type or select Media Transcode Template then fill the encoding attributes. There are few important attribute fields such as encoder, container and resolution.
**Hint**: Contact support team for any syntax matters
**Remark**: Presets can be started automatically or manually.
For manual transcoding select media content then properties-> select from drop-down menu Transcode and desired transcoding preset.
[](https://docs.profuzdigital.com/uploads/images/gallery/2024-11/3qEimage.png)
When transcoding process is started, a progress bar will appear and will show to the user the status of the transcoding progress. Once it finished, the copy will be available for usage.
**Remark**: You can monitor all queued and ongoing transformations in the MAM -> Current Transcoddings, and view all finished transcoddings in MAM -> Finished Transcodings.
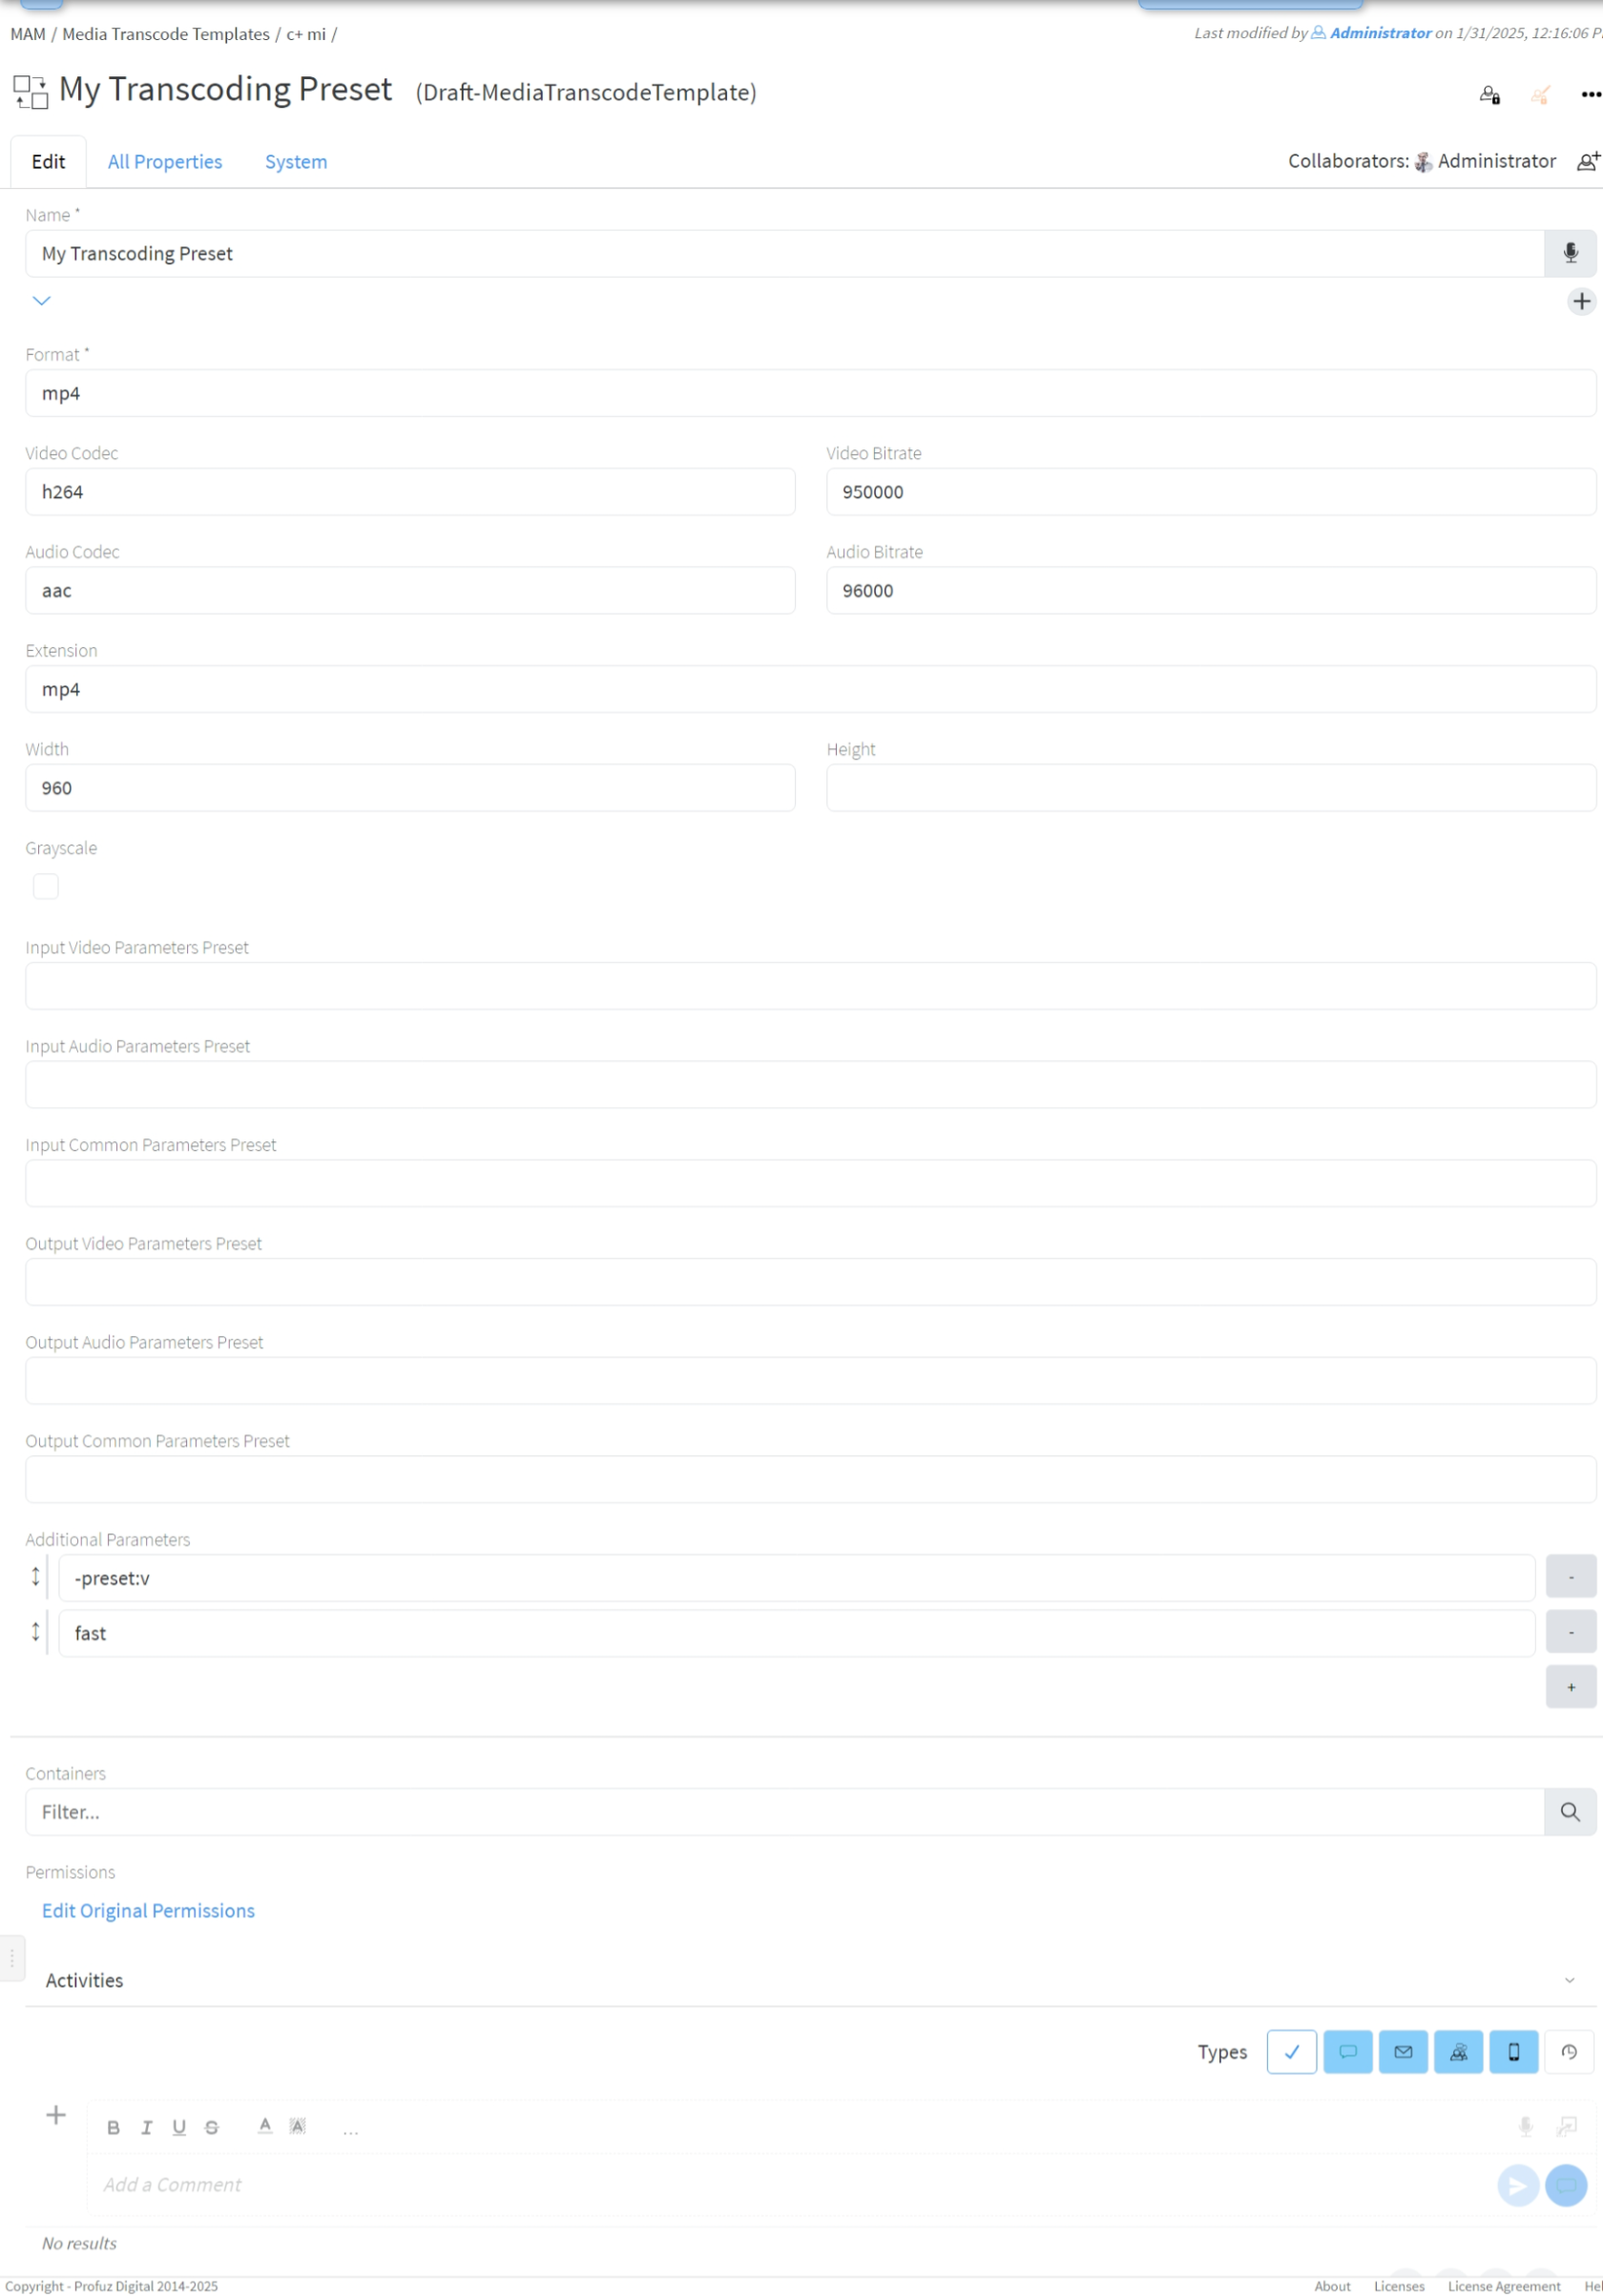
## Example for editing Video Transcode Template
Go to MAM → Video Transcode Templates as shown below:
[](https://docs.profuzdigital.com/uploads/images/gallery/2024-11/RsXimage.png)
Select the template you want to edit and go to Actions →Edit:
[](https://docs.profuzdigital.com/uploads/images/gallery/2025-01/eXKimage.png)
#### Template properties
- **Format** - file format. One of the specifiers for muxers as returned by `ffmpeg -formats`. For example **mp4**, **avi**, **flv**, **gif**. You may find more info in [ffmpeg formats documentation](https://ffmpeg.org/ffmpeg-formats.html);
- **Video Codec** - one of the video encoder specifiers as returned by `ffmpeg -codecs`. For example **h264** (for automatic selection of software or hardware encoding), **libx264** (for software encoding of h264), **h264\_nvenc** (for NVidia GPU encoder), **mpeg2video**. You may find more info in [ffmpeg video encoders documentation](https://ffmpeg.org/ffmpeg-codecs.html#Video-Encoders);
- **Video Bitrate** - bitrate in bits per second. For example **3000000** for 3 Mib/s;
- **Audio Codec** - one of the audio encoder specifiers as returned by `ffmpeg -codecs`. For example **aac**, **mp3**, **pcm\_f16le.** You may find more info in [ffmpeg audio encoders documentations](https://ffmpeg.org/ffmpeg-codecs.html#Audio-Encoders).
- **Audio Bitrate** - bitrate in bits per second. For example **96000** for 96 Kib/s;
- **Extension** - file extension for the transcoded file;
- **Width** - for video formats specify the width of the video frame. Leave blank to use original width;
- **Height** - for video formats specify the height of the video frame. Set to -1 to calculate it based on aspect ratio;
- **Grayscale** - if checked a grayscale video will be produced;
- **Input/Output Video/Audio/Common Parameter Preset** - specify corresponding ffmpeg preset file. You may find more info in [ffmpeg presets documentation](https://ffmpeg.org/ffmpeg.html#Preset-files);
- **Additional Parameters** - you may put any ffmpeg encoding or output option in this field. Each argument is put in separate line. You don't need to surround a parameter in quotes (they are needed only in command line). For all ffmpeg options execute `ffmpeg -h full`. You may find more info for available parameters in [ffmpeg documentation](https://ffmpeg.org/ffmpeg.html).
# Organization
If you don’t find the appropriate container (folder, category, tag, etc) where you wish to classify your file, you can create a new one (if you have user rights for that) by clicking on the Search icon as shown here:
[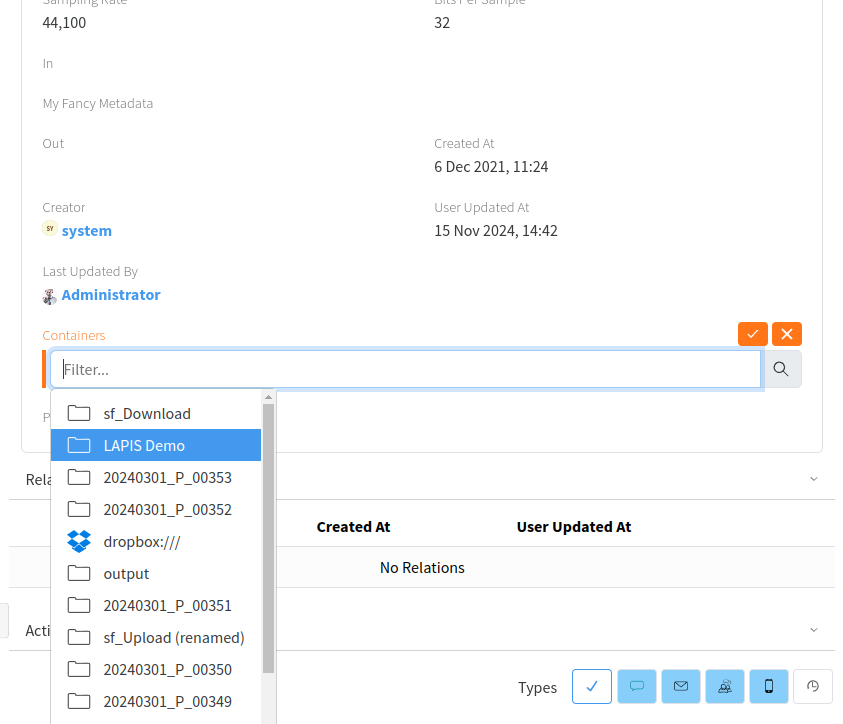](https://docs.profuzdigital.com/uploads/images/gallery/2024-11/u5simage.png)
[](https://docs.profuzdigital.com/uploads/images/gallery/2024-11/2elimage.png)
While creating a new Folder, for example, you can define several optional parameters such as - to which container it is linked, image, color and permissions as shown below:
[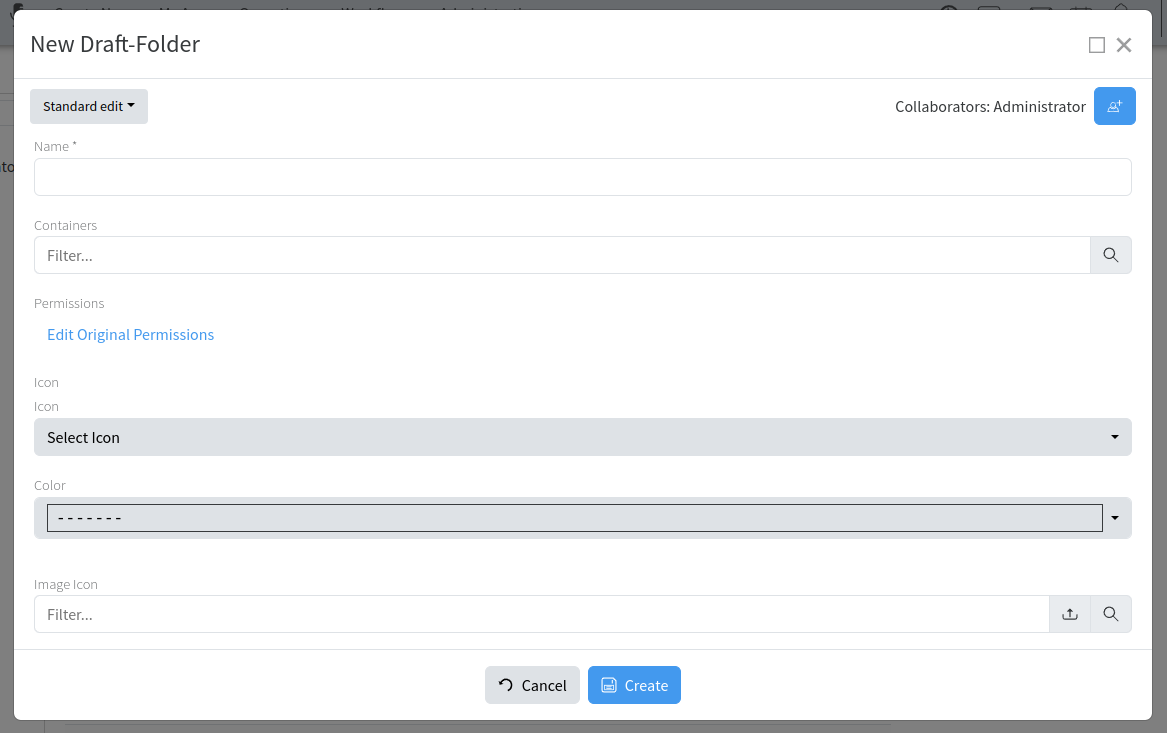](https://docs.profuzdigital.com/uploads/images/gallery/2024-11/t0Pimage.png)
# Exporting
You can export а media list or media asset to the local hard drive with or without its contents using the following available options:
[](https://docs.profuzdigital.com/uploads/images/gallery/2024-11/zIfimage.png)
You can also export only some of the contents if necessary using the local Actions menu of the content itself as shown here:
[](https://docs.profuzdigital.com/uploads/images/gallery/2024-11/dxVimage.png)
See also [Export for Video Editing software](https://docs.profuzdigital.com/books/profuz-lapis-user-guide/page/export-for-video-editing-software "Export for Video Editing software")
# Downloading
If you want to download a file or an asset with all its contents you can use the Download operation from the local menu of the file/asset as shown here:
[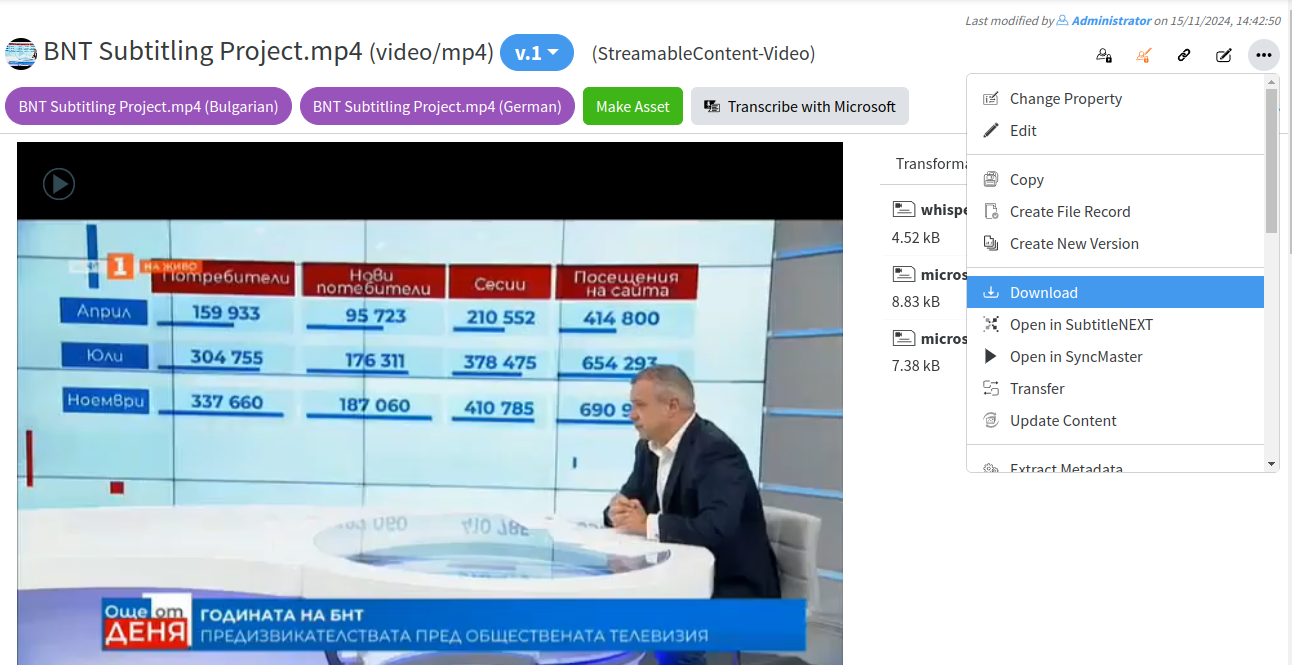](https://docs.profuzdigital.com/uploads/images/gallery/2024-11/1Gzimage.png)
If you want to download multiple files or assets with their contents, you can do that by:
1. Selecting multiple files/assets by clicking the check box in front of them
2. Going to Selection Actions →Download
[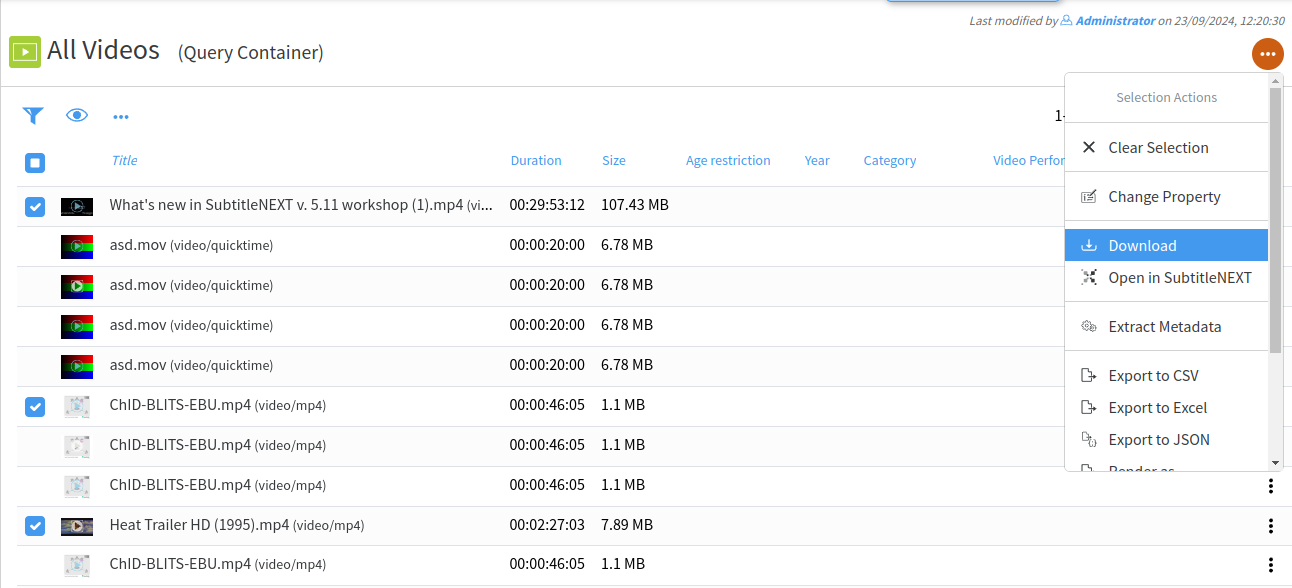](https://docs.profuzdigital.com/uploads/images/gallery/2024-11/YHYimage.png)
# Moving contents
If you want to move a file from one location to another you can use the Transfer operation from the local Actions Menu of the corresponding file (s) as shown:
[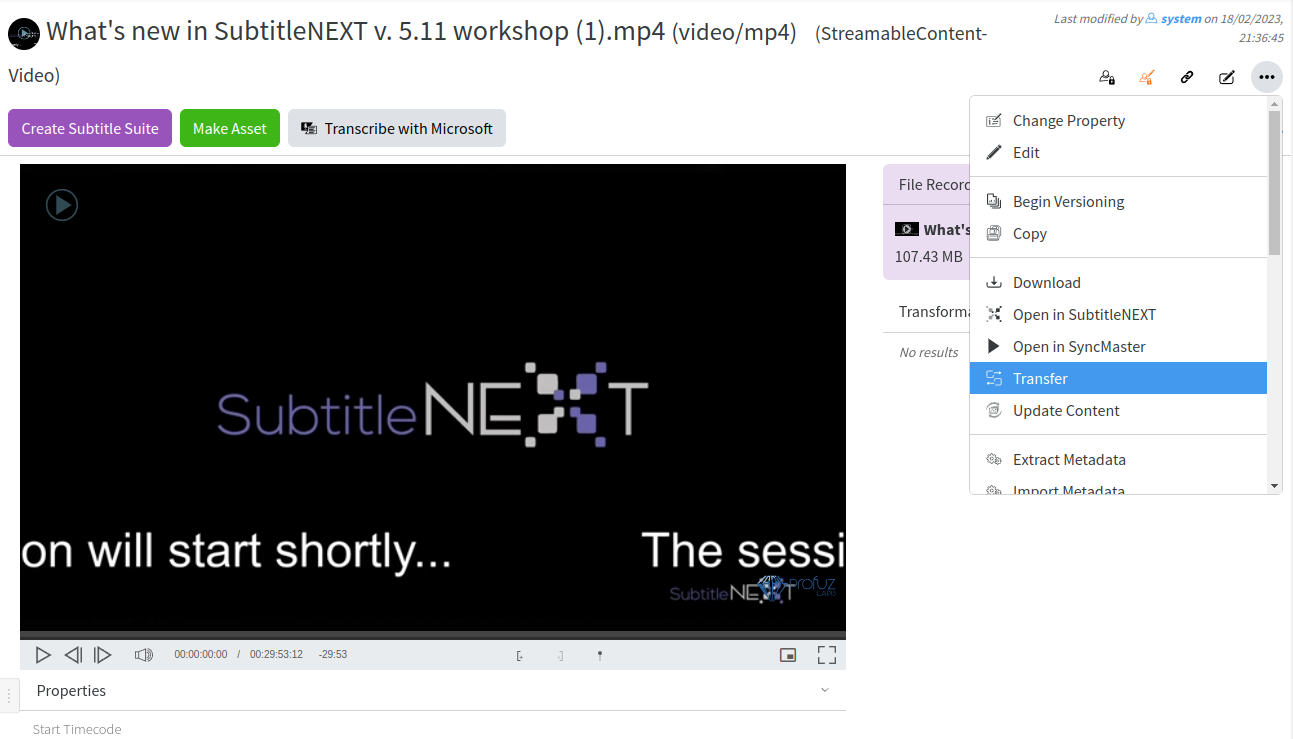](https://docs.profuzdigital.com/uploads/images/gallery/2024-11/ZWSimage.png)
When you click on Transfer the following window will appear to choose your transfer destination:
[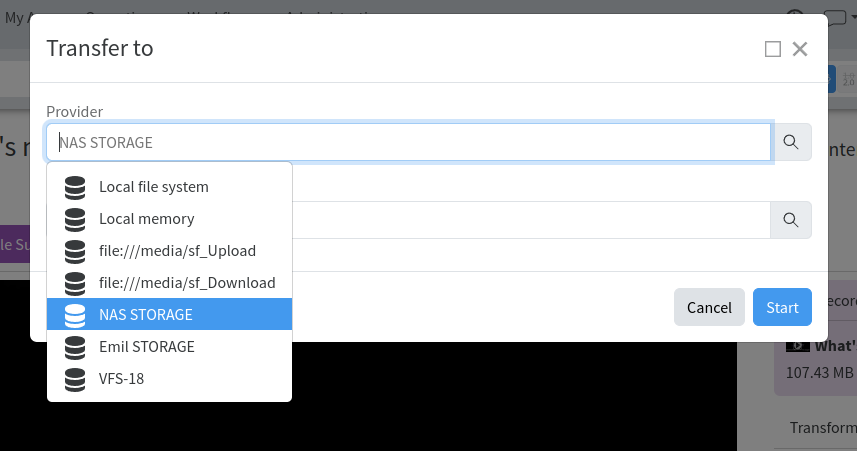](https://docs.profuzdigital.com/uploads/images/gallery/2024-11/nU6image.png)
Once the transfer starts, you will receive the following notification:
[](https://docs.profuzdigital.com/uploads/images/gallery/2024-11/9RDimage.png)
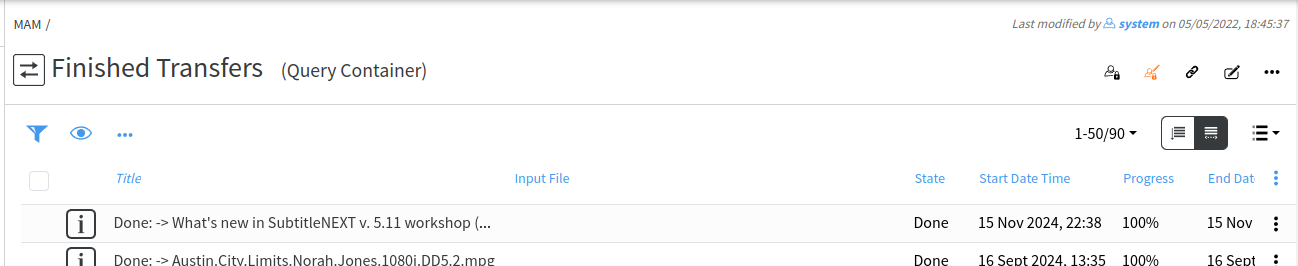
You can monitor progress in Current Transfers and see the ready transfer in Finished Transfers:
[](https://docs.profuzdigital.com/uploads/images/gallery/2024-11/yU0image.png)
Transfers will create a File Record. A File Records contains all copies of the content in all locations:
[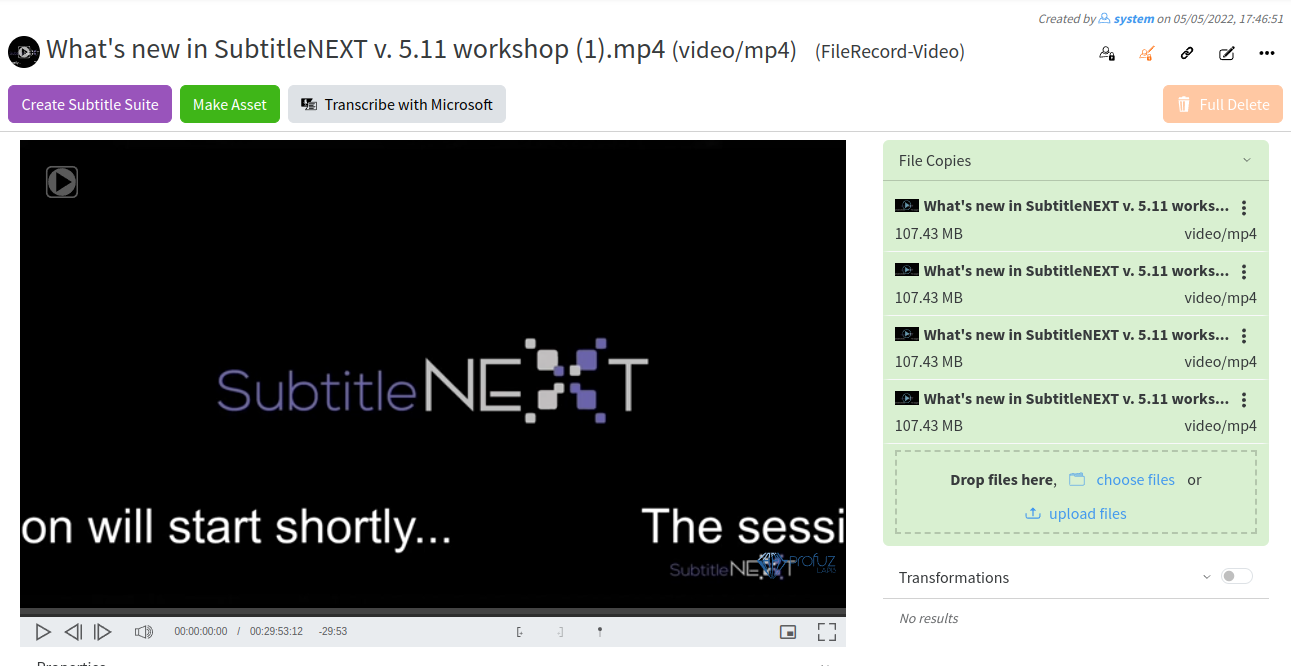](https://docs.profuzdigital.com/uploads/images/gallery/2024-11/0XQimage.png)
# Monitoring
To monitor all ongoing transfers with their progress, you can go to MAM → Current Transfers
To see all the transfers which have already been completed you can go to MAM →Finished Transfers as shown on the screenshot above
A list with finished or ongoing transfers will look like this:
[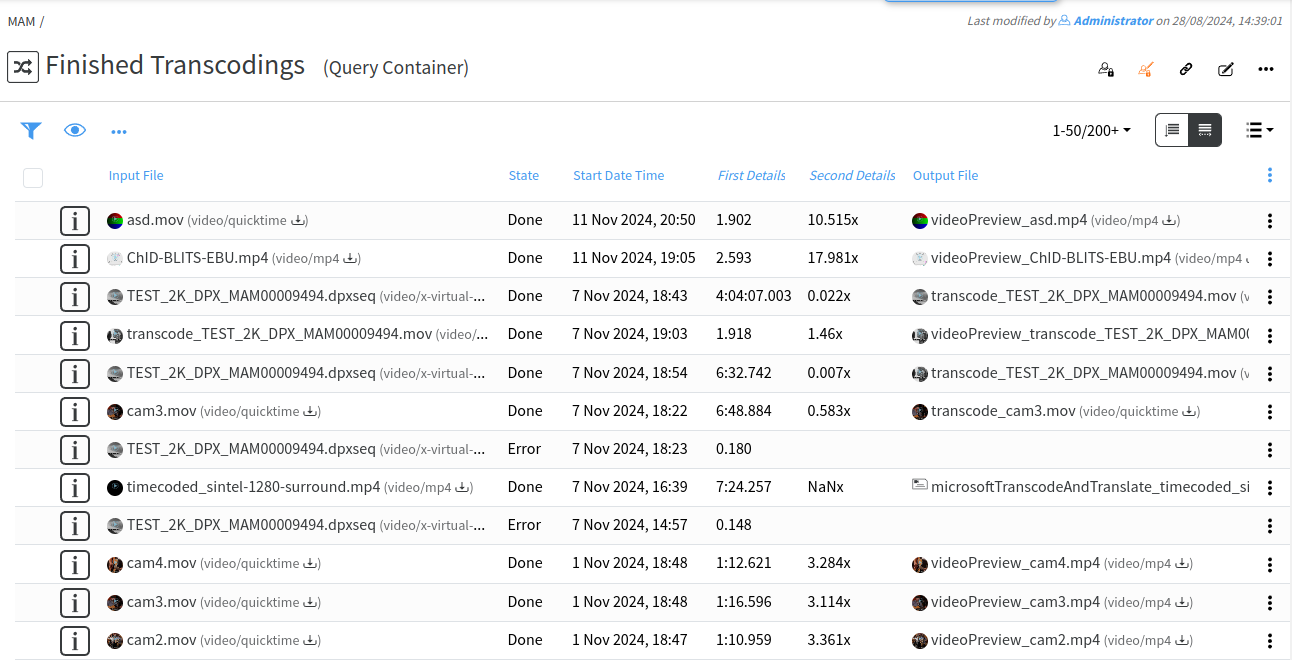](https://docs.profuzdigital.com/uploads/images/gallery/2024-11/BSyimage.png)
# Filtering
You can filter the list by writing in the columns where the filter sign appears:
[](https://docs.profuzdigital.com/uploads/images/gallery/2024-11/O1mimage.png)
This is valid for all the lists with results.
You can also change the columns which you want to see in the list by selecting the preferred ones. You can do that by selecting **Change Columns** from the table menu:
[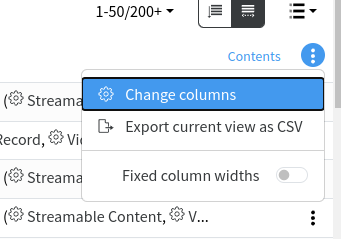](https://docs.profuzdigital.com/uploads/images/gallery/2024-11/4Y8image.png)
For example, here in the finished transfers list the following columns are available for selection:
[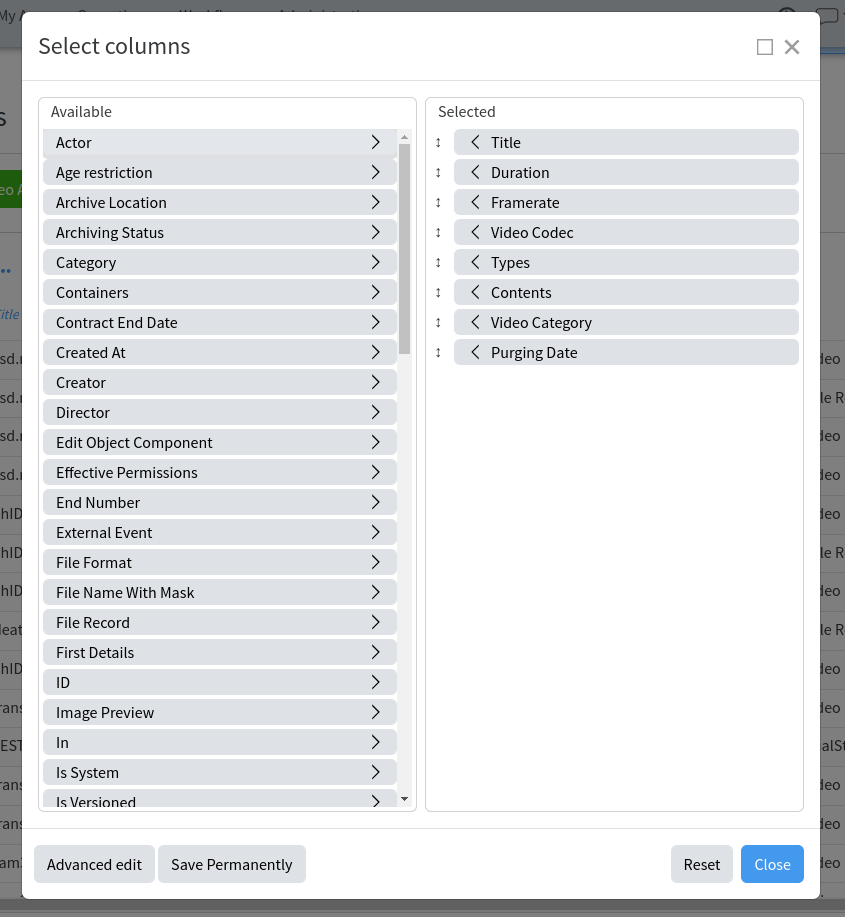](https://docs.profuzdigital.com/uploads/images/gallery/2024-11/jXeimage.png)
You can also rearrange the columns order by dragging the columns headers in the chosen order.
# Reports
You can also export the list to some formats or documents as shown here:
[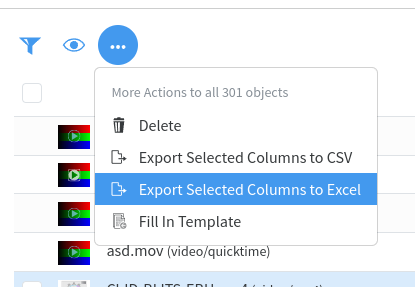](https://docs.profuzdigital.com/uploads/images/gallery/2024-11/TXUimage.png)
All these options are available for all Query Containers.
# Subtitles
# Subtitle integration with SutitleNEXT platform software
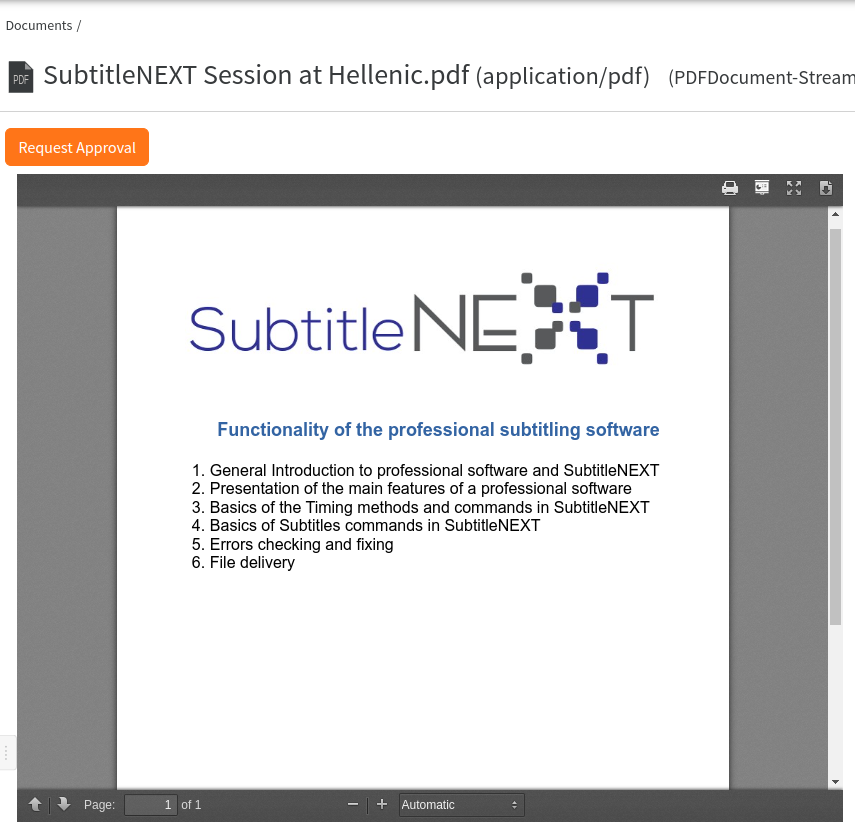
Profuz LAPIS has complete integration with standalone subtitling platform SubtitleNEXT (SBTN). This method is called Hybrid because it is a mixture of Web based software together with a standalone application. That means that all supported subtitle files stored into Profuz LAPIS database (web based) can be edited on workstations where SBTN is installed. Usually subtitle files are referring to media assets. We just must mark any media and subtitles belonging to that media. By pressing Open in SubtitleNEXT, user sends an internal call to the workstation where SBTN will be used.
**Important facts**: All subtitling tasks handled into SBTN and saved will return results into ProfuzLAPIS database directly on the server. So, users will not have to care about storing their work locally. Editing, creations and quality checks will be kept centralized in Profuz LAPIS.
To open any video or subtitle file with SBTN please do the following:
1. Select the video or the subtitle file
2. Open Actions drop-down menu and press: “Open in SubtitleNEXT”
**Remark**: If SubtitleNEXT is not yet installed on the local station, Profuz LAPIS will ask you to install SBTN.
[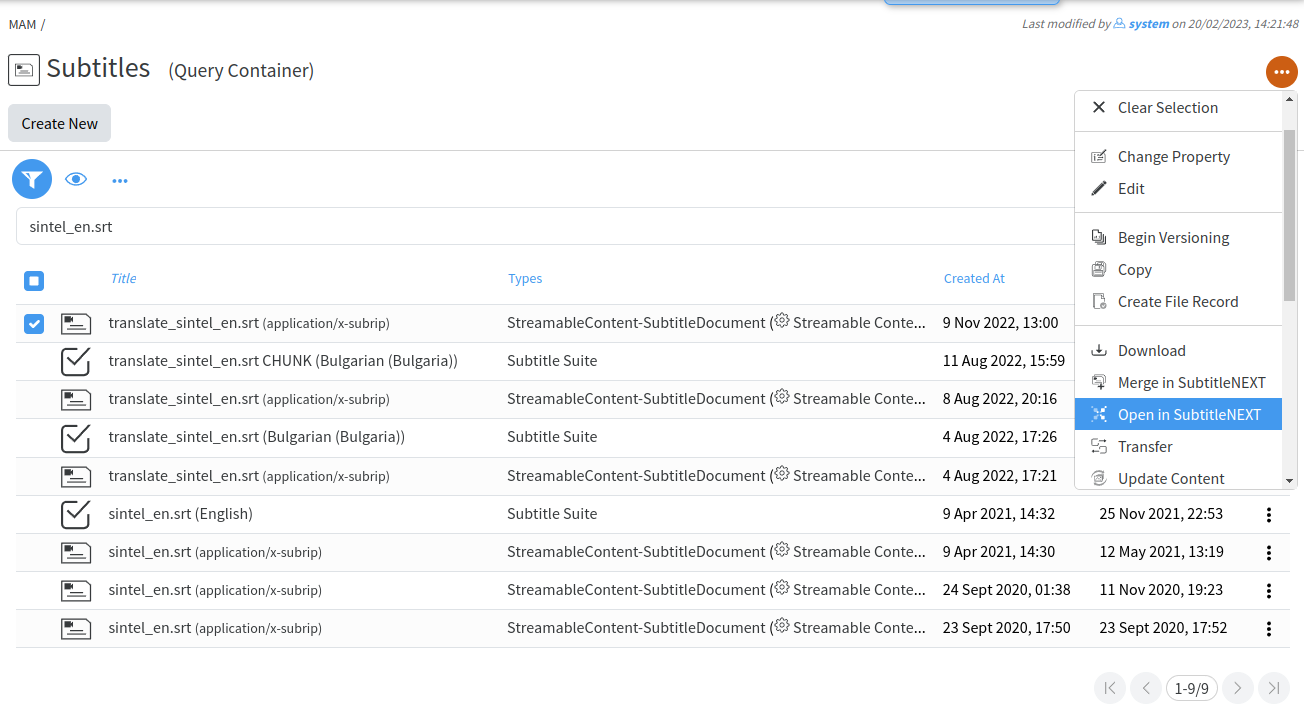](https://docs.profuzdigital.com/uploads/images/gallery/2024-11/q3mimage.png)
# Editing subtitles online
Subtitles are listed in the Subtitles container in the MAM folder by default. You can also search for a subtitle in the search. This is how a subtitle is previewed in Profuz LAPIS.
[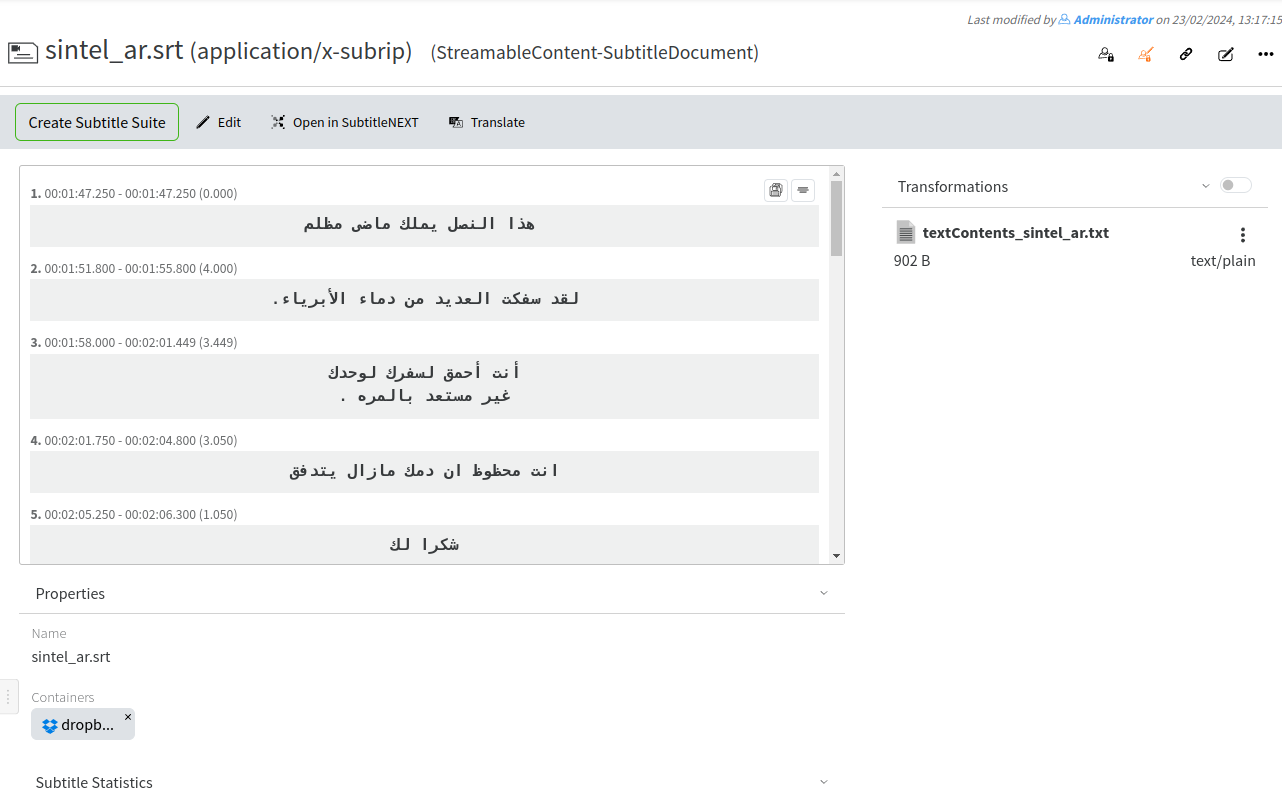](https://docs.profuzdigital.com/uploads/images/gallery/2024-11/Terimage.png)
In order to edit the subtitle files online go to Actions → Edit as shown below:
[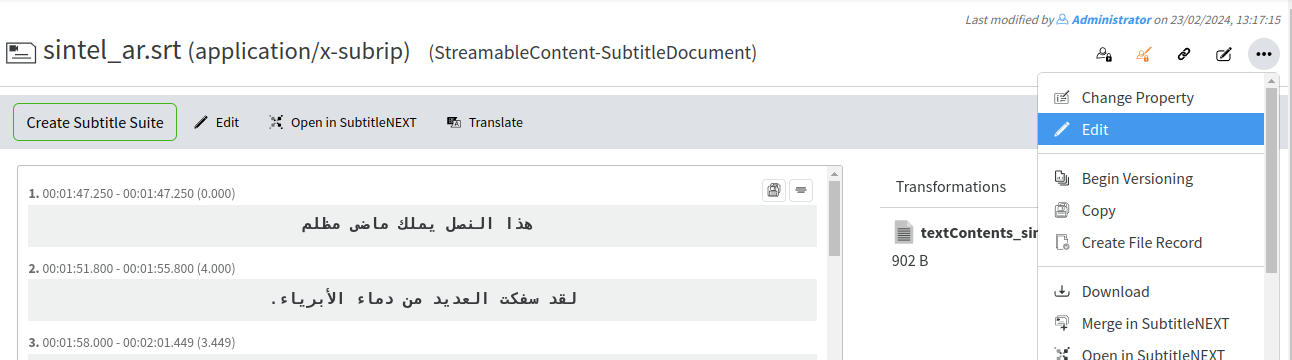](https://docs.profuzdigital.com/uploads/images/gallery/2024-11/dgcimage.png)
After you click Edit, the online subtitles editor will open and will offer you the available tools for online editing of the supported subtitle file formats ( SRT and WebVTT are currently supported):
[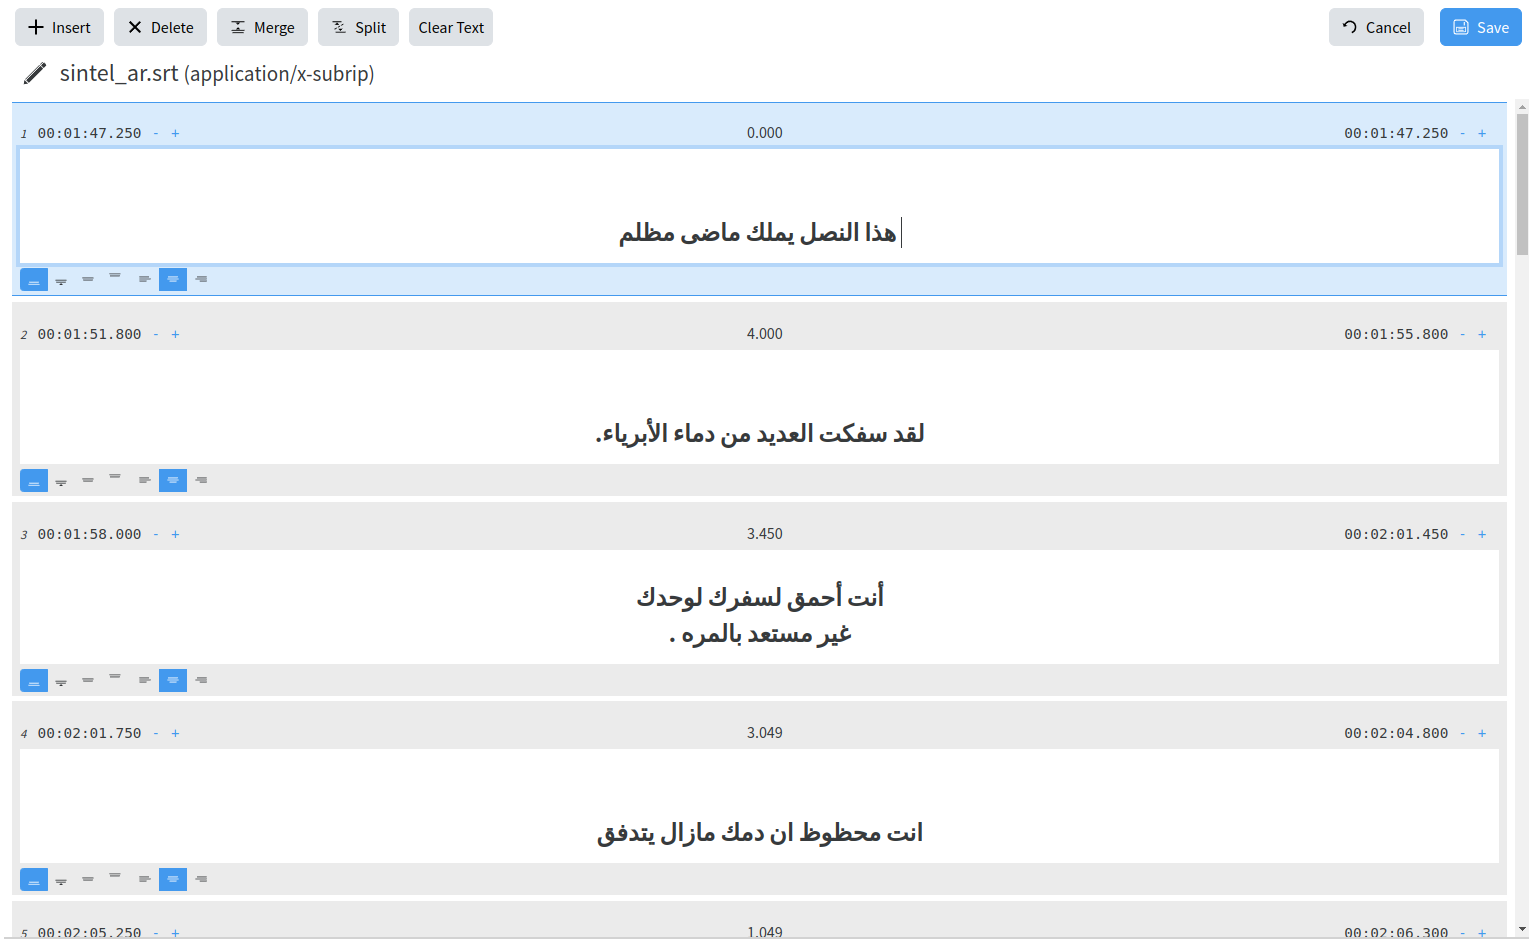](https://docs.profuzdigital.com/uploads/images/gallery/2024-11/2Tnimage.png)
You can edit text, timing and positioning of subtitles. You can also insert new subtitle, merge and split subtitles with the buttons above or by using the keyboard shortcuts.
If you want to work on a subtitle file editing together with its corresponding video or source subtitle file ( template, original language, script) , you can use the specific type of task called Subtitle Suite. How it works? You create a new Subtitle Suite in one of the following ways : Create New → Others → Subtitle Suite or Create New → Task and choose Subtitle Suite as shown below:
[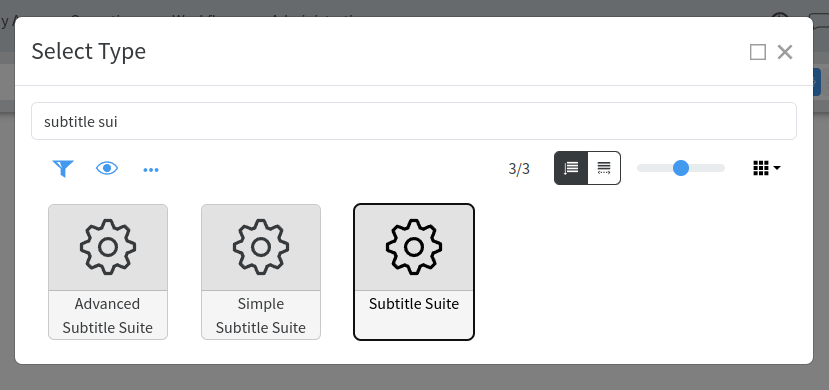](https://docs.profuzdigital.com/uploads/images/gallery/2024-11/7cuimage.png)
Once you select the Subtitle Suite type of task, you will be able to input the subtitles related data as shown here:
[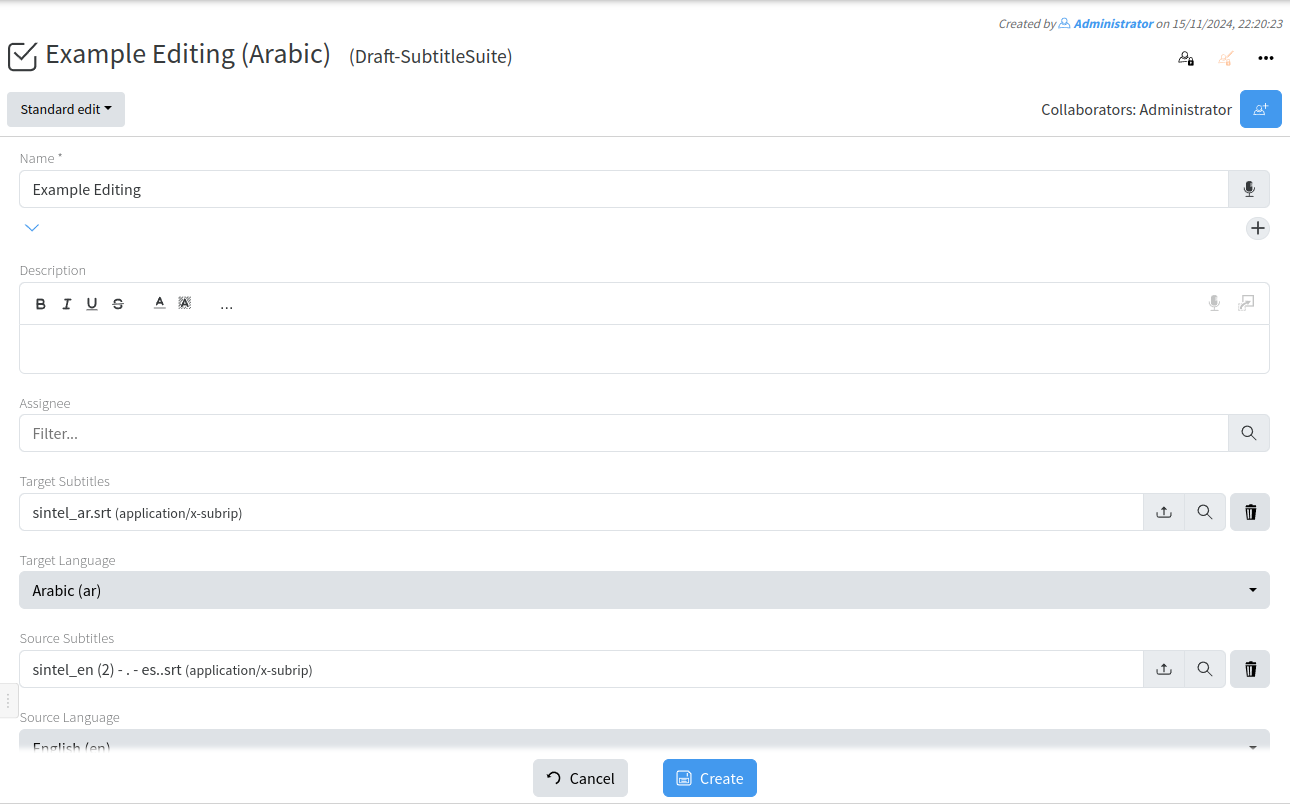](https://docs.profuzdigital.com/uploads/images/gallery/2024-11/v3Limage.png)
Fill in the details above in order to define the parameters of your subtitling project. Choose the Assignee ( the person in charge of editing the subtitles), upload or select the related media ( audio or video file), upload or select the source subtitles if you have such, set the source and target languages of your subtitling project, set the client’s subtitling rules if required, set the video framerate if you want to overwrite the automatically detected one.
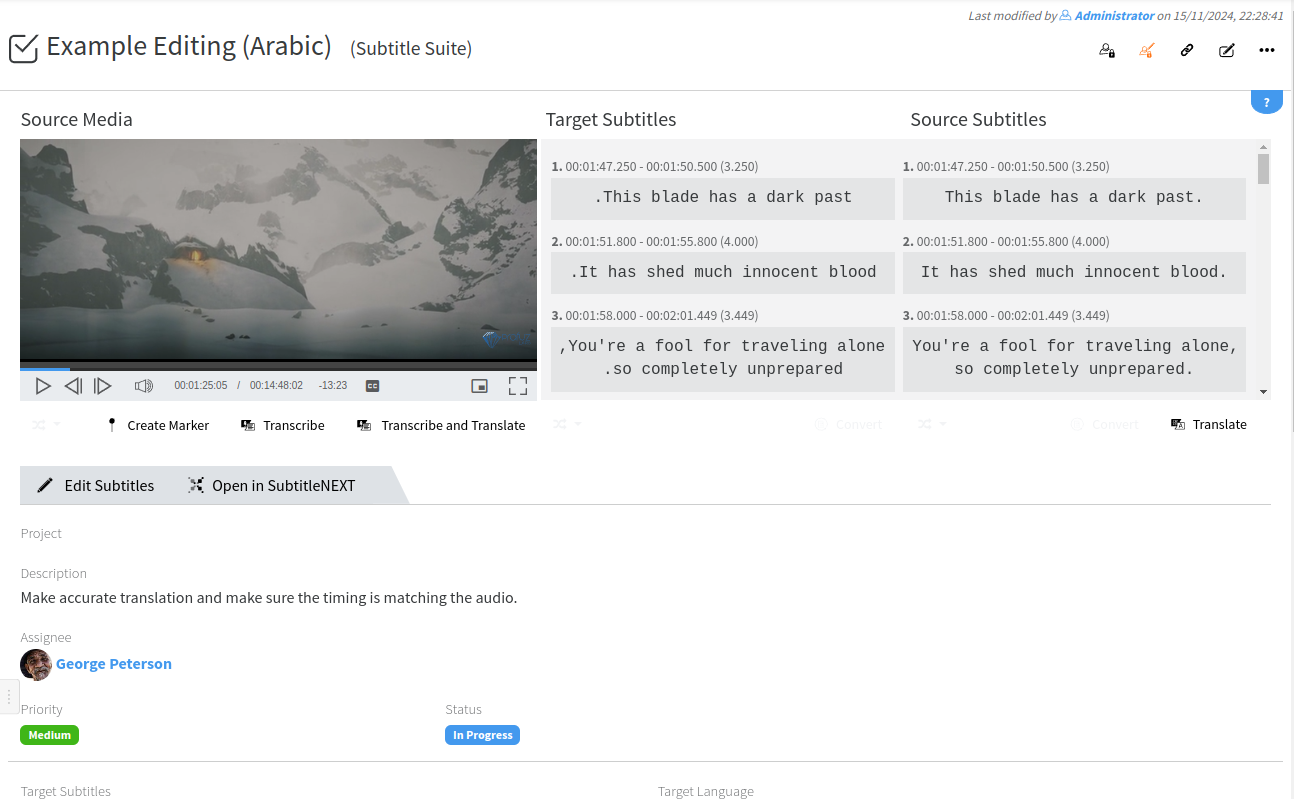
Once you fill all the known data click on the button “Create” and your subtitling project will be created and available for editing. The beauty of Profuz LAPIS hybrid model is that your subtitling projects “ Subtitle Suites” can be edited either in the built in online subtitles editor or in the integrated advanced subtitles editor SubtitleNEXT.
[](https://docs.profuzdigital.com/uploads/images/gallery/2024-11/EBpimage.png)
You have to first create an initial target subtitles file where to start creating the target subtitles in the target language. To do that, please hit the Create Target Subtitle button shown below the video preview window. If you use automatic translation or transcription engines for generating automatic files, the Transcribe and Translate buttons will also be active.
Once you create the target subtitles file it will be displayed in the Target Subtitles area and you will be able to start editing the subtitles in one of the available ways - through the online subtitles’ editor or in SubtitleNEXT editor.
[](https://docs.profuzdigital.com/uploads/images/gallery/2024-11/yzgimage.png)
If you choose to edit with the online subtitles editor, please click the Edit Subtitles button below the video preview window and you will see the subtitles and video timeline below them and start your work:
[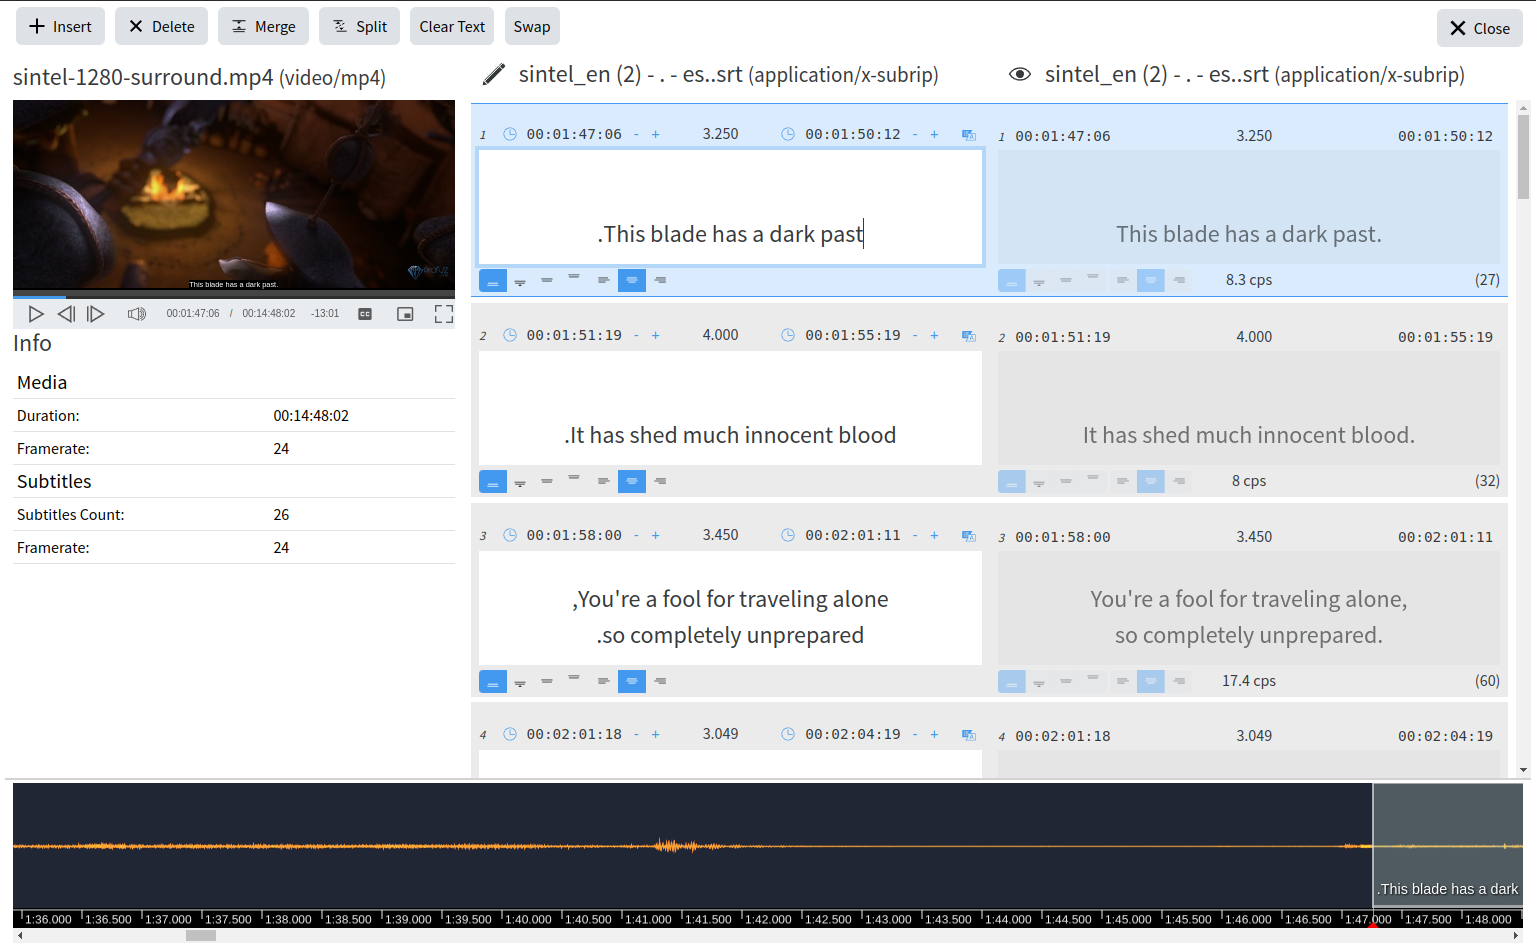](https://docs.profuzdigital.com/uploads/images/gallery/2024-11/ygPimage.png)
When you are ready click the Close button and your project will be saved.
If you choose to edit it in SubtitleNEXT, please click on Open in SubtitleNEXT button. Your video and both source and target subtitles will be opened in SubtitleNEXT as shown below:
[](https://docs.profuzdigital.com/uploads/images/gallery/2024-11/L7Jimage.png)
# Storing media data
# Storing media data at Profuz LAPIS
There are few ways to add different types of data to Profuz LAPIS storage space.
1. Manually copy - paste data to designated shared folder for that purpose. All files will automatically appear in the web browser after paste process is finished.
2. Select Operations menu → Ingest via Upload and select from local network location the desired data files for uploading.
**Remark**: Once uploading is finished, a notification will appear on the screen as shown below:
[](https://docs.profuzdigital.com/uploads/images/gallery/2024-11/jL4image.png)
Then users will be able to use the uploaded file.
# Workflows
# Workflow creation and editing

Profuz LAPIS is using [Business Process Model and Notation](https://en.wikipedia.org/wiki/Business_Process_Model_and_Notation) for creating and managing workflows. Creation of new workflows and automation can be done only with that scripting model language. In order to create a new workflow definition, go to **Workflows → Create New** from where it is possible to design an automation diagram and scripting. Workflows can be created also from existing BPMN files - **Workflows → Create New** and at the bottom of the page press **Select BPMN** button to choose an existing **.bpmn** file from your computer. Similarly you may update an existing workflow definition from a **.bpmn** file - go to the definition and from the object menu select "**Update Content**". Note that the **.bpmn** must have the same [process ID](https://docs.camunda.org/manual/latest/user-guide/process-engine/process-engine-concepts/#keys-and-versions). Any saved modification of a workflow definition will create a new version. Running instances of the same workflow definition will continue to use the version of the workflow definition with which they were started.
Example of an **Approve Document** process:
[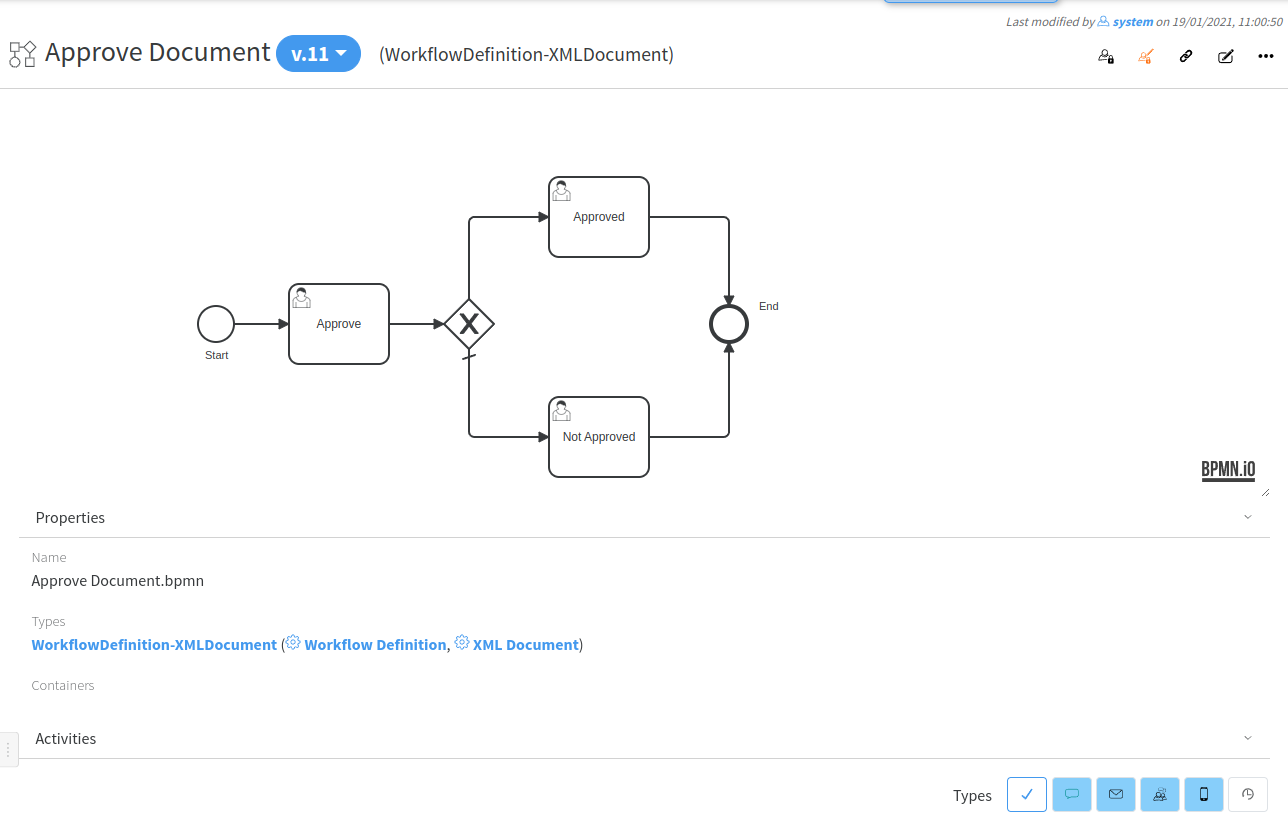](https://docs.profuzdigital.com/uploads/images/gallery/2024-11/dzzimage.png)
**Hint**: Please contact your supplier for any workflow automation assistance.
Profuz LAPIS uses Camunda 7 BPMN engine. You may read more in its documentation [here](https://docs.camunda.org/manual/latest/).
For the integrated BPMN editor you may find more information [here](https://bpmn.io/).
You may edit BPMN diagrams also offline in the Camunda Modeler desktop application. You can find it [here](https://camunda.com/download/modeler/).
Note that where forms are needed LAPIS uses its own UI types. There are two types of forms: Workflow Instance form and Workflow Task form. There are default base types for each of these types - **Workflow Instance** (type name: **WorkflowInstance**) and **Workflow Task** (type name: **WorkflowTask**). You can create subtypes of those base types, add additional properties, set the properties placement and even change the view and edit components to change their corresponding views in a way you need. In a BPMN diagram you may use the name of you newly created subtypes to tell LAPIS to use those types for the corresponding user tasks or the workflow instance itself. If no custom form is specified LAPIS will use the default base types. Read more in the [examples](https://docs.profuzdigital.com/books/profuz-lapis-user-guide/page/workflow-example-1).
# Workflow Example 1
##### Create workflow definition
Let create a simple workflow for document approval. Its process will look like this:
[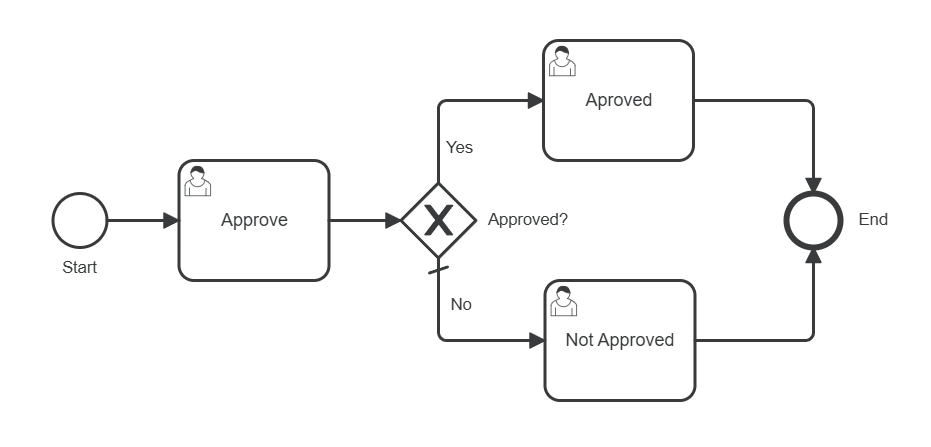](https://docs.profuzdigital.com/uploads/images/gallery/2025-01/ghIimage.png)
It will be started manually with either some provided documents for approval or it will prompt for the documents to be used for approval. The next step goes to a user responsible for the selected documents' approvals. The step after that is a decision gateway - it checks if the documents are approved or not. If they are approved the flow goes to the Approved user task step, which are assigned to the approval requested user. In not, it goes to the "Not Approved" user task. After the corresponding last step is completed the process ends.
Follow these steps to create this workflow:
1. We will need a custom workflow instance type and two types of workflow tasks: Workflow Approve Task and Workflow Approval Done Task.
1. For this go to Administration/Types and search for workflow instance:
[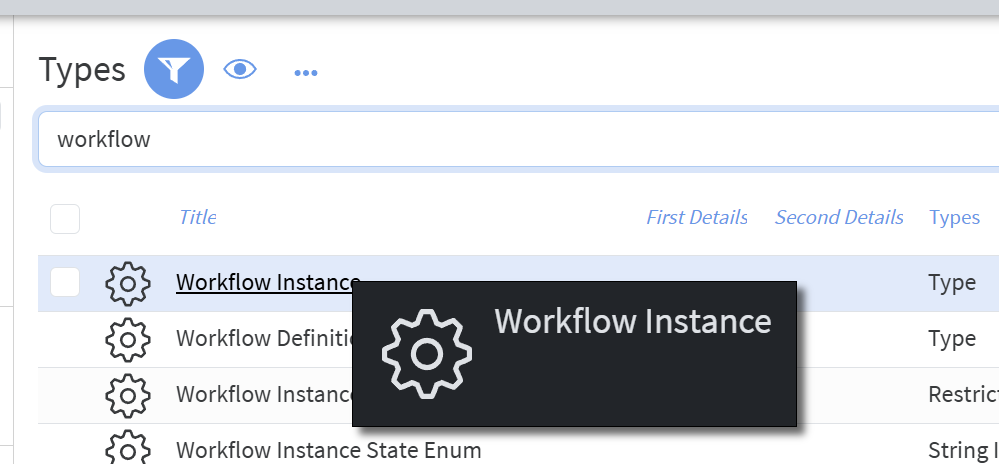](https://docs.profuzdigital.com/uploads/images/gallery/2025-01/9aximage.png)
2. Click on it and from there execute "Create Subtype":
[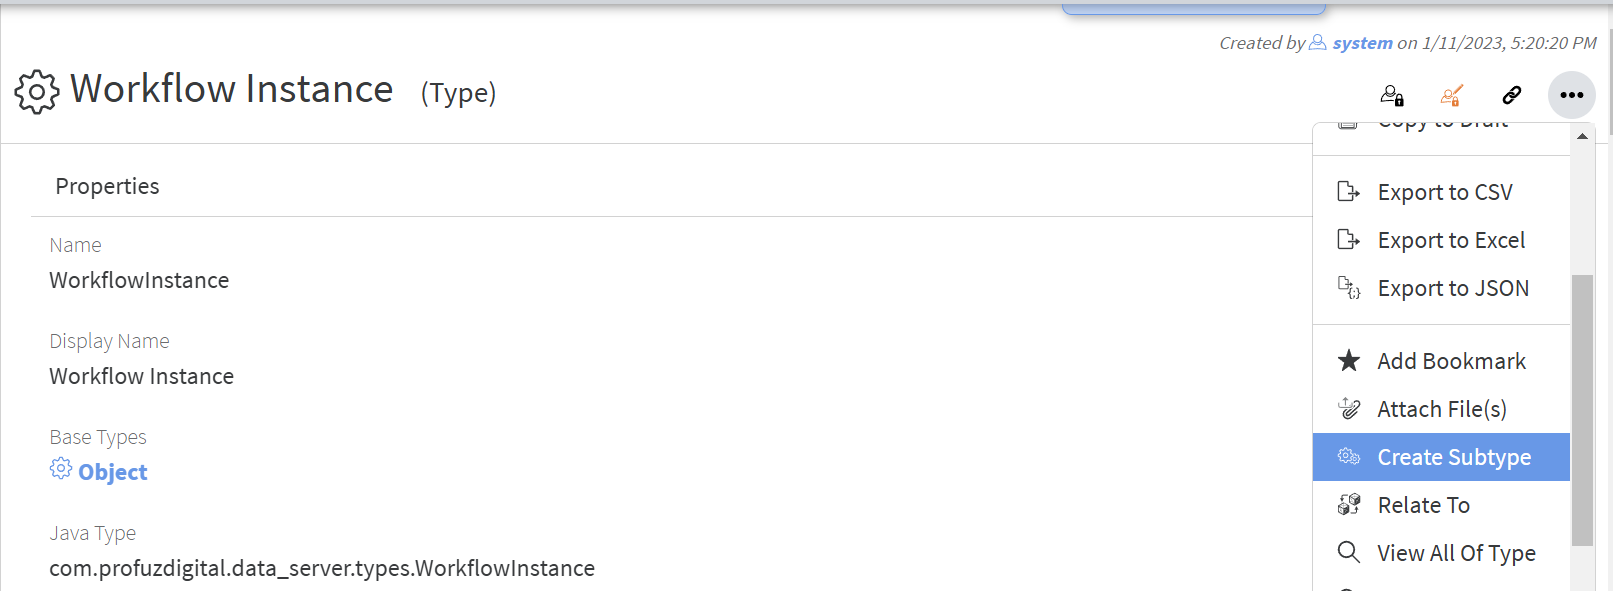](https://docs.profuzdigital.com/uploads/images/gallery/2025-01/51mimage.png)
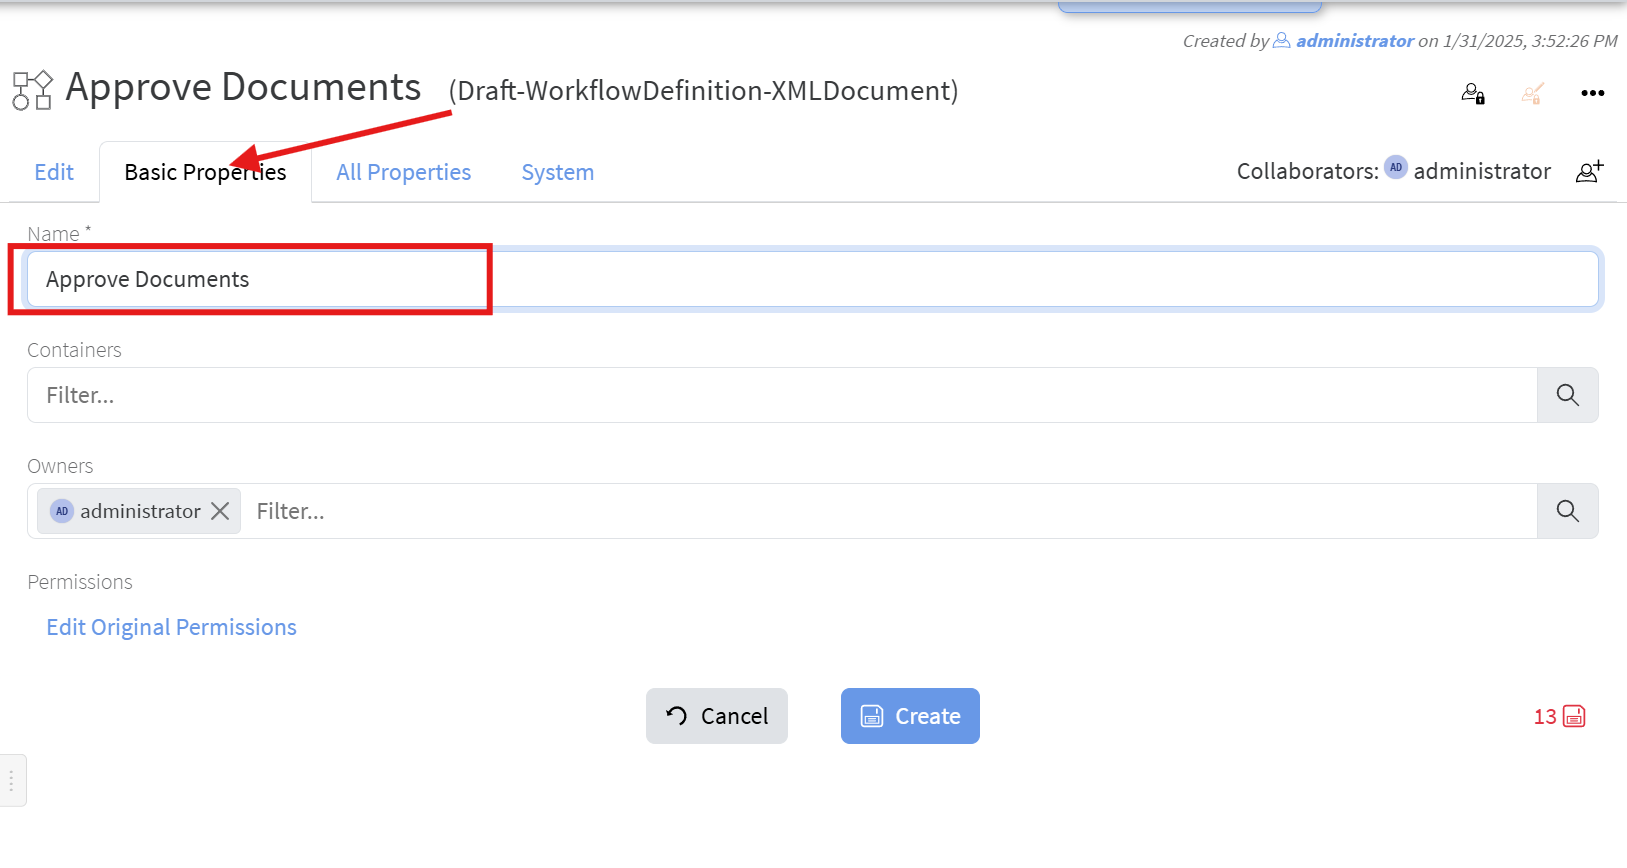
3. Name it "ApproveDocumentsProcess" with display name "Approve Documents":
[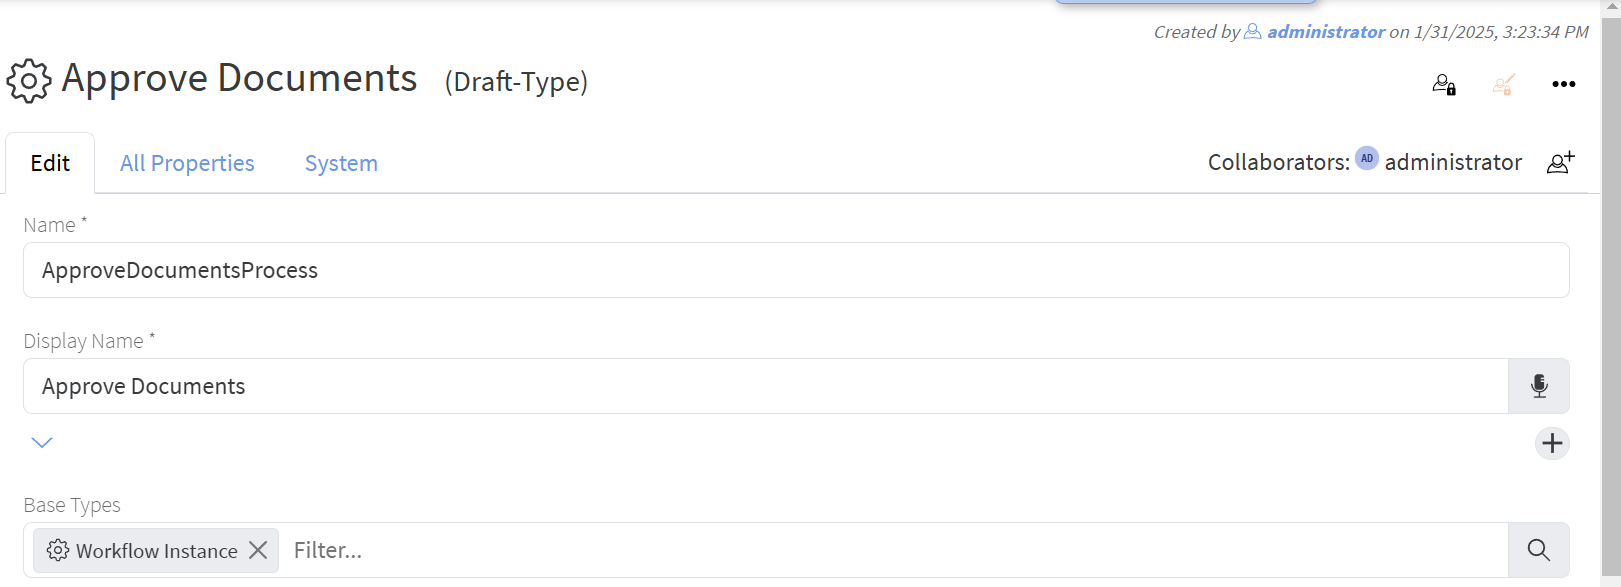](https://docs.profuzdigital.com/uploads/images/gallery/2025-01/dNuimage.png)
4. In the properties add existing properties Assignee, Due Date and Description:
[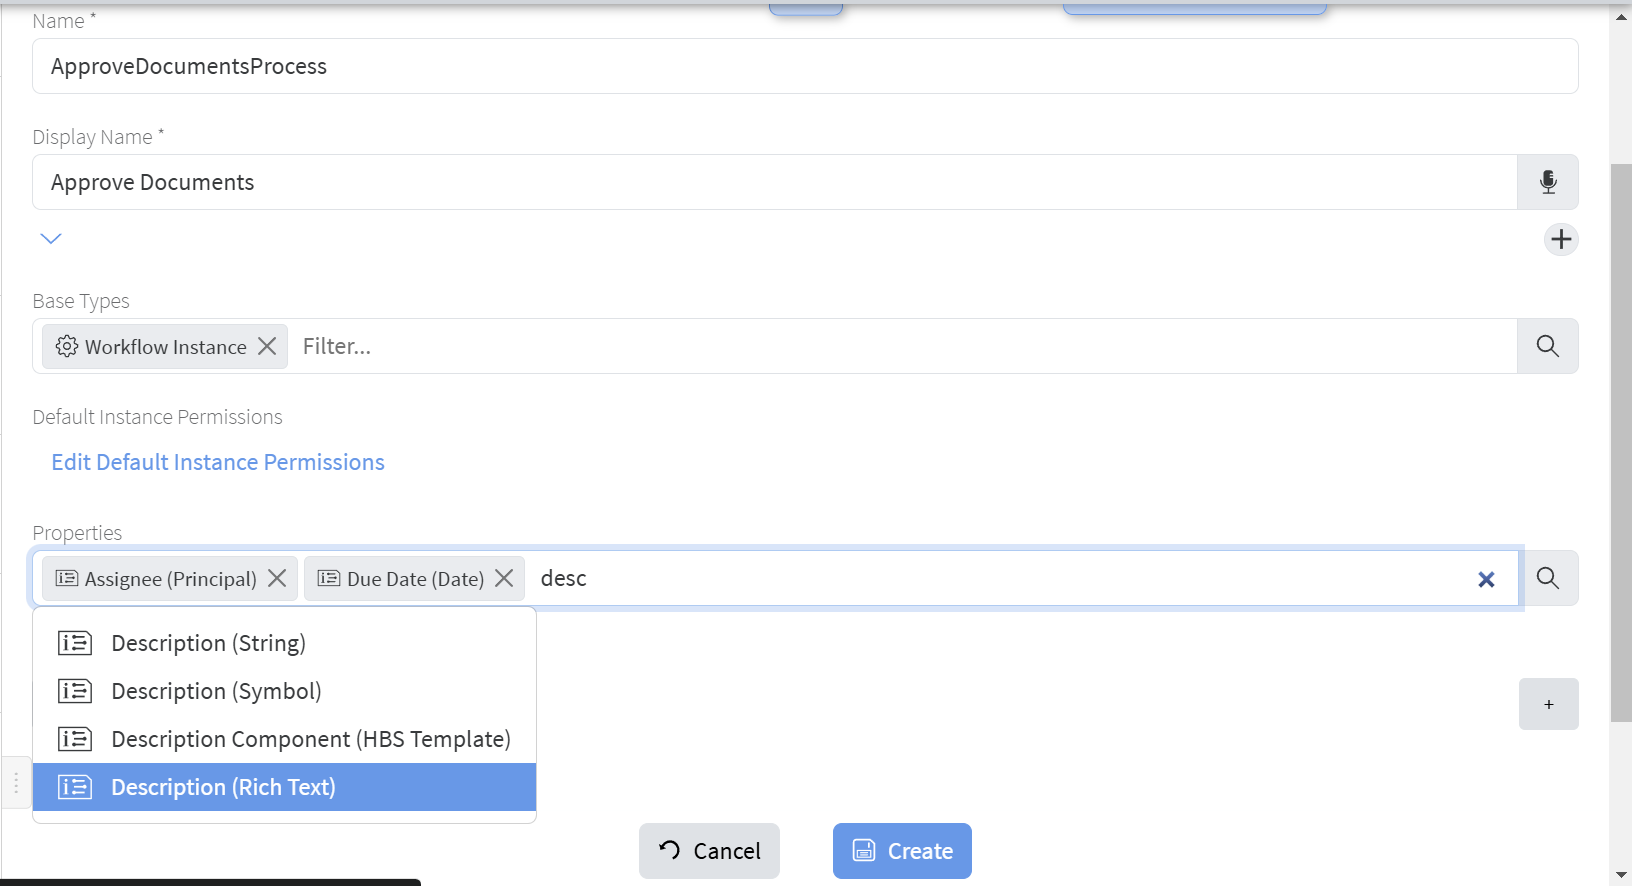](https://docs.profuzdigital.com/uploads/images/gallery/2025-01/Dvtimage.png)
5. Click the "Lens" button next to the Properties field and click "Create New" -> "Property":
[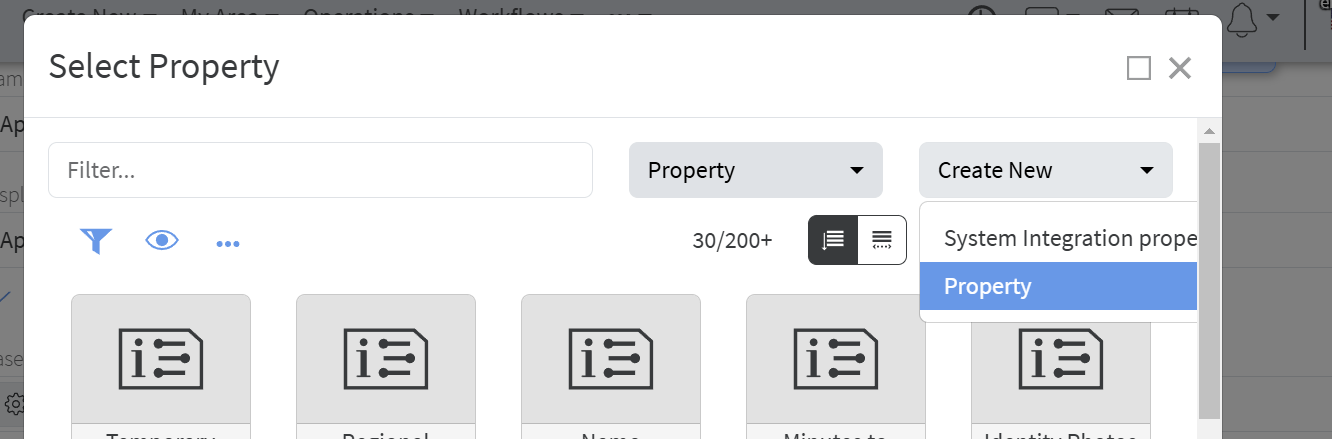](https://docs.profuzdigital.com/uploads/images/gallery/2025-01/v66image.png)
6. Fill the following details (name: documents, count: 1 or more, property type: Document):
[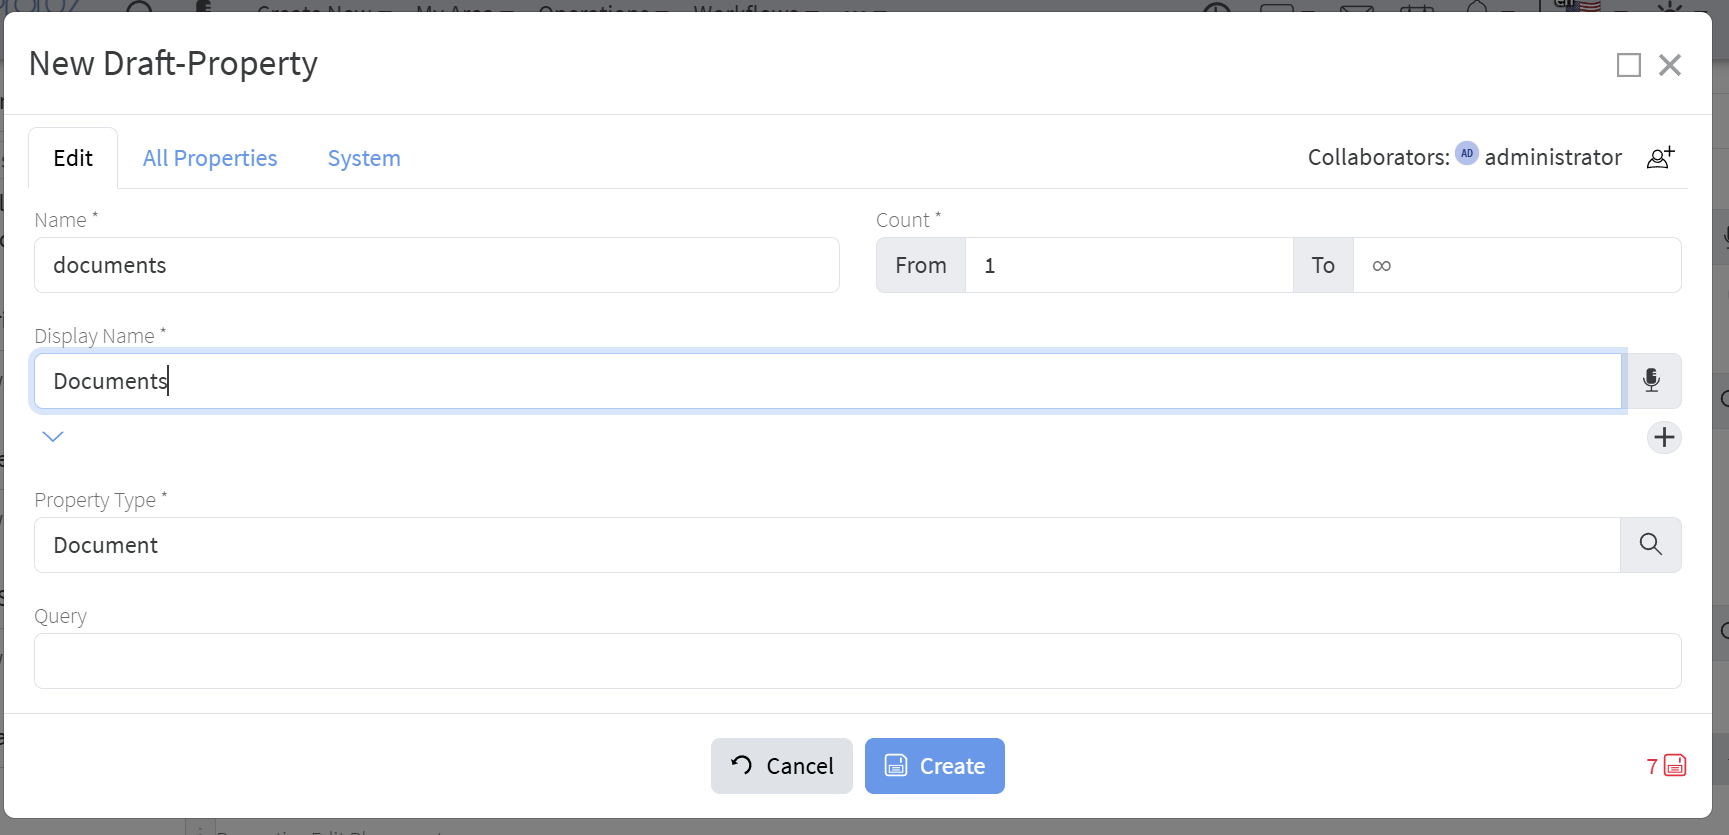](https://docs.profuzdigital.com/uploads/images/gallery/2025-01/T0Nimage.png)
7. Edit property placements to your likeness:
[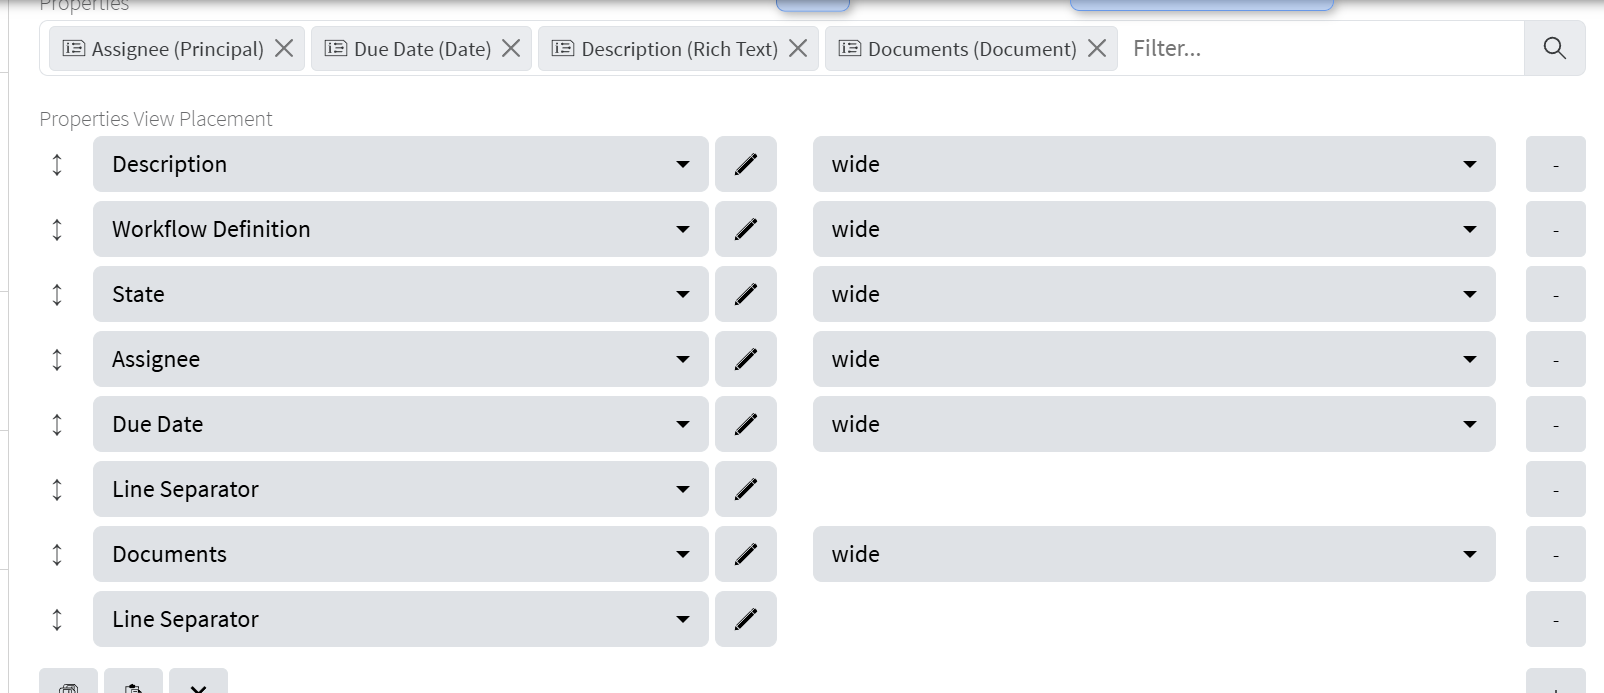](https://docs.profuzdigital.com/uploads/images/gallery/2025-01/CHXimage.png)
[](https://docs.profuzdigital.com/uploads/images/gallery/2025-01/PXJimage.png)
8. Click the "Create" button.
2. Similarly create types for the two approval tasks:
1. You will need two new properties - Comments and Approved:
[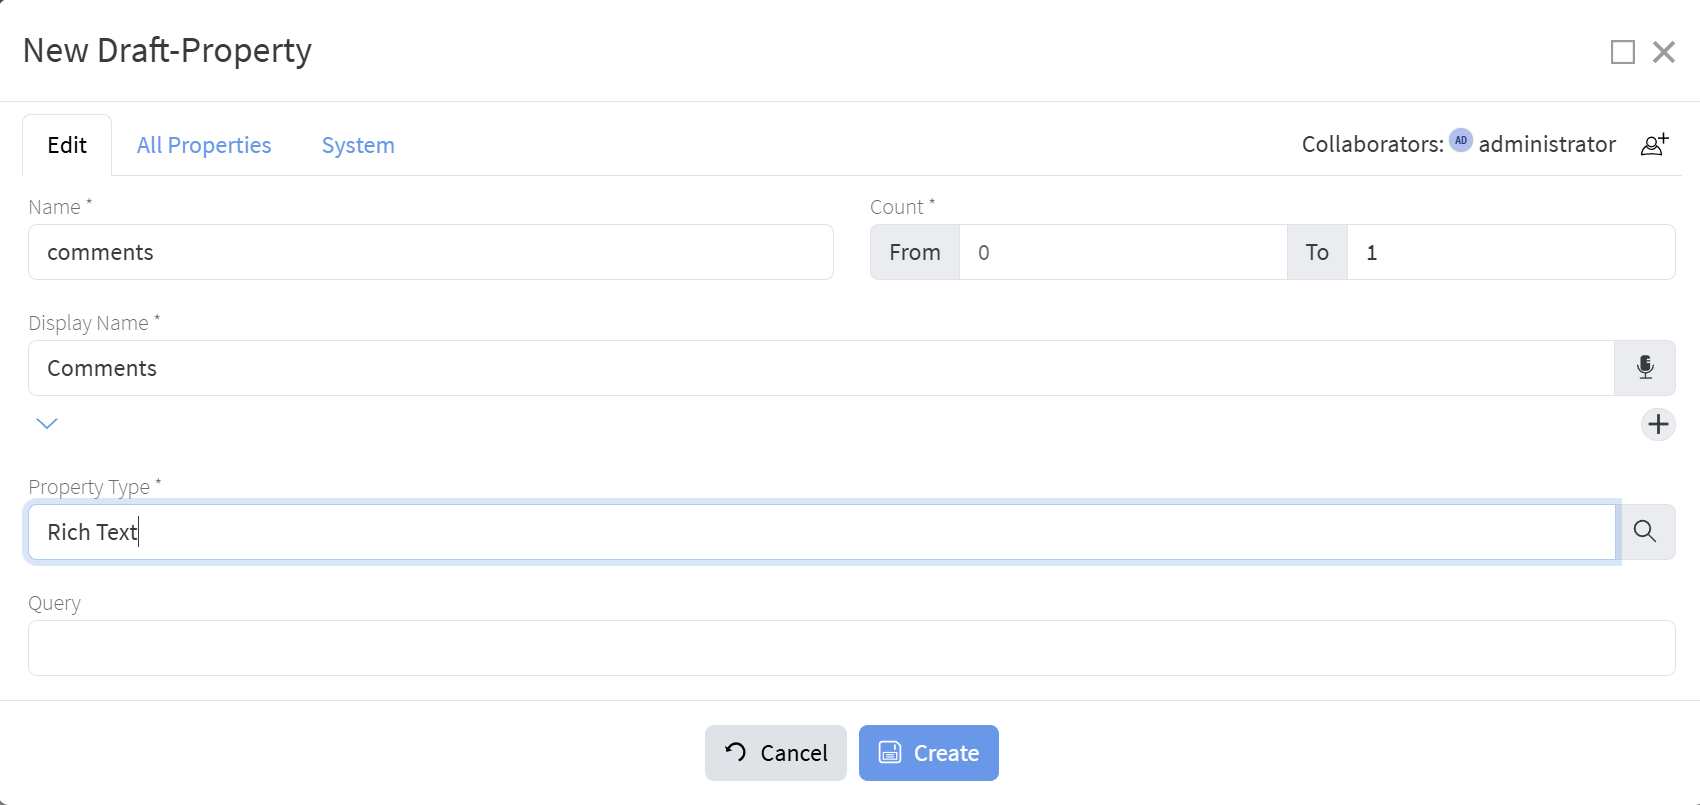](https://docs.profuzdigital.com/uploads/images/gallery/2025-01/KJRimage.png)
[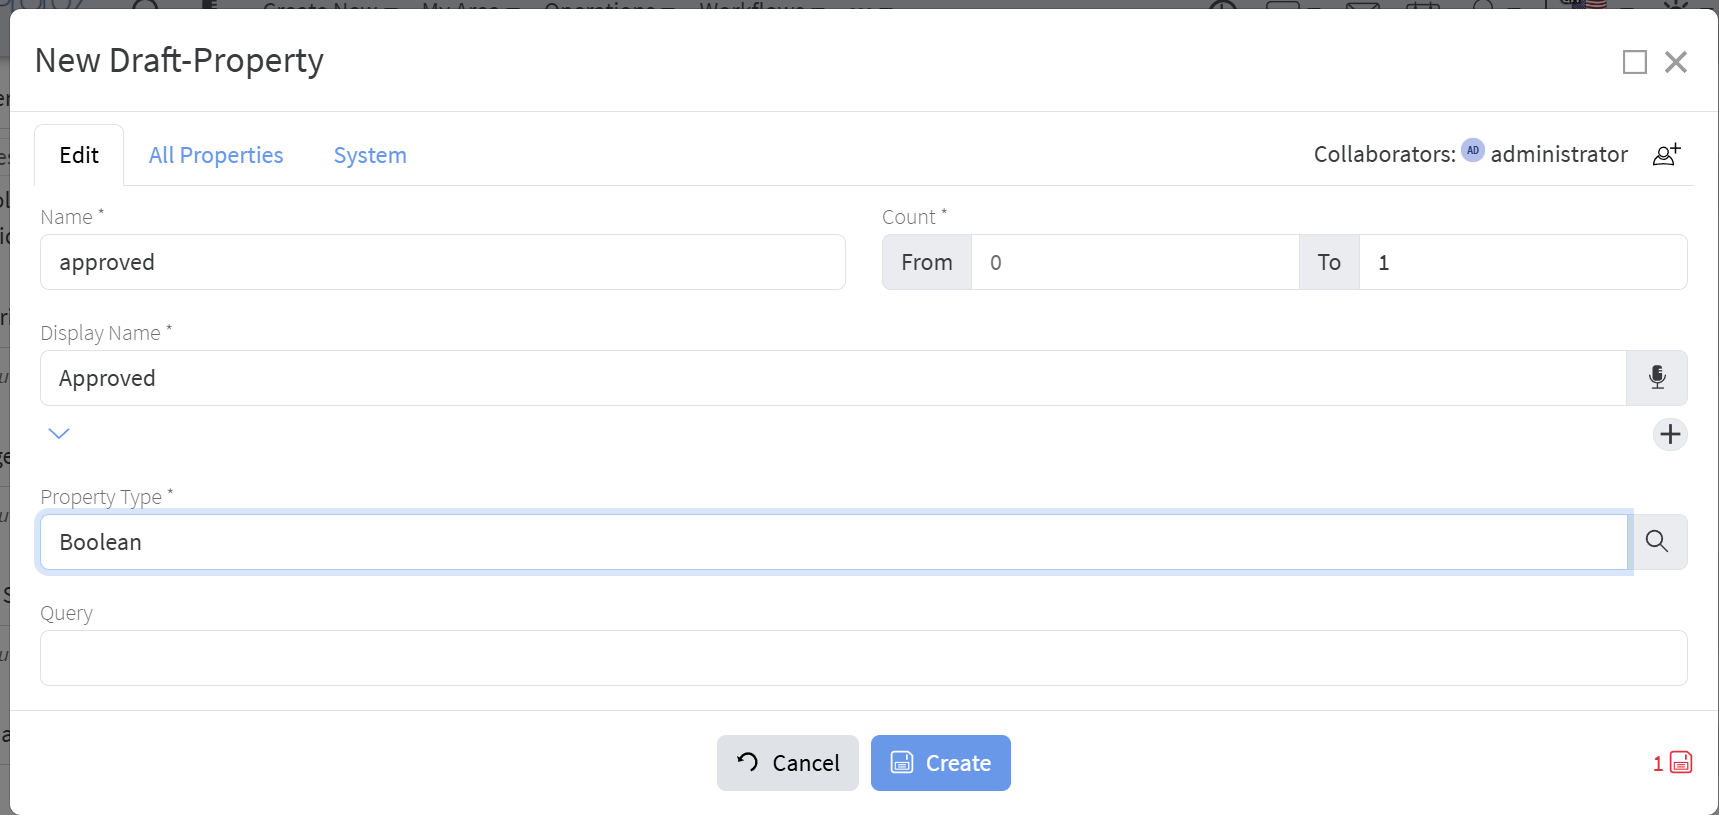](https://docs.profuzdigital.com/uploads/images/gallery/2025-01/rggimage.png)
2. The Workflow Approve Task:
[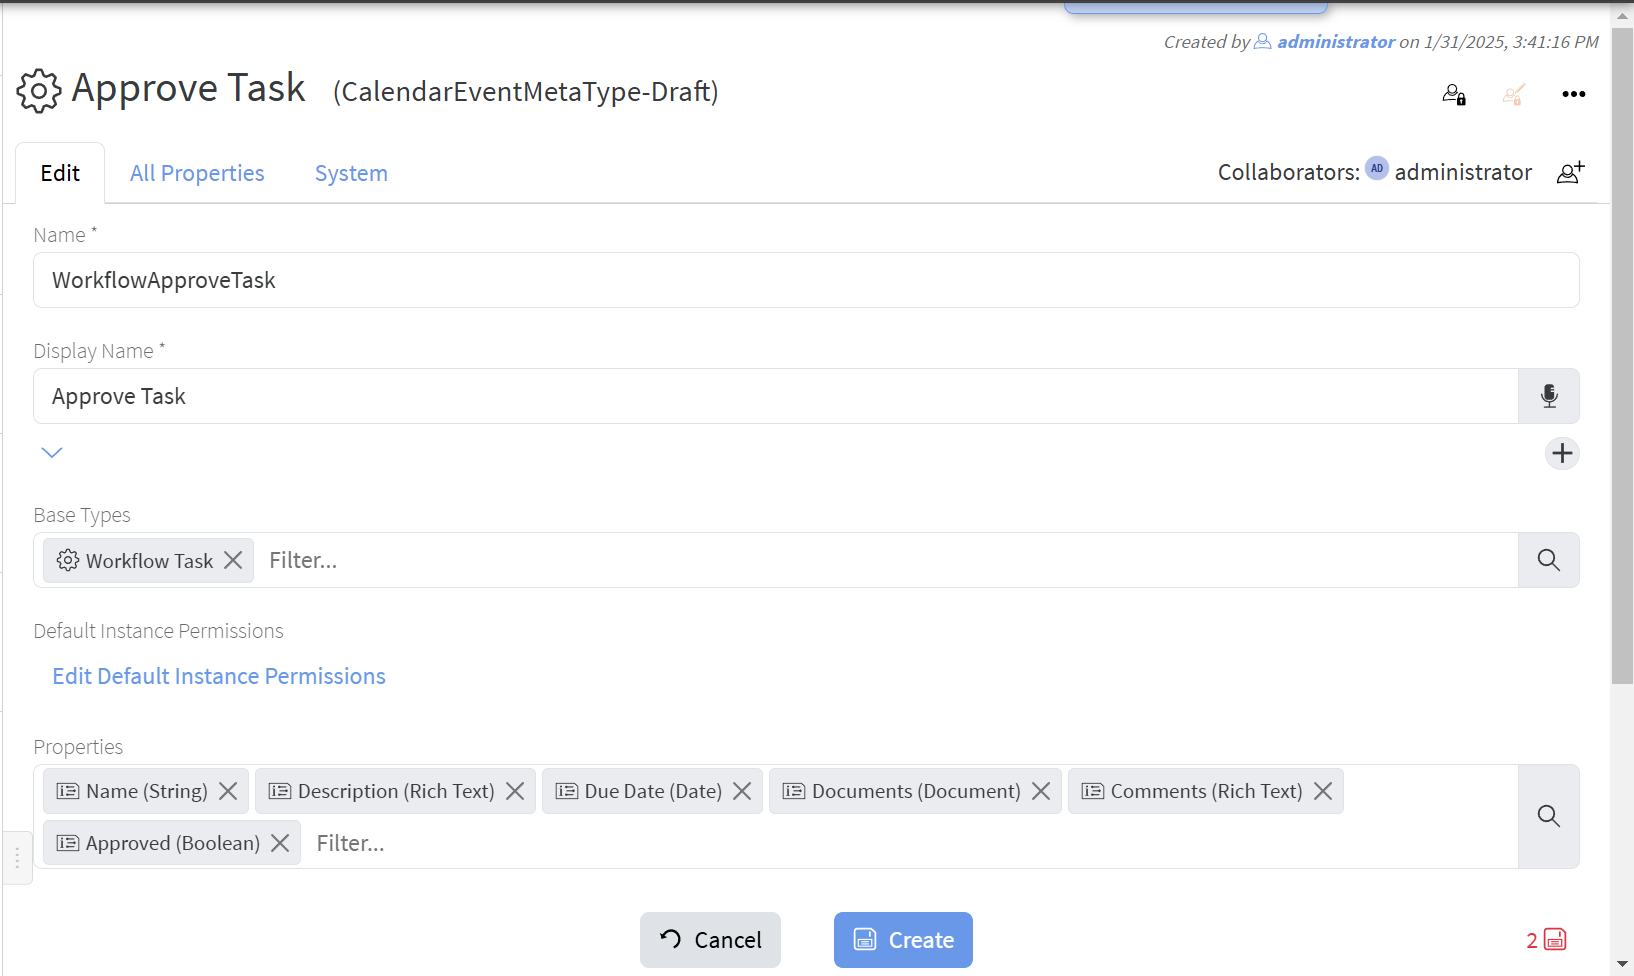](https://docs.profuzdigital.com/uploads/images/gallery/2025-01/GONimage.png)
3. Workflow Approve Done Task:
[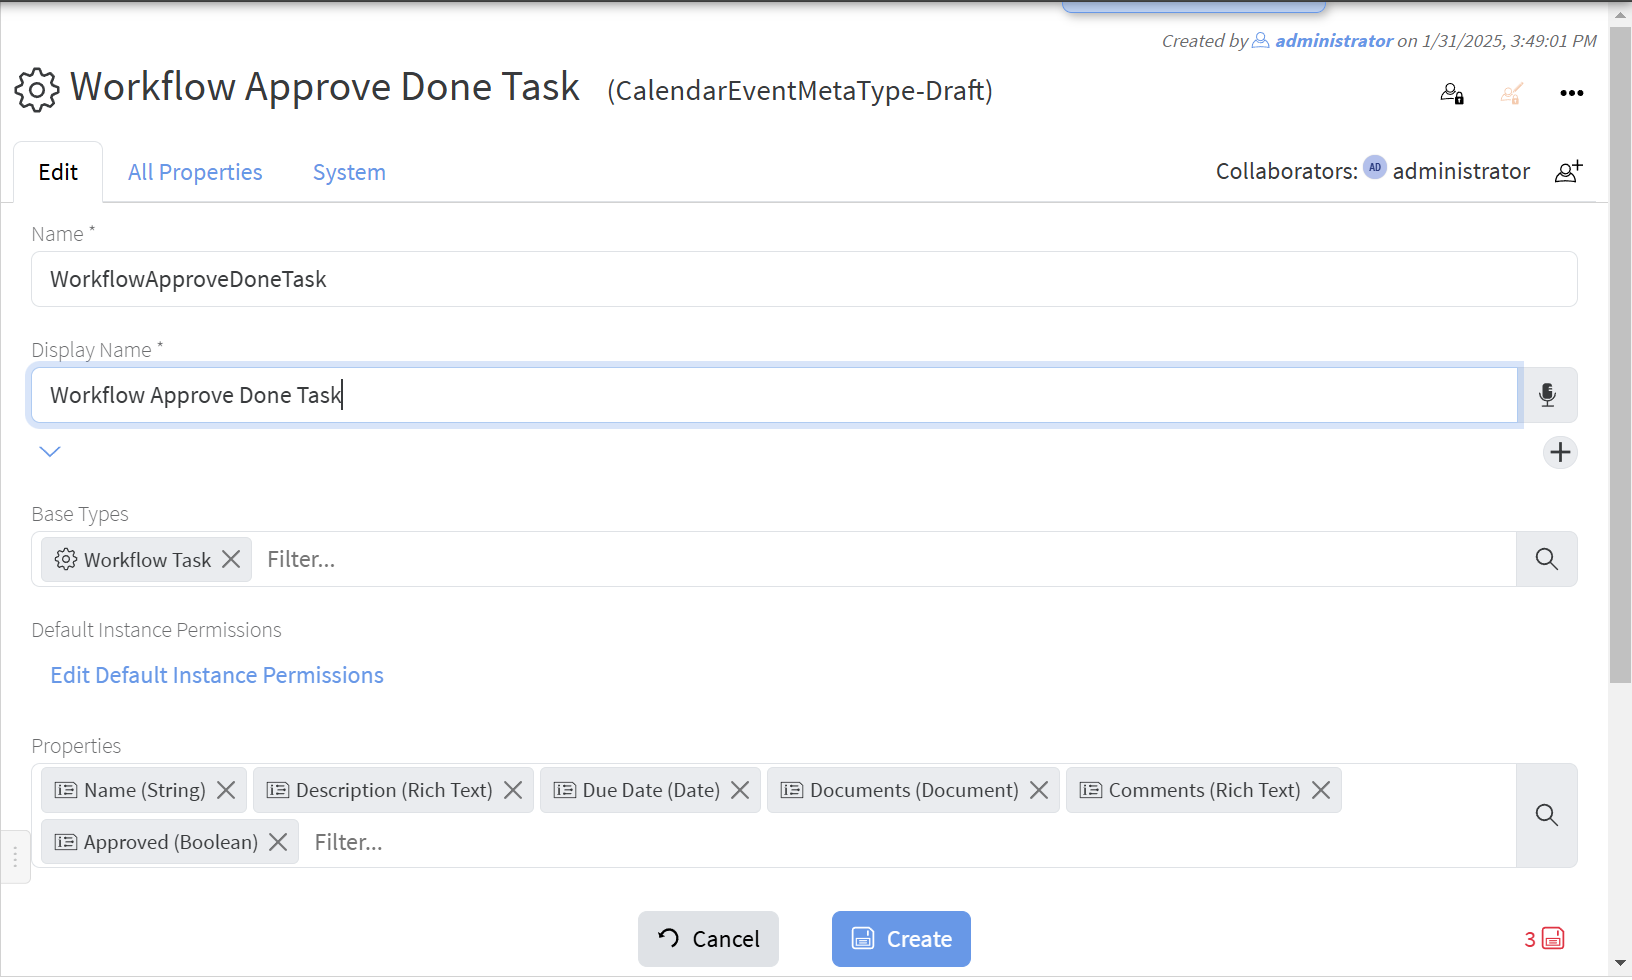](https://docs.profuzdigital.com/uploads/images/gallery/2025-01/YJnimage.png)
Now we are ready to create the workflow definition:
1. From the Workflows dropdown menu select "Create New":
[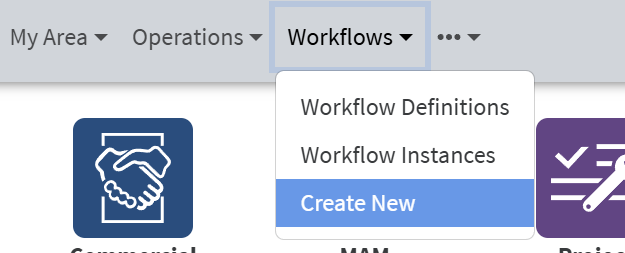](https://docs.profuzdigital.com/uploads/images/gallery/2025-01/qBHimage.png)
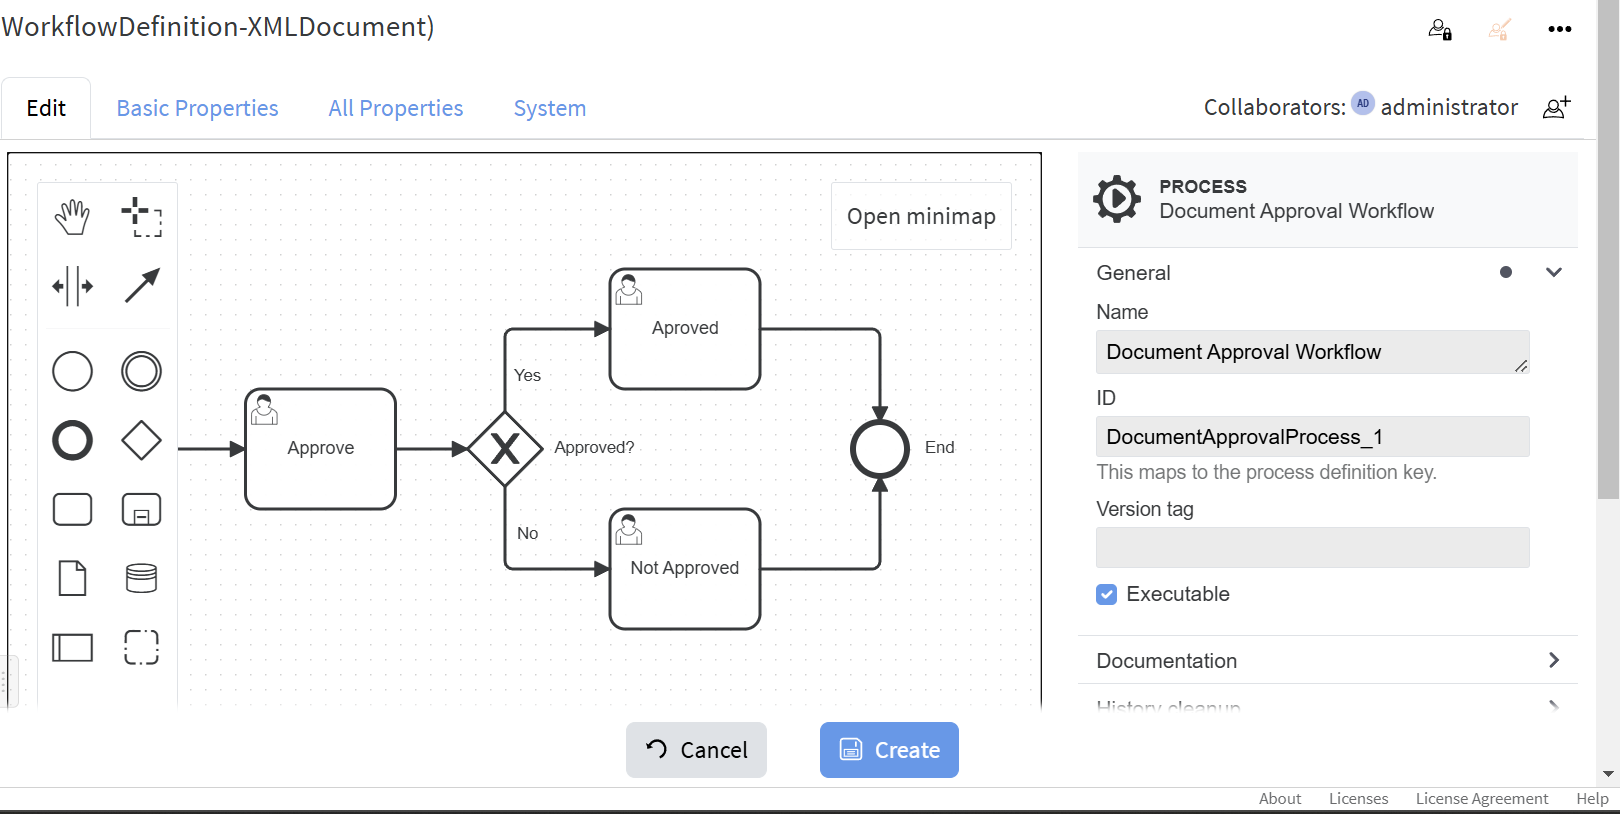
2. Set the properties of the process. Expand "General", fill Name and ID (must be unique in your installation) and check "Executable":
[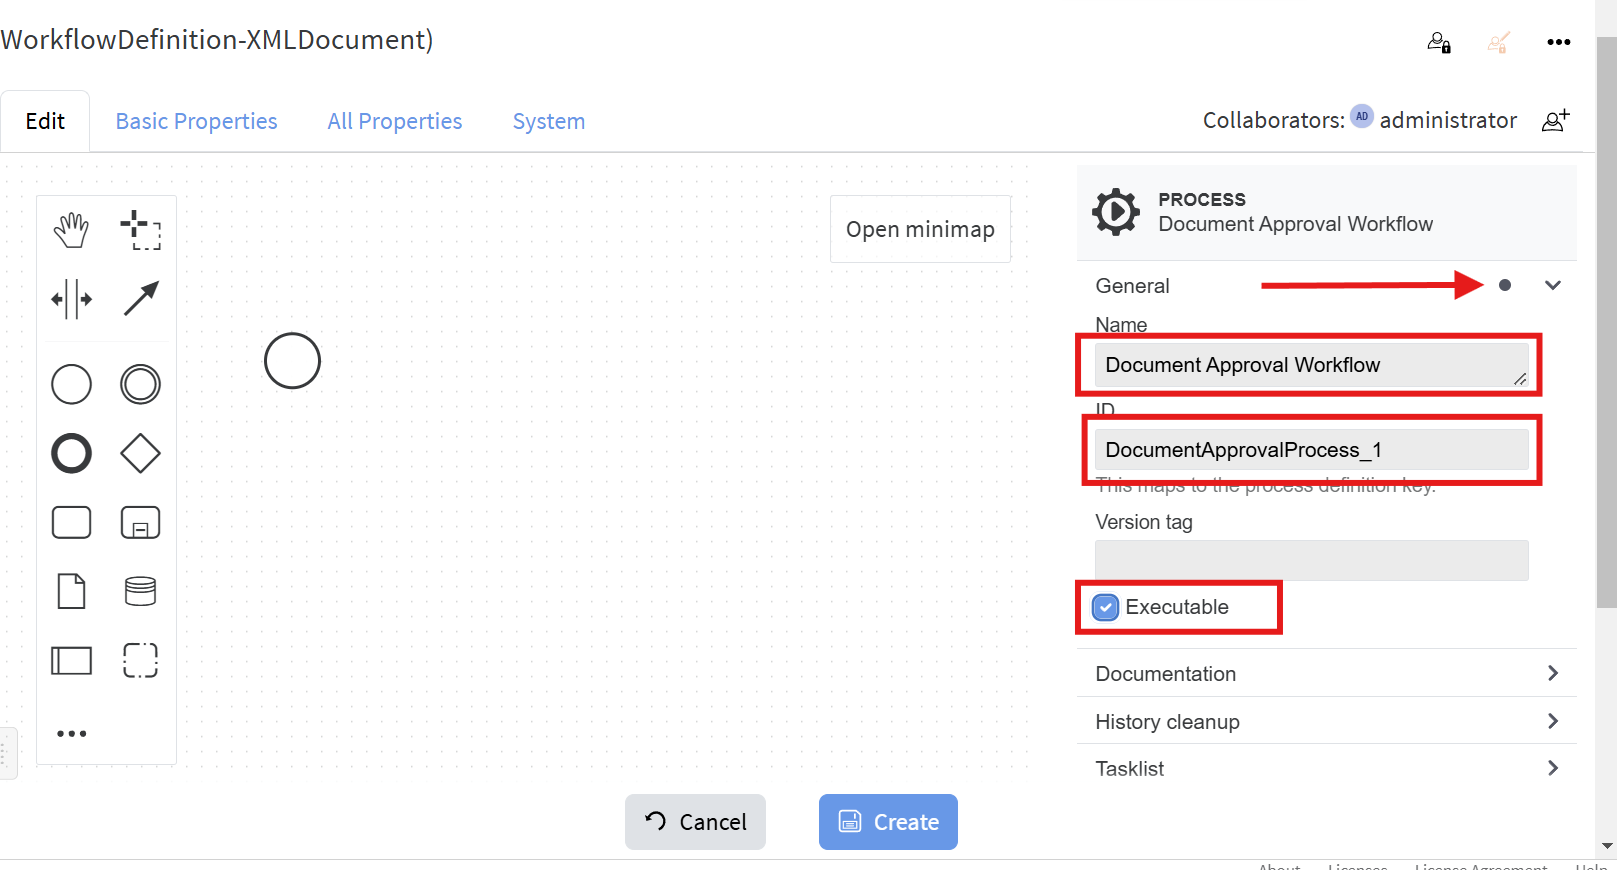](https://docs.profuzdigital.com/uploads/images/gallery/2025-01/A5Aimage.png)
3. Select the start event (the only circle in the process diagram) and fill its properties. For the Form key put the name of newly created Workflow Instance's subtype "ApproveDocumentsProcess":
[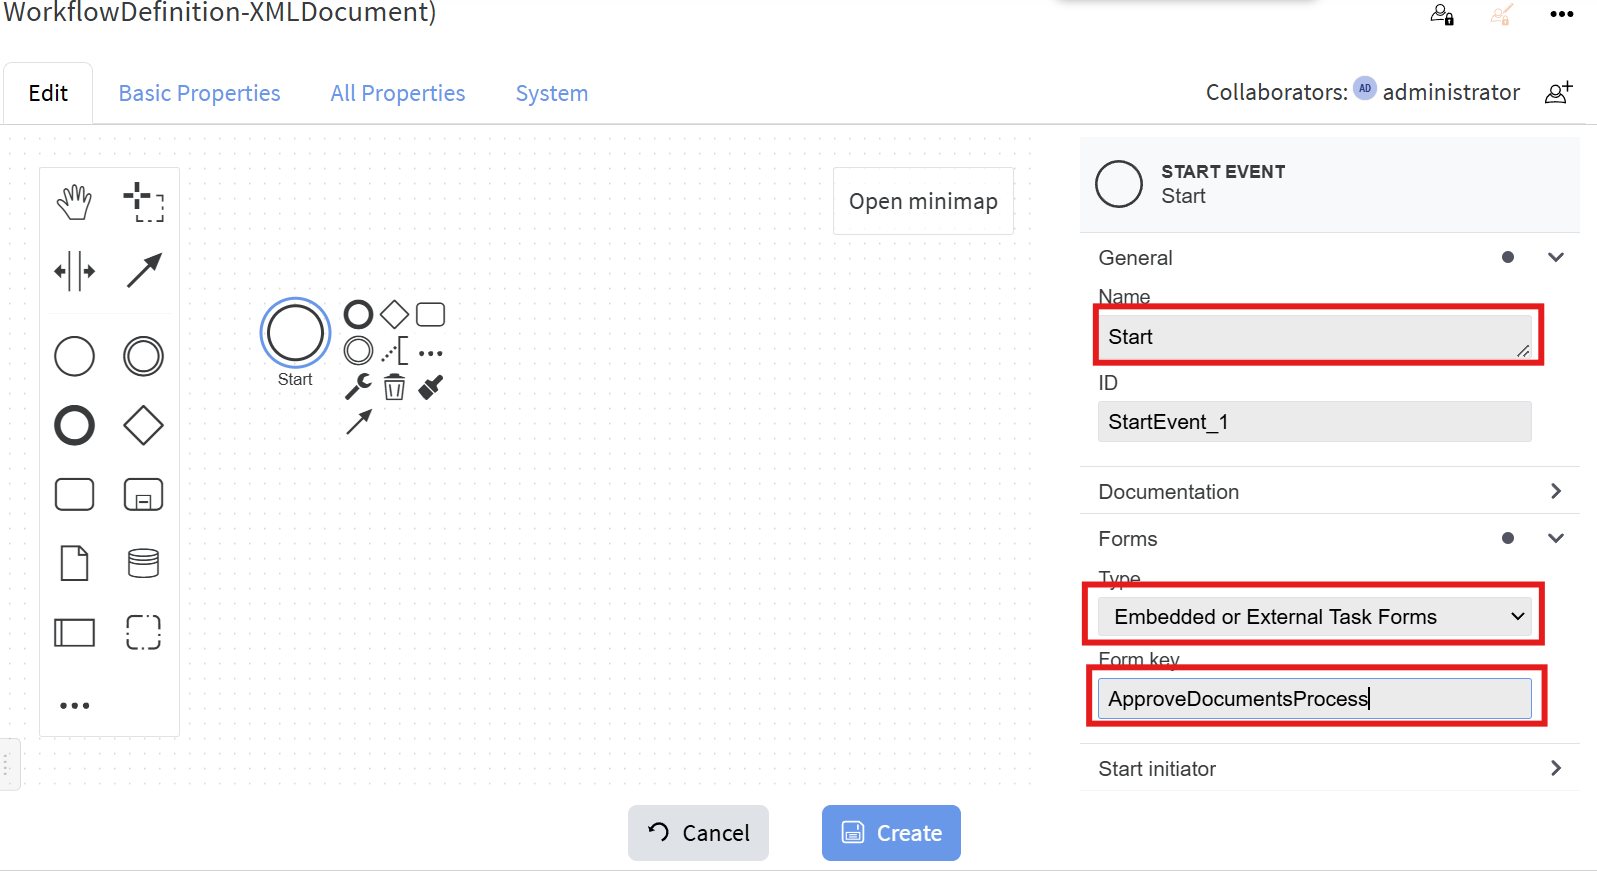](https://docs.profuzdigital.com/uploads/images/gallery/2025-01/82bimage.png)
4. Create two Execution listeners for **start** and **complete** and put the corresponding inline Groovy scripts to each of those:
[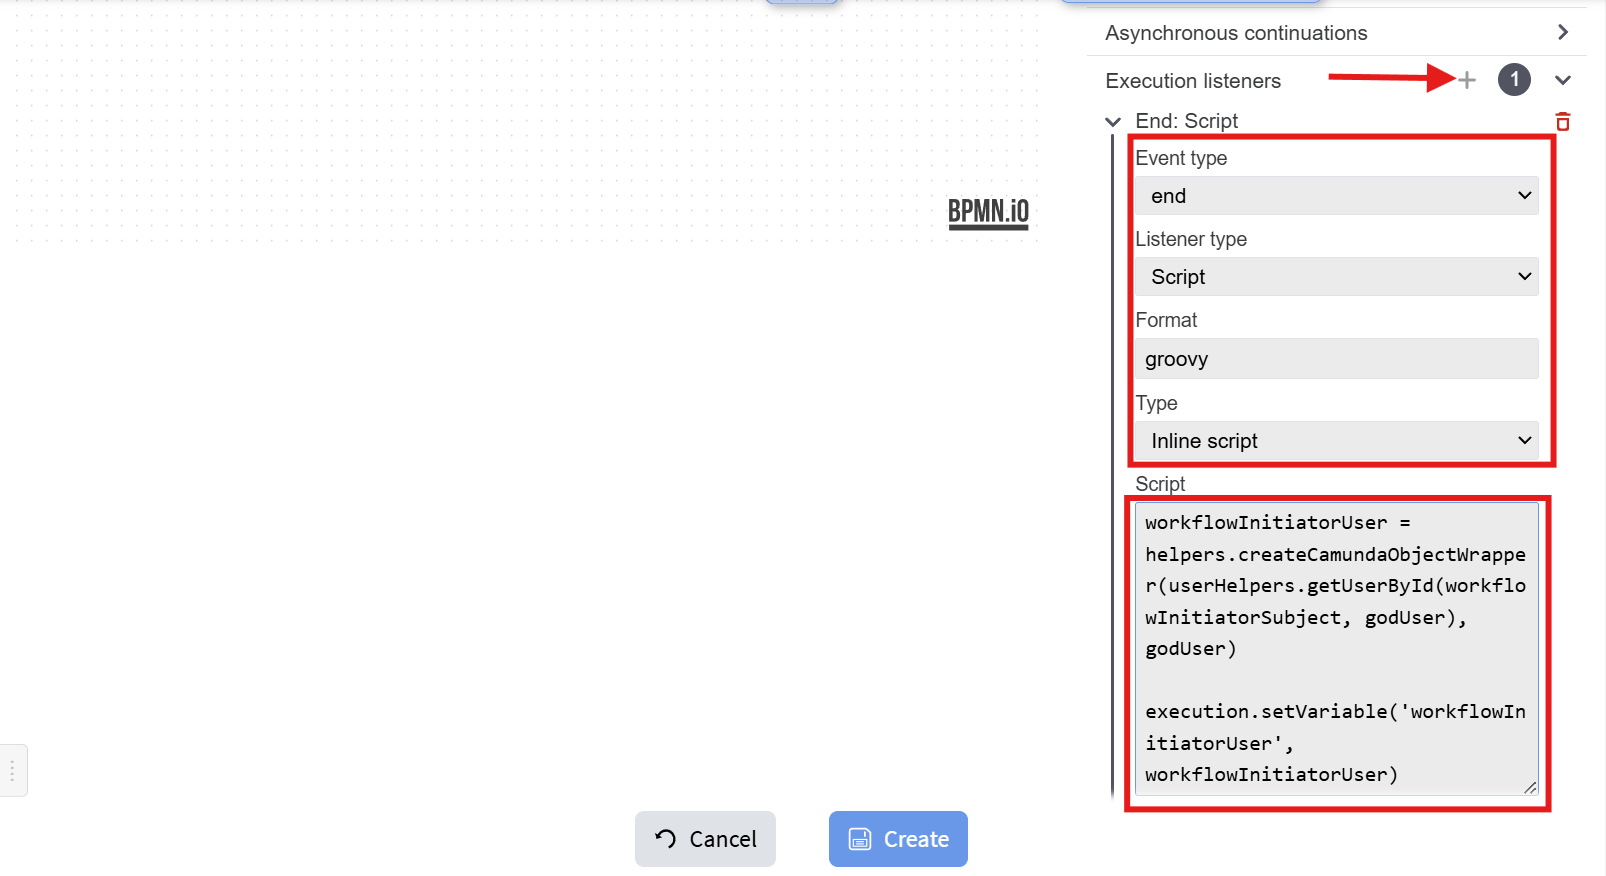](https://docs.profuzdigital.com/uploads/images/gallery/2025-01/LXlimage.png)
The script is: ```java
def workflowInitiatorUser = helpers.createCamundaObjectWrapper(userHelpers.getUserById(workflowInitiatorSubject, godUser), godUser)
execution.setVariable('workflowInitiatorUser', workflowInitiatorUser)
```
It sets the variable **workflowInitiatorUser** which will be used in other parts of the workflow.
5. Click on "Append Task" next to the Start event to create the next step:
[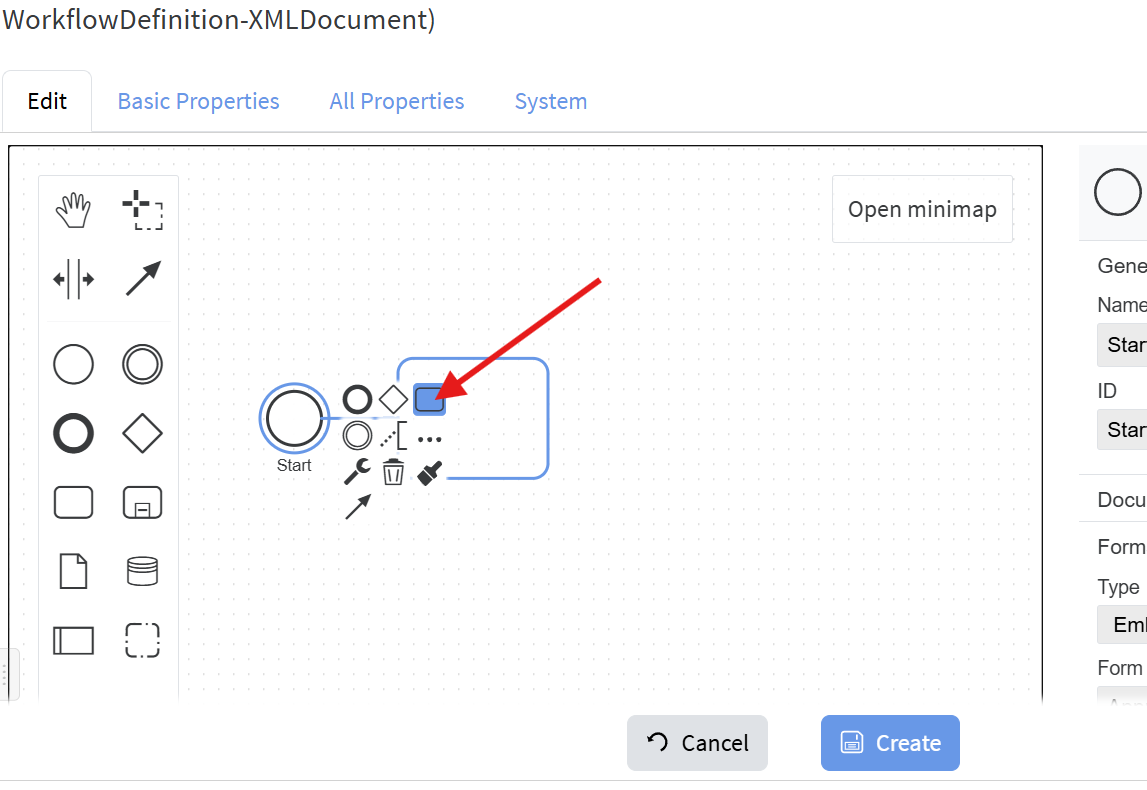](https://docs.profuzdigital.com/uploads/images/gallery/2025-01/q77image.png)
6. Click "Change Element" and select "User Task":
[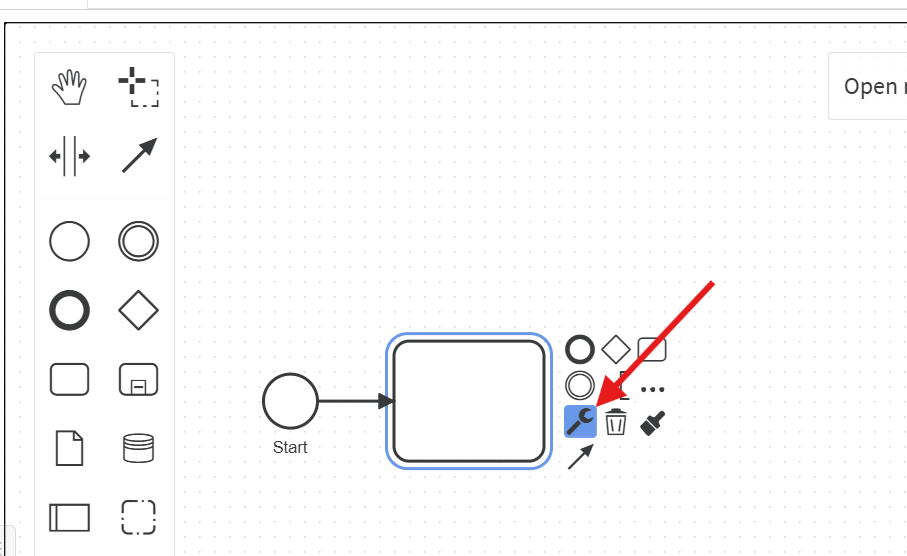](https://docs.profuzdigital.com/uploads/images/gallery/2025-01/9Uoimage.png)
[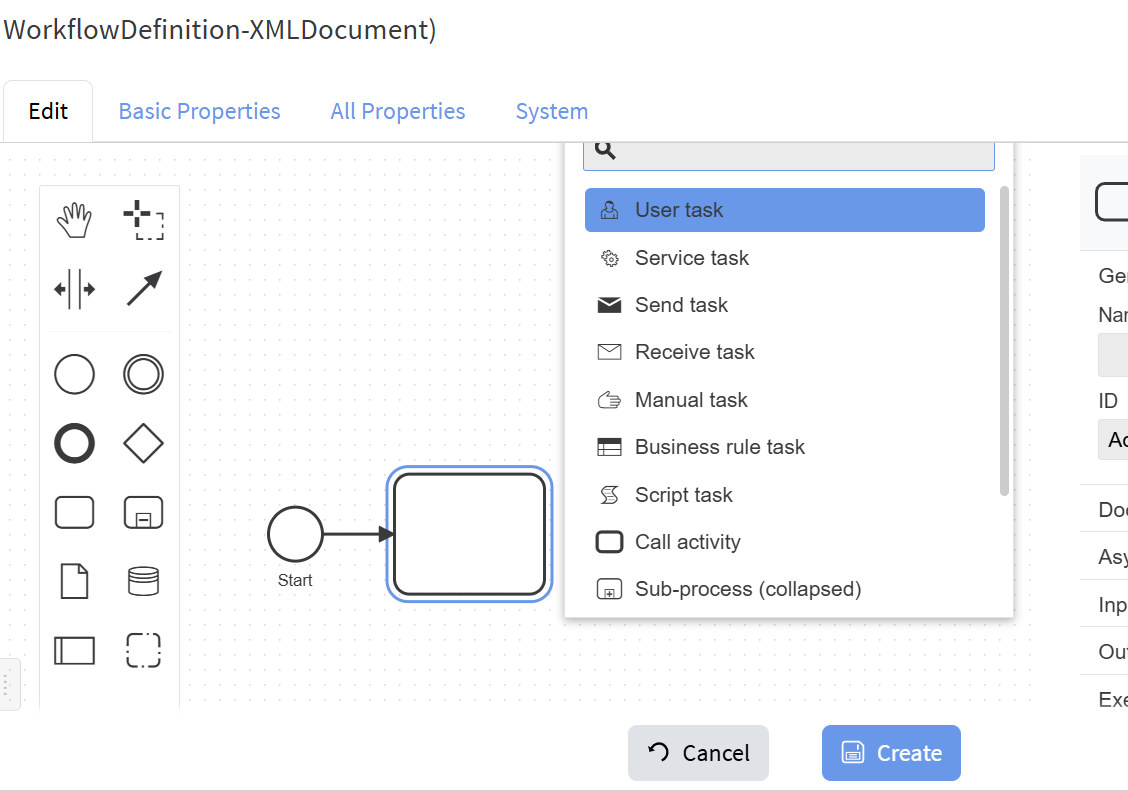](https://docs.profuzdigital.com/uploads/images/gallery/2025-01/1vcimage.png)
7. Set the properties of the step:
[](https://docs.profuzdigital.com/uploads/images/gallery/2025-01/oO2image.png)
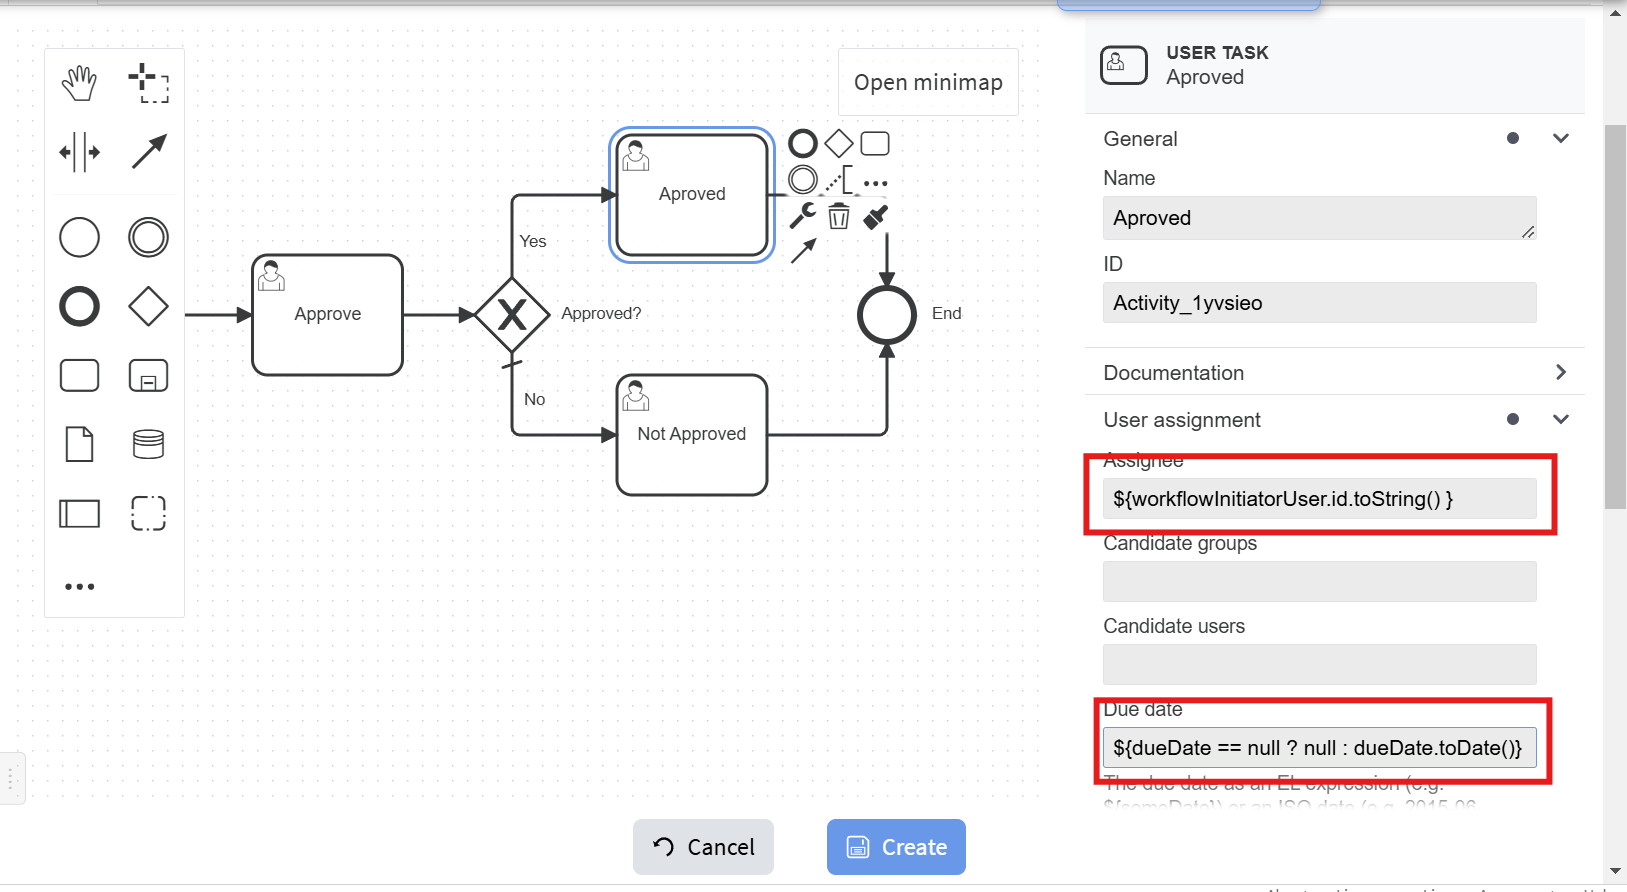
For **Assignee** enter: `${assignee != null ? assignee.id.toString() : null}` . For **Due Date** enter: `${dueDate == null ? null : dueDate.toDate()}`.
[](https://docs.profuzdigital.com/uploads/images/gallery/2025-01/yocimage.png)
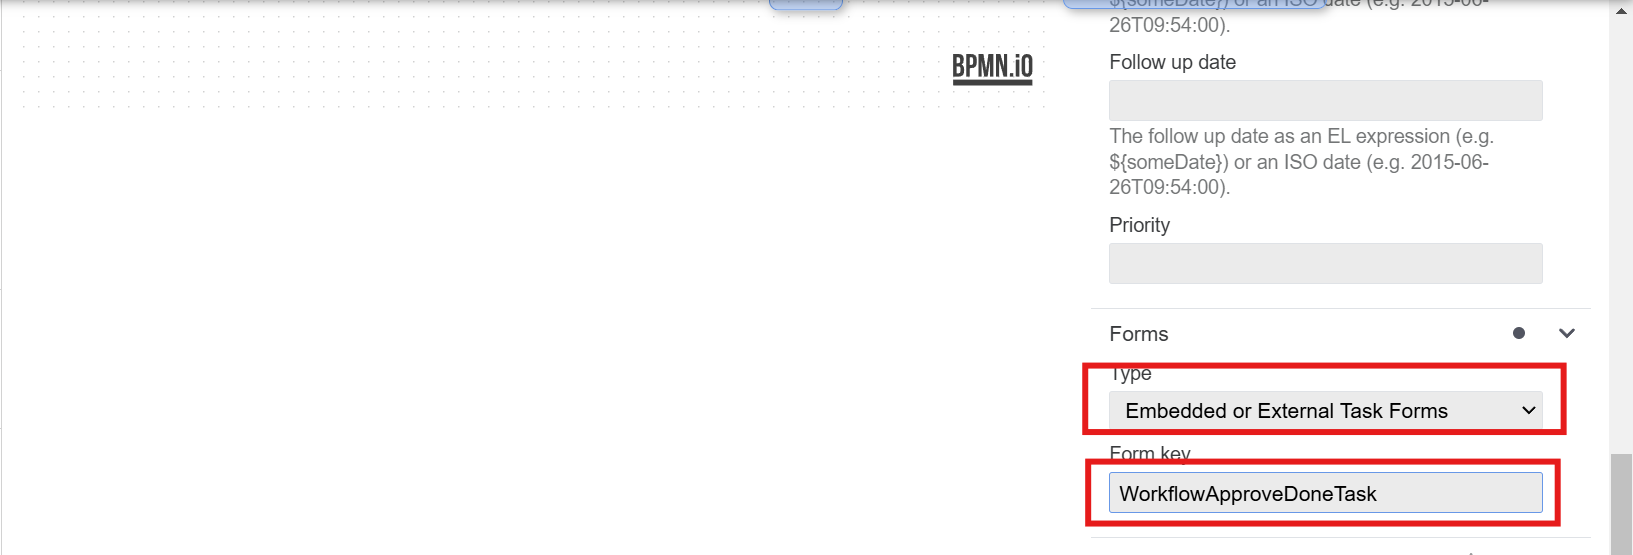
For **Form Key** use the name of the newly created workflow task type **WorkflowApproveTask**.
8. Add two Task listeners for **create** and **complete** events:
[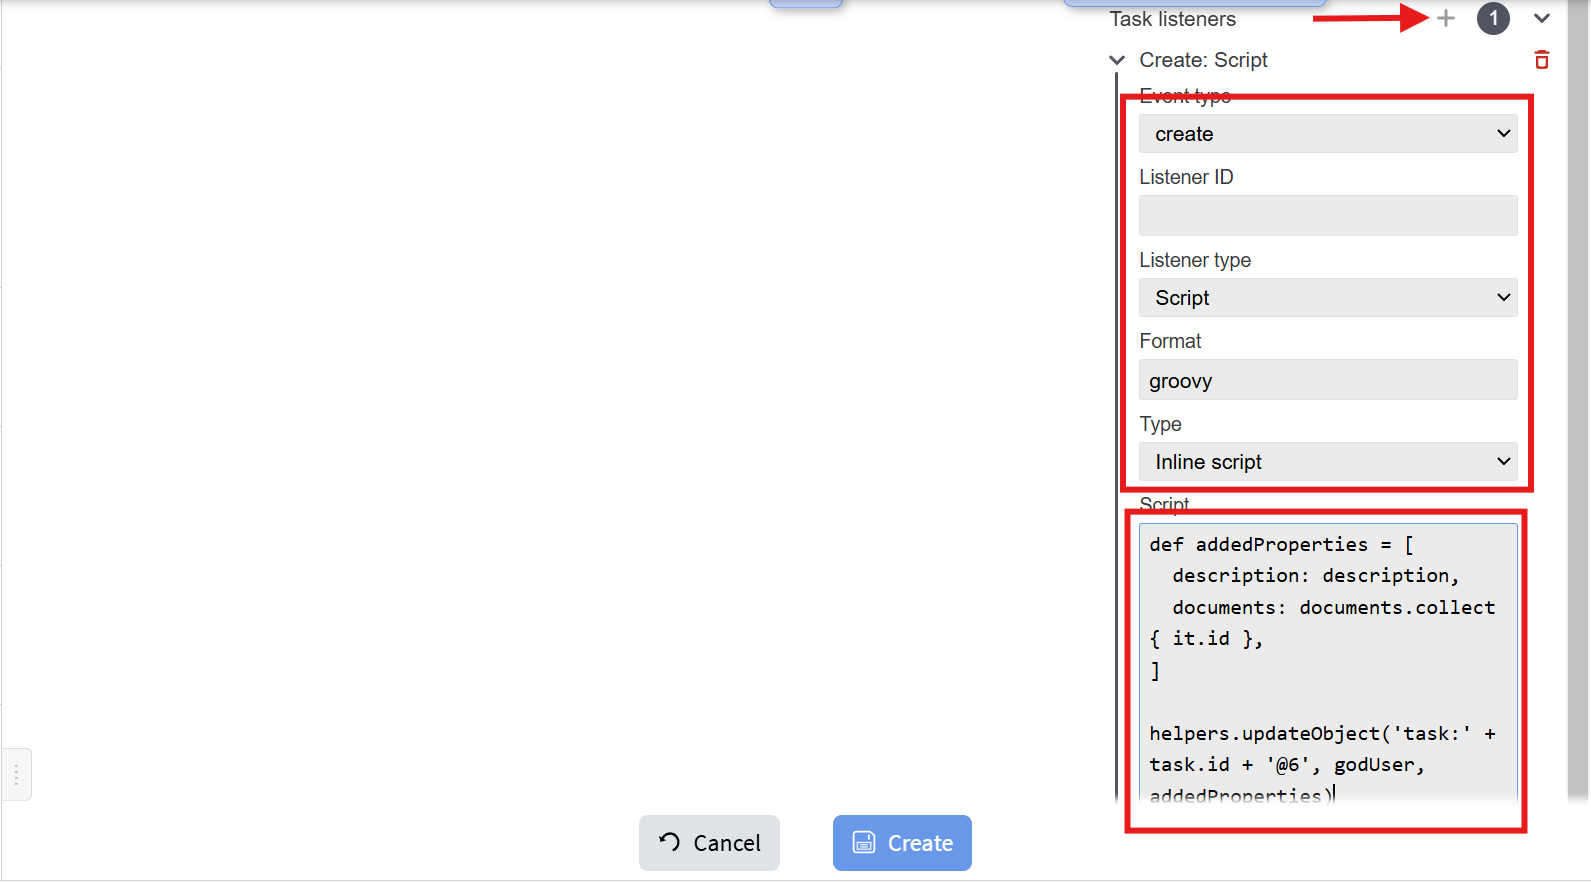](https://docs.profuzdigital.com/uploads/images/gallery/2025-01/Z45image.png)
Script is:
```java
def addedProperties = [
description: description,
documents: documents.collect { it.id },
]
helpers.updateObject('task:' + task.id + '@6', godUser, addedProperties)
```
which sets the **description** and **documents** properties to the task.
[](https://docs.profuzdigital.com/uploads/images/gallery/2025-01/wmyimage.png)
Script for the **complete** event is:
```java
def thisTask = helpers.getObjectById('task:' + task.id + '@6', godUser)
task.execution.setVariable('approved', thisTask.get('approved'))
task.execution.setVariableLocal('comment', thisTask.get('comment'))
```
which sets the **approved** and **comment** properties to the process.
9. Add and connect the next steps, and fill their properties:
[](https://docs.profuzdigital.com/uploads/images/gallery/2025-01/qzBimage.png)
10. Select the "No" path and set it as "Default flow":
[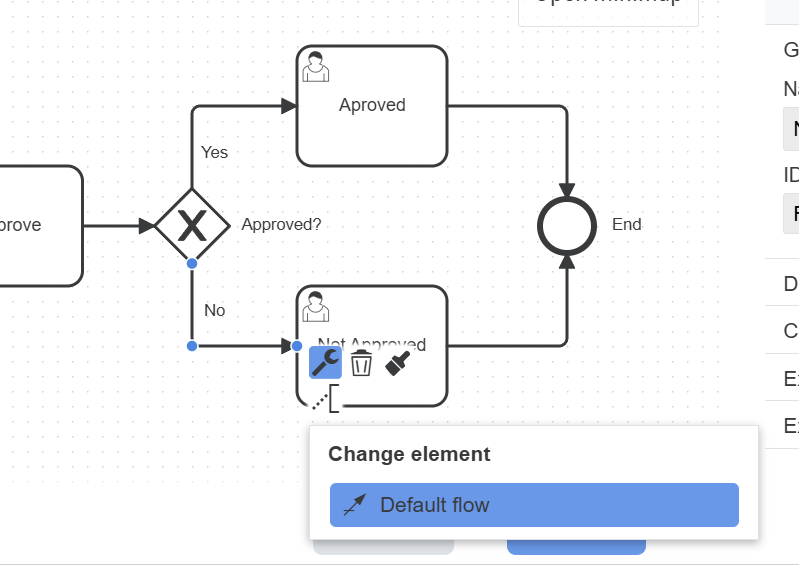](https://docs.profuzdigital.com/uploads/images/gallery/2025-01/LWWimage.png)
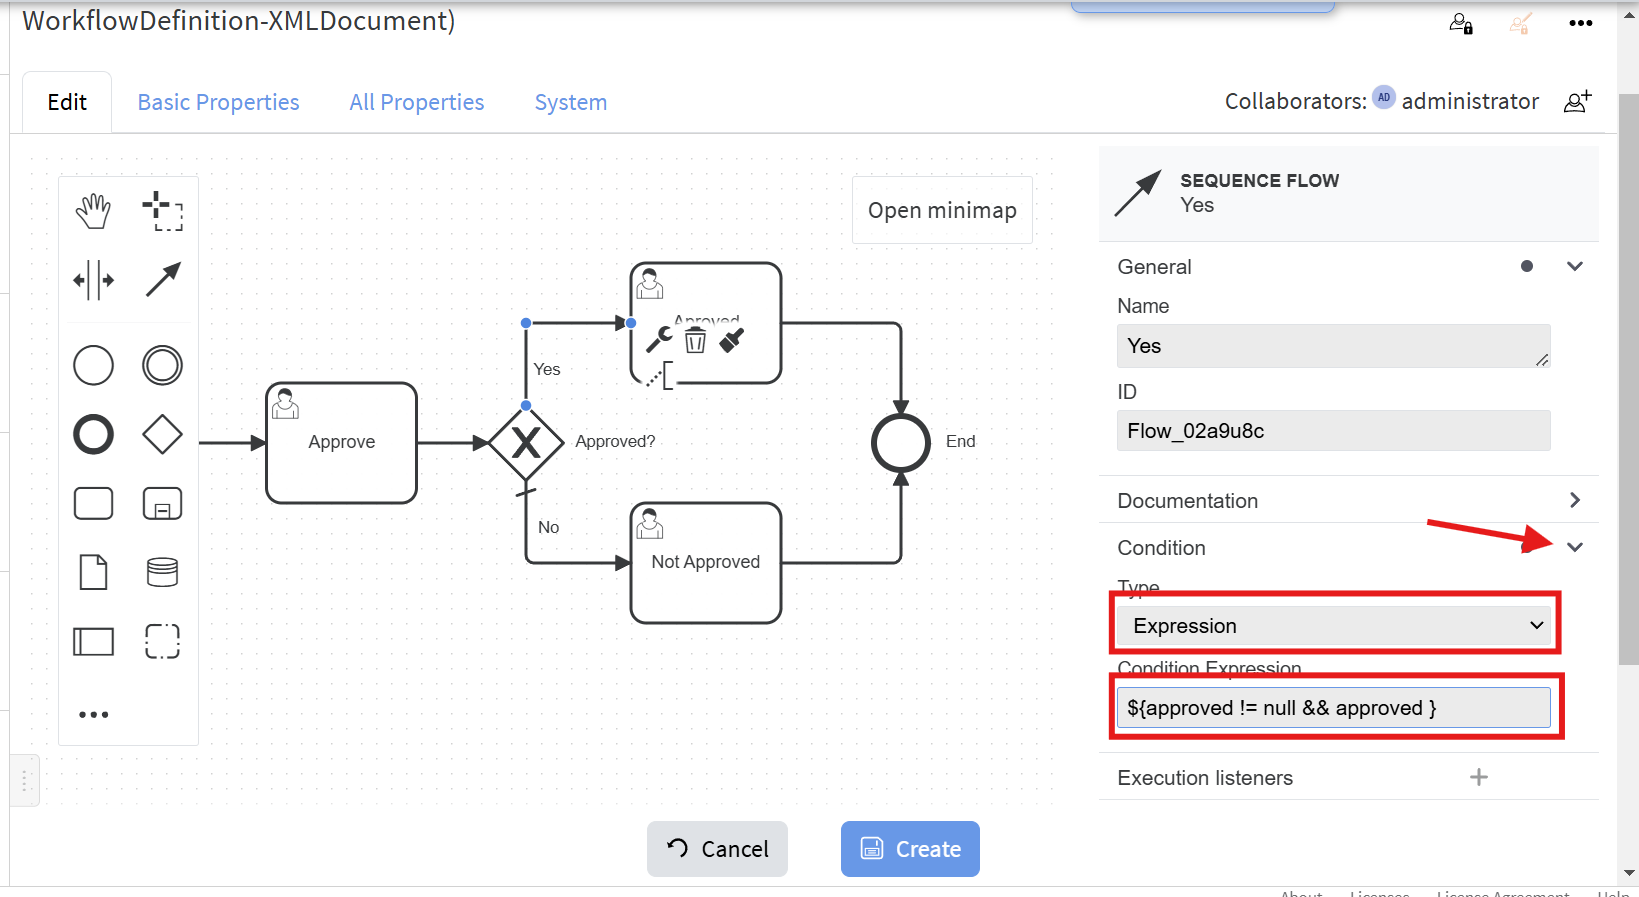
11. Select "Yes" flow and set its properties:
[](https://docs.profuzdigital.com/uploads/images/gallery/2025-01/l0Qimage.png)
Condition expression is: `${approved != null && approved}` , i.e. this path is taken only when the **approved** is set to true in the **Approve** task.
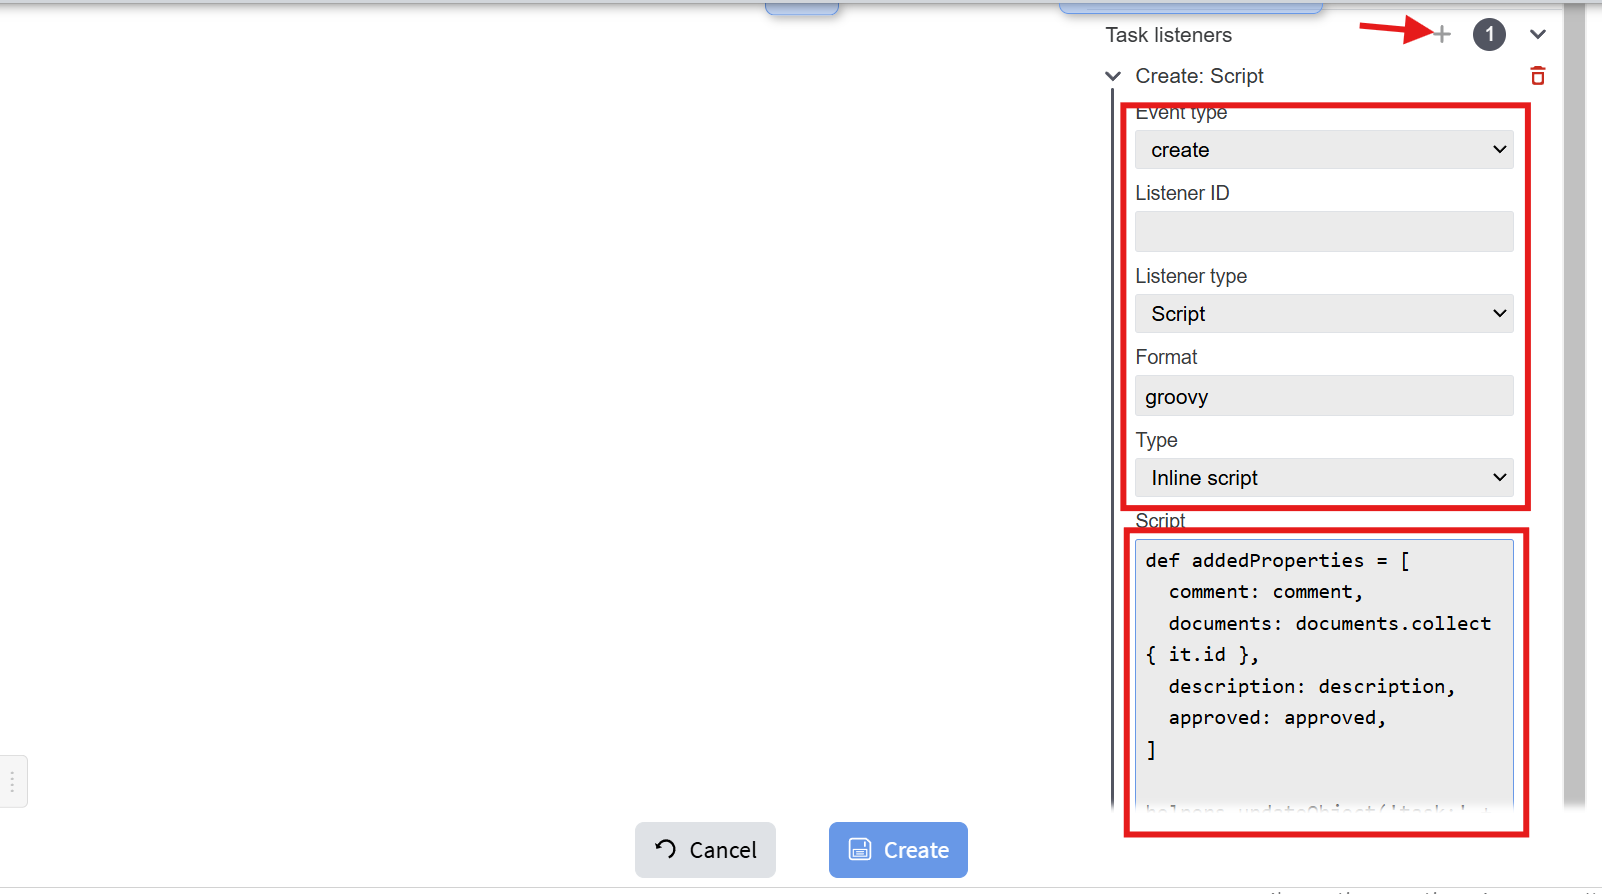
12. Similarly to the **Approve** task set properties of the "**Approved**" and "**Not Approved**" tasks:
[](https://docs.profuzdigital.com/uploads/images/gallery/2025-01/9VMimage.png)
[](https://docs.profuzdigital.com/uploads/images/gallery/2025-01/4yIimage.png)
[](https://docs.profuzdigital.com/uploads/images/gallery/2025-01/6Tximage.png)
For inline script use:
```java
def addedProperties = [
comment: comment,
documents: documents.collect { it.id },
description: description,
approved: approved,
]
helpers.updateObject('task:' + task.id + '@6', godUser, addedProperties)
```
which sets the corresponding properties from the process to tasks.
13. Enter the name of the workflow:
[](https://docs.profuzdigital.com/uploads/images/gallery/2025-01/tZCimage.png)
14. Click the "**Create**" button and your new workflow definition is ready and can be used to create instances based on it.
You can download the BPMN of the above example from [here](https://profuzlapis.com/download/Approve%20Documents.bpmn). The types and properties created for the above example can be downloaded from [here](https://profuzlapis.com/download/Approve%20Documents%20WF%20types%20export.json) and then can be imported through **Operations -> Import/Update from JSON**.
##### Test the new workflow
1. From the **Approve Documents** workflow definition's object menu select "Start Workflow":
[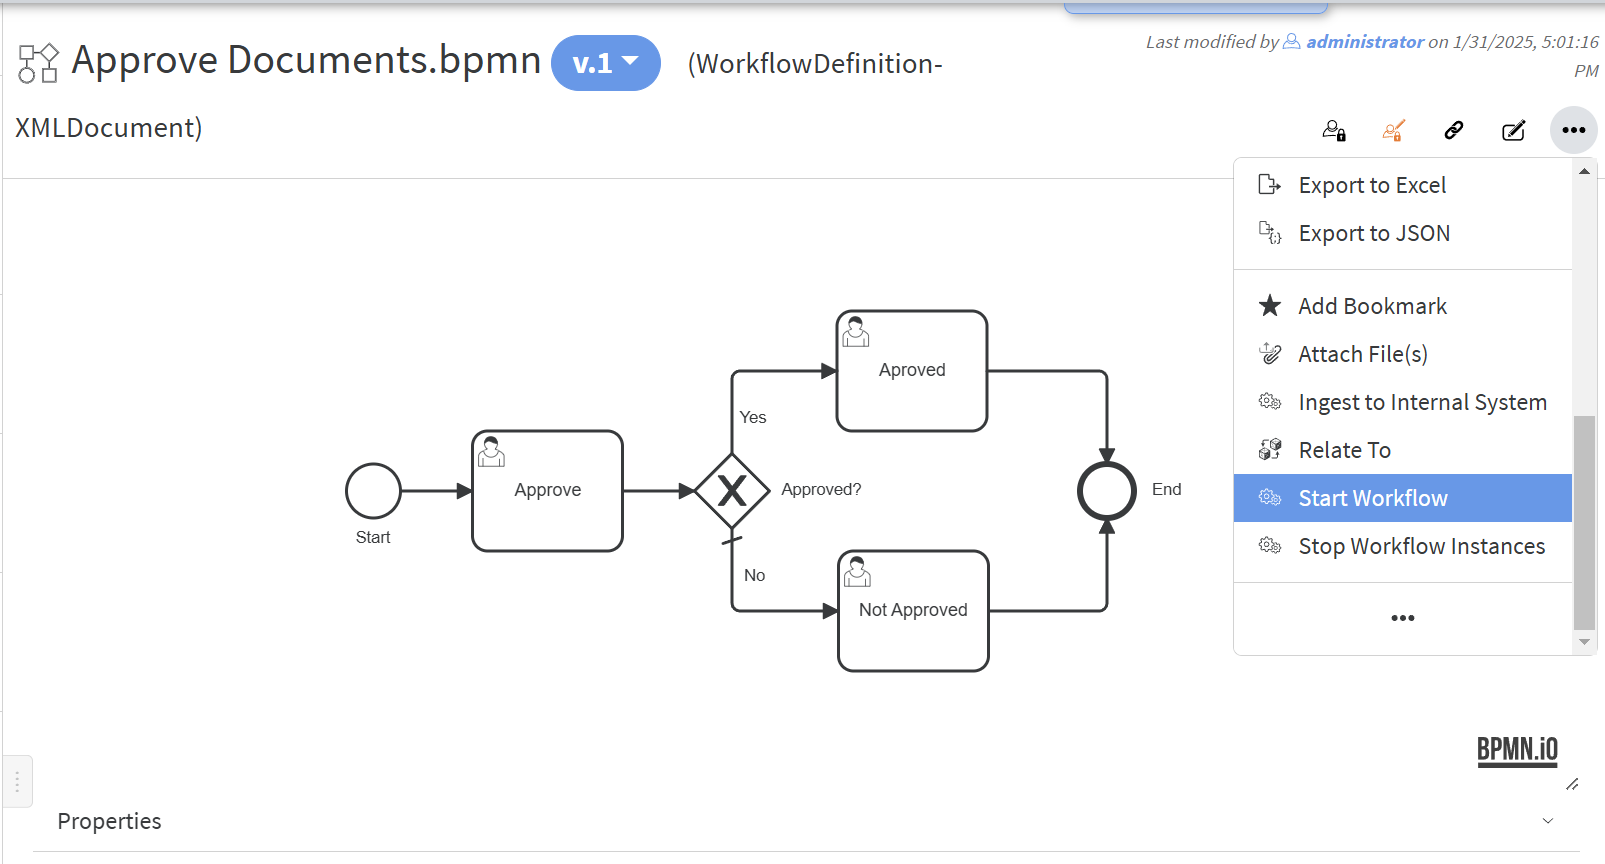](https://docs.profuzdigital.com/uploads/images/gallery/2025-01/PdOimage.png)
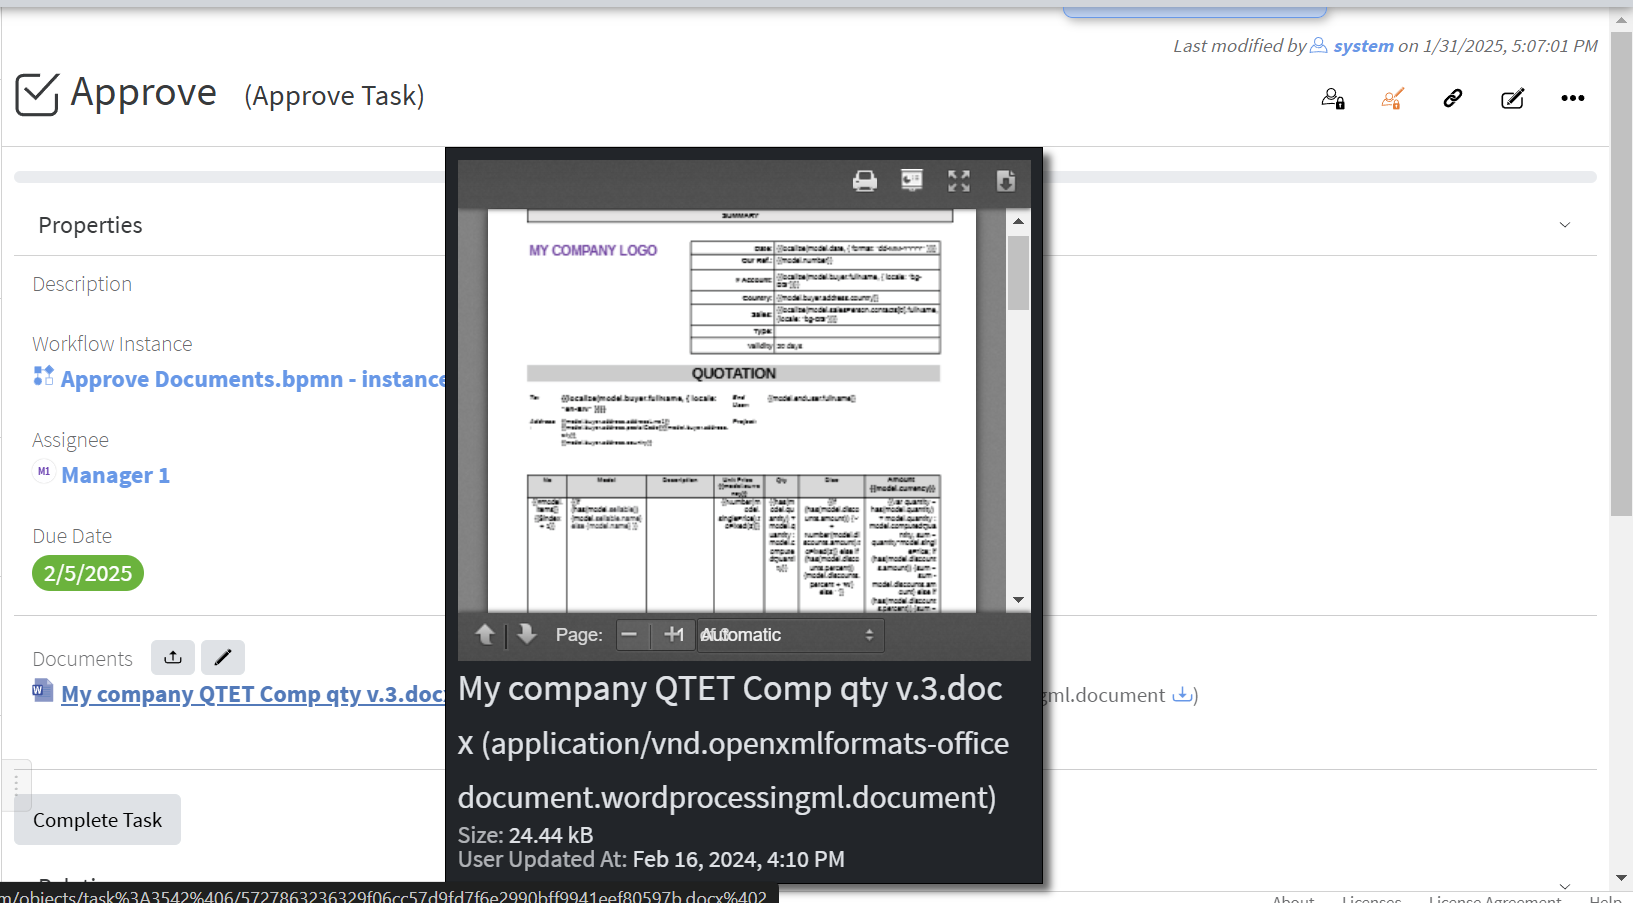
2. The form from the "ApproveDocumentsProcess" type will be shown to enter appropriate properties:
[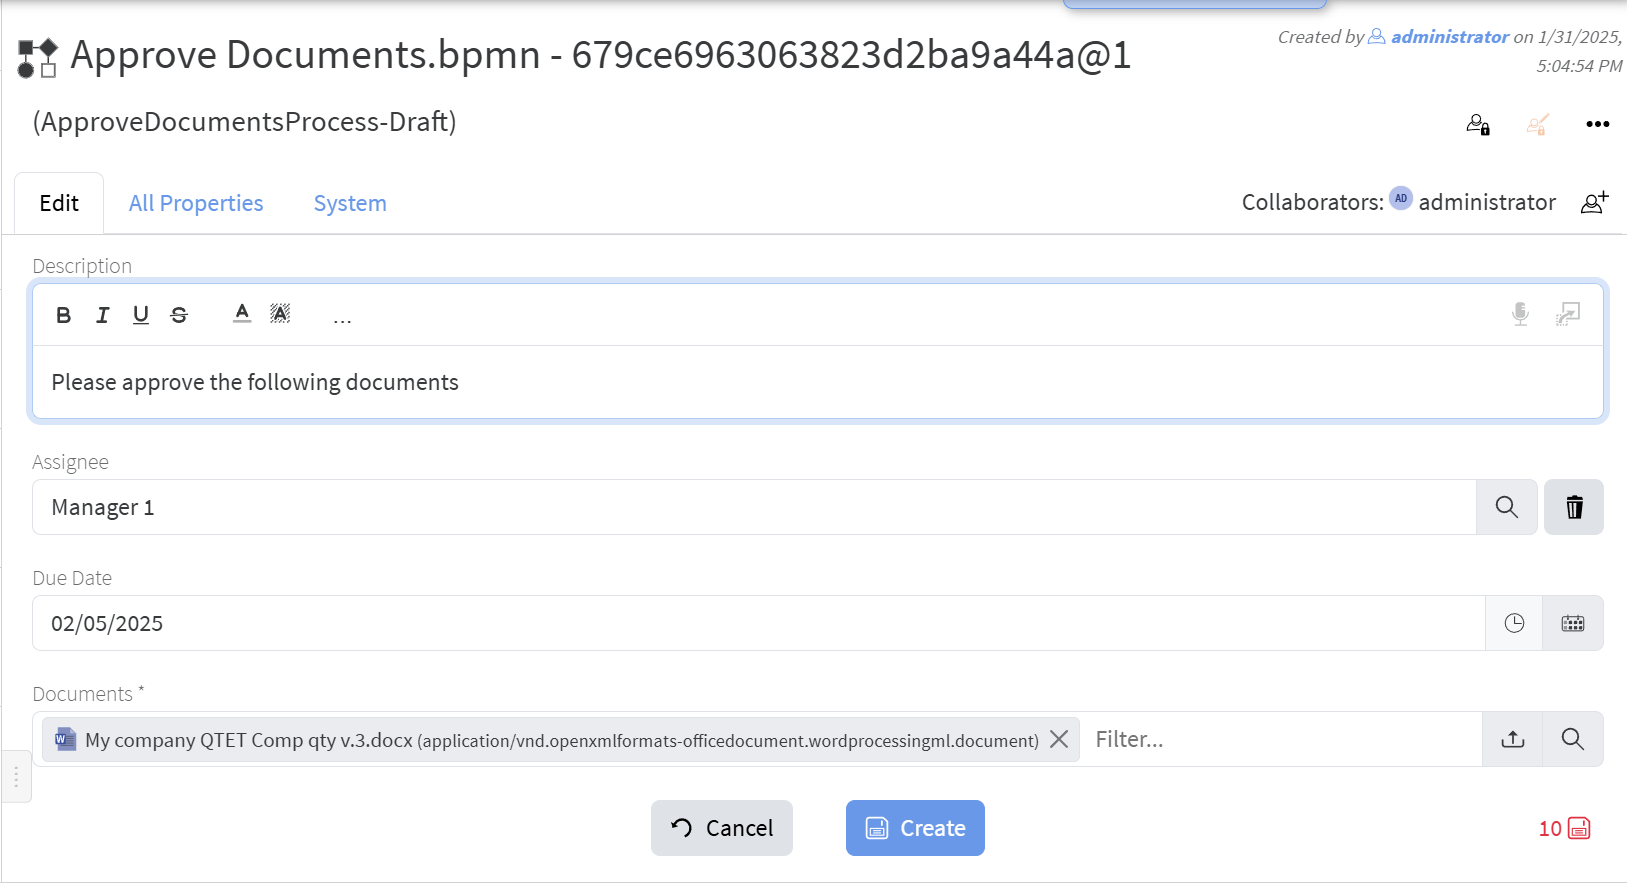](https://docs.profuzdigital.com/uploads/images/gallery/2025-01/usMimage.png)
3. The newly created instance of the workflow will be shown where you can observe the active steps and the history of the process:
[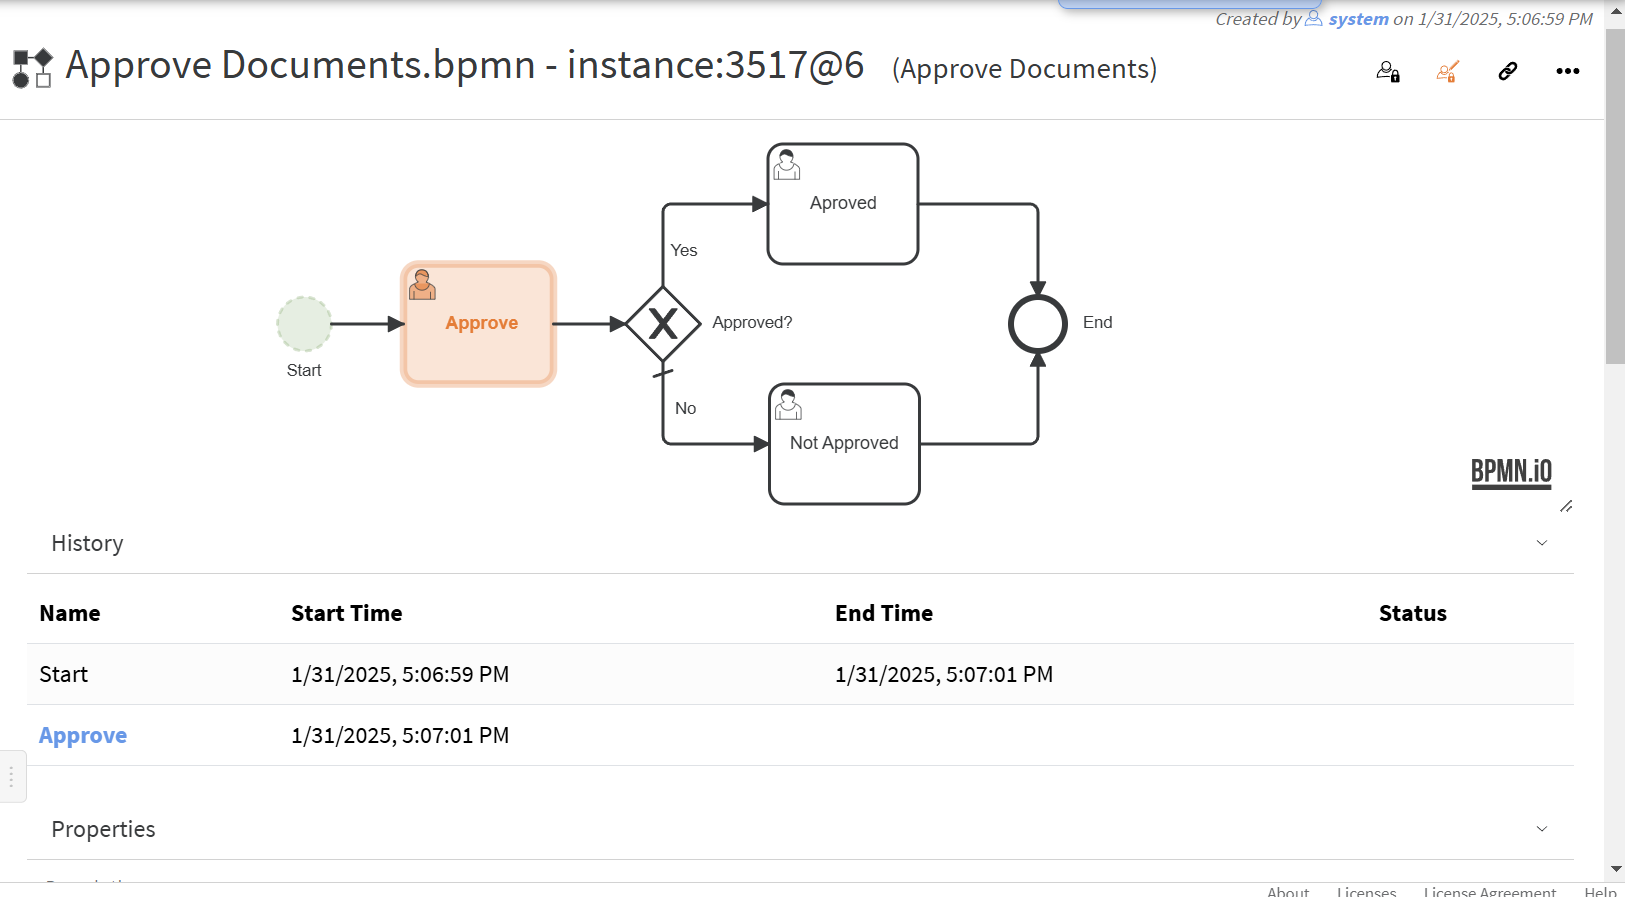](https://docs.profuzdigital.com/uploads/images/gallery/2025-01/4iyimage.png)
4. In history you can click an active step to go to it and observe its status (if you have rights of course):
[](https://docs.profuzdigital.com/uploads/images/gallery/2025-01/Jklimage.png)
##### Add a button in the header of Document objects to start approval process with the above workflow
1. Go to **Document** type:
[](https://docs.profuzdigital.com/uploads/images/gallery/2025-01/UEximage.png)
2. Enter the following in **Type Object Header Zone**:
[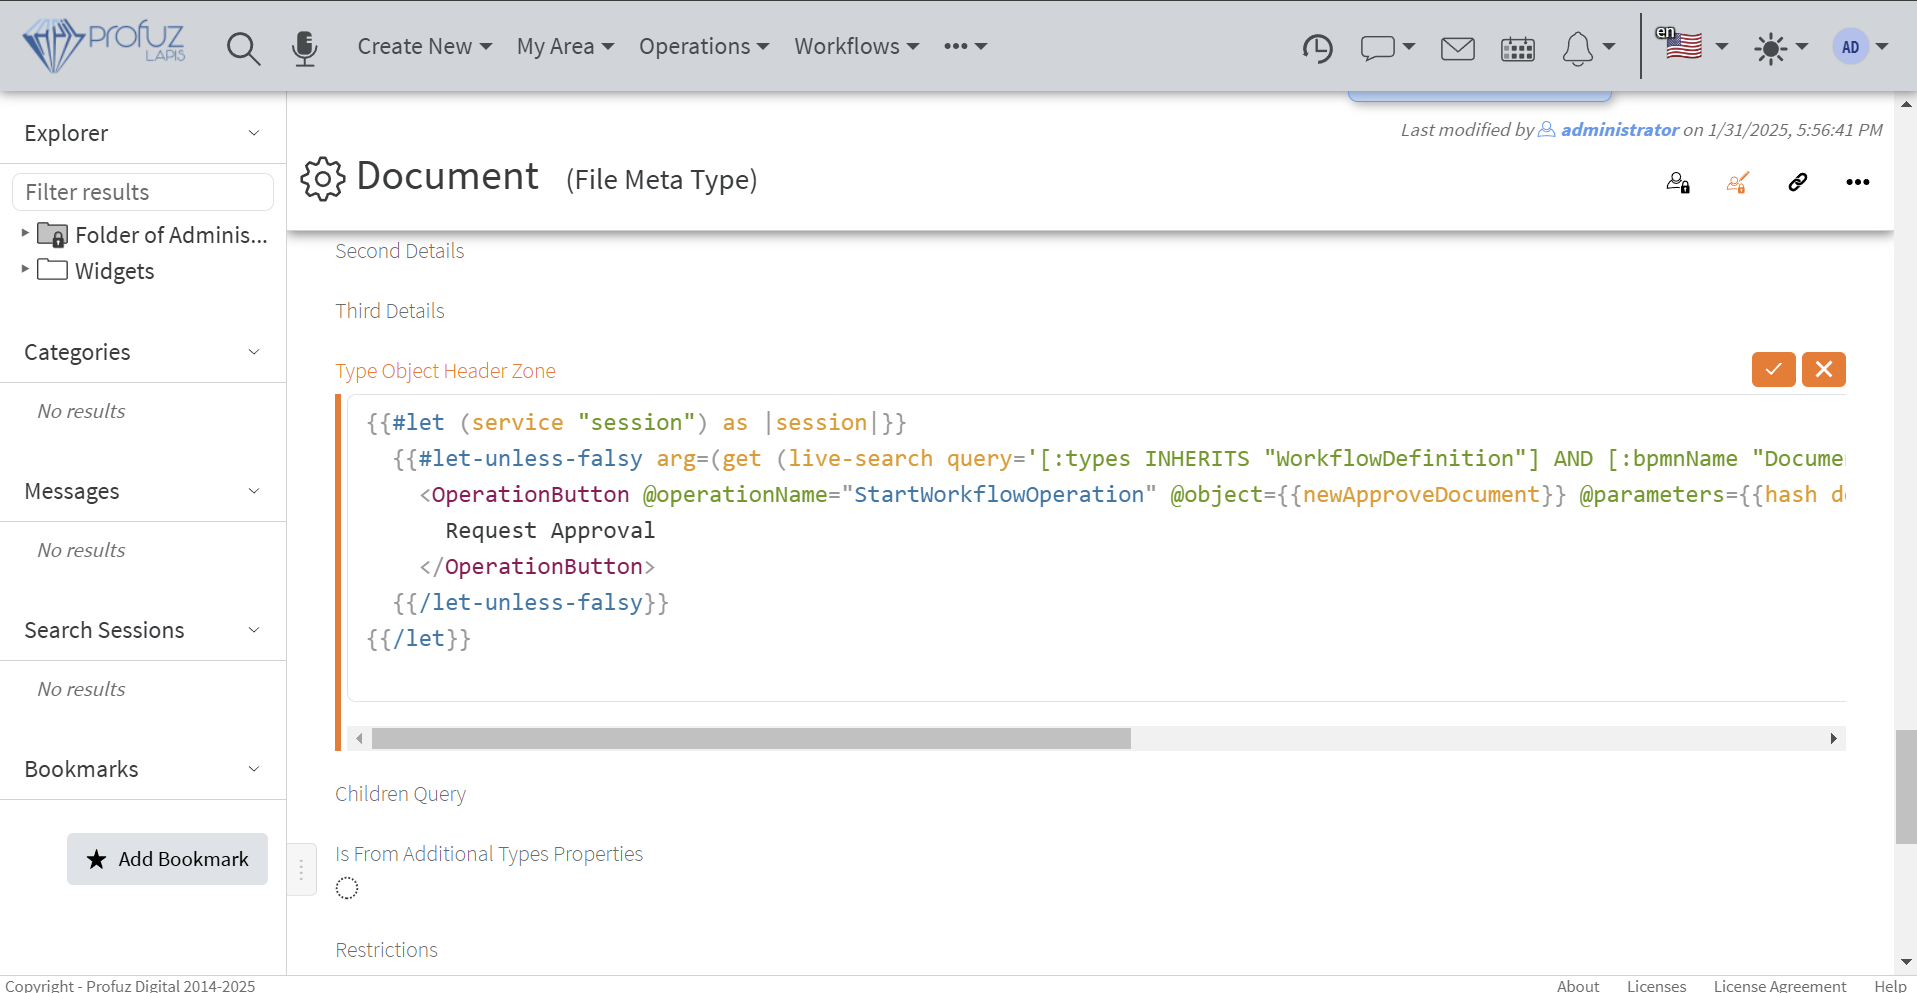](https://docs.profuzdigital.com/uploads/images/gallery/2025-01/LB8image.png)
The code is:
```vbscript
{{#let (service "session") as |session|}}
{{#let-unless-falsy arg=(get (live-search query='[:types INHERITS "WorkflowDefinition"] AND [:bpmnName "Document Approval Workflow"] SORT BY :name ASC LIMIT 1') 0) checkForEmptiness=true as |newApproveDocument|}}
Request Approval
{{/let-unless-falsy}}
{{/let}}
```
3. On your document's header the following button will be shown from which you directly can start the approval workflow:
[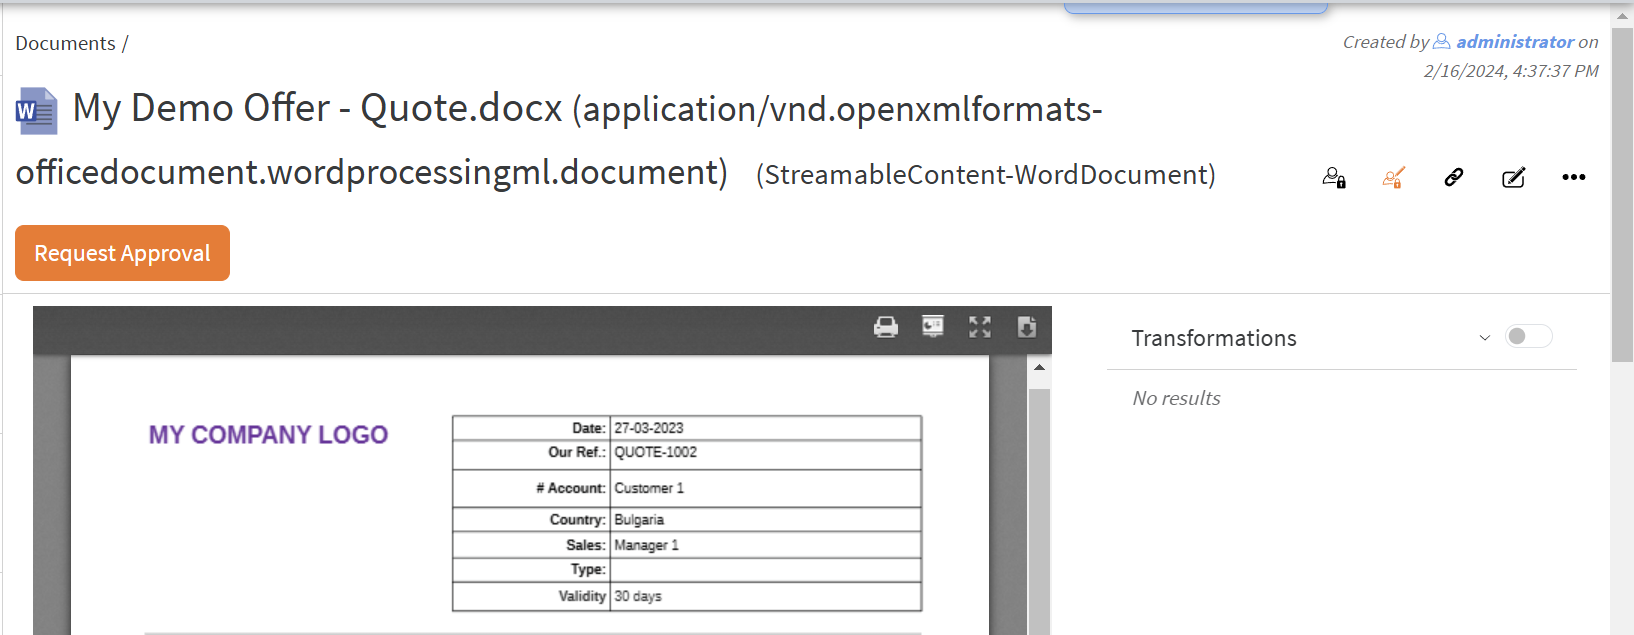](https://docs.profuzdigital.com/uploads/images/gallery/2025-01/foKimage.png)
# Workflow Example 2
##### Create Workflow Definition
Let's create a workflow that monitors specified folders and when a video file appears in some of them transcodes it with a selected transcoding template.
[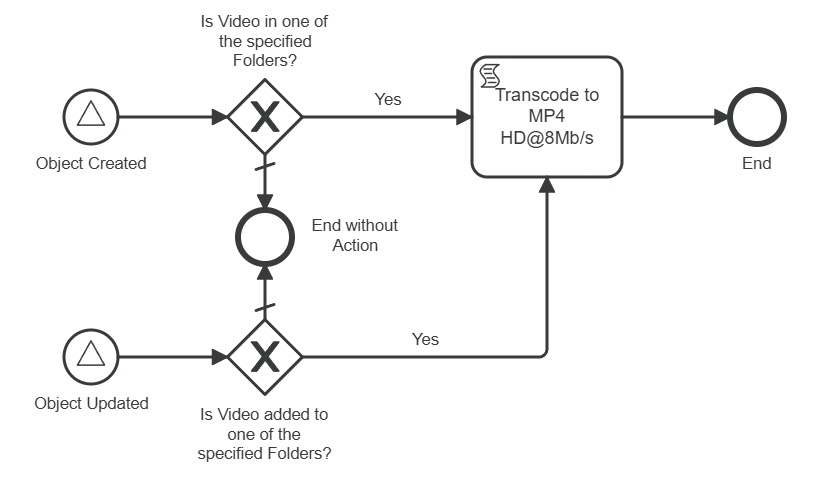](https://docs.profuzdigital.com/uploads/images/gallery/2025-01/7vEimage.png)
LAPIS emits [BPMN signals](https://docs.camunda.org/manual/7.22/reference/bpmn20/events/signal-events/) related to an object's lifecycle. The workflow will monitor two specific signals using [Signal Start Events](https://docs.camunda.org/manual/7.22/reference/bpmn20/events/signal-events/#signal-start-event):
1. **objectCreated** – Triggered when a new object is added to the system.
2. **objectUpdated** – Triggered when an existing object is modified.
When an object is created, the workflow will verify whether it is linked to one of the monitored folders. Similarly, when an existing object is modified, the workflow will check if it is linked to any of the monitored folders.
Let assume we have some folders:
[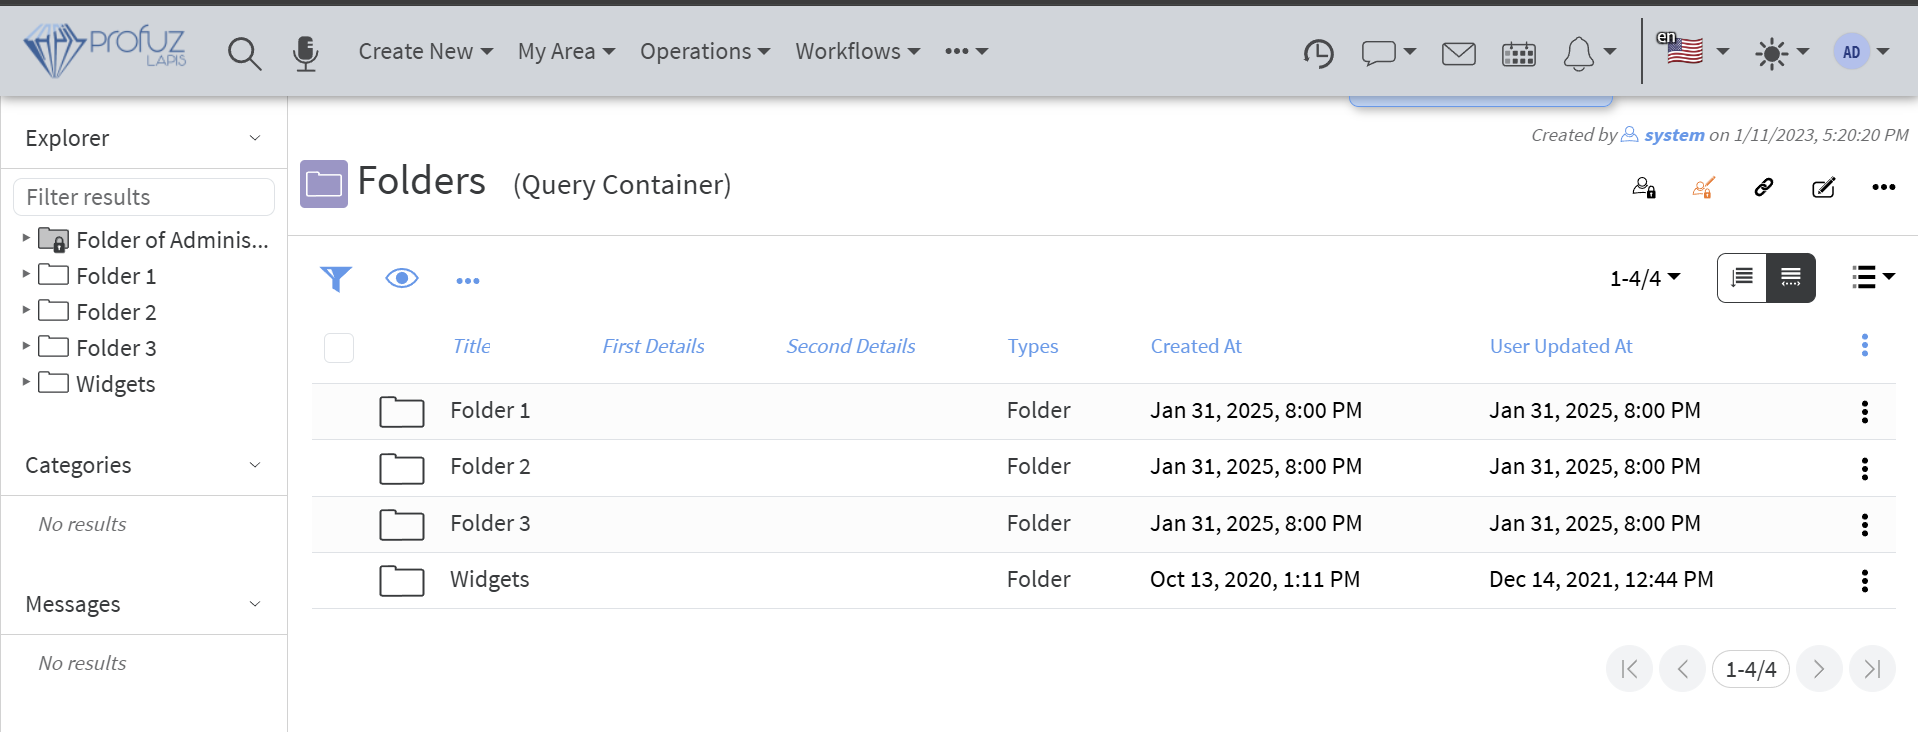](https://docs.profuzdigital.com/uploads/images/gallery/2025-01/JD3image.png)
For this example we will monitor "*Folder 1*" and "*Folder 2*". We will need their IDs which we can get by displaying the ID column:
[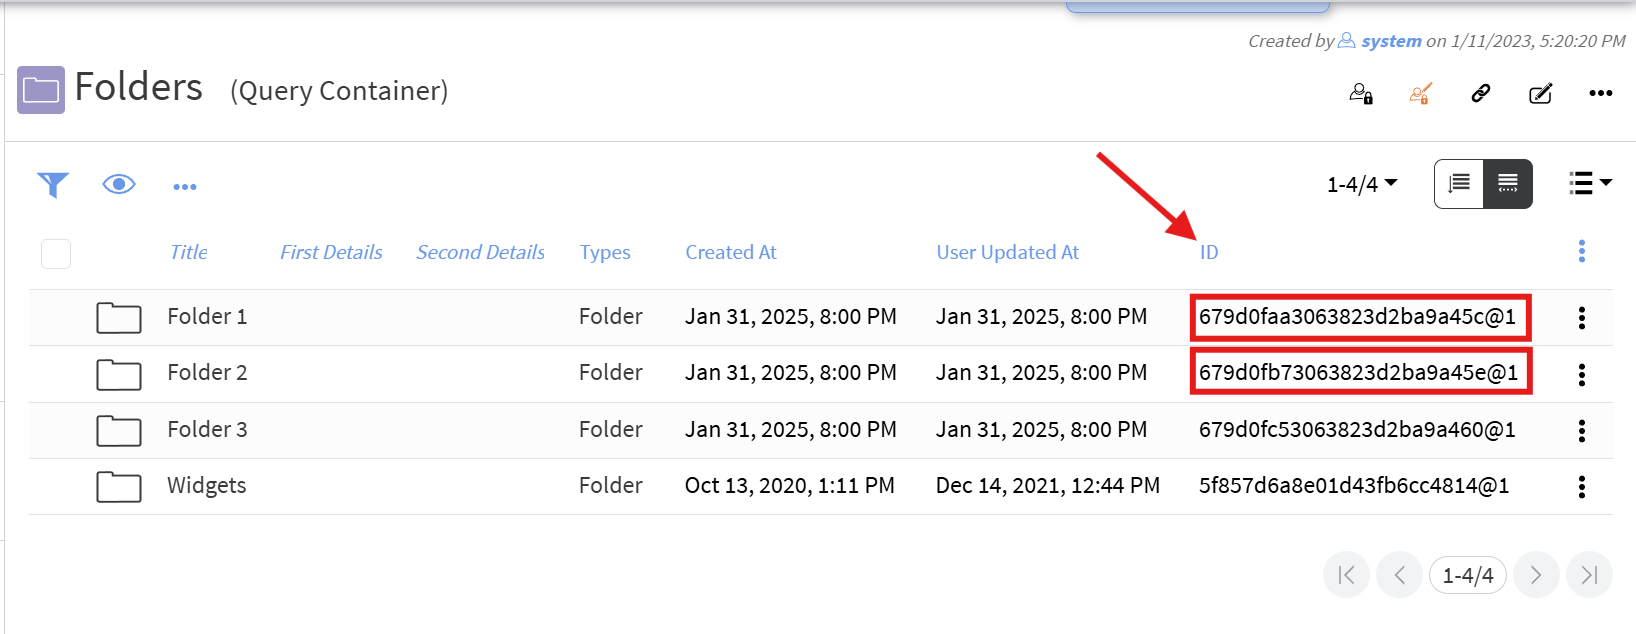](https://docs.profuzdigital.com/uploads/images/gallery/2025-01/dCwimage.png)
We will also use a Transcoding Template holding the transcoding parameters, so get its ID, too:
[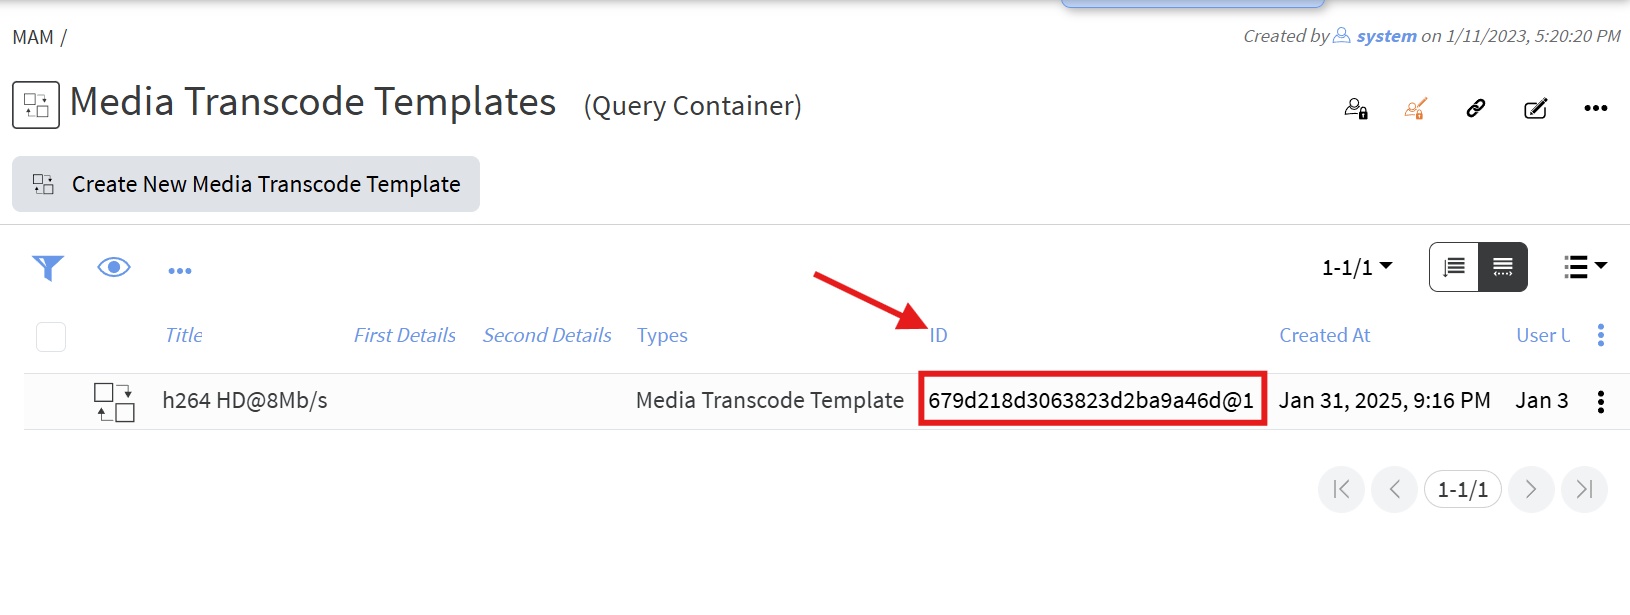](https://docs.profuzdigital.com/uploads/images/gallery/2025-01/fs4image.png)
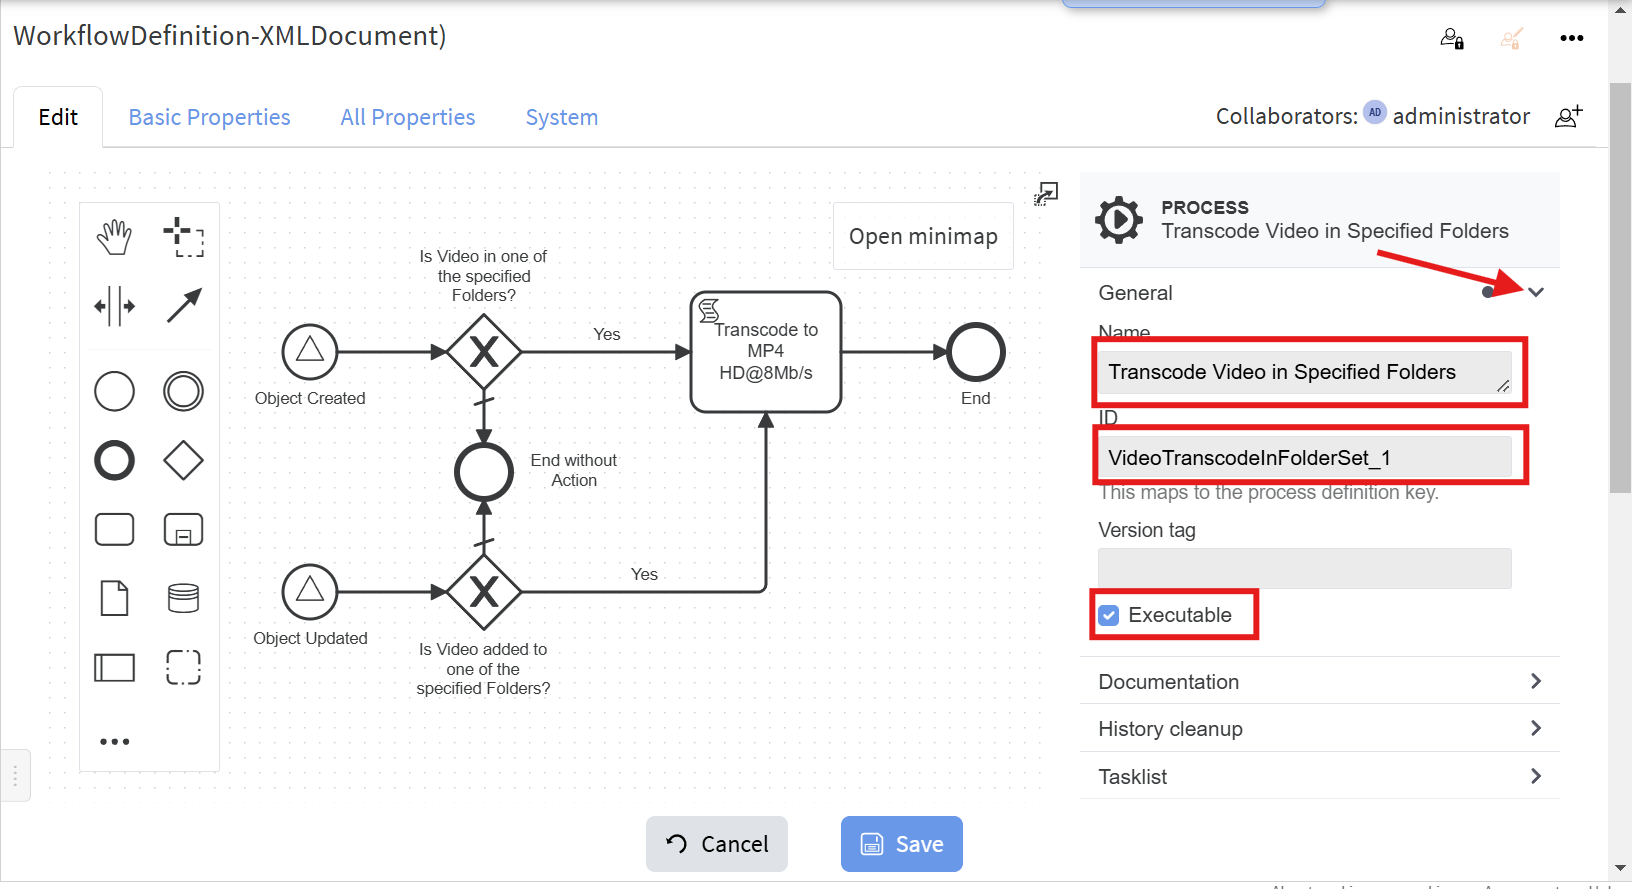
Now let's create a new workflow definition as shown:
1. Set general properties Name, ID and Executable:
[](https://docs.profuzdigital.com/uploads/images/gallery/2025-01/dM8image.png)
2. Important is to also add the following "**Extension Property**", so that workflow history is not flooded with all workflow instances that are created for any object creation or modification:
[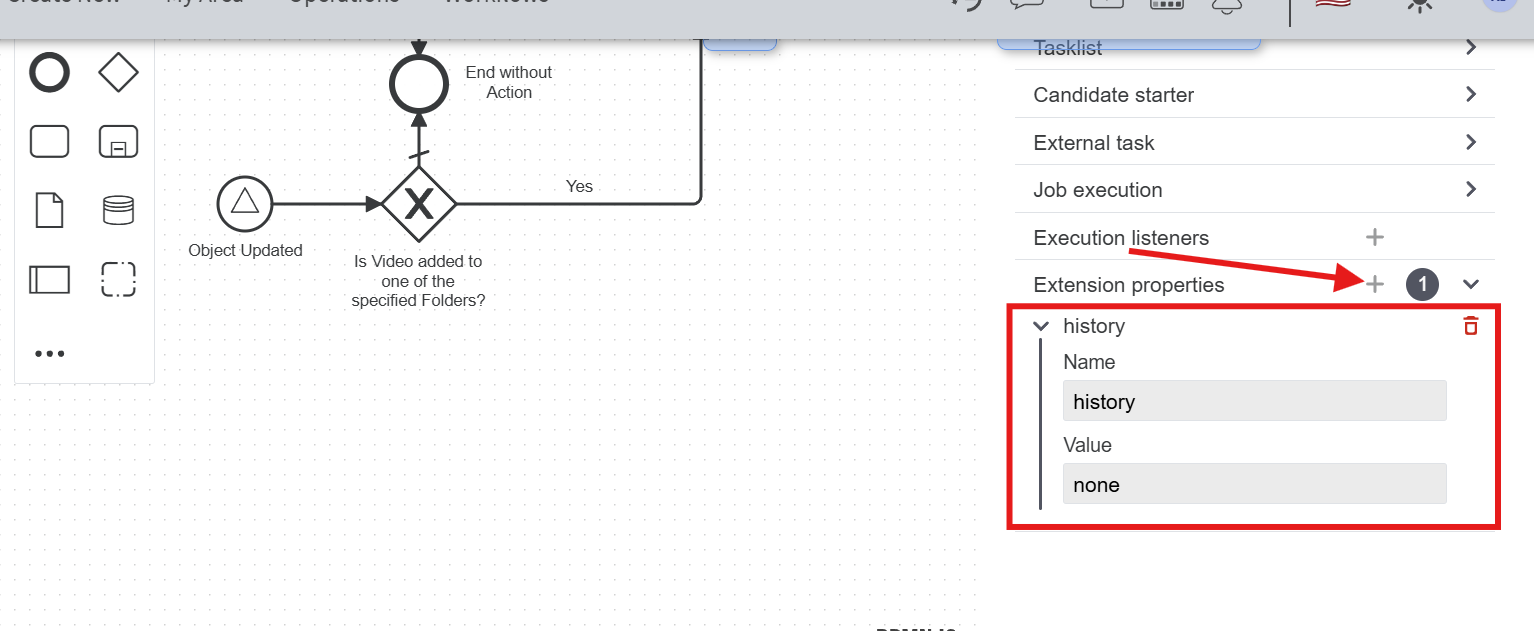](https://docs.profuzdigital.com/uploads/images/gallery/2025-01/jqVimage.png)
3. Set the properties for the **Object Created** signal start event:
[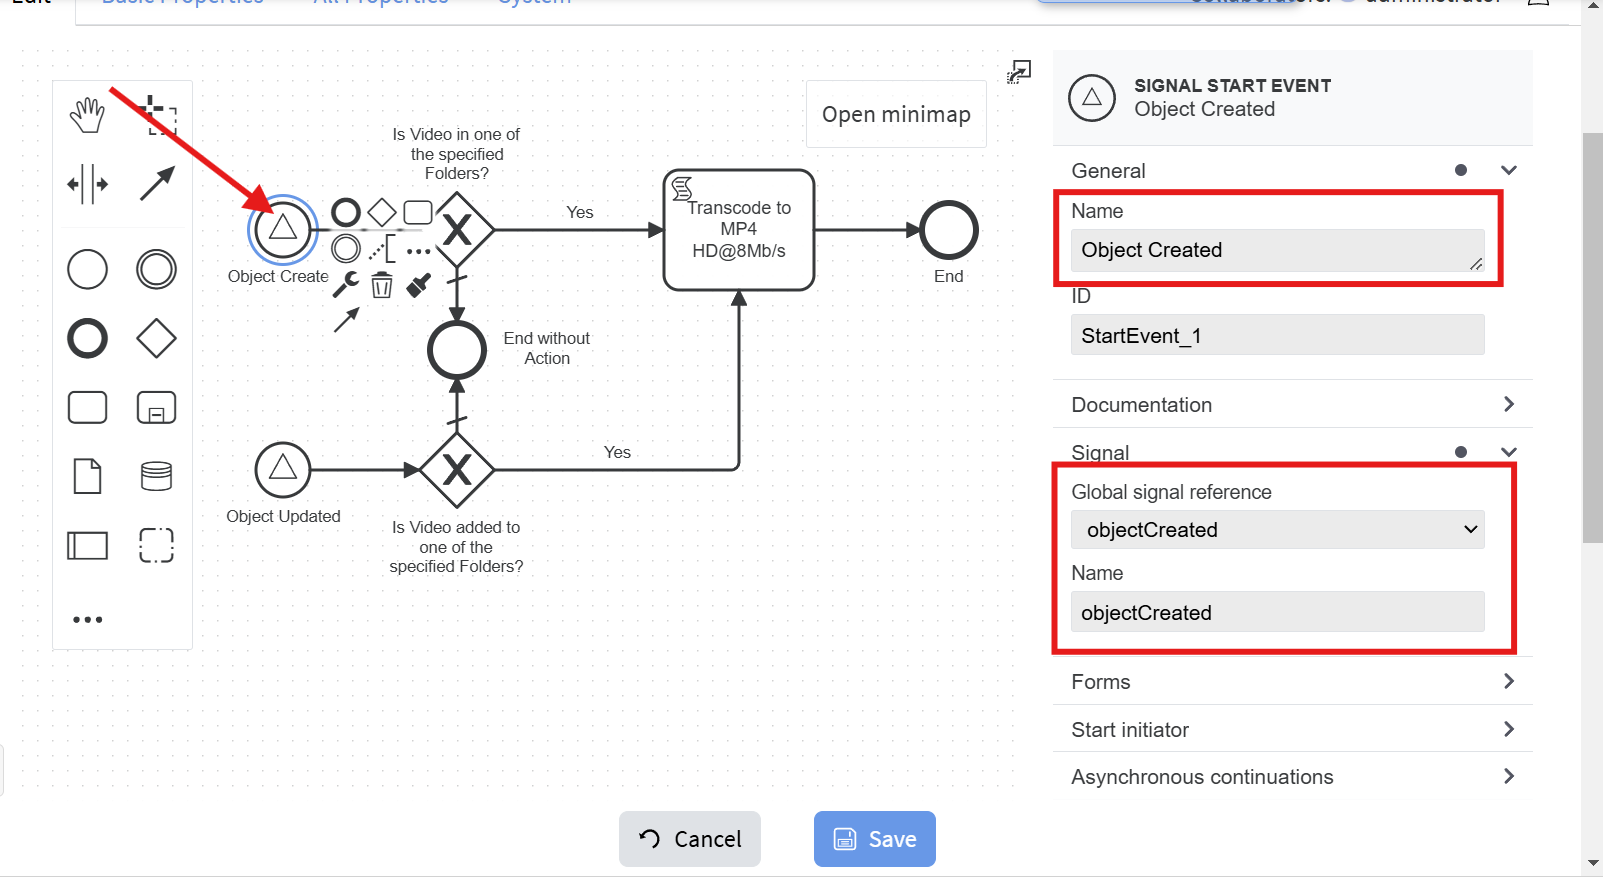](https://docs.profuzdigital.com/uploads/images/gallery/2025-01/lsHimage.png)
4. Set the properties for the **Object Updated** signal start event:
[](https://docs.profuzdigital.com/uploads/images/gallery/2025-01/ZP6image.png)
5. Set the following properties to the object-created **Yes** flow:
[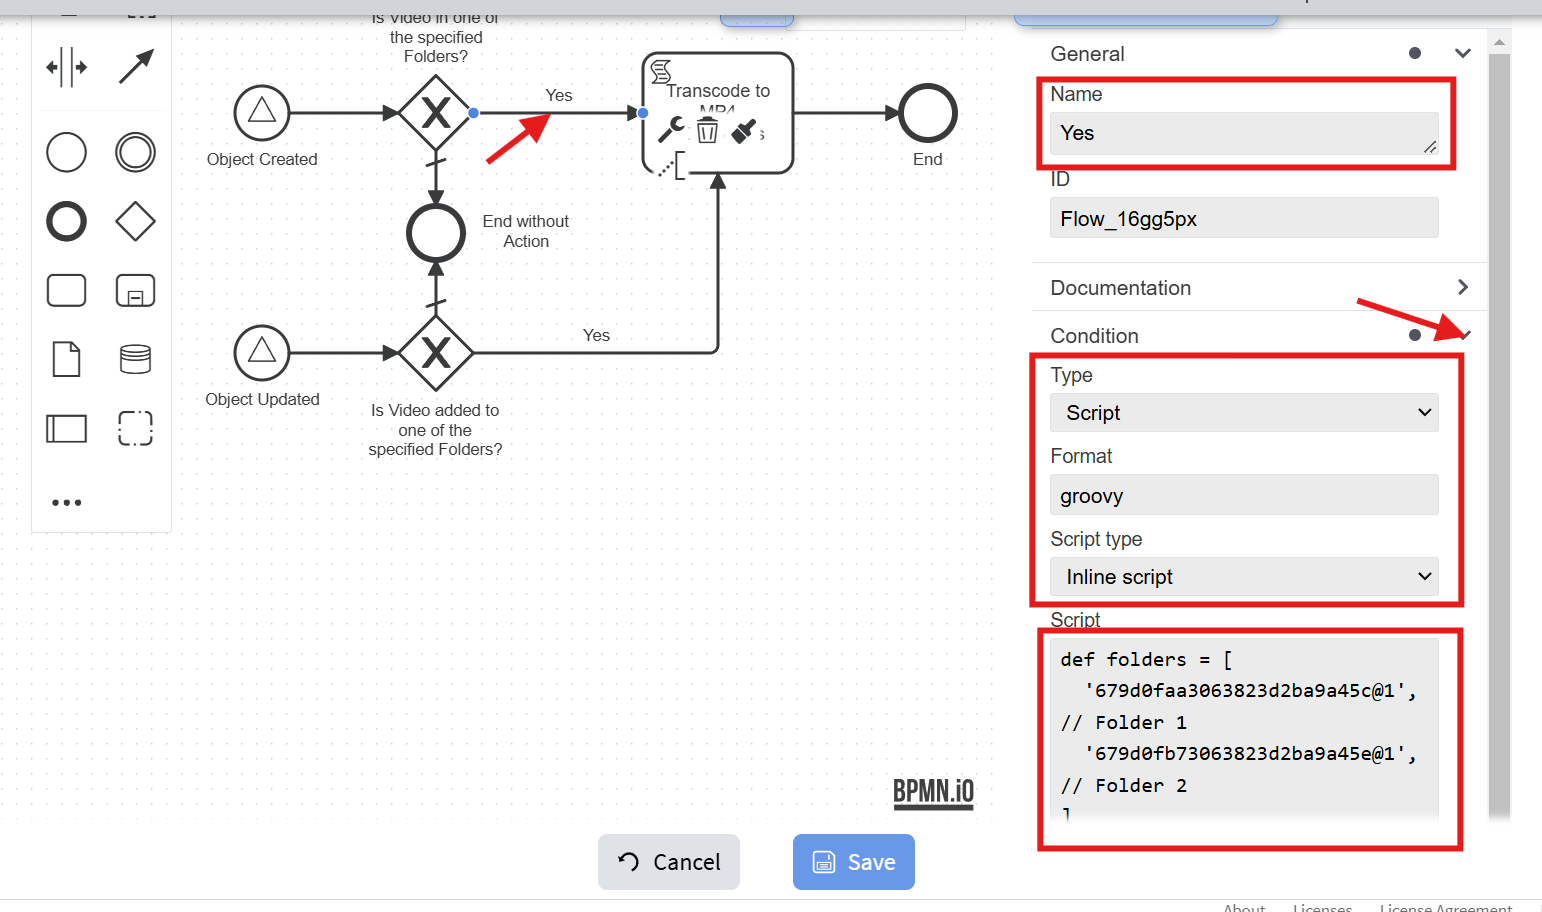](https://docs.profuzdigital.com/uploads/images/gallery/2025-01/vBJimage.png)
The script is:
```java
def folders = [
'679d0faa3063823d2ba9a45c@1', // ID of "Folder 1"
'679d0fb73063823d2ba9a45e@1', // ID of "Folder 2"
]
def containers = (object.get('containers') ?: []).collect { it.id.toString() }
def addedToAnyFolder = folders.intersect(containers)
(object.unwrap().isInstanceOf('Video')) && !['draft', 'newObjectDraft'].contains(object.get('lifeCycleStatus')) && object.get('containers') != null && addedToAnyFolder
```
Replace/add IDs of the folders you want to be monitored in the **folders** variable.
The **object** variable is defined for workflow instances that trigger either the **objectCreated** or **objectUpdated** signal events. By using `object.get()`, you can retrieve any property value from the object, including non-existent or undefined properties. If querying a property doesn't exist or has no value, `get()` will return `null`.
Similarly, you can inspect and act upon other object properties as needed. For instance, in this example, the **containers** property contains IDs of folders (and/or other containers) that are linked to the current object.
The final script statement must evaluate to a Boolean value, which determines the outcome of the condition check. In this example, the script checks the following:
1. Whether the newly created object is of type **'Video'**.
2. Whether the object is not in the process of being created (e.g., autosaves during data entry will have this state).
3. Whether the object is linked to one of the monitored folders (as required in this example).
6. Set the following properties to the object-updated **Yes** flow:
[](https://docs.profuzdigital.com/uploads/images/gallery/2025-01/qVXimage.png)
The script is:
```java
def folders = [
'679d0faa3063823d2ba9a45c@1', // ID of "Folder 1"
'679d0fb73063823d2ba9a45e@1', // ID of "Folder 2"
]
def originalContainers = (originalObject.get('containers') ?: []).collect { it.id.toString() }
def containers = (object.get('containers') ?: []).collect { it.id.toString() }
def intersectOriginal = folders.intersect(originalContainers) ?: []
def intersectNew = folders.intersect(containers) ?: []
def addedToAnyFolder = intersectOriginal.size() == 0 && intersectNew.size() > 0
execution.hasVariable('originalObject') && (object.unwrap().isInstanceOf('Video')) && !['draft', 'newObjectDraft'].contains(object.get('lifeCycleStatus')) && addedToAnyFolder
```
Match the **folders** variable to the previous script. (Note that there is way to set this variable ones in the workflow and use it on other places, but for simplicity we have put it in both scripts).
7. Set the following properties to the scripting task:
[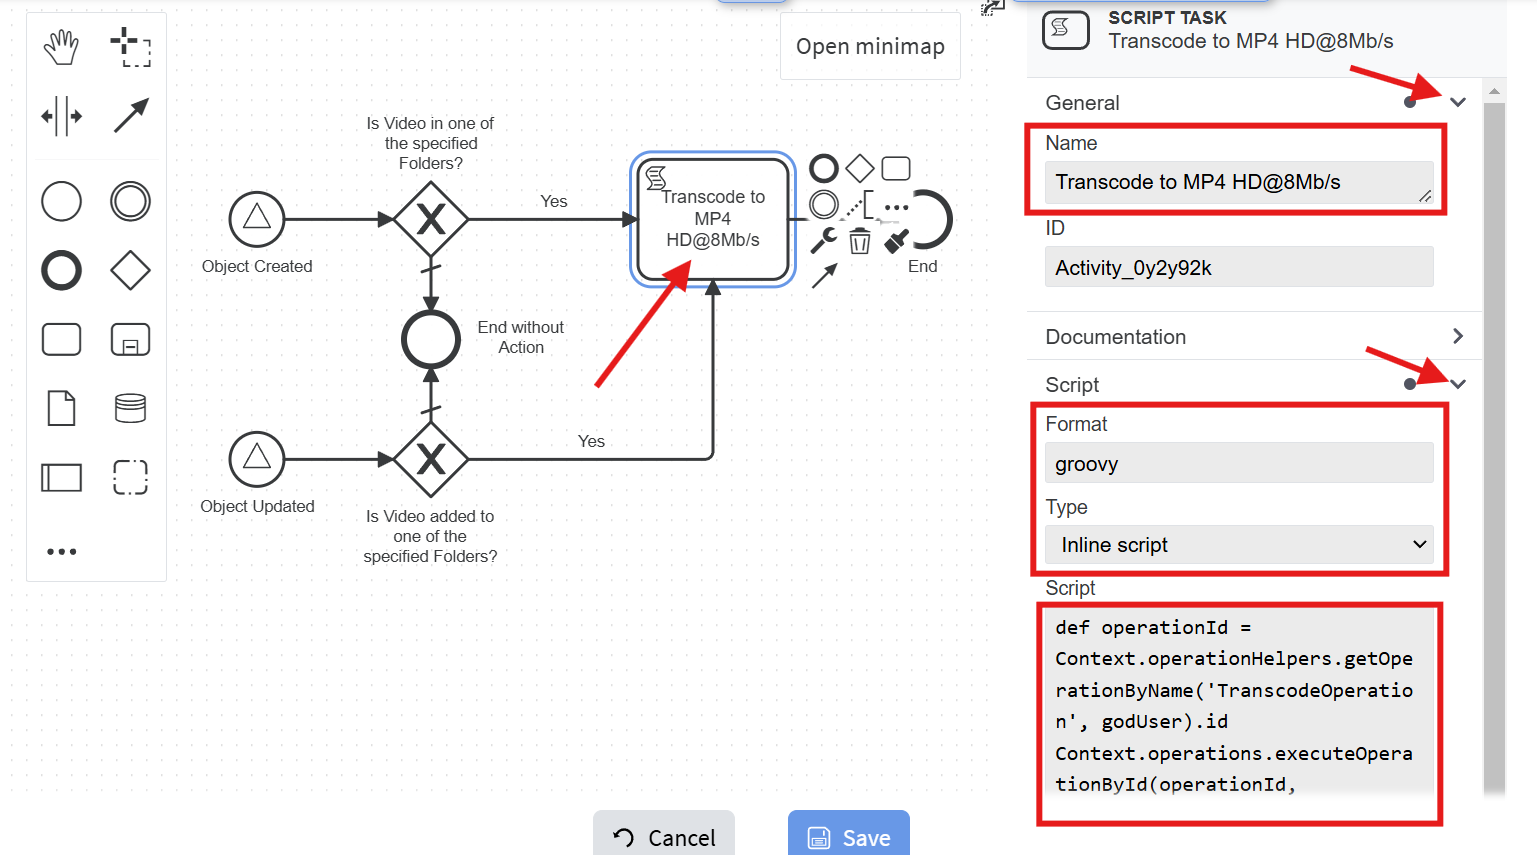](https://docs.profuzdigital.com/uploads/images/gallery/2025-01/m0nimage.png)
The script is:
```java
def operationId = Context.operationHelpers.getOperationByName('TranscodeOperation', godUser).id
def templateId = '679d218d3063823d2ba9a46d@1' // ID of the transcoding template
Context.operations.executeOperationById(operationId, [object.id].toImmutableList(), helpers.getSubject(subject), [ templateId: helpers.relationFromString(templateId),
].toImmutableMap(), null)
```
Change the **templateId** variable with your own ID.
You can download the BPMN of the above example from [here](https://profuzlapis.com/download/Transcode%20Video%20in%20Specified%20Folders.bpmn).
##### Test the new workflow
1. Upload a video file to one of the monitored folders:
[](https://docs.profuzdigital.com/uploads/images/gallery/2025-02/image.png)
2. The transcoding should start after upload is finished:
[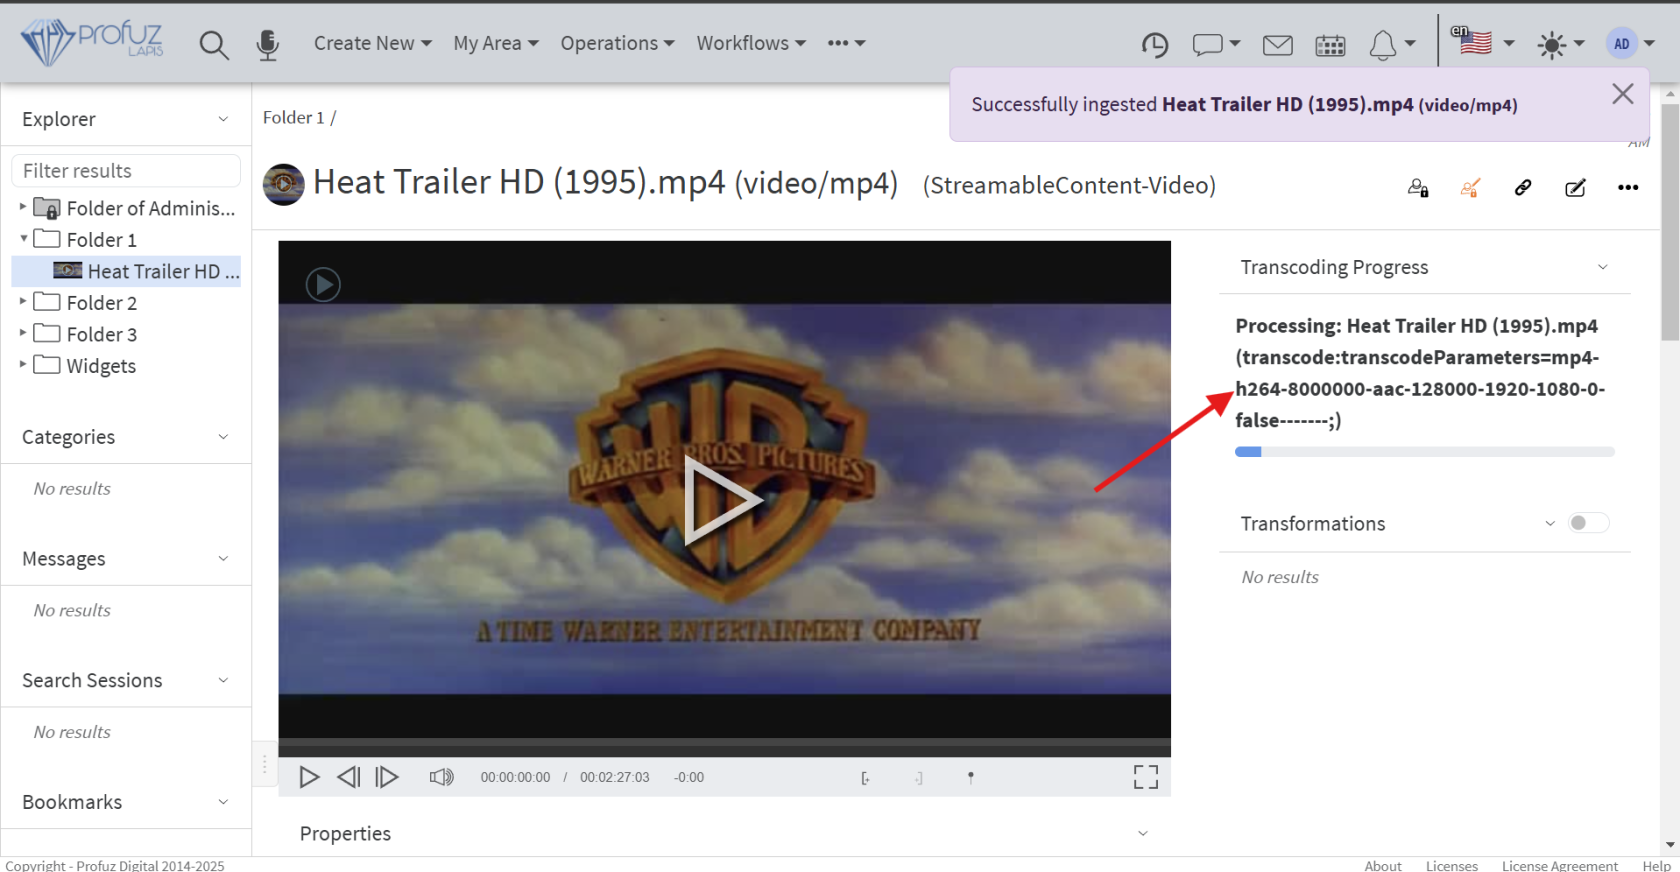](https://docs.profuzdigital.com/uploads/images/gallery/2025-02/leyimage.png)
3. You can also drag and drop an existing video into one of the monitored folders, and the workflow will automatically initiate the transcoding process for it.
# Export
# Export for Video Editing software
### Export for Video Editing software like Adobe Premiere, LightWorks, Final Cut Pro, etc.
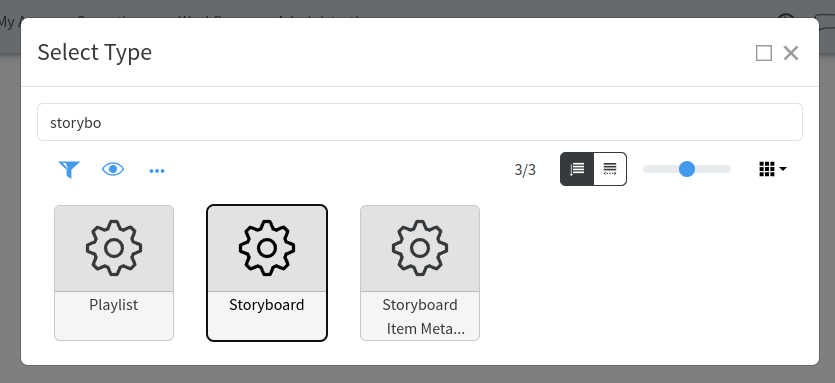
Create a Storyboard by following the steps:
Create new → Other → Storyboard
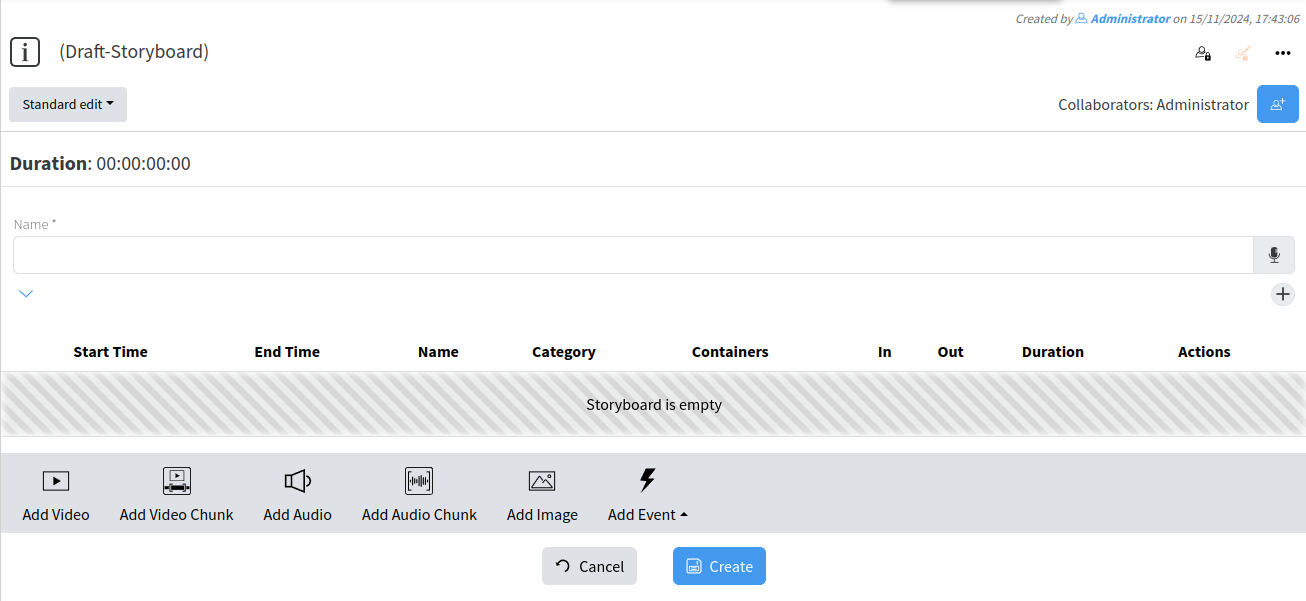
Define attributes for the storyboard
[](https://docs.profuzdigital.com/uploads/images/gallery/2024-11/dS6image.png)
[](https://docs.profuzdigital.com/uploads/images/gallery/2024-11/tRlimage.png)
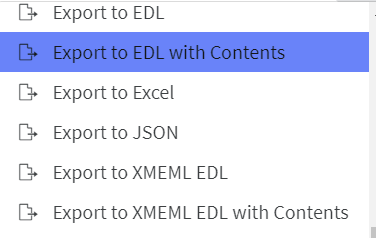
Add media assets into storyboard then from the object's menu select **Export to EDL** or **Export to XMEDL EDL**, or
**Export to EDL with Contents** or **Export to XMEDL EDL with Contents**. Second choices will download automatically stored content at the storyboard to the local PC where EDL is saved. Simply, second choice will download EDL file with its corresponding media content.
[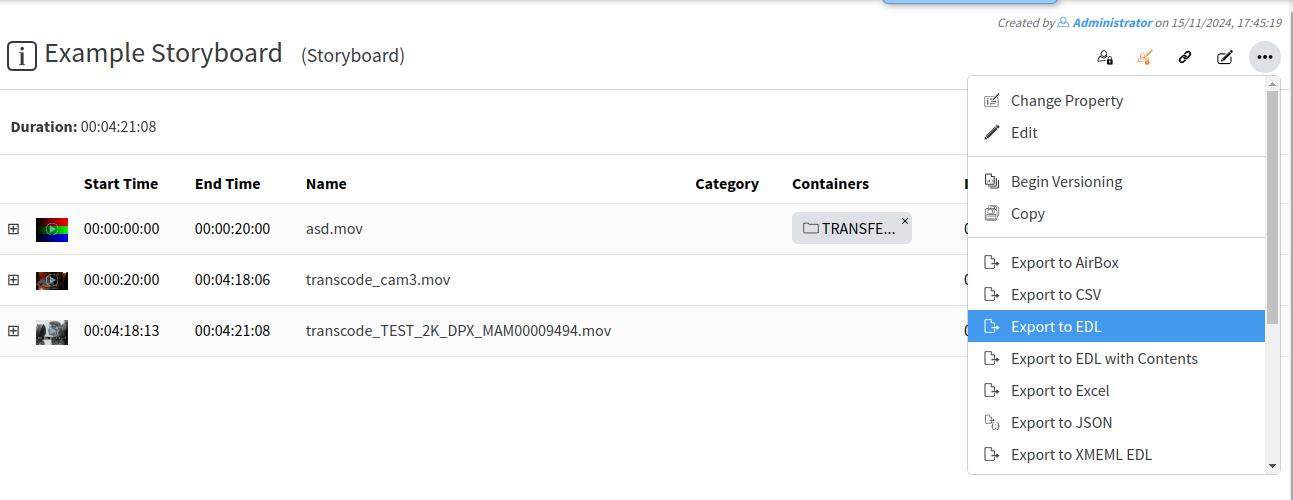](https://docs.profuzdigital.com/uploads/images/gallery/2024-11/b4eimage.png)
Open Adobe Premiere or other NLE software and load the EDL or the XML file.
# Redundancy
# Redundancy
Running data server instances (main, redundant, load balancing)
Main – only one server
Redundant – 2 parallel servers working simultaneously
Load balancing - Load balancing aims to optimize resource use, maximize throughput, minimize response time, and avoid overload of any single resource. Using multiple components with load balancing instead of a single component may increase reliability and availability through redundancy.
Load balancing redundancy for the data base (Mongo Data Base) or load balancing for the software instance.
# Users and Permissions
# Creating User
Like every Server-clients oriented software Profuz LAPIS allows to manage users with different level of privileges. Adding new user can be done from main Create New drop-down menu. Same is valid for adding new Groups. Each user can be defined to be member of different groups e.g.
- Subtitling QC
- Subtitling Editing
- Subtitling Approval
Accessing permission rights for each task, subtask or other data can be managed by entering inside the location. Go to Action → Edit → Permissions. Click to edit per specific permission request.
## Creating User
To create an User go to **Create New** - **User**
[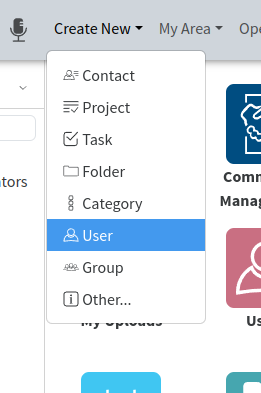](https://docs.profuzdigital.com/uploads/images/gallery/2024-11/VlLimage.png)
The new window appear where the details about User have to be defined.
Only Username is mandatory.
[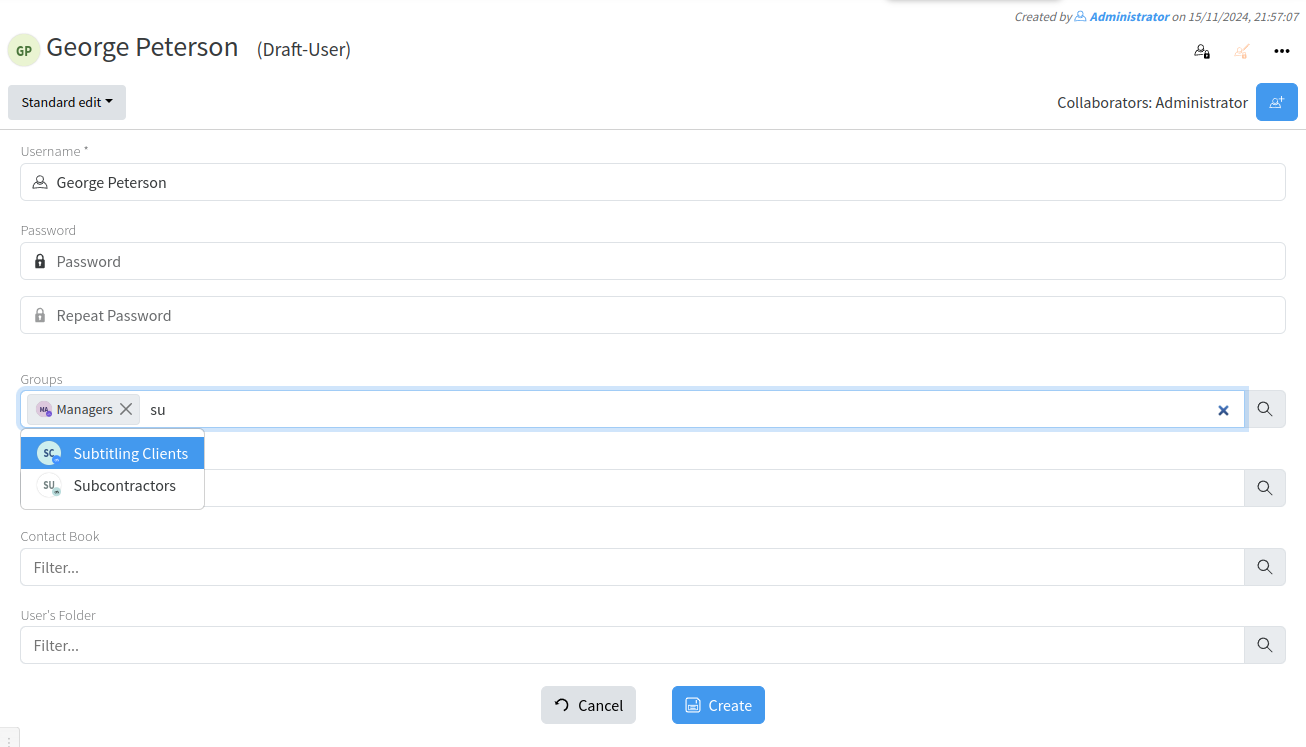](https://docs.profuzdigital.com/uploads/images/gallery/2024-11/lrDimage.png)
By pressing Create, the User is created.
More details can be added
[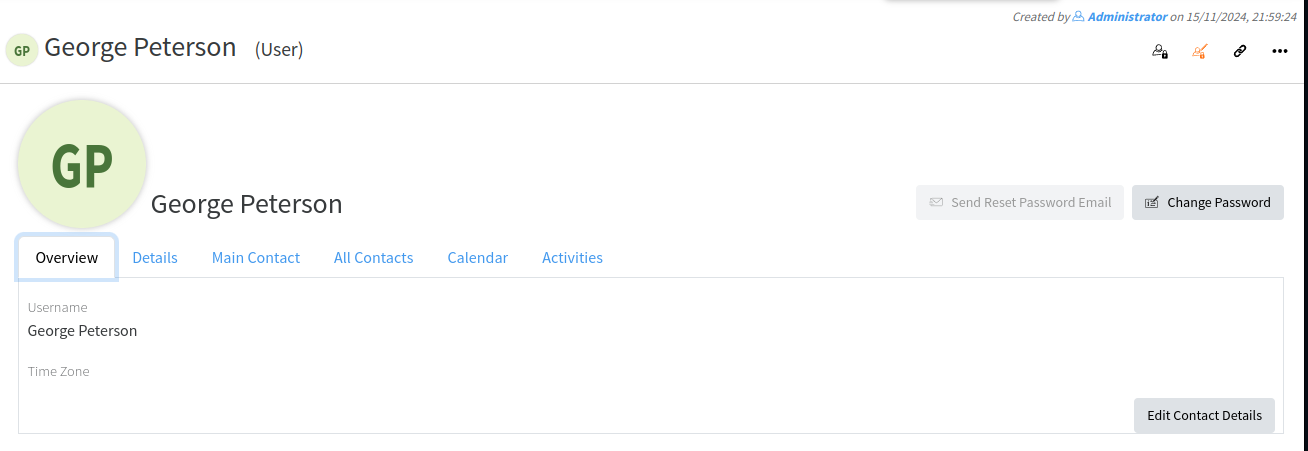](https://docs.profuzdigital.com/uploads/images/gallery/2024-11/HZLimage.png)
[](https://docs.profuzdigital.com/uploads/images/gallery/2024-11/9Y2image.png)
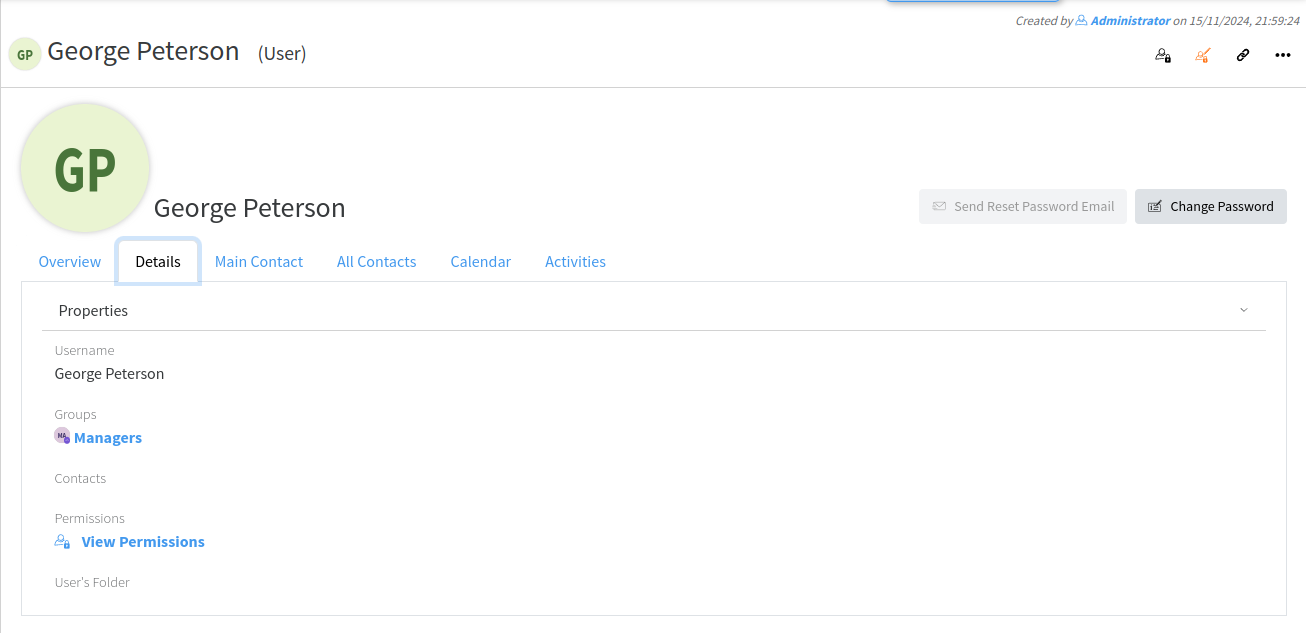
To connect an Existing contact to the User:
- By quick editing
[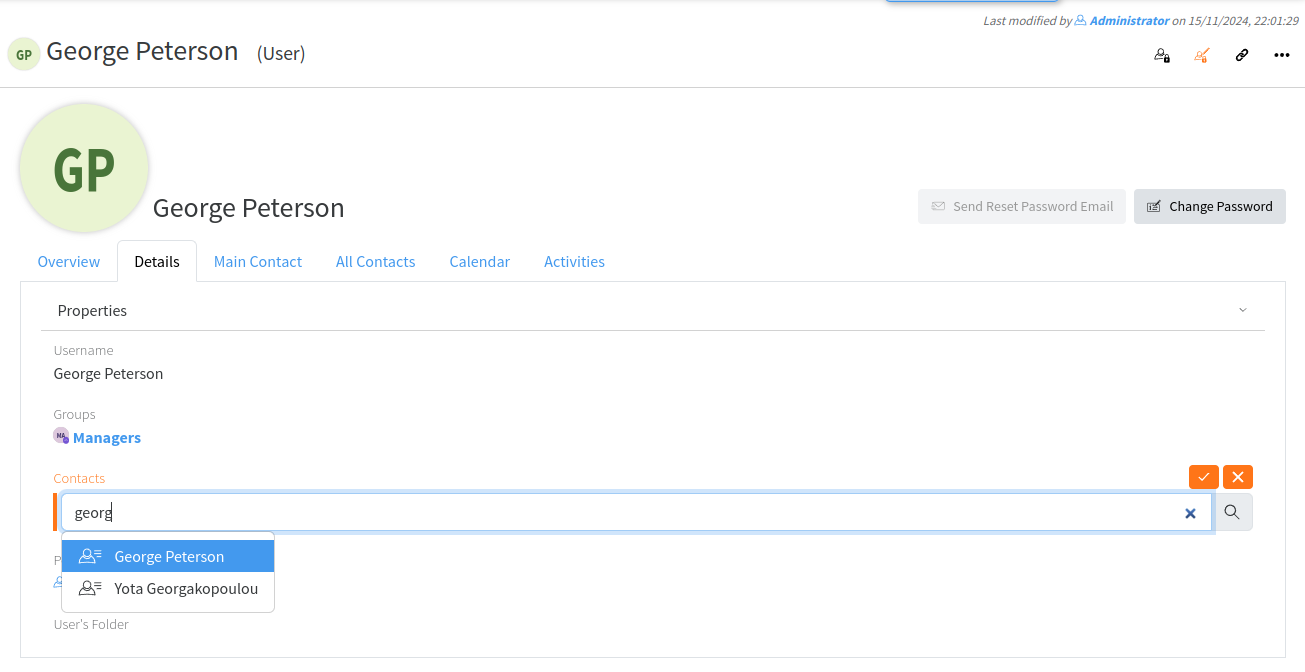](https://docs.profuzdigital.com/uploads/images/gallery/2024-11/CAAimage.png)
- By Actions - Edit
[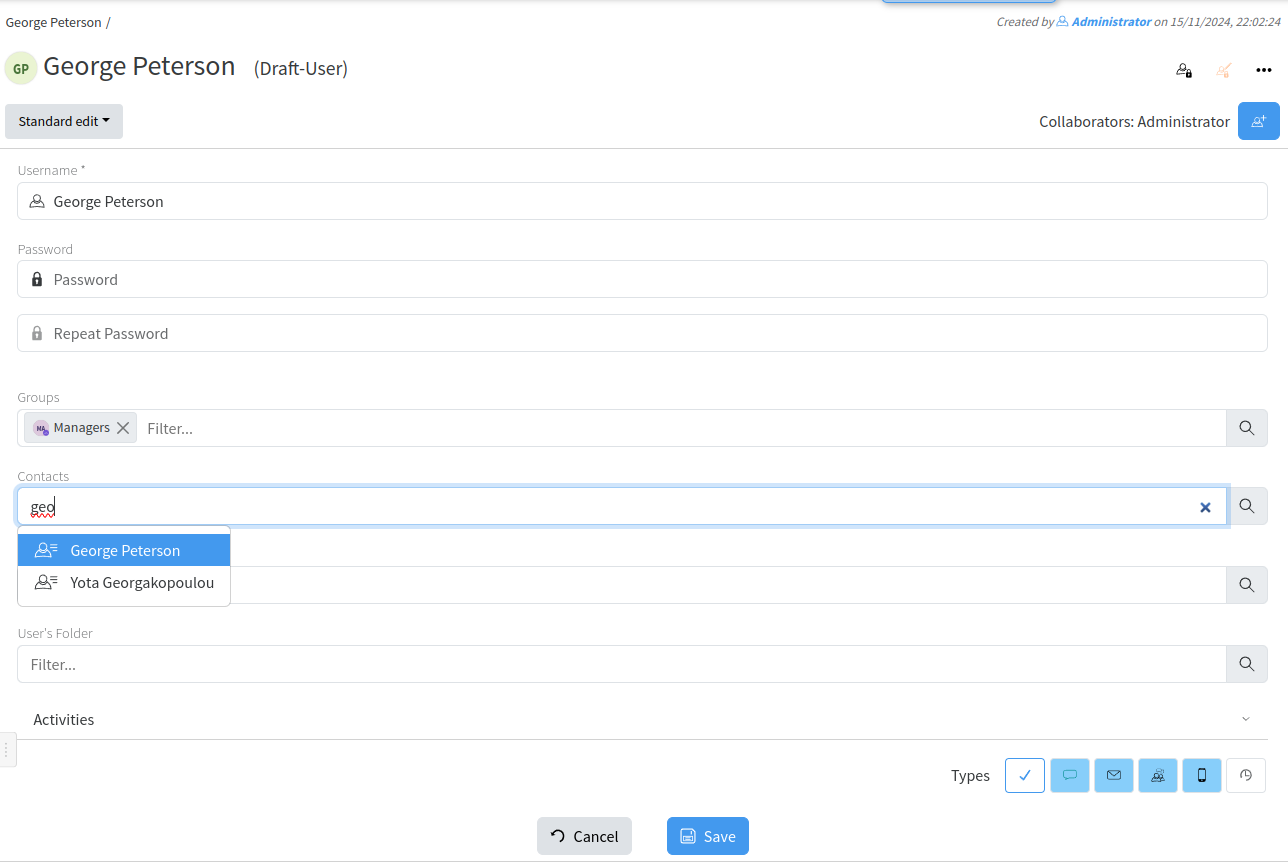](https://docs.profuzdigital.com/uploads/images/gallery/2024-11/c7timage.png)
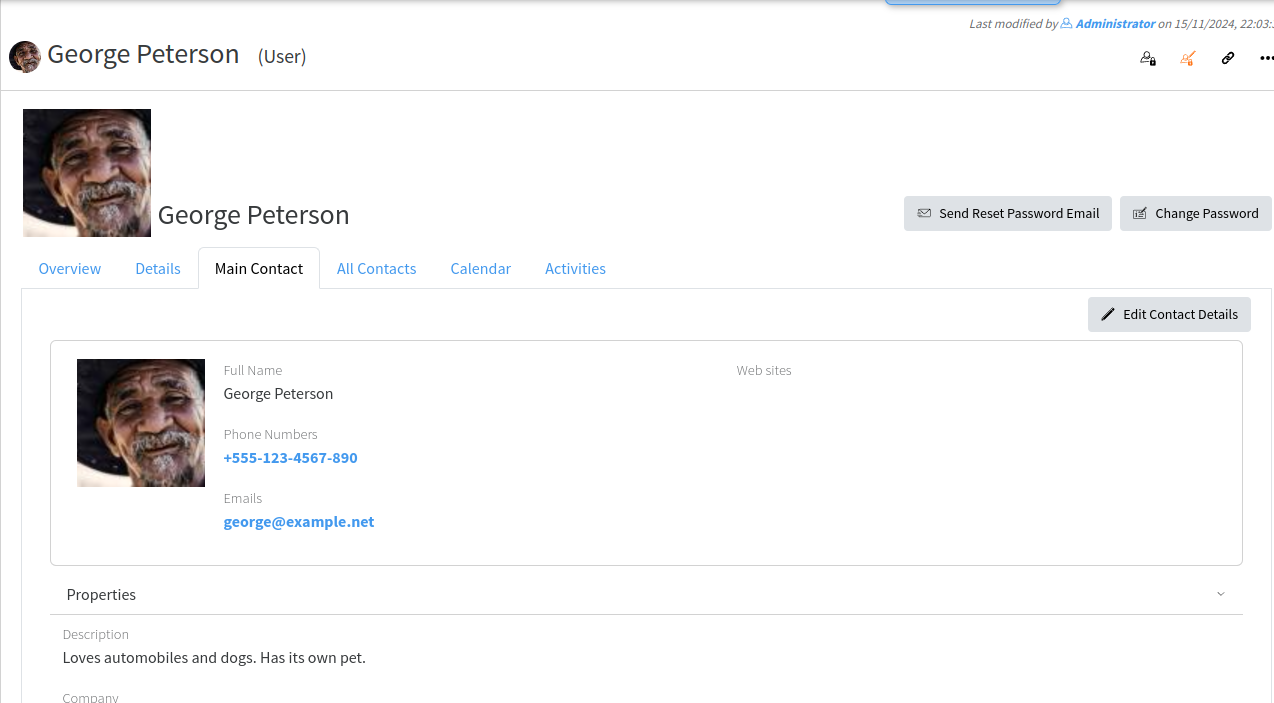
The details of the contact now appear in the Main Contact tab
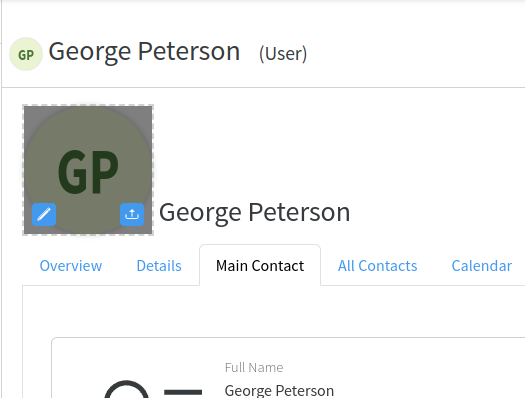
[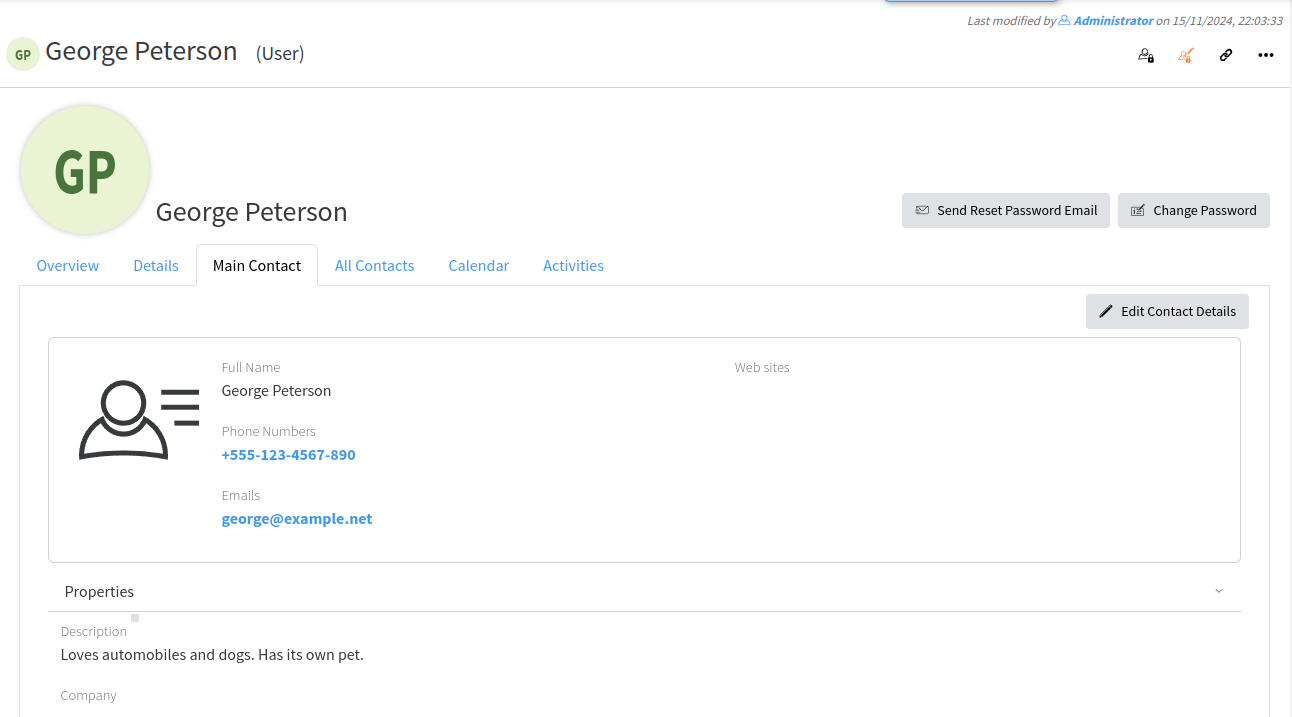](https://docs.profuzdigital.com/uploads/images/gallery/2024-11/CZ1image.png)
When contact is attached it may have also an image of the user
[](https://docs.profuzdigital.com/uploads/images/gallery/2024-11/glnimage.png)
[](https://docs.profuzdigital.com/uploads/images/gallery/2024-11/dJZimage.png)
# Managing Permissions
## Understanding Permissions logic
Permissions in LAPIS are per object. They control the common operations that are allowed or denied on an object for particular Users and Groups. The most important ones are:
- **read** – allows/denies an object to be accessible
- **write** – allows/denies an object to be modifiable
- **delete** – allows/denies object to be delete-able
- **download** – allows/denies an object to be downloadable
- **owner** – allows/denies all operations
Each object in the system has **explicitly set** and **implicit** permissions. Explicit permissions are set to each object and can be changed manually, while **implicit** permissions are applied to an object through connected to it other objects (for example from a Folder object in which it is present) or other rules (for example an Assignee property gives permissions to its Task). Combination of explicit and implicit permissions gives the effective permissions of an object. Explicit permissions overwrite the Implicit permissions. **Deny** of an operation has priority in effective (combined) permissions.
When an object is created in the system it receives the default explicit permissions as set for its type. This is configured in the “Default Instance Permissions” property in the corresponding Type or if not set there, from the first ancestor Type in which it is defined.
## Define Default Instance Permissions for a Type
You have to be part of Administrators group to be able to perform these tasks. Go to the menu Administration/Types and find the type you want to manage.
[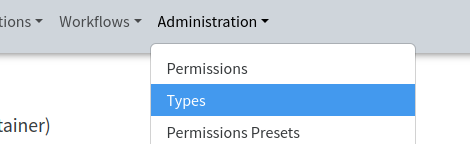](https://docs.profuzdigital.com/uploads/images/gallery/2024-11/Zboimage.png)
[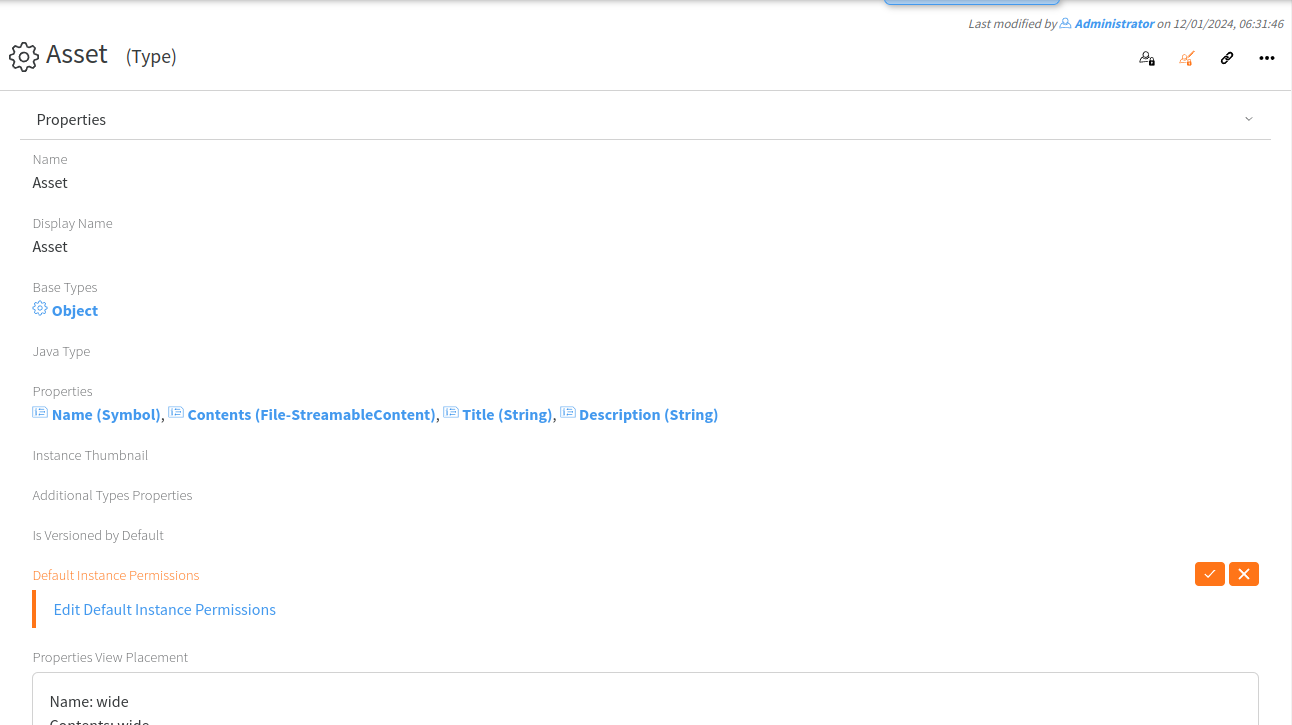](https://docs.profuzdigital.com/uploads/images/gallery/2024-11/FM1image.png)
Edit the “Default Instance Permissions” property, add users, groups or Everyone and allow or deny the operations you want for each of those:
[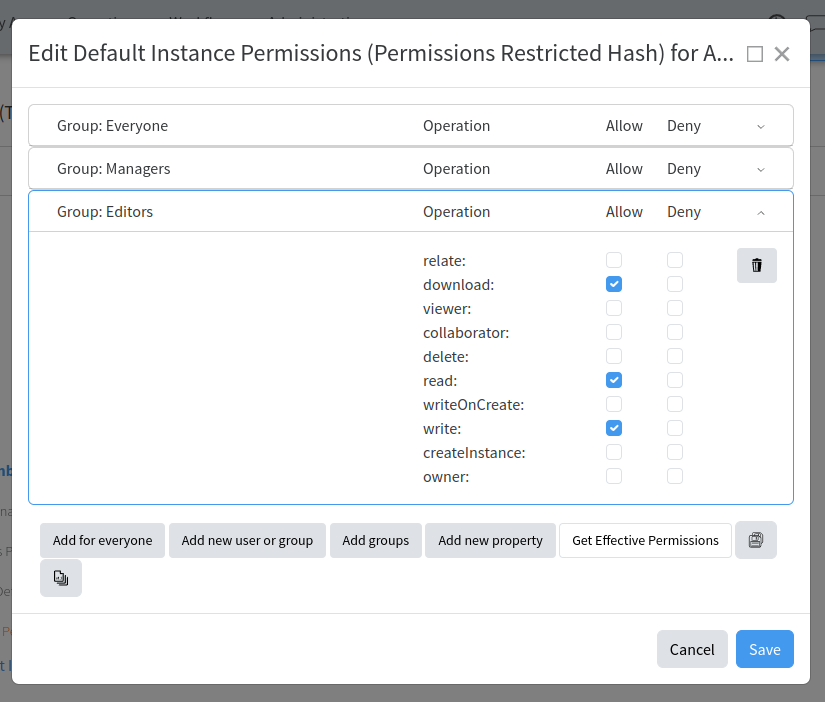](https://docs.profuzdigital.com/uploads/images/gallery/2024-11/71oimage.png)
Note that those permissions will be applied to the objects created from now on. All existing objects will keep their existing permissions.
## Using Folders, Categories and Tags to manage permissions
Folders, Categories and Tags are all configured to provide inherited permissions to objects they contain. It is enough to set or change permissions to a folder in order to easily propagate them to multiple objects. Note that objects’ explicit permissions will overwrite those set in a folder.
## Change explicit permissions of a particular object
Click on Edit Permissions button in the object header:
[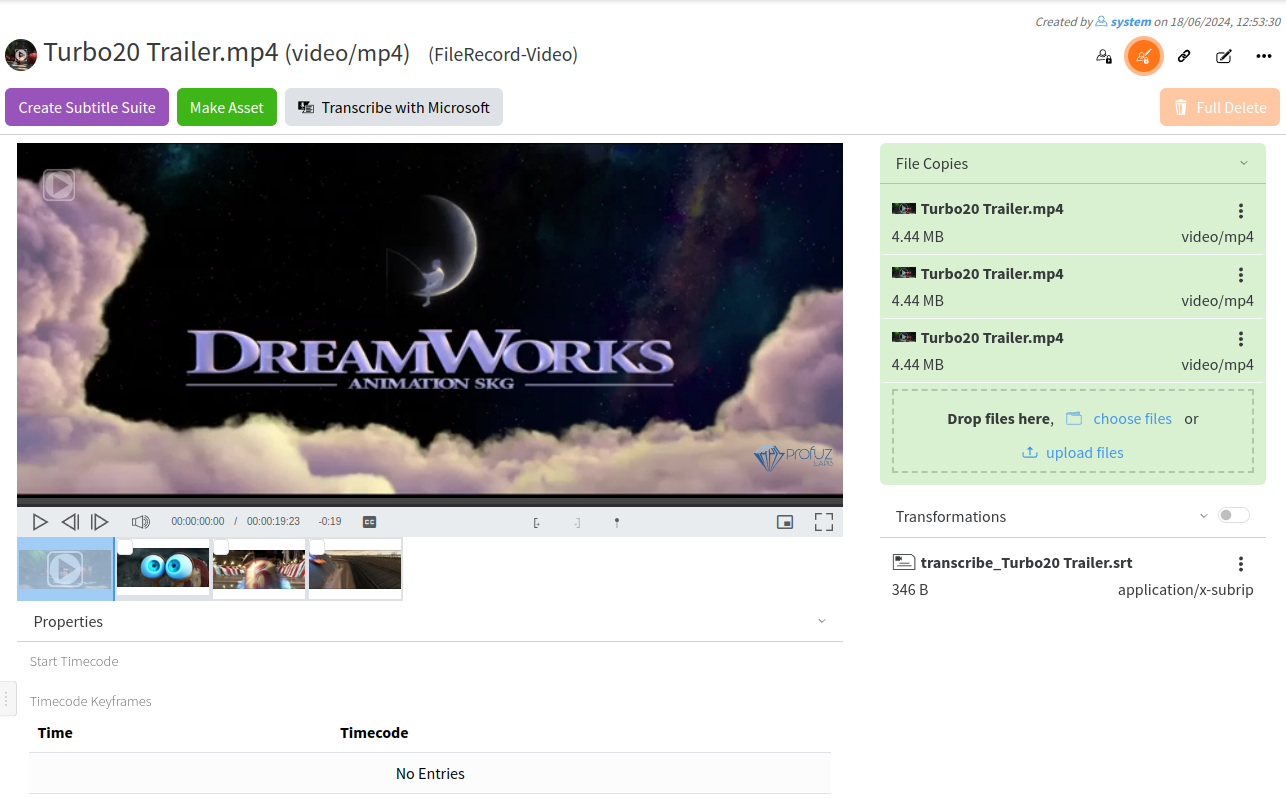](https://docs.profuzdigital.com/uploads/images/gallery/2024-11/WK4image.png)
then click on “Edit Permissions”:
[](https://docs.profuzdigital.com/uploads/images/gallery/2024-11/TJEimage.png)
and set the permission you want to be applied to this object:
[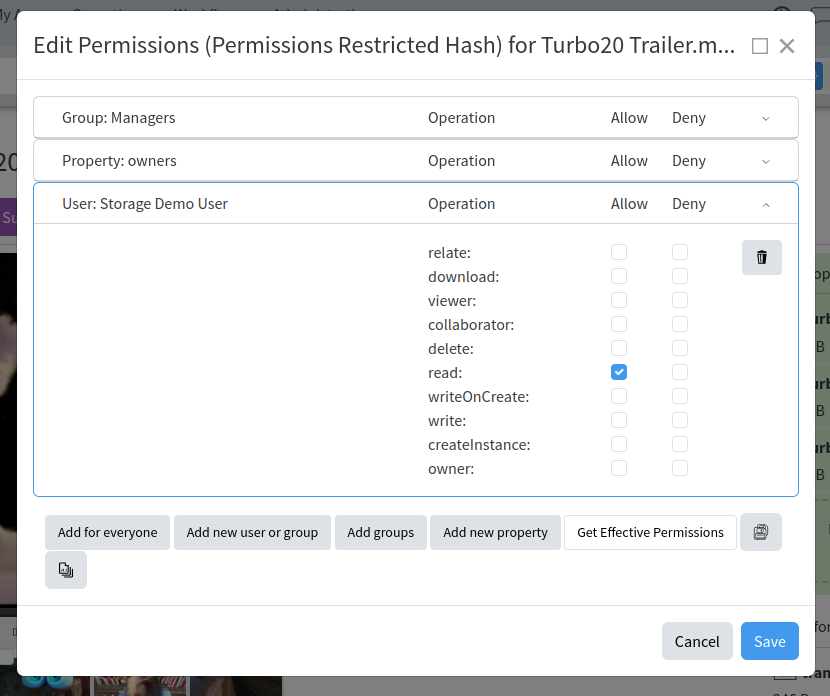](https://docs.profuzdigital.com/uploads/images/gallery/2024-11/Xybimage.png)
# Commercial Management
# Sales process
General Sales process goes in the following way:
The Process starts by creating a **Deal**. This is the first entry in the system of the deal details. It can be used for internal approval if necessary or that can be done on some of the following steps as well.
Then **Quote** – **Order** – **Project** - **Invoice**
Before starting sales process, products and services have to be defined. Please refer to Products and Services Section
### Starting a Deal
There are several ways to start a Deal:
- From a contact, which type is **External**, and relationship role is **Client** (which might be a company or individual) **Actions/Start sales Deal**.
[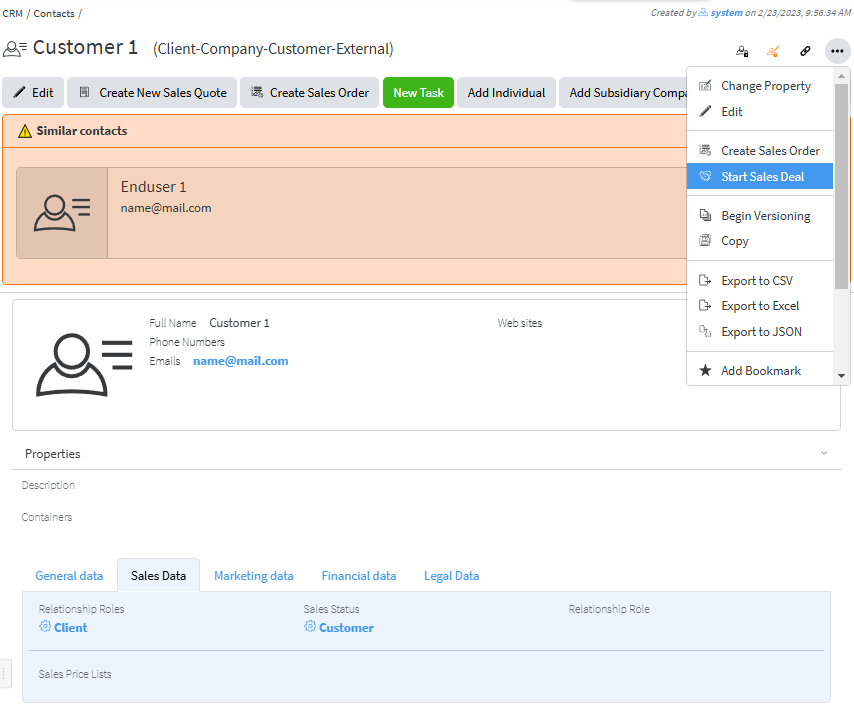](https://docs.profuzdigital.com/uploads/images/gallery/2024-11/wn4image.png)
- From **Create new** menu choose **Other**, then search for **Sales Deal** and select it. Press SAVE
- From **Commercial module** – **Sales Deals** – with the button Create New Sales deal
[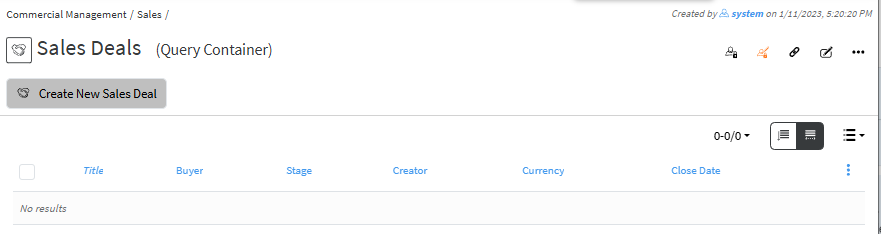](https://docs.profuzdigital.com/uploads/images/gallery/2024-11/ES5image.png)
The details then need to be added.
**Name** – a name of the deal
**Description** – some description or additional details can be added
**Close date** – if there is a deadline it can be added here
**Currency** – it is selected from a dropdown menu. If not selected USD is used by default.
**Price list** – it is selected from a drop-down menu, as options shown depend on the currency chosen. For Price list see [Creating Price List](https://docs.profuzdigital.com/books/profuz-lapis-user-guide/page/products-and-services#bkmrk-creating-price-list)
**Payment method, Payment terms, Shipping method** and **Contacts** are added if needed.
**Deal #** by default is a text, depending on the company policy for numbering Sales deal, however automatic numbering can be additionally configured. Enumerators can be added in advance to use automatic numbering. [Creating Enumerator](https://docs.profuzdigital.com/books/profuz-lapis-user-guide/page/enumerators#bkmrk-creating-enumerator)
By Pressing **Create**, the Deal is created.
[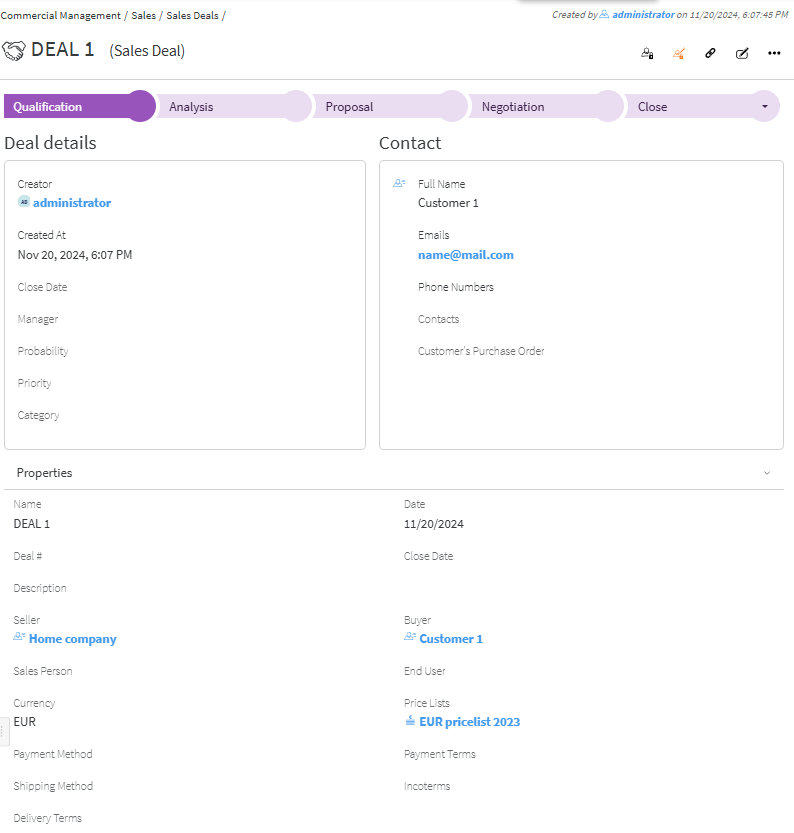](https://docs.profuzdigital.com/uploads/images/gallery/2024-11/Jdmimage.png)
Items (Sellables) can be added after that in Edit Mode (**Actions/Edit**) or by quick edit button [](https://docs.profuzdigital.com/uploads/images/gallery/2024-11/8Zqimage.png)
When pressing Add item at the bottom left of the deal screen, a field with item details is shown.
[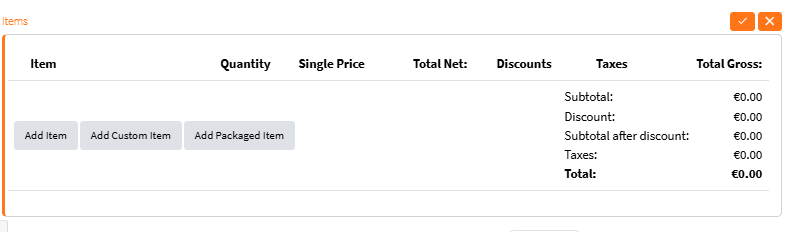](https://docs.profuzdigital.com/uploads/images/gallery/2024-11/oxoimage.png)
By clicking in an empty field a list with suggested Products is shown,
[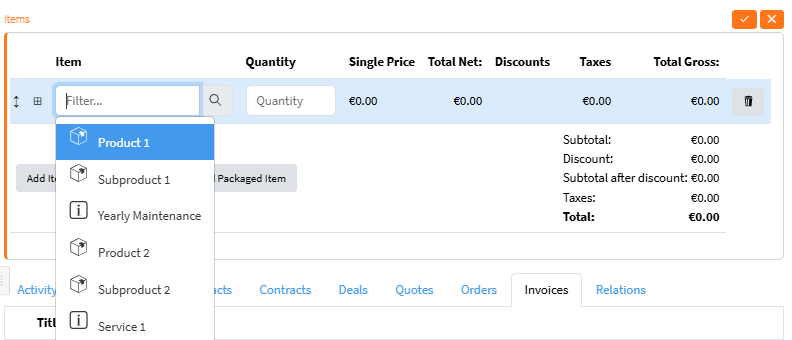](https://docs.profuzdigital.com/uploads/images/gallery/2024-11/jfVimage.png)
If another one needs to be found or new created you have to click on the **magnifier** and in the pop up screen you can find an existing item.
[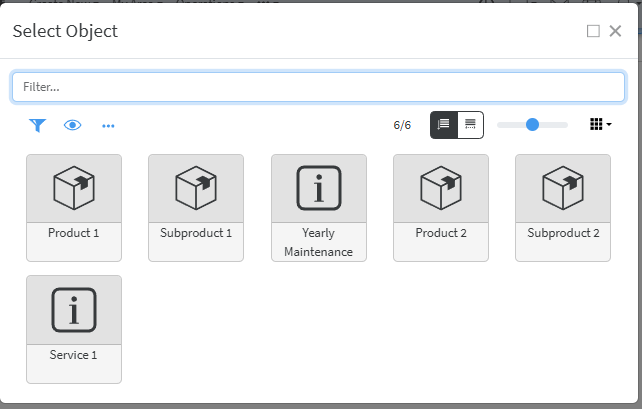](https://docs.profuzdigital.com/uploads/images/gallery/2024-11/1rzimage.png)
Once the Item is added and quantity is set to 1 or more, the price from Price List appears. It can be edited if necessary.
[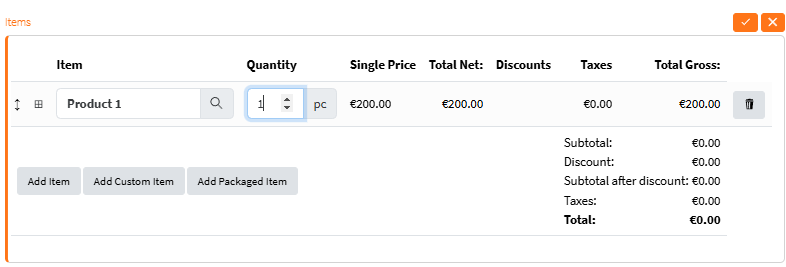](https://docs.profuzdigital.com/uploads/images/gallery/2024-11/1Muimage.png)
Some additional information needs to be filled in and it appears by pressing here [](https://docs.profuzdigital.com/uploads/images/gallery/2024-11/4Vwimage.png)
[](https://docs.profuzdigital.com/uploads/images/gallery/2024-11/vUeimage.png)
Quantity and single price can be edited.
The VAT, additional taxes and discounts (in % or with a value) can be added.
Stock will be defined later.
[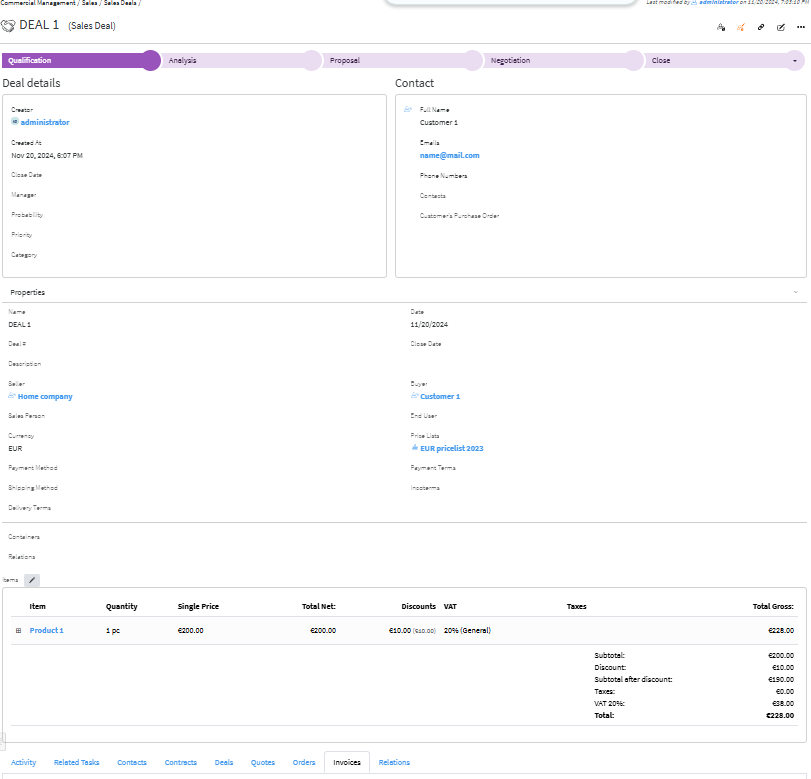](https://docs.profuzdigital.com/uploads/images/gallery/2024-11/deIimage.png)
Deal statuses by default configuration are
Qualification – Analysis – Proposal – Negotiation – Close Approved/Close Declined
Depending on customer’s needs these statuses can be more or less and named in a different way.
[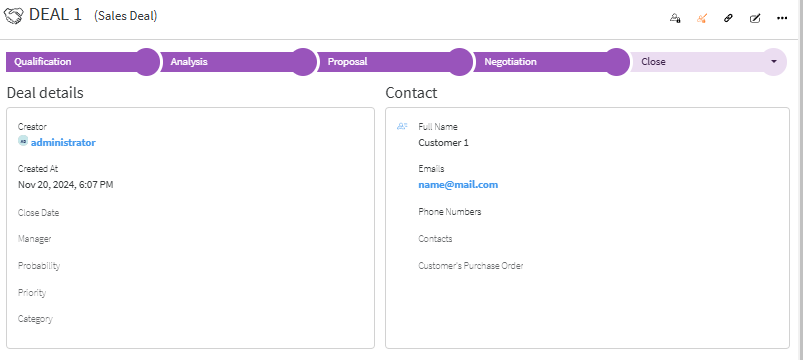](https://docs.profuzdigital.com/uploads/images/gallery/2024-11/w6Wimage.png)
In the Deal Object at the bottom of the page there are several tabs with useful links and information.
**Activities**
At the bottom of the page, in Activity tab, the Several types of Activities can be monitored
They can be swithed on by pressing the corresponding button.
[](https://docs.profuzdigital.com/uploads/images/gallery/2024-12/PTJimage.png)
The two main types are:
Comments  and Activity logs [](https://docs.profuzdigital.com/uploads/images/gallery/2024-12/oPyimage.png)
Comments are used for real time comments and notes.
Adding a comment - In the corresponding field *Add a Comment* is visible in grey.
[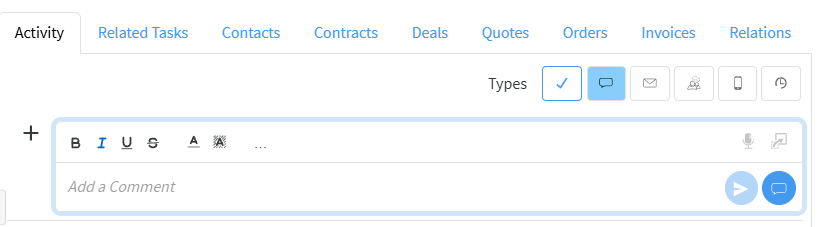](https://docs.profuzdigital.com/uploads/images/gallery/2024-12/ScWimage.png)
The comment is written there and it is added by pressing Submit Button.[](https://docs.profuzdigital.com/uploads/images/gallery/2024-11/H8ximage.png)
They can be formatted with colors, fonts, styles, etc and edited if needed.
[](https://docs.profuzdigital.com/uploads/images/gallery/2024-11/dHwimage.png)
Activity [](https://docs.profuzdigital.com/uploads/images/gallery/2024-12/uzJimage.png)– shows log of the Activities
[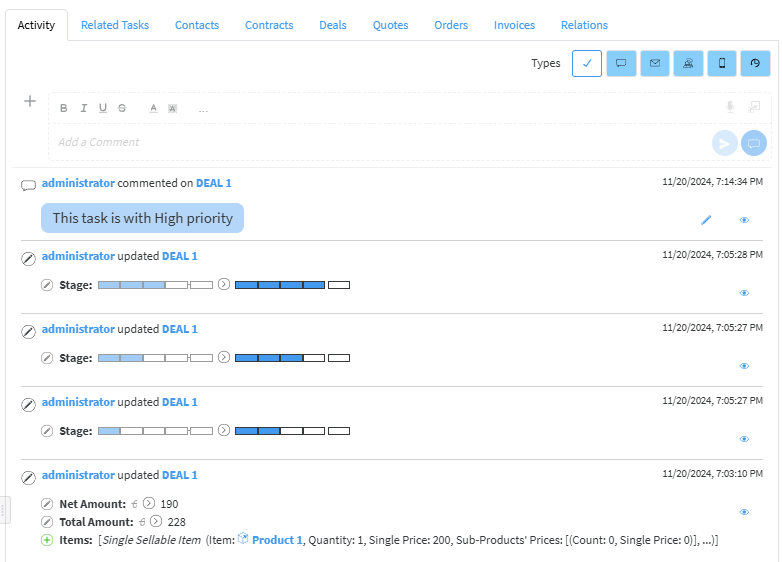](https://docs.profuzdigital.com/uploads/images/gallery/2024-11/c3oimage.png)
In **Relations** tab any related file or object can be seen **Relating a file or an object.**
### Creating a Quote
From Deal the Quote can be created by Actions/Generate Quote with the details that are in the Deal
[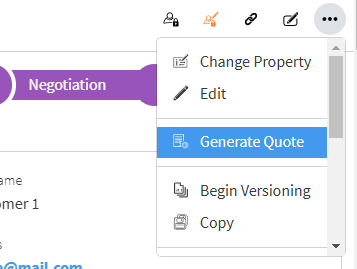](https://docs.profuzdigital.com/uploads/images/gallery/2024-12/LSximage.png)
Quote # by default is a text, depending on the company policy for numbering Sales quote, however automatic numbering can be additionally configured. Enumerators can be added in advance to use automatic numbering. [Creating Enumerator](https://docs.profuzdigital.com/books/profuz-lapis-user-guide/page/enumerators#bkmrk-creating-enumerator)
[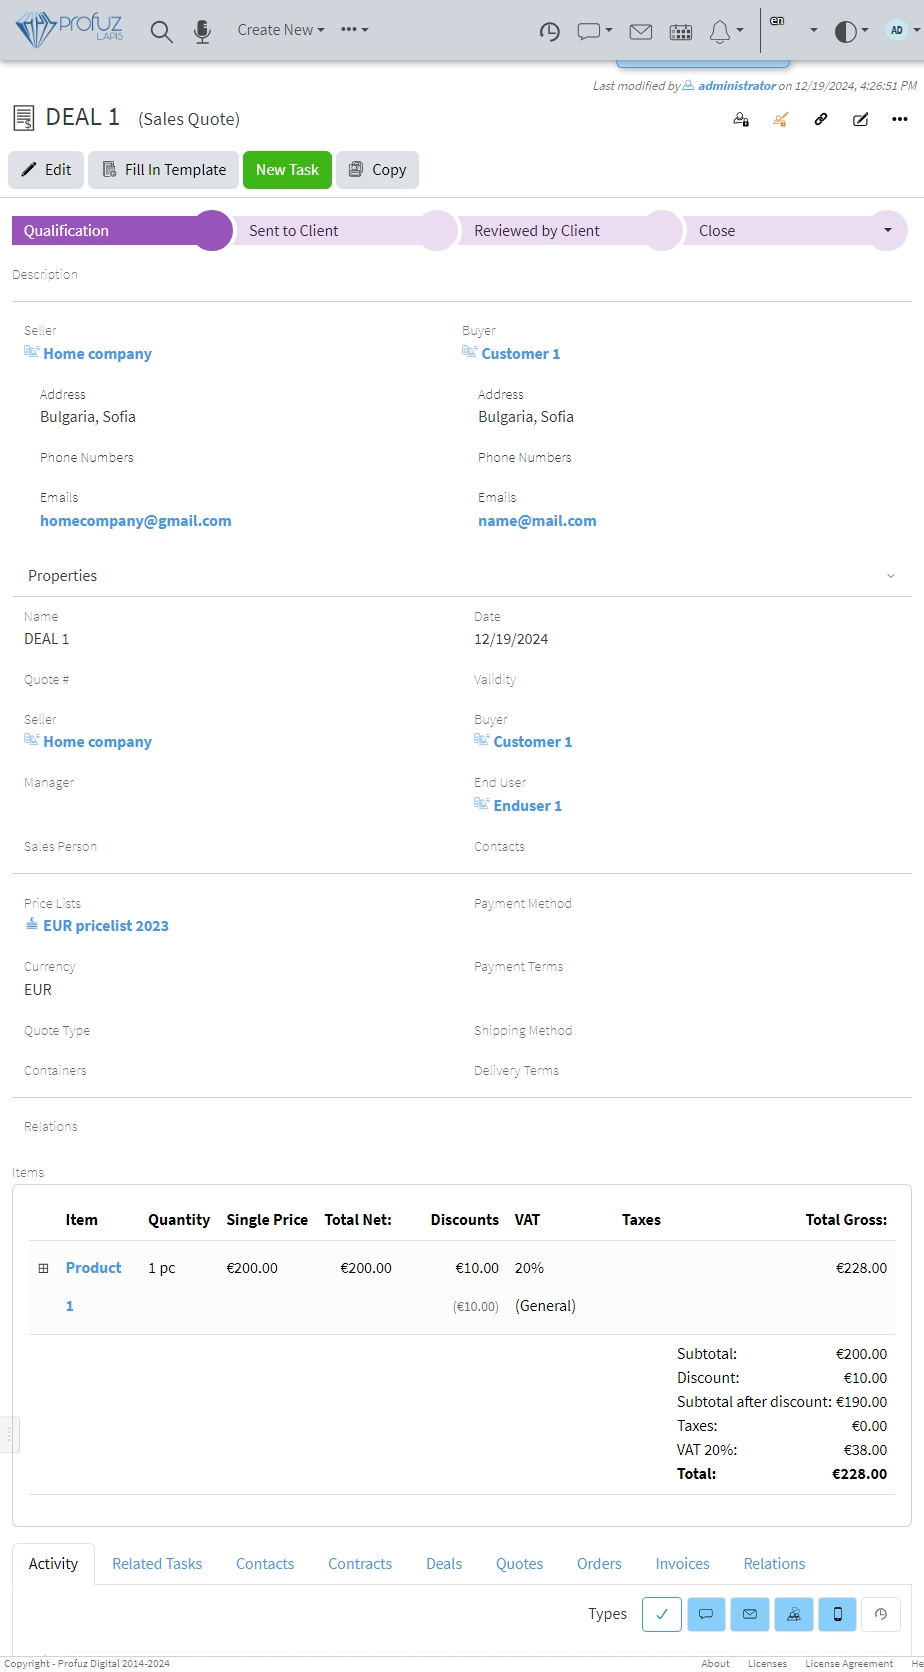](https://docs.profuzdigital.com/uploads/images/gallery/2024-12/4gjimage.png)
Quote Statuses by default are Qualifications – Sent to Client – Reviewed by Client – Close(Approved/Declined)
[](https://docs.profuzdigital.com/uploads/images/gallery/2024-12/Yhsimage.png)
To create A file from Template with the details from the object, go to Actions – Fill in Template from the Object Operations menu, at the upper right  See [Creating a template](https://docs.profuzdigital.com/books/profuz-lapis-user-guide/page/document-templates#bkmrk-creating-template)
[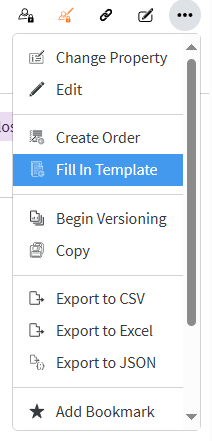](https://docs.profuzdigital.com/uploads/images/gallery/2024-12/lgaimage.png)
and choose the Template you need.
Or using the Button if available
[](https://docs.profuzdigital.com/uploads/images/gallery/2024-12/IoQimage.png)
[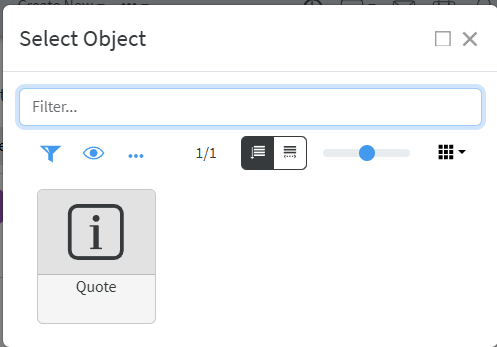](https://docs.profuzdigital.com/uploads/images/gallery/2024-12/Esvimage.png)
Once selected, the document is generated. It might need some time.
[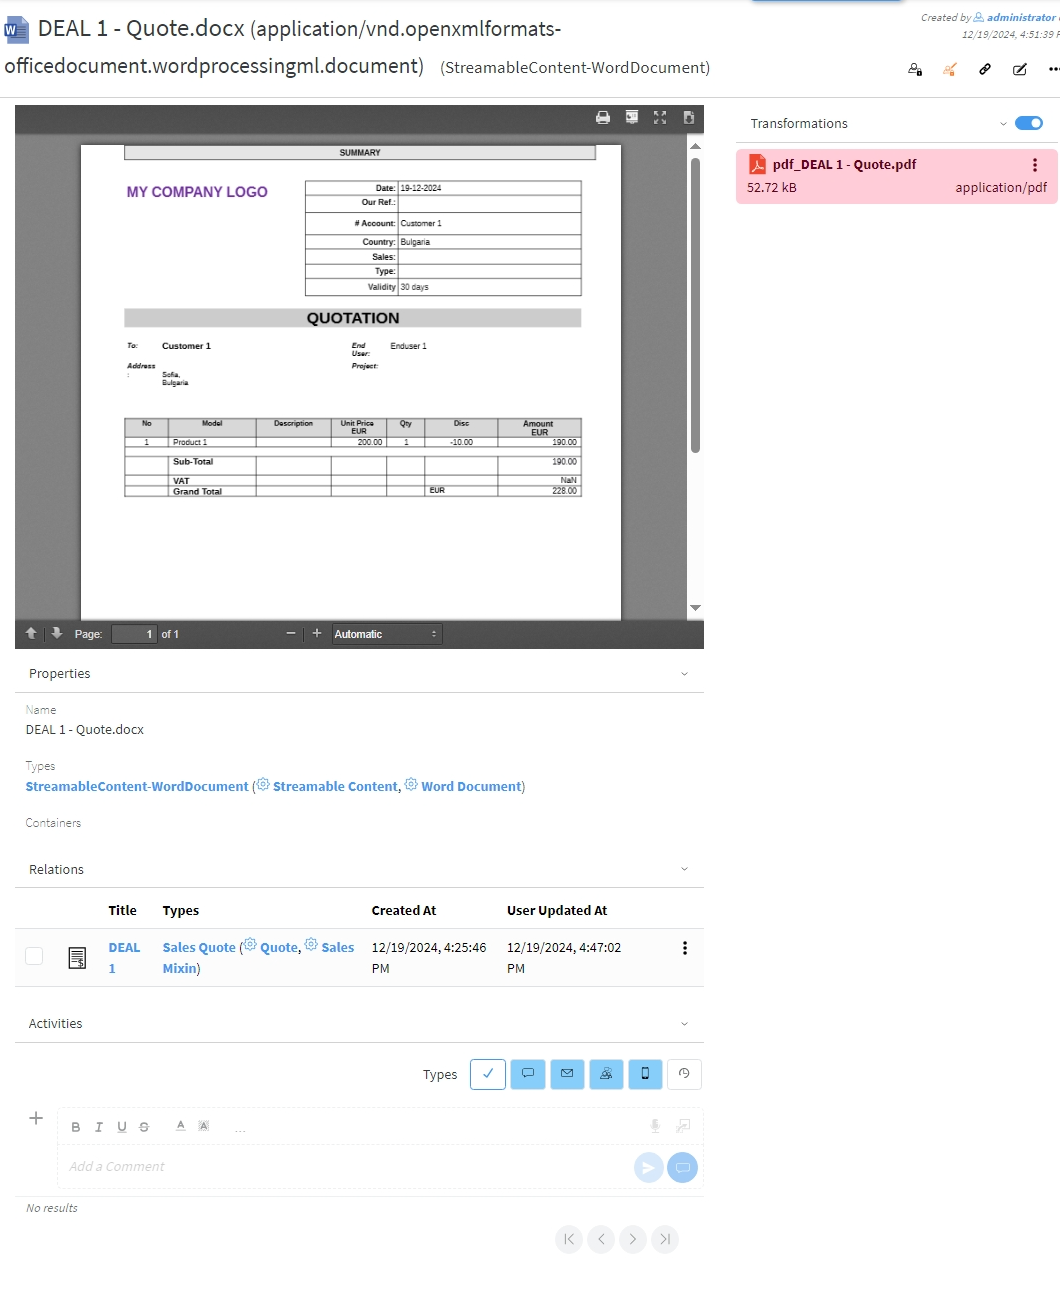](https://docs.profuzdigital.com/uploads/images/gallery/2024-12/88Uimage.png)
Then the file is generated in docx format. Docx file is shown in the Contents field.
There is pdf transformation available as well, which can be shown or hidden by swithing on
[](https://docs.profuzdigital.com/uploads/images/gallery/2024-12/Cbnimage.png)
and off the Transformations list
[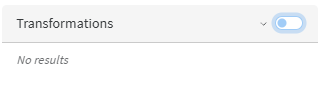](https://docs.profuzdigital.com/uploads/images/gallery/2024-12/YsSimage.png)
The download of .pdf file can be done by download button in JS viewer [](https://docs.profuzdigital.com/uploads/images/gallery/2024-12/SW6image.png)
or in the Transformation field, by clicking the Actions icon [](https://docs.profuzdigital.com/uploads/images/gallery/2024-12/HiPimage.png)
[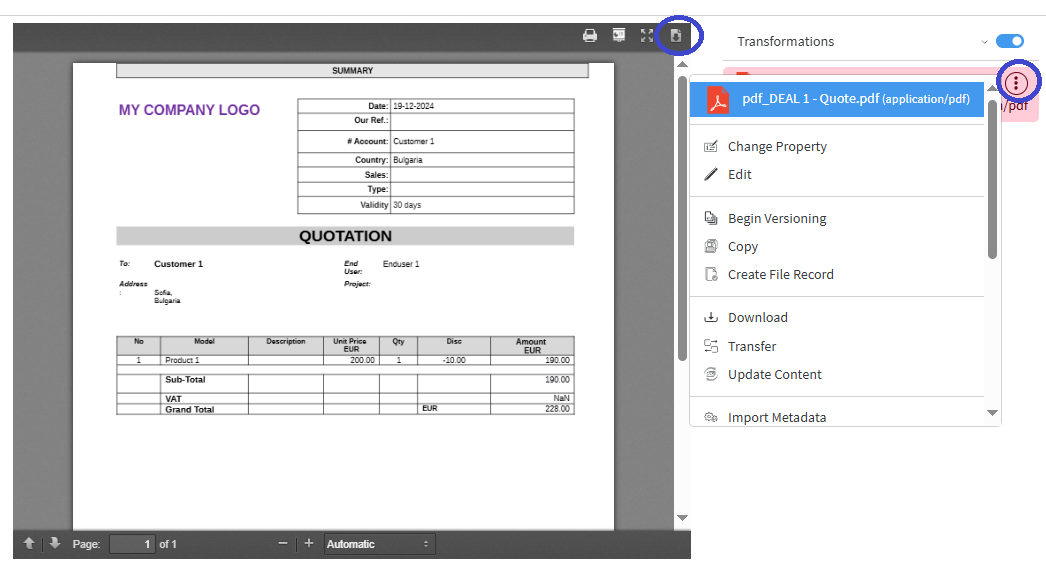](https://docs.profuzdigital.com/uploads/images/gallery/2024-12/XbWimage.png)
The Quote object can be accessed from the current view of the generated file as it appears at the bottom in the **Relations** section
[](https://docs.profuzdigital.com/uploads/images/gallery/2024-12/Kw8image.png)
A docx file appears in Relations tab at the bottom of **Quote object**. It can be downloaded from there as well via Actions icon
[](https://docs.profuzdigital.com/uploads/images/gallery/2024-12/4FWimage.png)
[](https://docs.profuzdigital.com/uploads/images/gallery/2024-12/JDbimage.png)
Once the status of the Quote is set to Approved, the next step can be done – creating an order
### Creating an Order
- From Create New/Other – Sales order – in case Sales process doesn’t go via Deal-Quote
- From a contact, which type is **External**, and relationship role is **Client** (which might be a company or individual) **Actions/Creates Sales Order** - in case selling process doesn’t go via Deal-Quote
- From Quote the Order can be created by Actions/Create Order
Order statuses by default configuration are Draft – Validated – Processed - Close (Delivered or Canceled)
[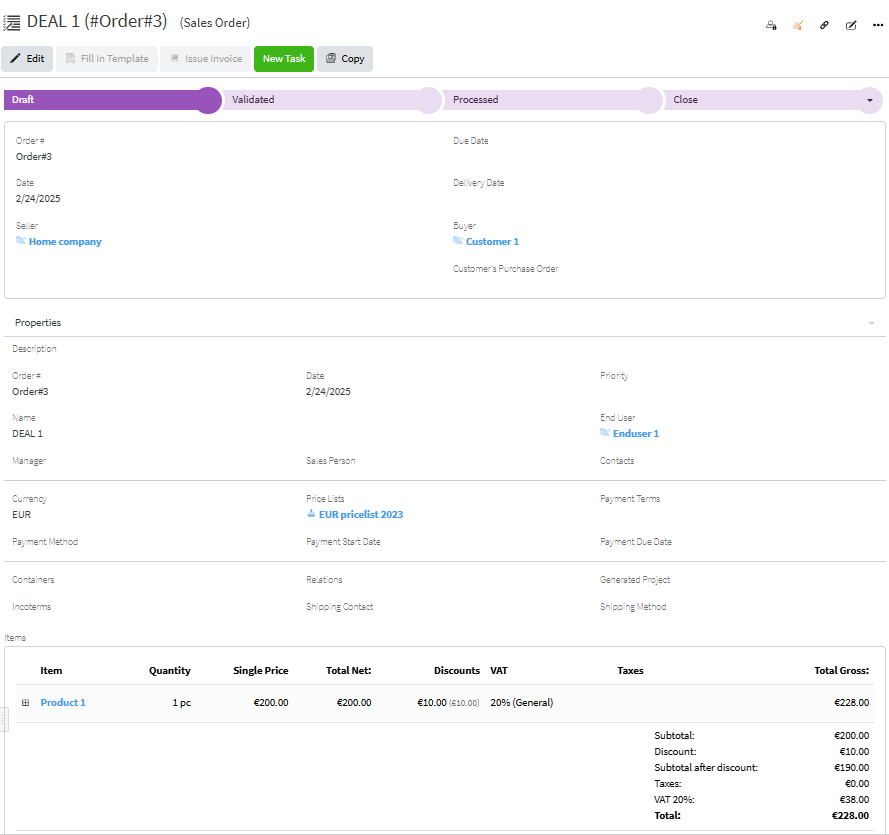](https://docs.profuzdigital.com/uploads/images/gallery/2025-02/yvRimage.png)
Order has the same data as Quote. If necessary, some may be added and some amended.
Order # by default is a text, depending on the company policy for numbering Sales orders, however automatic numbering can be additionally configured. Enumerators can be added in advance to use automatic numbering. [Creating Enumerator](https://docs.profuzdigital.com/books/profuz-lapis-user-guide/page/enumerators#bkmrk-creating-enumerator)
Order statuses by default configuration are Draft – Validated – Processed - Close (Delivered or Canceled)
In order to go to Stage **Processed**, the stock for each Product or Service on stock has to be set. That means that exact stock, from the inventory has to be appointed. If that is not done the current message will appear
[](https://docs.profuzdigital.com/uploads/images/gallery/2024-11/t2simage.png)
This is how the stock is appointed:
Click on the square near the Item as shown below
[](https://docs.profuzdigital.com/uploads/images/gallery/2025-02/Mtuimage.png)
Then the Item area appears, upon hovering on the Stock property, the *Quick Edit* icon appears on the right [](https://docs.profuzdigital.com/uploads/images/gallery/2025-02/LhIimage.png)
[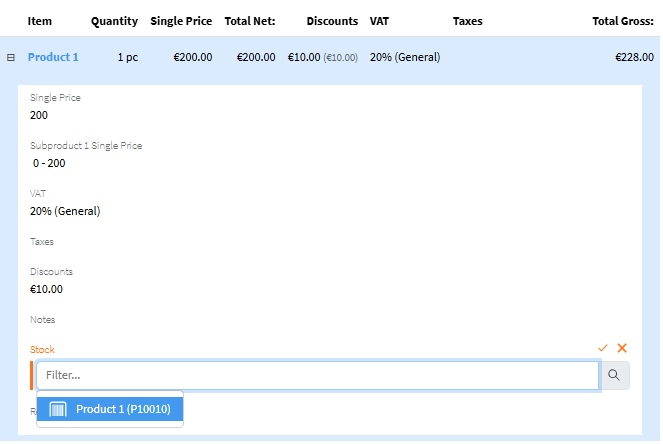](https://docs.profuzdigital.com/uploads/images/gallery/2025-02/iybimage.png)
The stocks that are available, and which Product corresponds to the Item, appear as choices.
Same can be done in the *Edit* mode of the Order or *Quick Edit* of Items.
After the stocks are set for each Item that needs it, the Status can be changed to Processed and Invoice object can be created.
Documents such as Proforma Invoices, Order Acknowledgements (or other) can be generated by Fill in Template in Actions. See [Creating a template](https://docs.profuzdigital.com/books/profuz-lapis-user-guide/page/document-templates#bkmrk-creating-template) for more details.
[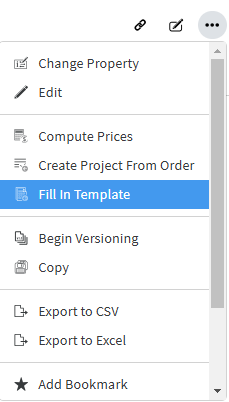](https://docs.profuzdigital.com/uploads/images/gallery/2025-02/du1image.png)
[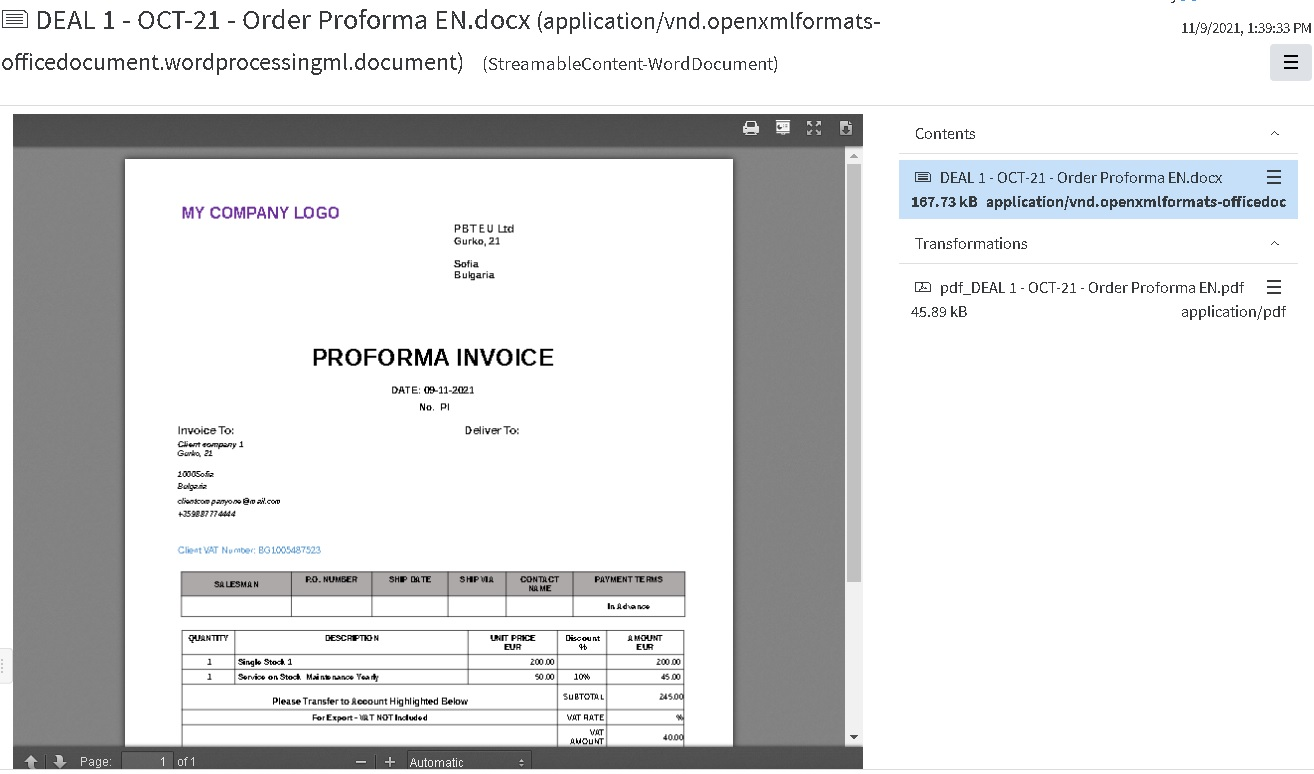](https://docs.profuzdigital.com/uploads/images/gallery/2024-11/AOpimage.png)
## Creating a project from Sales Order
More information can be found in [Project Management](https://docs.profuzdigital.com/books/profuz-lapis-user-guide/page/project-management "Project Management") chapter
- From Create New/Other – Project
- From the Order can be created by Actions/Create Project from Order
[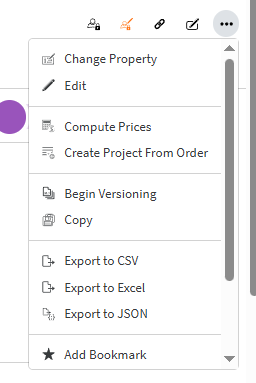](https://docs.profuzdigital.com/uploads/images/gallery/2025-03/image.png)
The new object is created of type Project.
[](https://docs.profuzdigital.com/uploads/images/gallery/2025-03/7Upimage.png)
New tasks or subprojects can be added as follows:
[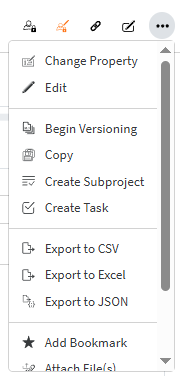](https://docs.profuzdigital.com/uploads/images/gallery/2025-03/9XMimage.png)
If different types of Tasks are defined, they can be used for the specific processes in the company.
[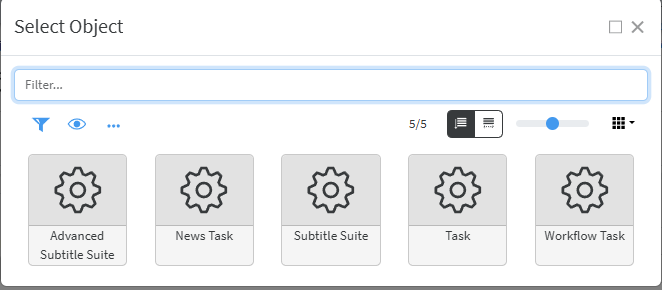](https://docs.profuzdigital.com/uploads/images/gallery/2025-03/BzZimage.png)
This is how a simple task looks like:
[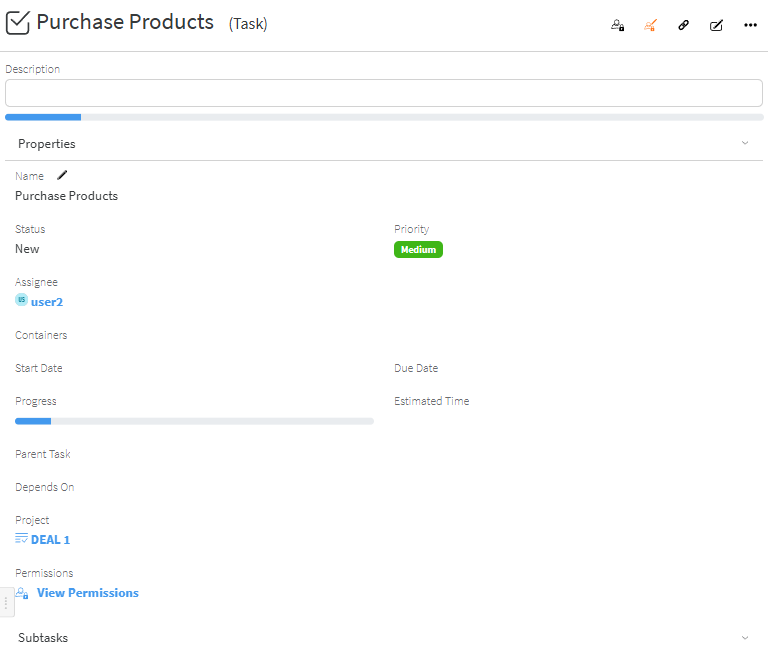](https://docs.profuzdigital.com/uploads/images/gallery/2025-03/AgIimage.png)
Tasks to the Projects appear in the Tasks tab
[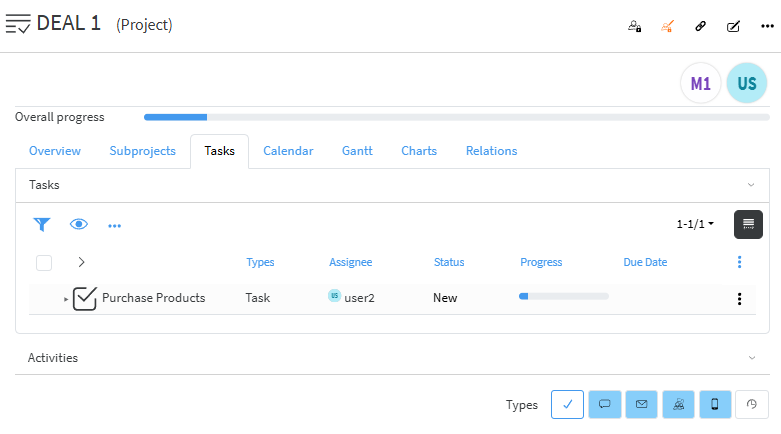](https://docs.profuzdigital.com/uploads/images/gallery/2025-03/g2himage.png)
## Issue an Invoice
From the order, which status is Processed Invoice can be created by **Actions - Issue Invoice**
[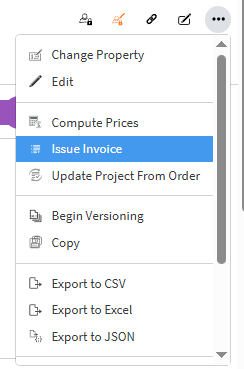](https://docs.profuzdigital.com/uploads/images/gallery/2025-03/fSIimage.png)
or using the button **Issue Invoice**
[](https://docs.profuzdigital.com/uploads/images/gallery/2025-03/Q1iimage.png)
The object of type Sales Invoice is created with the data from the order.
[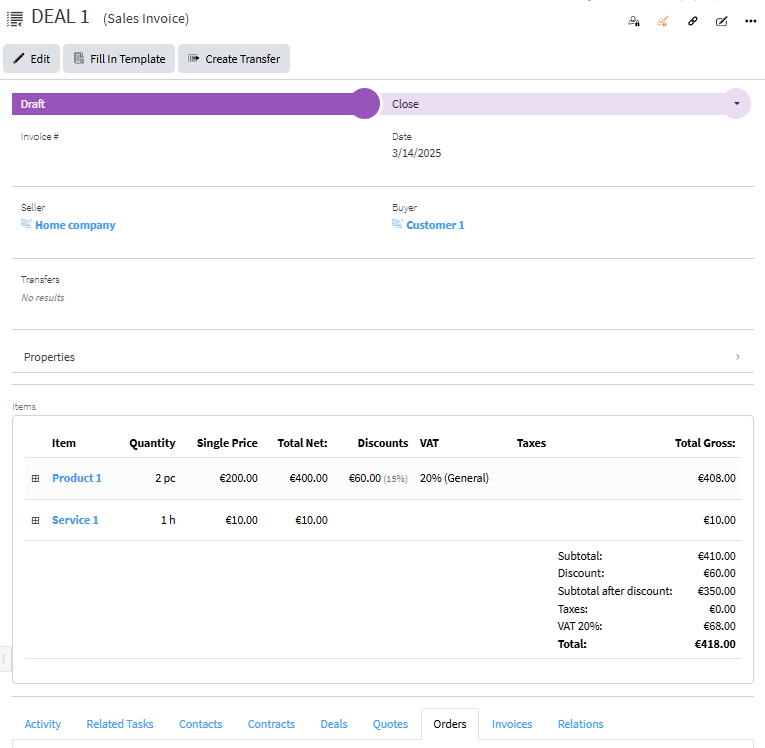](https://docs.profuzdigital.com/uploads/images/gallery/2025-03/WAQimage.png)
Properties field can be shown or hidden by pressing the arrow at the right part of the row [](https://docs.profuzdigital.com/uploads/images/gallery/2025-03/Lakimage.png)
When extended it is generally as follows:
[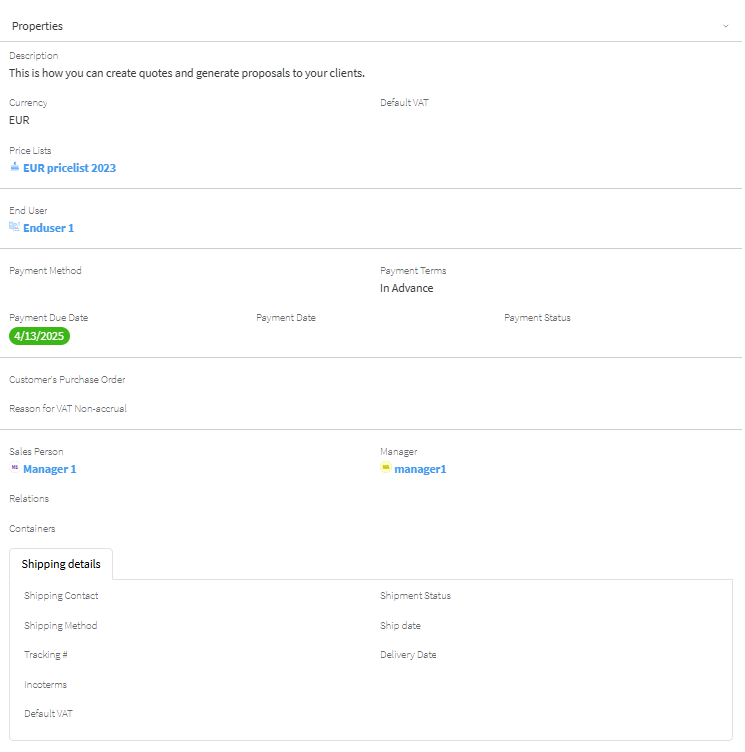](https://docs.profuzdigital.com/uploads/images/gallery/2025-03/ui4image.png)
Generally, depending on the official rules for Invoice numbering, different Enumerators can be chosen. See [Creating Enumerators](https://docs.profuzdigital.com/books/profuz-lapis-user-guide/page/enumerators#bkmrk-creating-enumerator) for details.
When the status is set to Validated, the number and current date are automatically assigned (Number will appear if a proper Enumerator is defined).
If you need to see more details for each item and which stock is assigned to the Item, click on the  near the Item.
[](https://docs.profuzdigital.com/uploads/images/gallery/2025-03/k5ximage.png)
[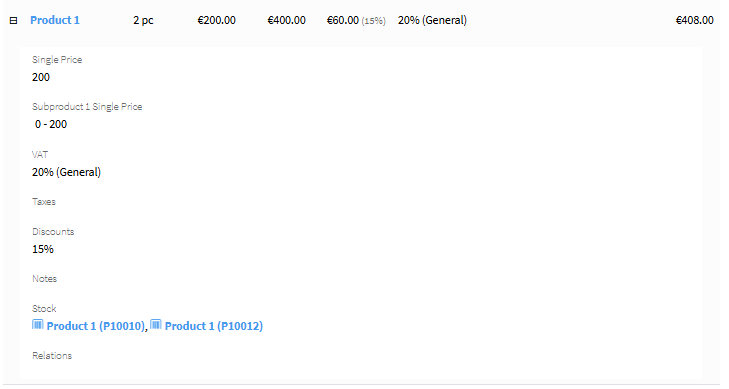](https://docs.profuzdigital.com/uploads/images/gallery/2025-03/xsVimage.png)
The export of the Invoice details to a MS Word document can be generated by Fill in template, choosing the corresponding Template. See [Creating a template](https://docs.profuzdigital.com/books/profuz-lapis-user-guide/page/document-templates#bkmrk-creating-template) for more details.
[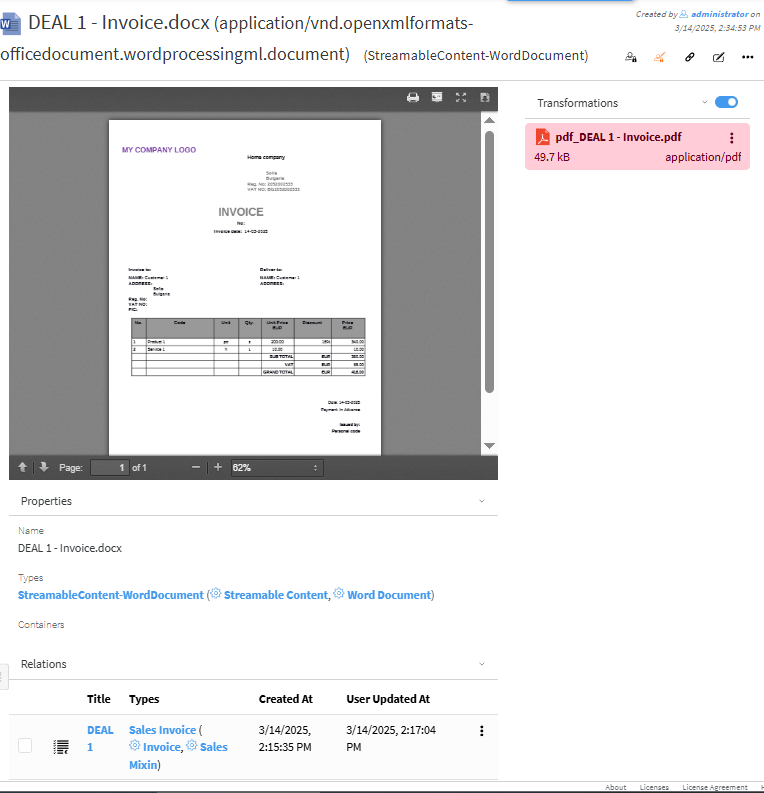](https://docs.profuzdigital.com/uploads/images/gallery/2025-03/IVXimage.png)
The process of delivering Stock items to customers is described in[ Sales Transfer ](https://docs.profuzdigital.com/books/profuz-lapis-user-guide/page/inventory#bkmrk-sales-transfer)section
# Products and services
## Creating New Product
This can be done, using the corresponding buttons, directly from **Commercial Management**, **Products and Services** Container, which can be found in each **Sales**, **Purchases**, **Inventory** Containers
**Commercial Management**, **Sales** - Icons view:
[](https://docs.profuzdigital.com/uploads/images/gallery/2024-11/znZimage.png)
**Commercial Management**, **Sales** - List view
[](https://docs.profuzdigital.com/uploads/images/gallery/2024-11/H7Mimage.png)
[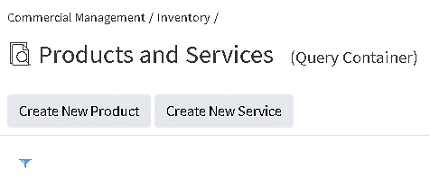](https://docs.profuzdigital.com/uploads/images/gallery/2024-11/cktimage.png)
or following the general rule for creating object
[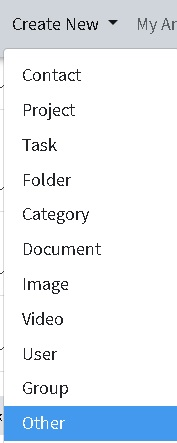](https://docs.profuzdigital.com/uploads/images/gallery/2024-11/O8Timage.png)
[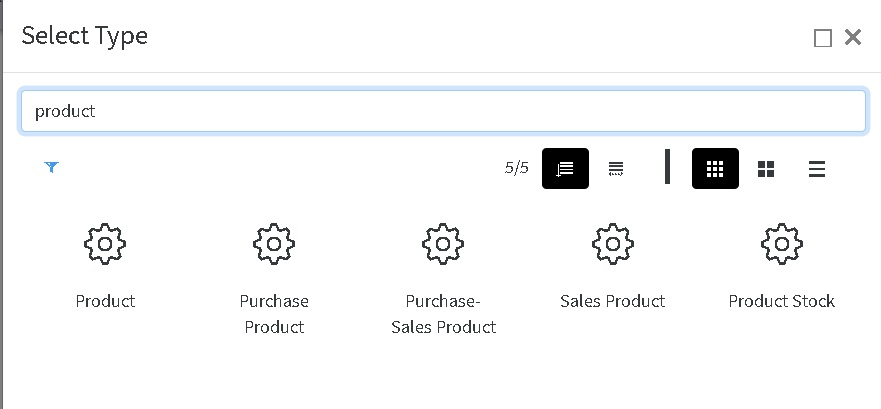](https://docs.profuzdigital.com/uploads/images/gallery/2024-11/0qyimage.png)
Depending on the purpose of the product/service it can be for Purchase only (Purchasing product), for Sale only (Sales product) or for both (Purchase-Sales Product)
When the New Object Window opens, some Common Details for all kind of products can be defined.
[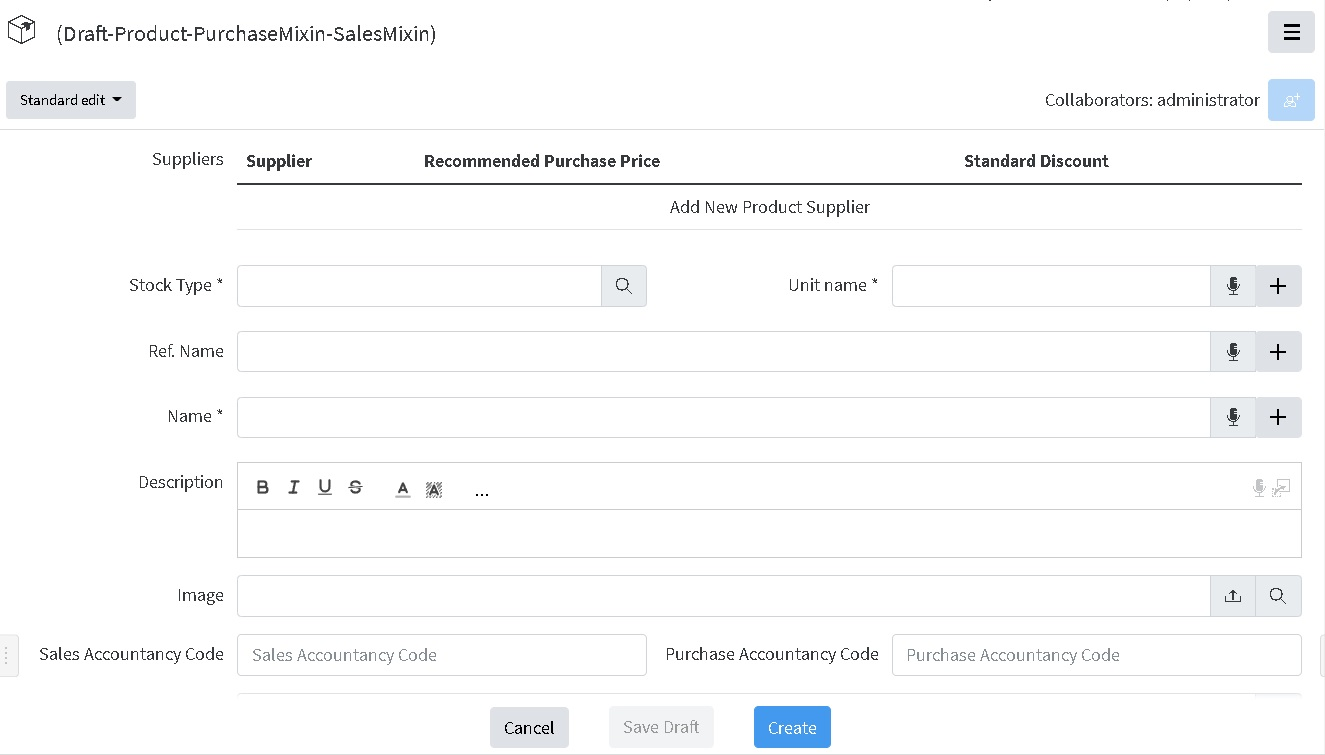](https://docs.profuzdigital.com/uploads/images/gallery/2024-11/OPkimage.png)
A supplier can be added pressing on the **Add New Product Supplier**
Supplier can be chosen by the Options that appear when clicked on the empty field near Supplier\*
[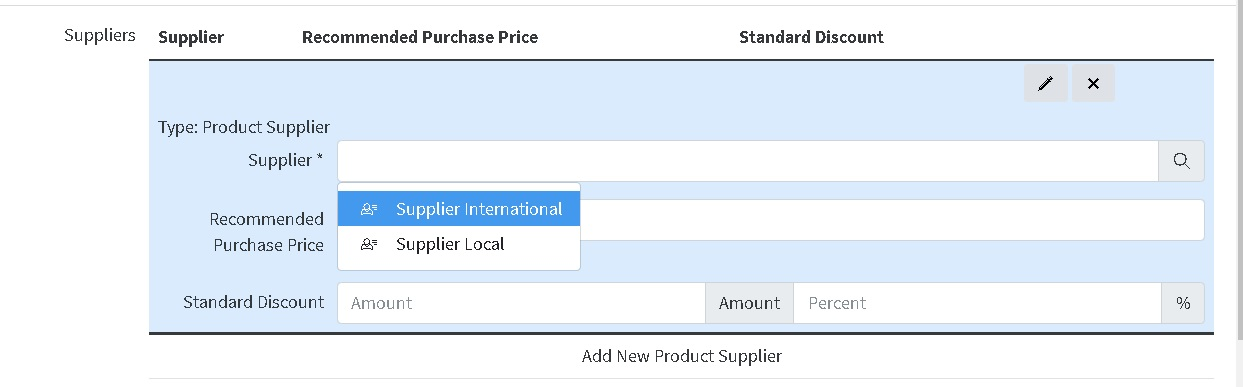](https://docs.profuzdigital.com/uploads/images/gallery/2024-11/m6bimage.png)
Then the Currency options appear by clicking directly on the text Currency
[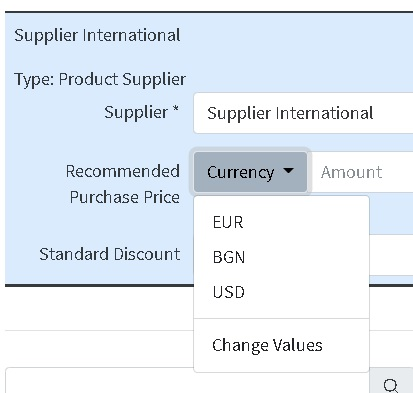](https://docs.profuzdigital.com/uploads/images/gallery/2024-11/j6yimage.png)
And the price is written in the next field
[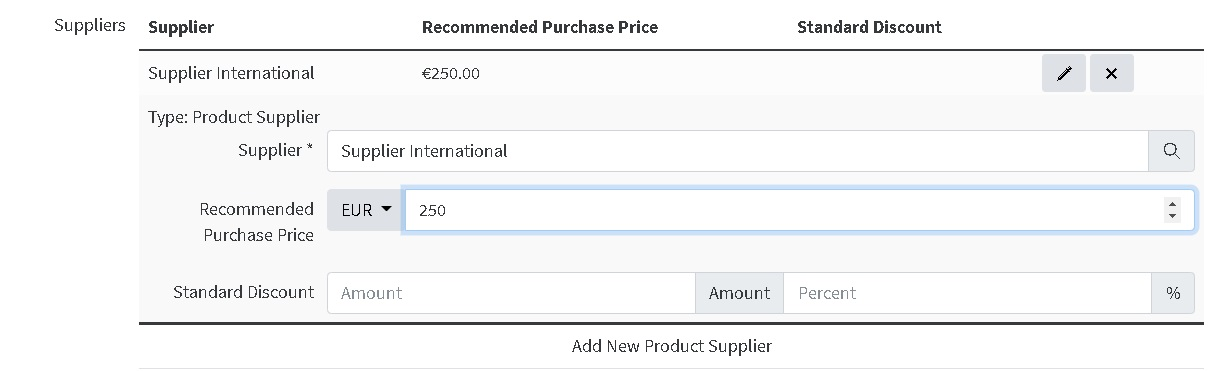](https://docs.profuzdigital.com/uploads/images/gallery/2024-11/Qteimage.png)
Then discounts can be described in fixed amount and/or percentage
If another Supplier needs to be added, that can be done in the similar way by pressing the below the already defined supplier details
The details: [Stock type](https://docs.profuzdigital.com/books/profuz-lapis-user-guide/page/inventory "Inventory"), Unit name and Name are mandatory (marked with \*). Other details are optional.In order to align with the accountancy papers, there is an option to put as details Purchase Accountancy Code and Sales Accountancy Code.
The process is finished by pressing button **Create** at the bottom of the screen.
[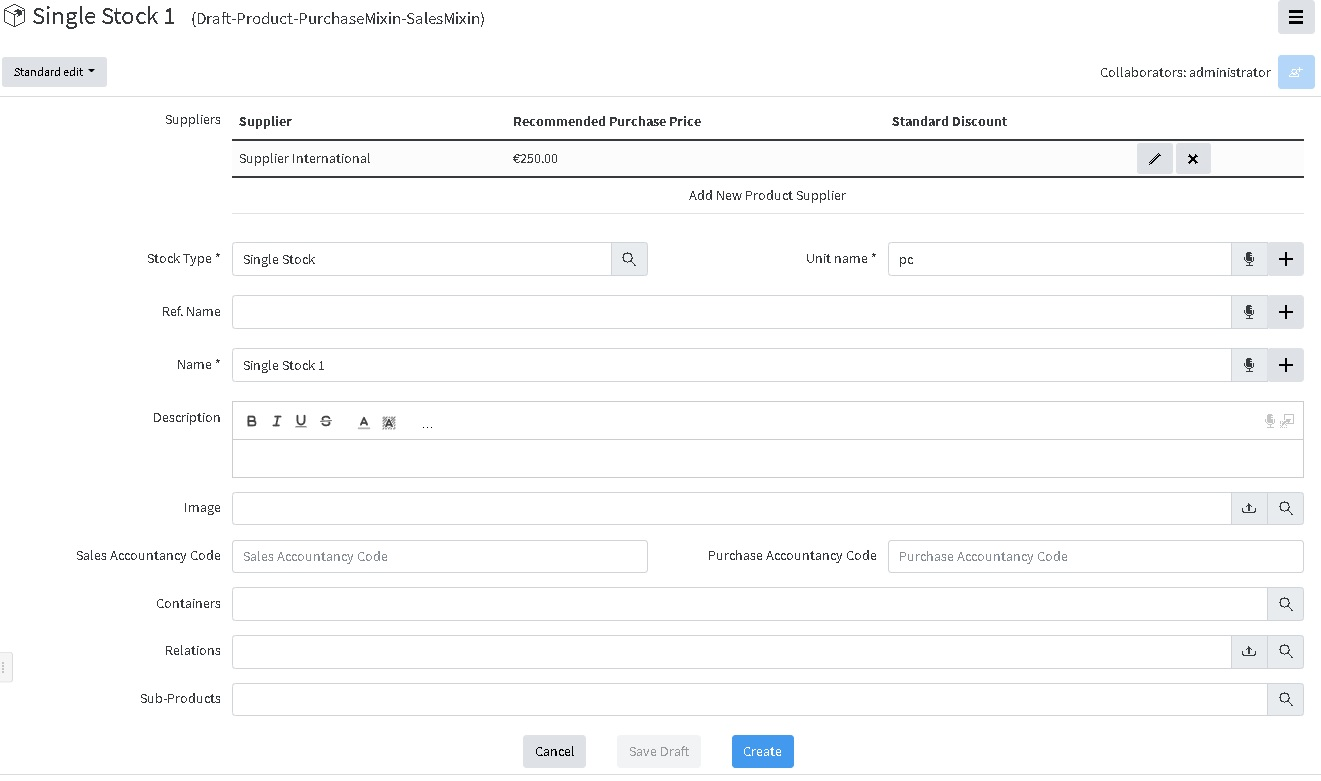](https://docs.profuzdigital.com/uploads/images/gallery/2024-11/5nHimage.png)
And this is how the Product Page looks like:
[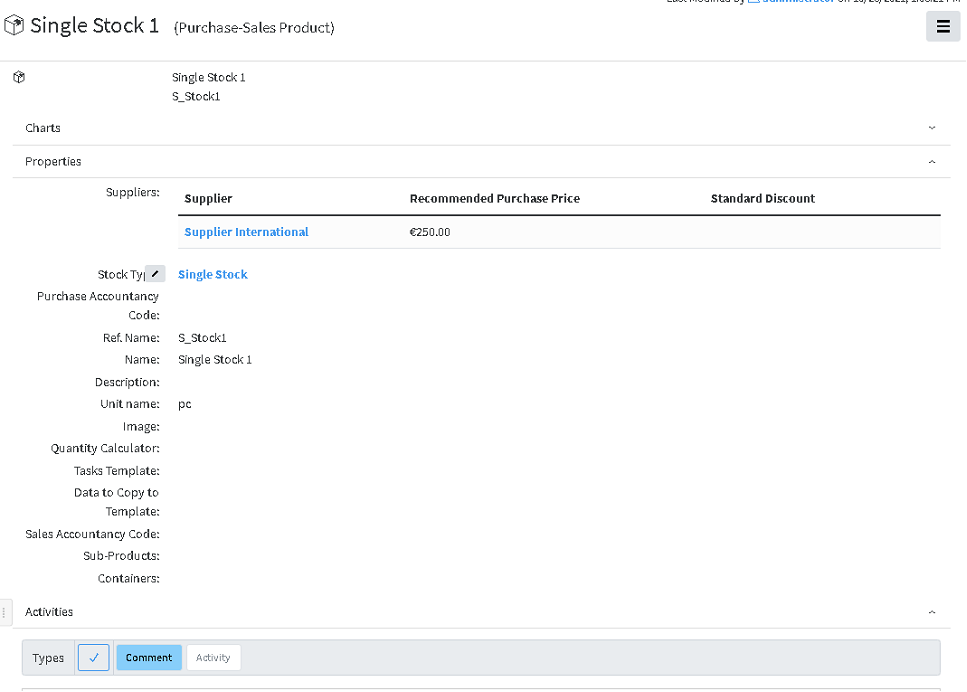](https://docs.profuzdigital.com/uploads/images/gallery/2024-11/t0Cimage.png)
here are 3 zones – Charts, Properties, Activities, that can be expanded or hidden by pressing the ^ at the end of the rows
## Creating New Service
Similarly to creating a new Product, this can be done directly from **Commercial Management**, **Products and Services** Container, which can be found in each **Sales**, **Purchases**, **Inventory** Containers
[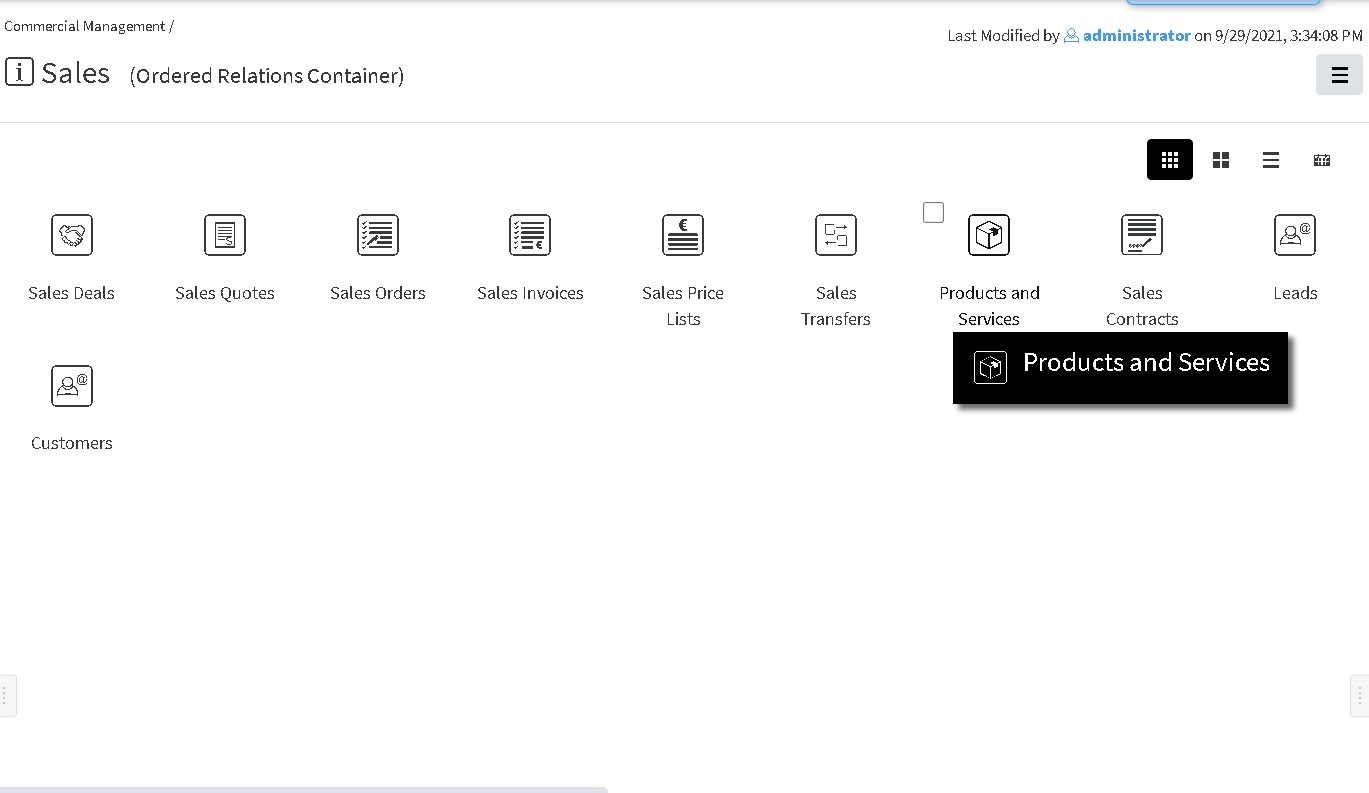](https://docs.profuzdigital.com/uploads/images/gallery/2024-11/Q9Gimage.png)
using the corresponding buttons
[](https://docs.profuzdigital.com/uploads/images/gallery/2024-11/7OIimage.png)
or following the general rule for creating object
[](https://docs.profuzdigital.com/uploads/images/gallery/2024-11/dhJimage.png)
Depending on the purpose of the service, there are several types of services and each has their sales, purchase, or purchase-sales variant.
**Service** – used for any services, apart from the below two cases.
**Group service** – used for many stocks, serviced under one contract with same conditions
**Service on stock** – used for service (for example maintenance) on the specific stock. When defining, the product on which that service will be applied should be specified mandatory.
[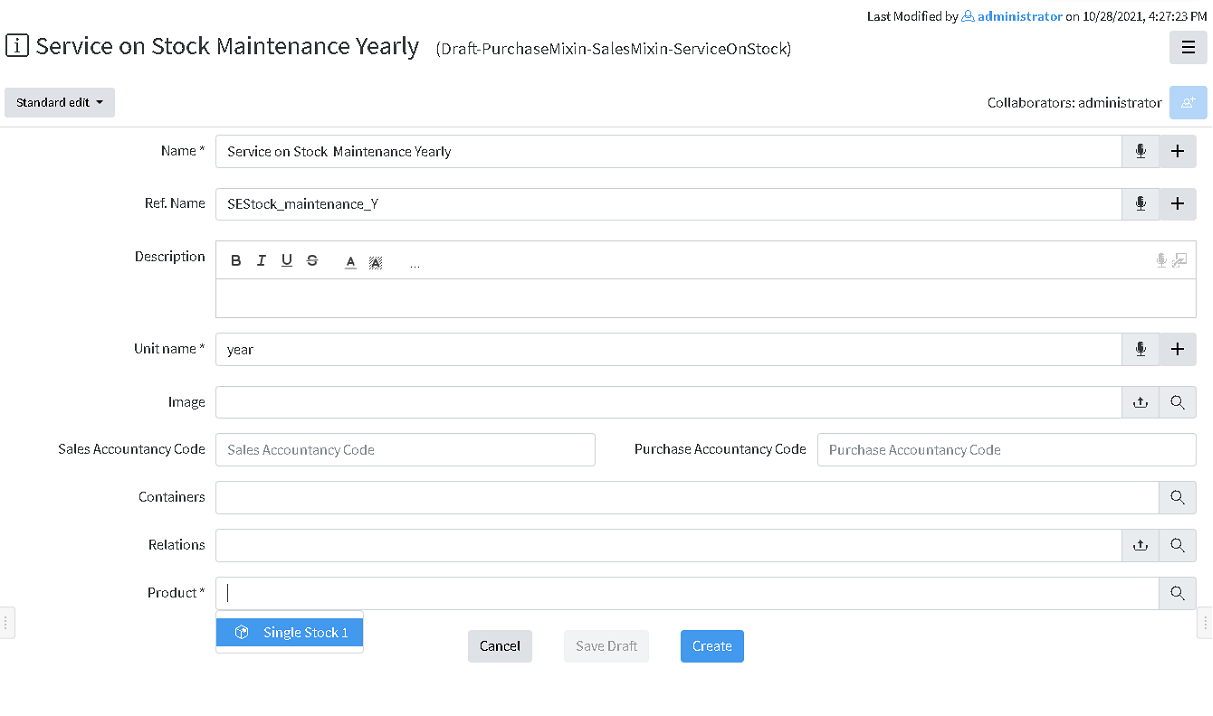](https://docs.profuzdigital.com/uploads/images/gallery/2024-11/MvKimage.png)
The process is finished by pressing button **Create** at the bottom of the screen.
[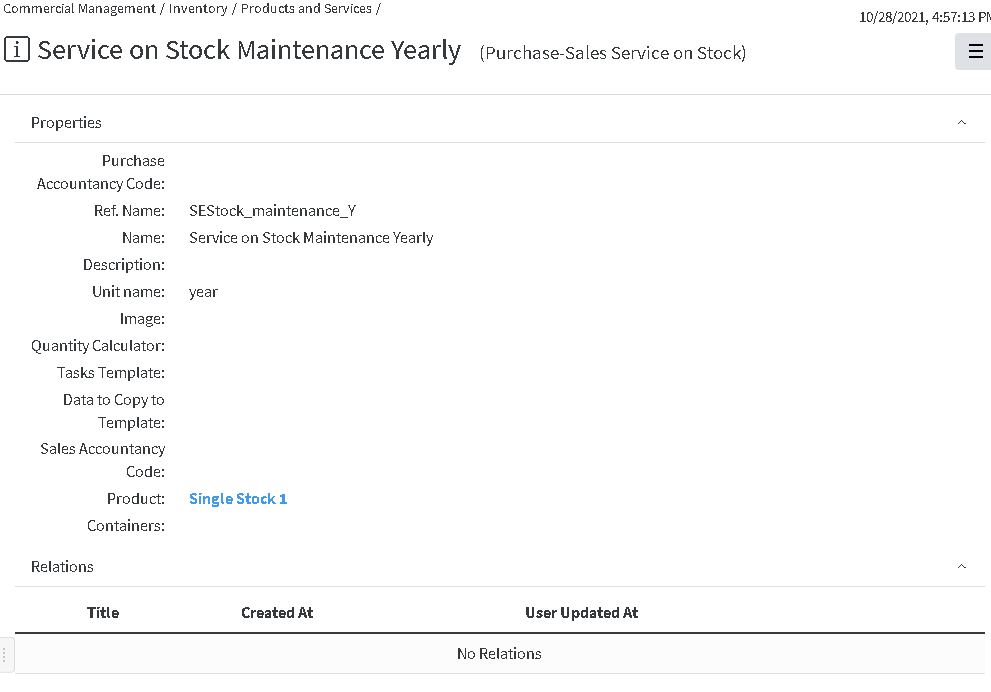](https://docs.profuzdigital.com/uploads/images/gallery/2024-11/hUVimage.png)
## Creating Price list
Creating New Price list can be done via Create New – Other and selecting Sales or Purchase Price List
[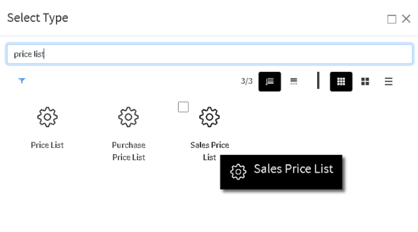](https://docs.profuzdigital.com/uploads/images/gallery/2024-11/ajJimage.png)
Let’s chose Sales Price List, then the following screen appears
[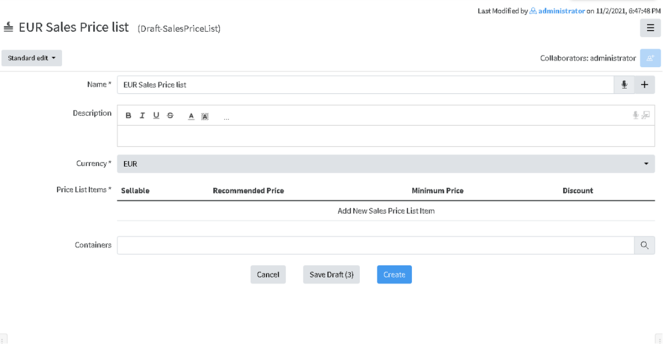](https://docs.profuzdigital.com/uploads/images/gallery/2024-11/n1Pimage.png)
To add an Item in the list just press on **Add New Sales Price List** Item a and the new area will appear
[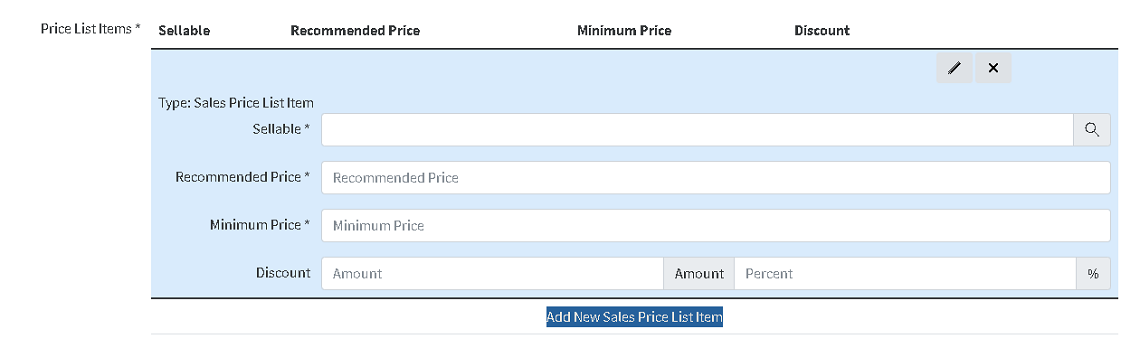](https://docs.profuzdigital.com/uploads/images/gallery/2024-11/nAAimage.png)
On a Sellable field available products or services should appear as options and one can be chosen to be included in the list
[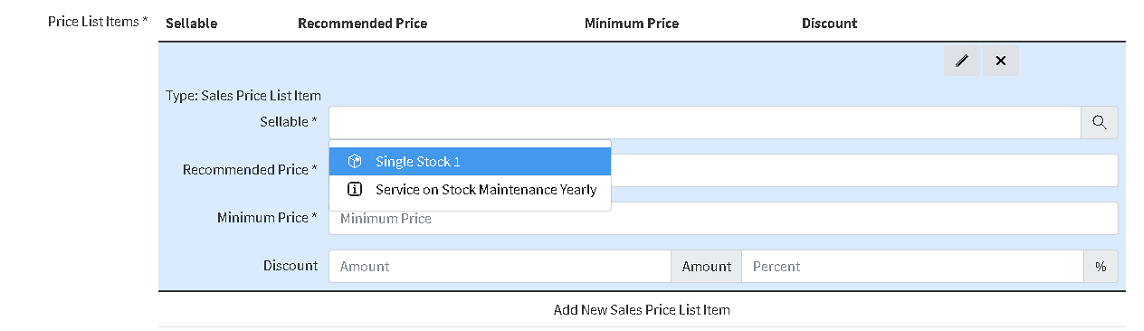](https://docs.profuzdigital.com/uploads/images/gallery/2024-11/9myimage.png)
Recommended price and Minimum Price should be defined, as well as Discount amount or percent.
Another sellable item can be added by **Add New Sales Price List.**
By the pencil button  the details for each item can be shown or hidden.
[](https://docs.profuzdigital.com/uploads/images/gallery/2024-11/Dsoimage.png)
Once all details are defined, process is finished by Create button.
[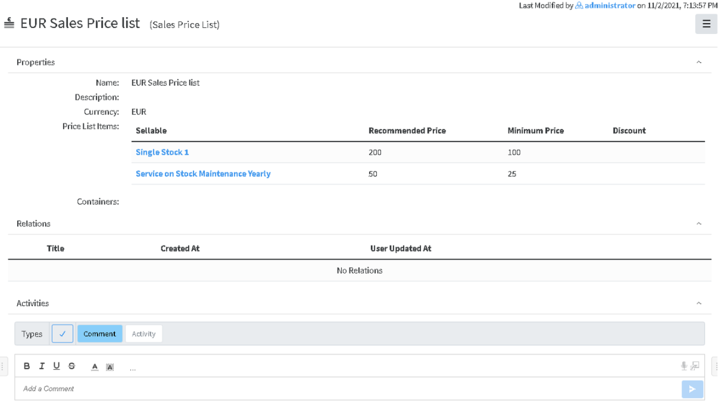](https://docs.profuzdigital.com/uploads/images/gallery/2024-11/wWqimage.png)
# Purchase process
It usually goes this way:
Purchase Deal (Optional)– Purchase Quote (Optional) – Purchase Order – Purchase Invoice – Purchase Transfer (for products) – Inventory (for Products), but it can be configured to skip some steps if do not necessary.
In oder to start, Products, services and Price lists has to be defined. Please, refer to [Products an services](https://docs.profuzdigital.com/books/profuz-lapis-user-guide/page/products-and-services "Products and services") section
All objects part of the process or related are listed in containers **Purchases** section of **Commercial Management module.**
[](https://docs.profuzdigital.com/uploads/images/gallery/2024-11/2eRimage.png)
## Starting a Purchase Deal
- **Starting a Purchase Deal** can be done directly from the Purchase Deals container in Commercial Management folder
[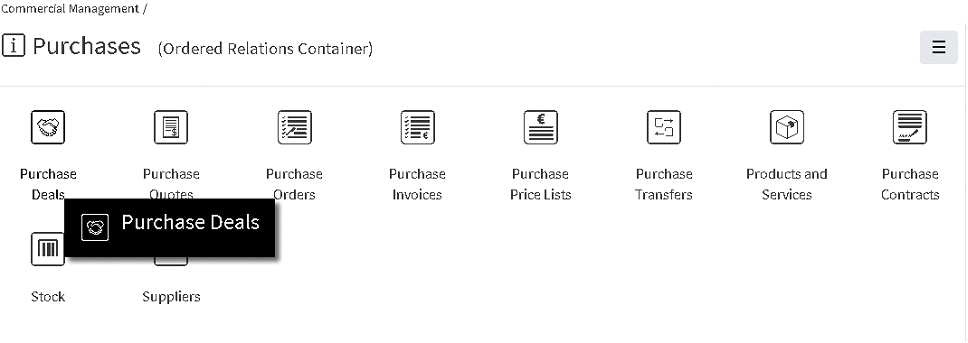](https://docs.profuzdigital.com/uploads/images/gallery/2024-11/7Cpimage.png)
- Via button **Create New Purchase Deal**
- Or in the usual way via **Create New** Menu, **Other, Purchase deal**
Several basic details need to be defined upon starting: Name (you choose as per important information), Seller and Buyer, Currency and Price List (Mandatory)
Seller can be chosen within suggestions, shown after entering several letters in the Seller field. The list of available options to choose from contains companies, defined as External and Suppliers. LINK TO Contacts
There are other optional details, such as Manager, Close date, Payment Method. Payment terms, Shipping method, Contacts etc., that can be added or edited later.
Enumerators can be added in advance to use automatic numbering. Creating Enumerator
[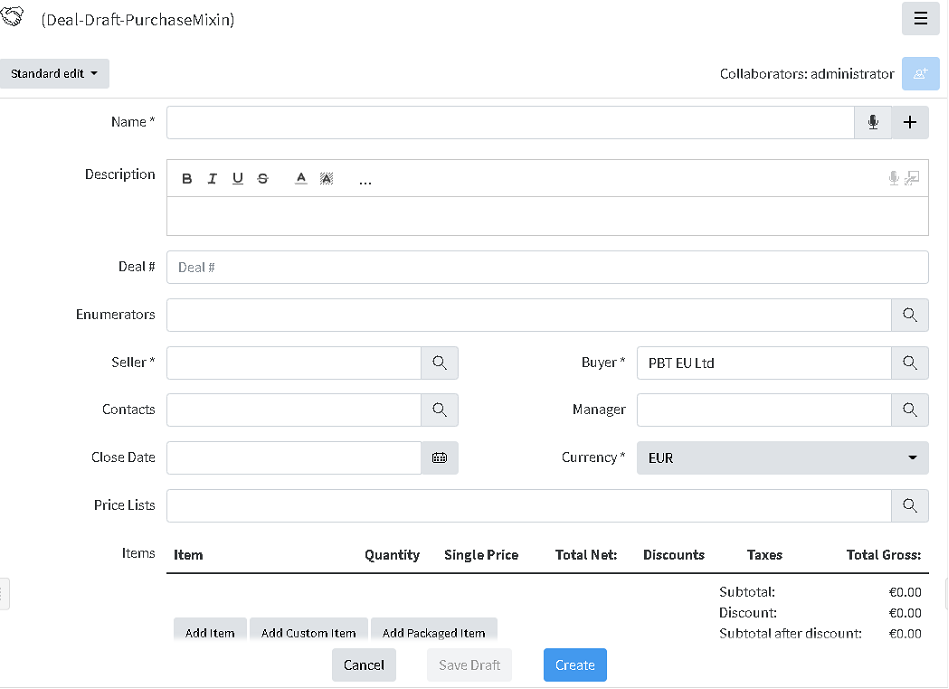](https://docs.profuzdigital.com/uploads/images/gallery/2024-11/yrJimage.png)
Items can be added now or later on by Actions/Edit.
**Add item** is used for adding defined products/services (see Products and Services), included in the corresponding selected Price list.
**Add custom item** does the same thing, for the items, which are not defined as products, usually this is necessary for custom products, with a special description or price, needed once.
By pressing Add item, a new field is shown, where to select the item to be sold and define Quantity and Price will appear, once Quantity is selected, VAT, taxes (fixed amount or percentage, discounts (fixed amount or percentage) and relations if any.
[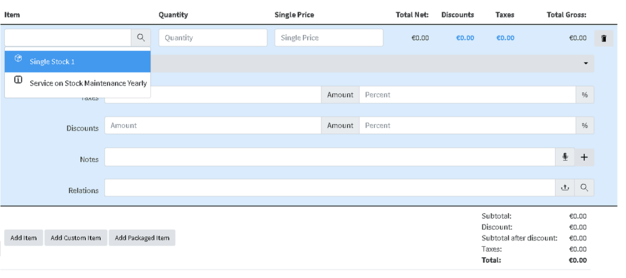](https://docs.profuzdigital.com/uploads/images/gallery/2024-11/4u1image.png)
More Items can be added by buttons below.
After entering all details, press Save and the item will appear in the Deal. If amendment is needed that can be done via Actions/Edit (or Edit button) and pressing on the item to view the fields described above.
[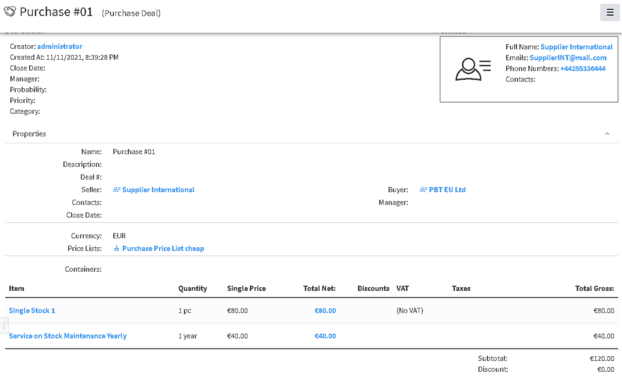](https://docs.profuzdigital.com/uploads/images/gallery/2024-11/nIrimage.png)
Additional details such as **Probability, Priority, Category and Container** could also be defined if needed.
Deal # by default is a text, depending on the company policy for numbering Purchase deals, however automatic numbering can be additionally configured. Enumerators can be added in advance to use automatic numbering. [Creating Enumerator](https://docs.profuzdigital.com/books/profuz-lapis-user-guide/page/enumerators#bkmrk-creating-enumerator)
After entering the necessary details and Saving Deal is created. If edit is needed that can be done via **Actions** Menu/**Edit**.
#### Purchase Deal Stages
Default Stages of the Purchase Deal are: Qualification, Analysis, Proposal, Negotiation, Close (Won/Lost)
[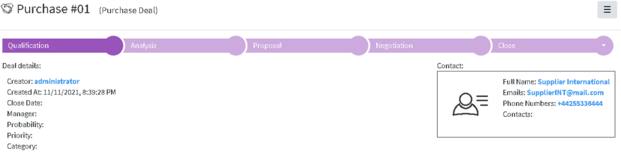](https://docs.profuzdigital.com/uploads/images/gallery/2024-11/3pkimage.png)
## Create a Quote from the Deal
Creating a Quote from the Deal can be done in any of the Deal’s stages and That is done via **Actions** Menu/**Generate Quote**.
[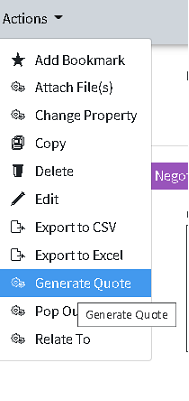](https://docs.profuzdigital.com/uploads/images/gallery/2024-11/jhdimage.png)
Once Quote is generated, the relation between the Deal and the Quote can be seen in the tabs at the bottom of the Deal object.
[](https://docs.profuzdigital.com/uploads/images/gallery/2024-11/OpXimage.png)
The generated quote has the same Title as the Deal. In order to avoid confusion, the text in brackets near the name of the Object shows the kind of Object it is (Purchase Quote).
It can be Edited by **Edit** Button or via **Actions** Menu/**Edit**.
Details can be added or edited.
Quote # by default is a text, depending on the company policy for numbering Purchase quotes, however automatic numbering can be additionally configured. Enumerators can be added in advance to use automatic numbering. [Creating Enumerator](https://docs.profuzdigital.com/books/profuz-lapis-user-guide/page/enumerators#bkmrk-creating-enumerator)
[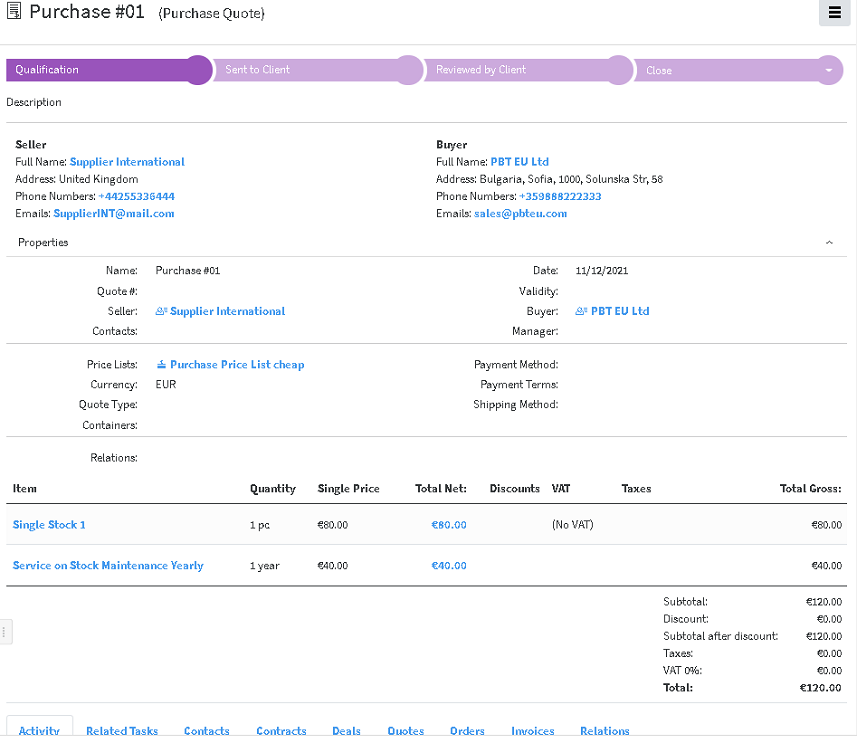](https://docs.profuzdigital.com/uploads/images/gallery/2024-11/lIjimage.png)
Quote has the following stages:
**Qualifications**, **Sent to Client**, **Reviewed By Client**, **Close (Approved/Declined)**, which can help track the different Quote stages.
If necessary, **Fill in template** operation can be used to generate previously designed template for Quotation.
Next step is Create Order from Quote
## Create Order from Quote
Order can be created from Quote or directly from the button in the Purchase Quote folder.
In case created from Quote, the details are copied to the Order created.
[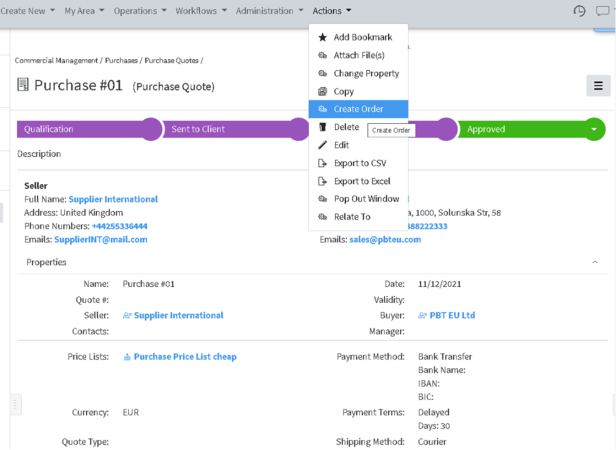](https://docs.profuzdigital.com/uploads/images/gallery/2024-11/eXsimage.png)
Again, the Purchase order created is opened automatically and can be edited or details can be added via **Edit** Button or via **Actions** Menu/**Edit**.
The generated Purchase order has the same Title as the Purchase Quote
Order # by default is a text, depending on the company policy for numbering Purchase orders, however automatic numbering can be additionally configured. Enumerators can be added in advance to use automatic numbering. [Creating Enumerator](https://docs.profuzdigital.com/books/profuz-lapis-user-guide/page/enumerators#bkmrk-creating-enumerator)
Stages of the Purchase order are as follows: Draft – Validated – Processed – Close (Delivered/Canceled)
Once it is Validated Fill in Template operation can be used to create Purchase Order documents.
It is available via button or via **Actions** Menu/**Fill in template**.
It can be used to generate from previously created template, a file in pdf format, which can be sent to the seller if necessary.
[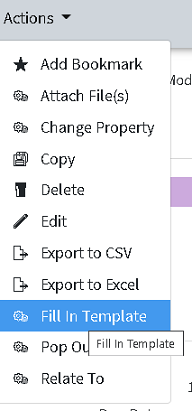](https://docs.profuzdigital.com/uploads/images/gallery/2024-11/PZQimage.png)
Here is how it can be done:
After clicking on the Fill in template button, a window opens, asking to Select the template to be used. The corresponding templates appear possible for selection
[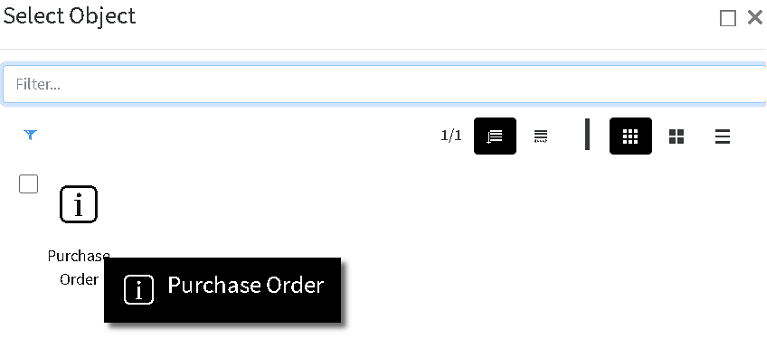](https://docs.profuzdigital.com/uploads/images/gallery/2024-11/rE2image.png)
Once selected, the template is created and opened in .docx format, and the corresponding .pdf file can be seen in the Transformations field on the right.
[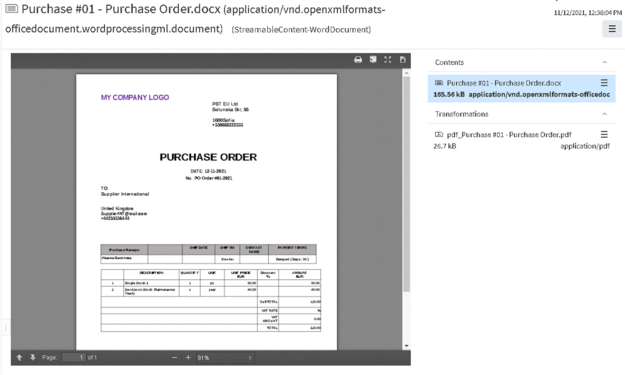](https://docs.profuzdigital.com/uploads/images/gallery/2024-11/uWMimage.png)
Names of the generated files are combination between Title of the Purchase order and Template name. It can be downloaded by pressing on the  sign
[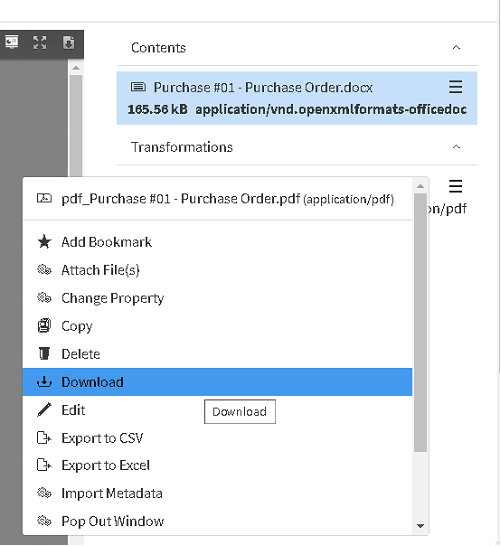](https://docs.profuzdigital.com/uploads/images/gallery/2024-11/r0Uimage.png)
When in Purchase order, these files appear in the Relations tab at the bottom
[](https://docs.profuzdigital.com/uploads/images/gallery/2024-11/5pcimage.png)
## Issue an Invoice
When proceeding to the next stage of the Purchase order - **Processed**, Issue Invoice button or Issue Invoice in Actions menu, becomes available.
When pressing the Issue Invoice button, Invoice is created. It contains the details from the order, but some additional details appear such as: Invoice #, Date, which corresponds to the details from the Invoice from the supplier. The Invoice from supplier, if available digitally, can be uploaded in Lapis and then related to this object
[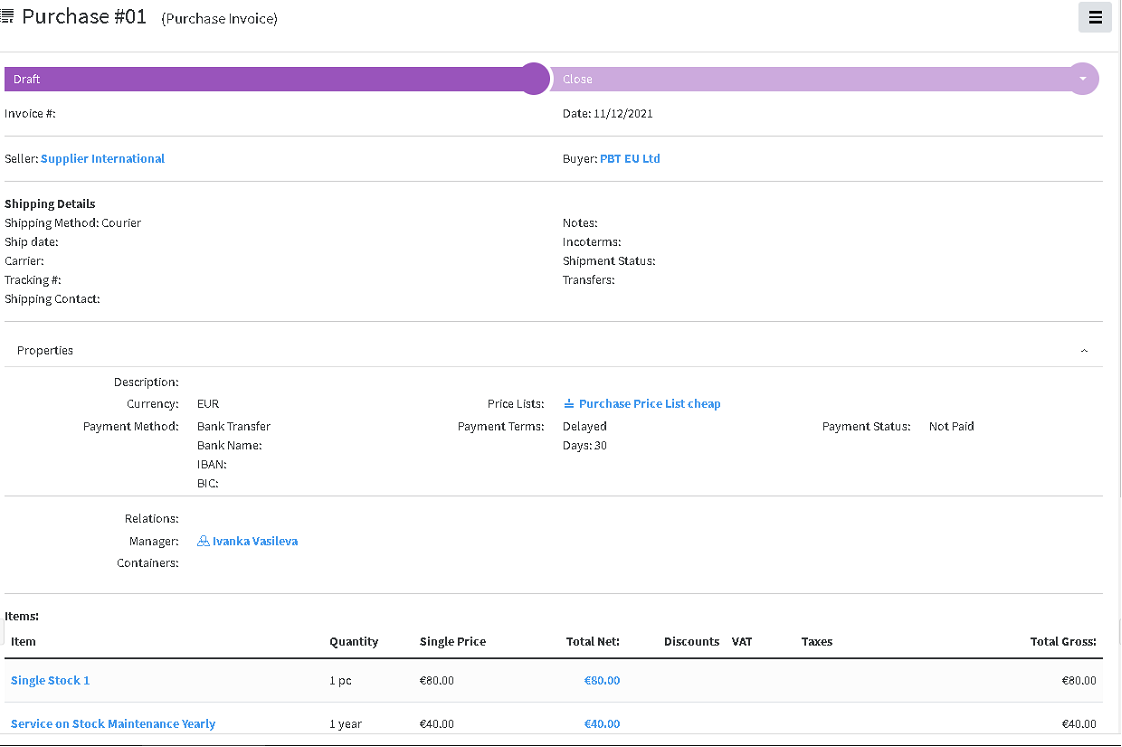](https://docs.profuzdigital.com/uploads/images/gallery/2024-11/1N7image.png)
If **Сhipping details** are available, they can be added as well.
**Payment status** appears here and has several options, which are visible in Edit mode via quick edit
Or via **Actions** Menu/**Edit**
The Invoice status can be changed, once all available details are entered.
Once Purchase Invoice is created, it is already possible to enter the stock in the warehouse, which is done by Create transfer in
Transfer – the link to object Transfer will appear there, when available. Transfer [creates stock](https://docs.profuzdigital.com/books/profuz-lapis-user-guide/page/inventory#bkmrk-creating-stock-via-t) in the Warehouse in Inventory container, with the details from the Invoice. The process is described in [Inventory](https://docs.profuzdigital.com/books/profuz-lapis-user-guide/page/inventory "Inventory") section.
# Inventory
In the Inventory module, purchased or manufactured products are converted into Stock (with Serial or Part number) and can be kept, transferred, sold etc. Stocks are organized in Warehouses.
[](https://docs.profuzdigital.com/uploads/images/gallery/2024-11/8Jhimage.png)
#### Stock type
There are currently 4 Stock types for products in Lapis – Batch stock, Single Stock, Compound stock, Packaged stock
Batch stock allows you to create a group of multiple units of an item, and assign them a unique value/number/tag called Batch No.
Single Stock is a unique stock item, it has a unique Serial No. and each unit can be traced.
Compound stock is a stock that consists of a list of possible subproducts, which are single stock type.
Stocks are managed within the Inventory, and used in Sales and Purchases processes. Each stock corresponds to a product, defined in the system.
## Creating Warehouse
A New warehouse can be created via Create New/Other choosing Warehouse
[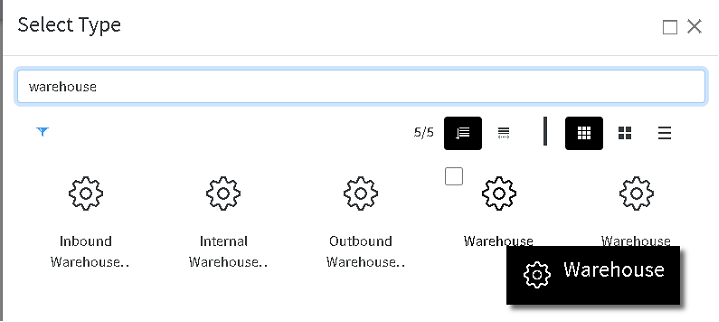](https://docs.profuzdigital.com/uploads/images/gallery/2024-11/QOSimage.png)
Name, address and Supervisor can be defined, as well as some standard for the system properties like Containers, Relations etc.
[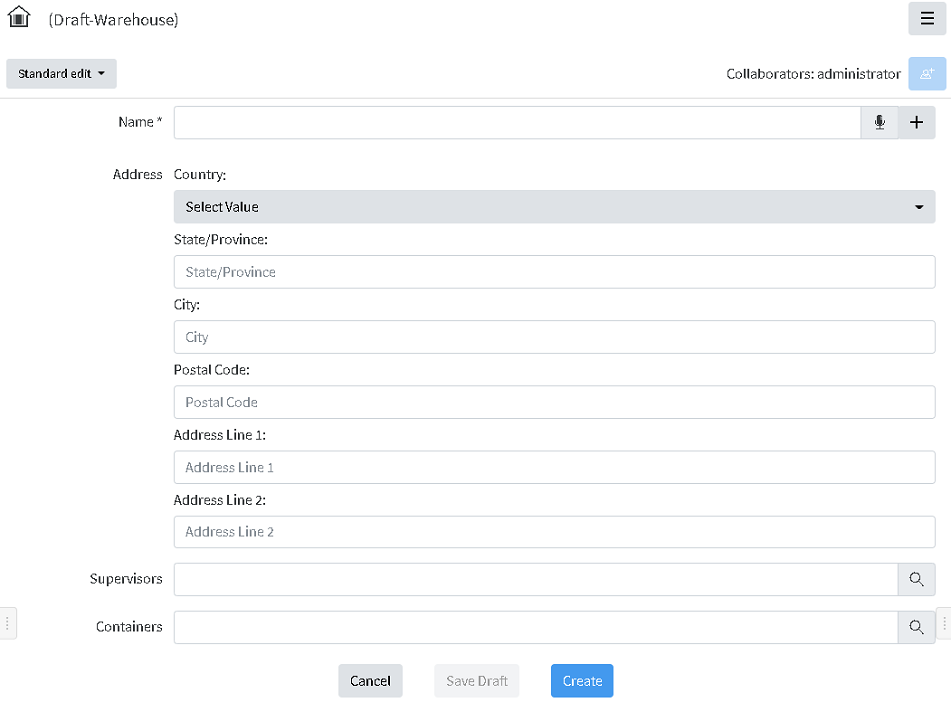](https://docs.profuzdigital.com/uploads/images/gallery/2024-11/1Bfimage.png)
By pressing Create the warehouse is ready and can be seen in the Warehouses container.
[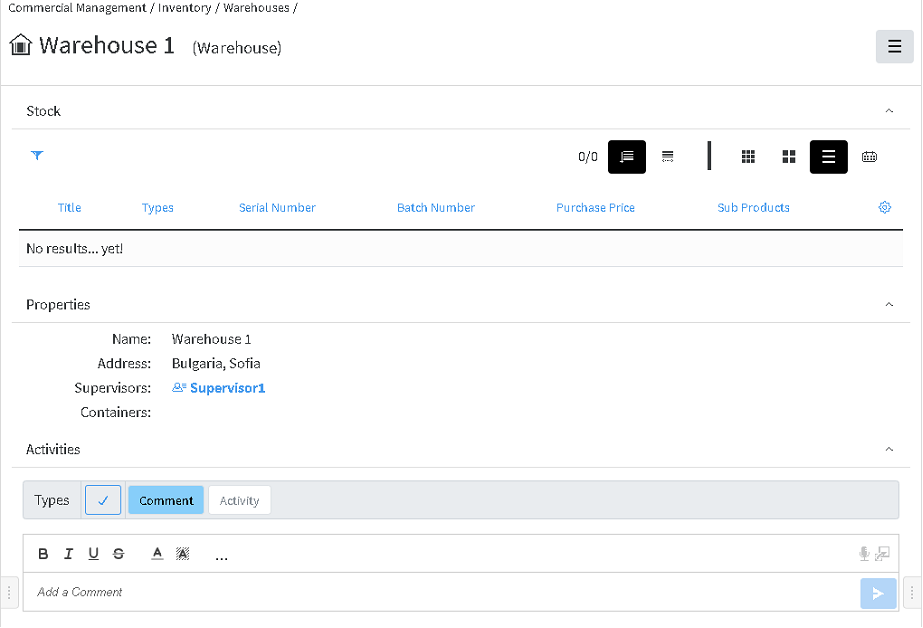](https://docs.profuzdigital.com/uploads/images/gallery/2024-11/9Zjimage.png)
## Creating Stock via Transfer
[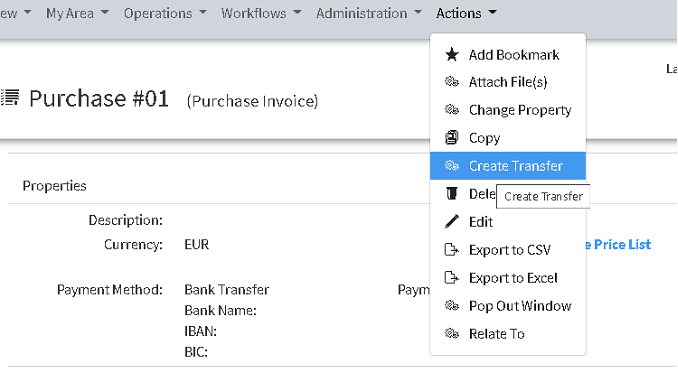](https://docs.profuzdigital.com/uploads/images/gallery/2024-11/sP1image.png)
The destination warehouse has to be selected
[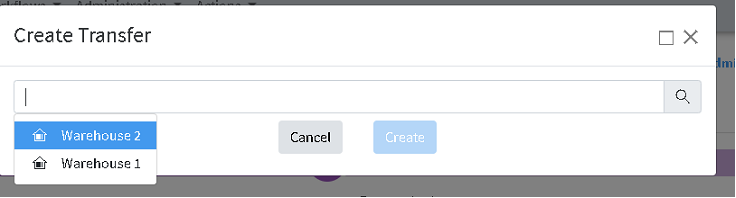](https://docs.profuzdigital.com/uploads/images/gallery/2024-11/3Biimage.png)
Choosing the warehouse and pressing Create, creates object Inbound Warehouse Transfer, which is actually Purchase Transfer.
It looks this way:
[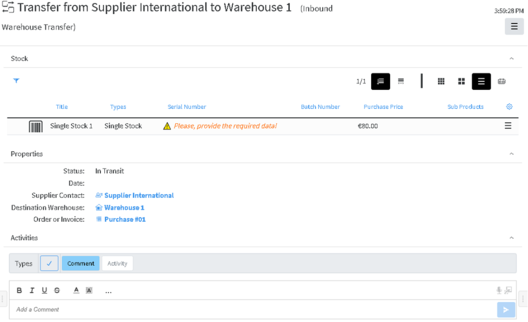](https://docs.profuzdigital.com/uploads/images/gallery/2024-11/M35image.png)
Items from the Invoice become stock in the transfer. The Serial number can be set by editing the details of the stock via Edit menu in the right end of the row
[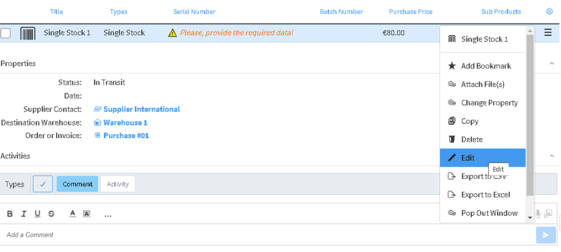](https://docs.profuzdigital.com/uploads/images/gallery/2024-11/fGIimage.png)
Then the Stock Edit screen appears, where details can be added or edited.
[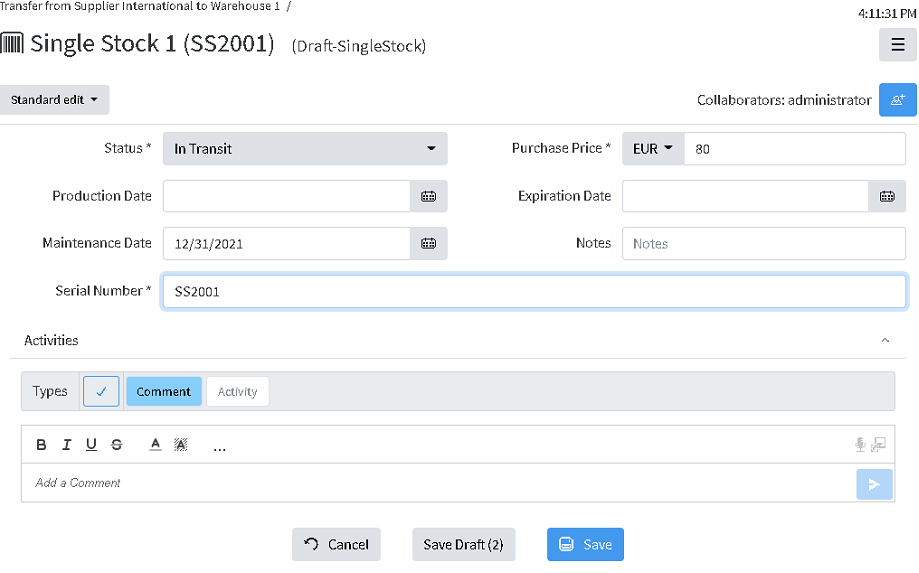](https://docs.profuzdigital.com/uploads/images/gallery/2024-11/gPDimage.png)
After saving the info appears in the Transfer.
[](https://docs.profuzdigital.com/uploads/images/gallery/2024-11/Owlimage.png)
The Tranfer is created with Status is **In Progress**, presuming that the products are shipped but not yet delivered to the Warehouse.
When the products are ready to be entered in the warehouse, the status should be set to Finished, and the Date has to be set.
Once the status is se to Finished, the stocks enter the destination Warehouse.
The Stock in the transfer appear as NON CURRENT, as new version of the stock is created, listed in the corresponding Warehouse
[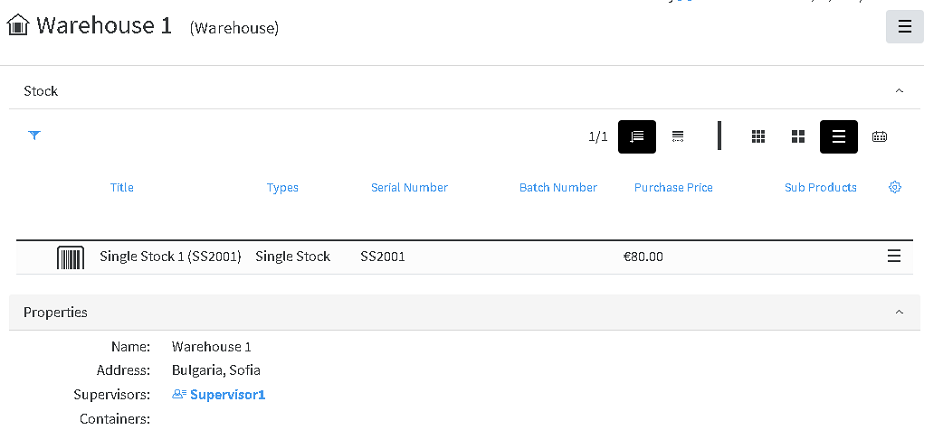](https://docs.profuzdigital.com/uploads/images/gallery/2024-11/ofvimage.png)
Clicking on the stock title, opens the stock object, with the information as follows:
[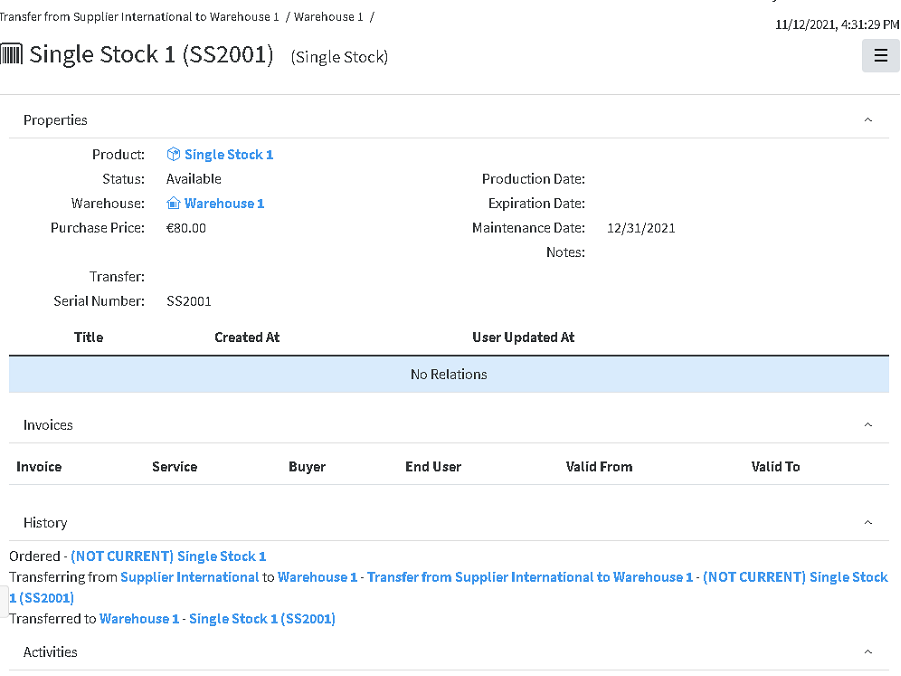](https://docs.profuzdigital.com/uploads/images/gallery/2024-11/DW0image.png)
## Stock versions
With each change in Stock status or if it the stock is a part of Transfers of some kind, the new version of the Stock object is created.
The previous versions are kept in the system for reference and tracking
Here is how to see versions of the stock, which is available:
Find the stock in the warehouse and open it.
[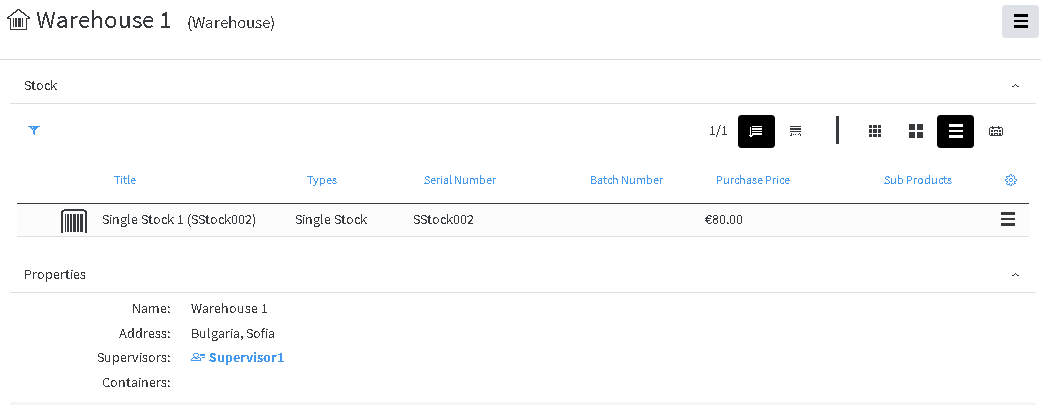](https://docs.profuzdigital.com/uploads/images/gallery/2024-11/Wguimage.png)
The number next to the name shows how many versions exist
[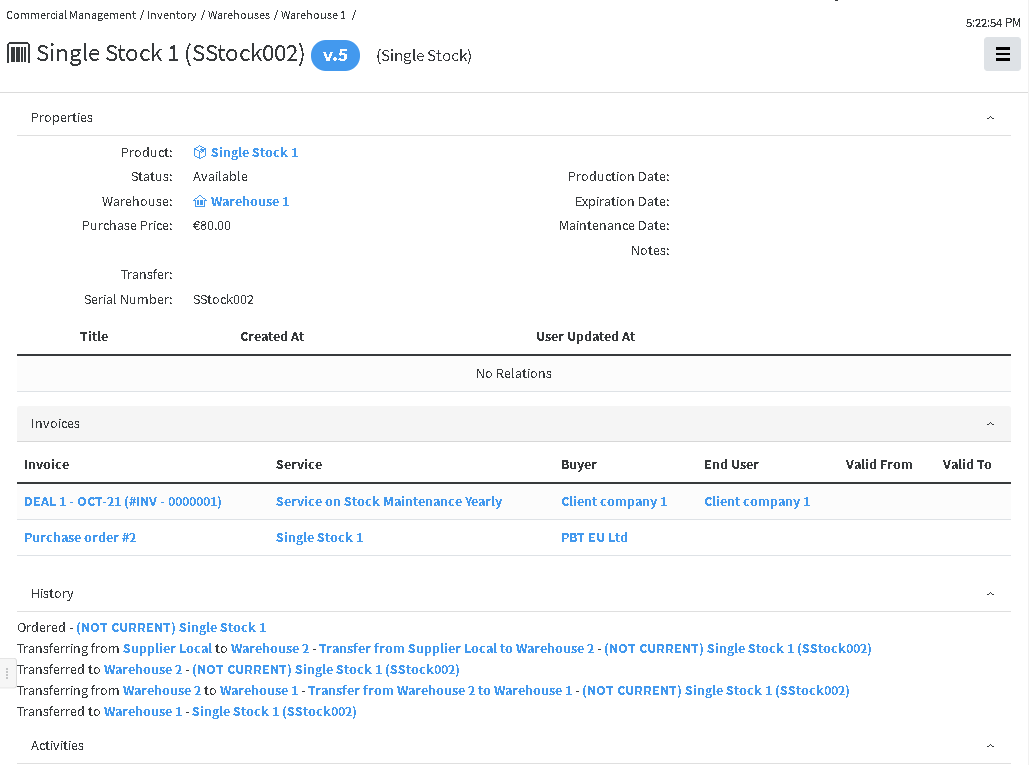](https://docs.profuzdigital.com/uploads/images/gallery/2024-11/t2Yimage.png)
By clicking on the number box, the list with versions appear
[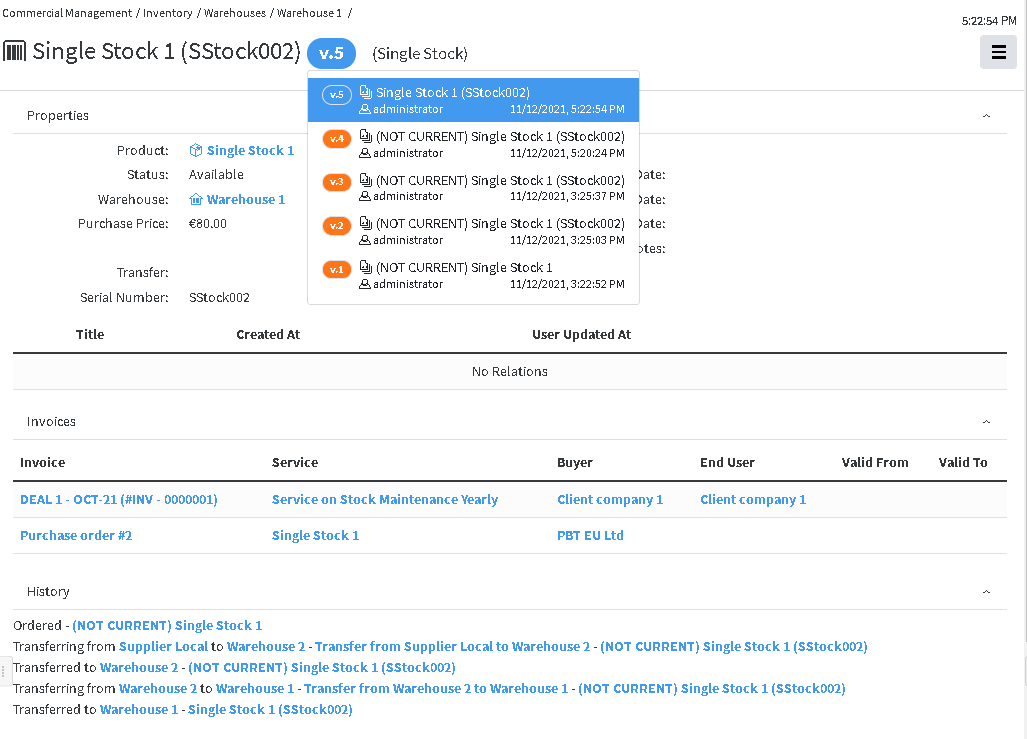](https://docs.profuzdigital.com/uploads/images/gallery/2024-11/ecDimage.png)
In the History section, the information of the transfers appear.
In the Invoices Section appear information of the Purchase Invoice and Sales invoice (if stock itself or service on it is sold)
## Transfer between warehouses
Find the product in the list of stocks In the Stock container
[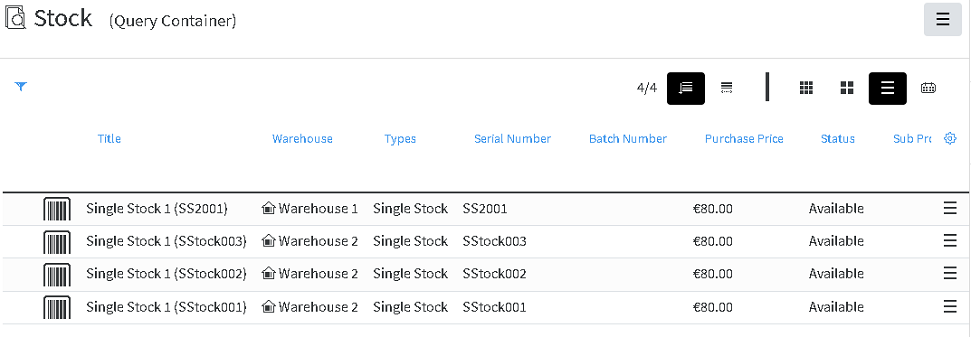](https://docs.profuzdigital.com/uploads/images/gallery/2024-11/ZbZimage.png)
or in the corresponding warehouse
[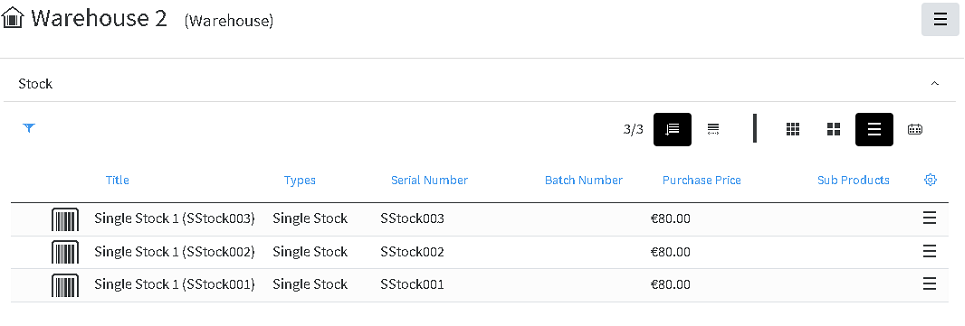](https://docs.profuzdigital.com/uploads/images/gallery/2024-11/jrVimage.png)
From the menu on the right of the product line, choose **Transfer** and then choose the destination warehouse, and then press Create.
[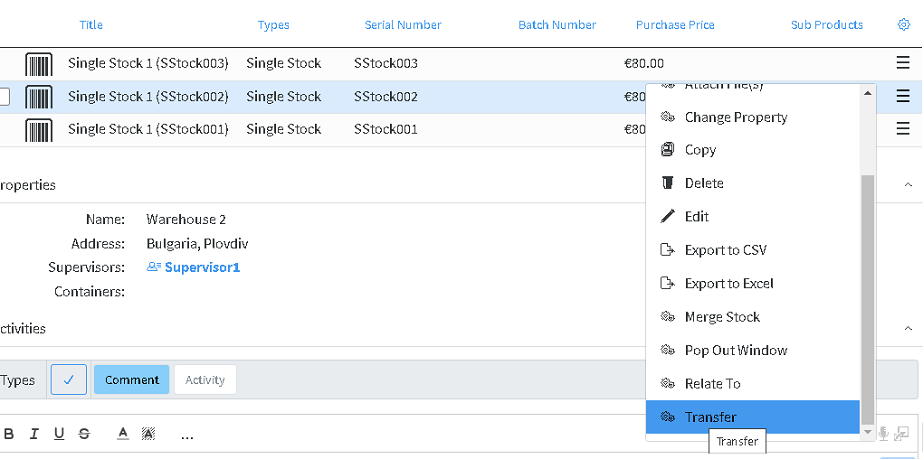](https://docs.profuzdigital.com/uploads/images/gallery/2024-11/KM4image.png)
A new transfer is created with status **In Transit**.
[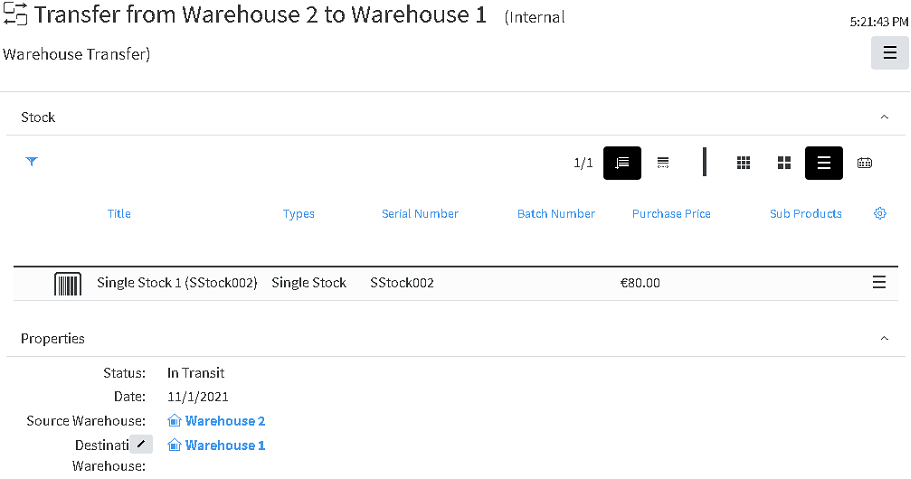](https://docs.profuzdigital.com/uploads/images/gallery/2024-11/fYaimage.png)
Once status is changed to **Finished**, the stock is moved to the Destination Warehouse.
[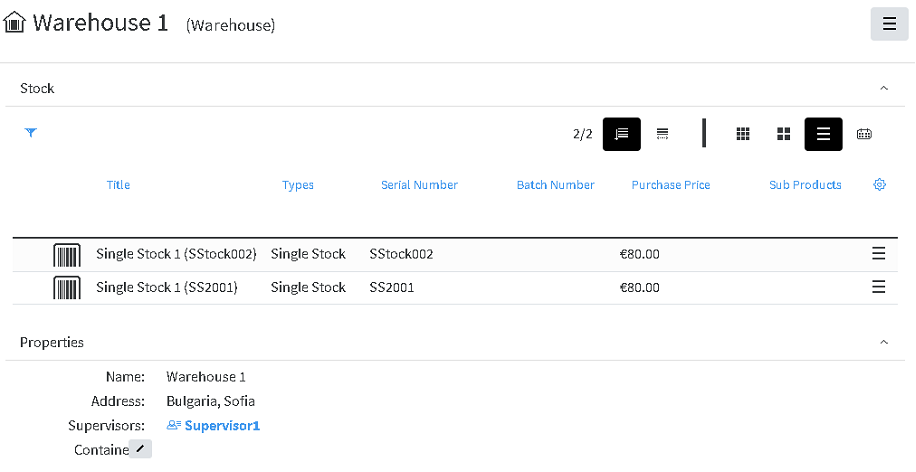](https://docs.profuzdigital.com/uploads/images/gallery/2024-11/JgAimage.png)
## Sales Transfer
During the Sales process, on the Order stage, after validation of the order, the status cannot be changed to Processed, if stocks are not defined for each Item in the Order (If they are products or Service on stock. The following message will appear upon trying to do so.
[](https://docs.profuzdigital.com/uploads/images/gallery/2024-11/r5vimage.png)
Adding a stock to an Item is done by Edit operation, then by clicking of the Item line, to reveal the Item section.
If you add a stock, which does not correspond to the Item product, the following message will appear:
[](https://docs.profuzdigital.com/uploads/images/gallery/2024-11/kRfimage.png)
After selecting stocks, for all Items, the status can be changed to Processed.
Once status Processed is set, the Invoice can be issued, from which Sales Transfer can be created.
From Sales Invoice, Transfer can be created. This represents shipping and delivering goods to the Buyer.
The stock is taken out of the available Stock items, and kept for reference in Sold Stock container in Inventory section.
[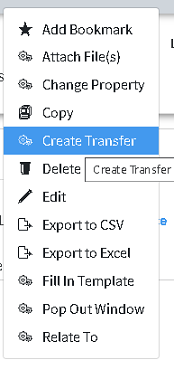](https://docs.profuzdigital.com/uploads/images/gallery/2024-11/pnsimage.png)
Transfer includes only stock items, not services. It is created with status In transfer.
Once the date is set and the status is changed to Finished, the stocks are moved to Sold stock container.
The new version of stock object is created and the one, listed in the transfer become NON CURRENT.
[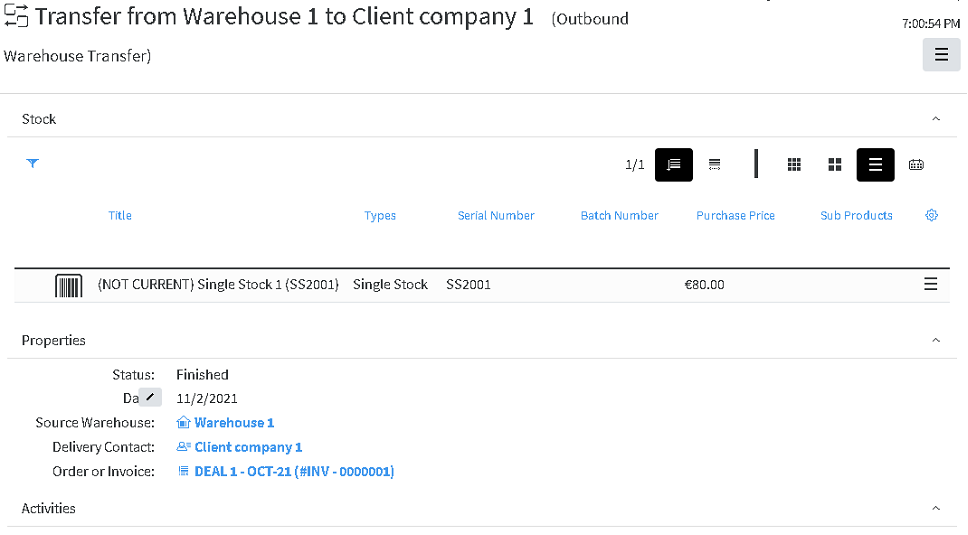](https://docs.profuzdigital.com/uploads/images/gallery/2024-11/cZTimage.png)
Stock items, included in Sales Invoices and included in Sales transfers with status Finished are listed in the Sold Stock Container in Inventory.
[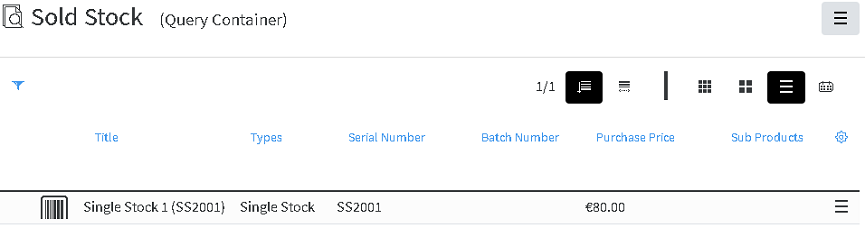](https://docs.profuzdigital.com/uploads/images/gallery/2024-11/2Jaimage.png)
In the Stock object the info for its transfers can be foundin the History Area
[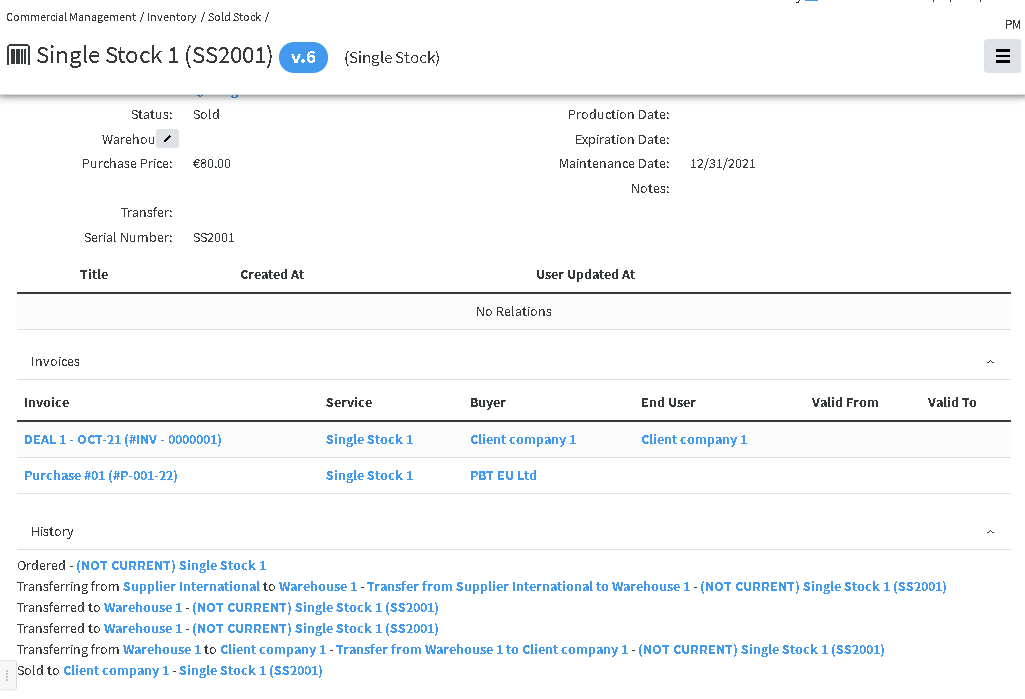](https://docs.profuzdigital.com/uploads/images/gallery/2024-11/mCIimage.png)
# Enumerators
## Creating Enumerator
Automatic numbering of financial objects can be defined. Creating a rule and a format of numbering, can be done in the following way.
Create New/Other then find **Prefixed Number Enumerator** type
[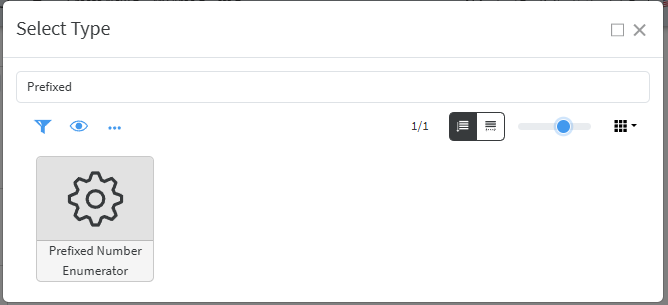](https://docs.profuzdigital.com/uploads/images/gallery/2025-03/O5Yimage.png)
[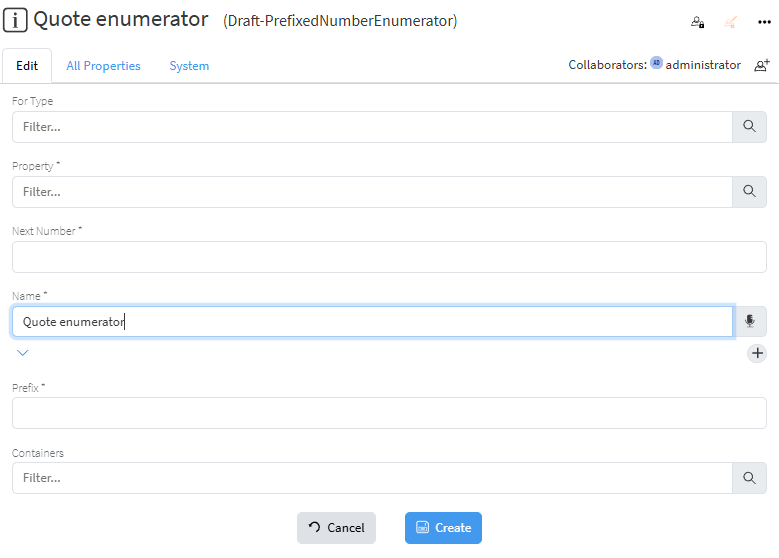](https://docs.profuzdigital.com/uploads/images/gallery/2025-03/mm0image.png)
The type for which this enumerator is to be used. Let’s for example create enumerator for type **Sales Quote**.
*For type* should be defined as **Sales Quote**
*Property* is set to *Quote #* (Symbol)
*Next number* is the number from which the numbering will start
*Name* is the name of the enumerator
*Prefix* is the text used as prefix.
Once created, the enumerator will appear in the objects of type **Sales Quote** in the property *Enumerator*, when in Edit mode.
# Document Templates
## Creating Template
Template is the file to be used as a template in .docx format and has to be added in the system.
The file is added via Operations – Ingest via Upload
[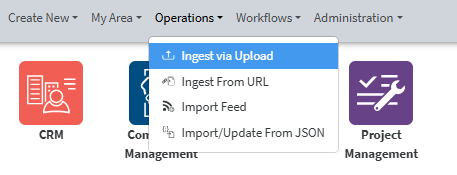](https://docs.profuzdigital.com/uploads/images/gallery/2025-02/8aqimage.png)
The file uploaded will then appear in My area/ My uploads section if the upload is done by you,
[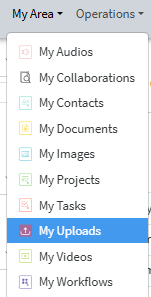](https://docs.profuzdigital.com/uploads/images/gallery/2025-02/fSZimage.png)
or has to be found in the system, if previously uploaded by someone else.
[](https://docs.profuzdigital.com/uploads/images/gallery/2025-02/kpBimage.png)
Output Template can be created by **Create New** – **Other** – **Output Template Specification** (it will appear if you start typing "output")
[](https://docs.profuzdigital.com/uploads/images/gallery/2025-02/zwhimage.png)
You need to set a Name and Specify the type to which that Template will be used.
[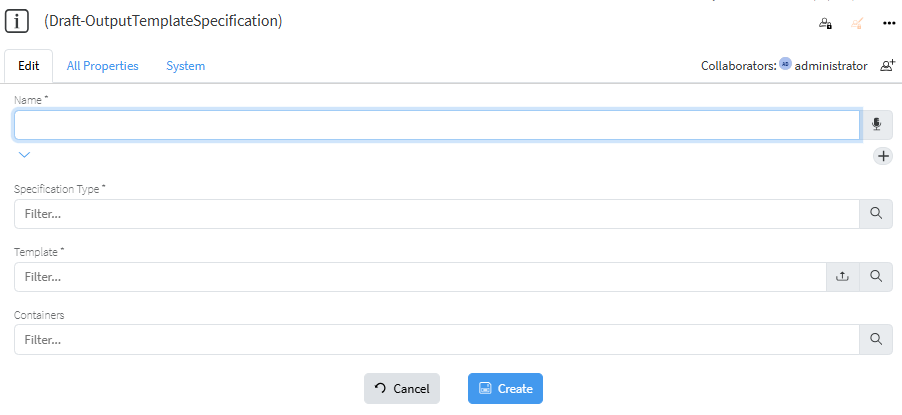](https://docs.profuzdigital.com/uploads/images/gallery/2025-02/e4ximage.png)
The Type has to be specified and can be easily found by typing at least one of the words in its name.
[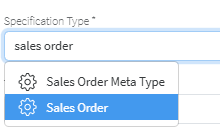](https://docs.profuzdigital.com/uploads/images/gallery/2025-02/yw5image.png)
The file to be used is selected
[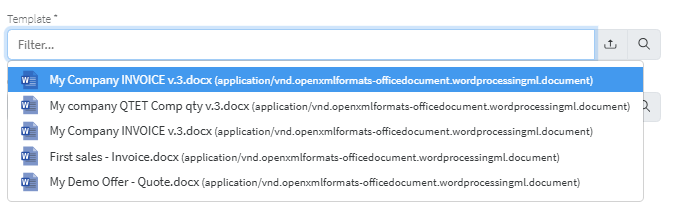](https://docs.profuzdigital.com/uploads/images/gallery/2025-02/ByJimage.png)
If .docx file to be used as template is not previously uploaded in the system, that can be done directly from this step by pressing on the [ ](https://docs.profuzdigital.com/uploads/images/gallery/2025-02/UNwimage.png) which will open file manager to choose file from your computer to upload (ingest).
The process is finished by pressing Create button and the object is created.
[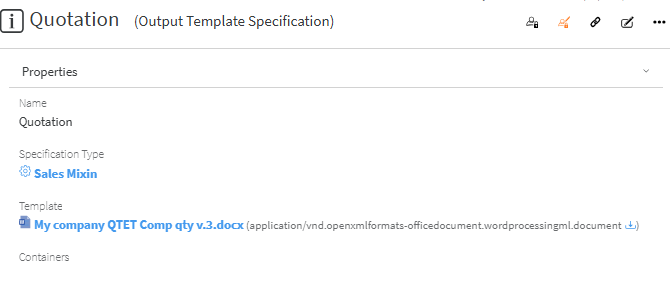](https://docs.profuzdigital.com/uploads/images/gallery/2025-02/51eimage.png)
# CRM
Contacts Management
# CRM Module
[](https://docs.profuzdigital.com/uploads/images/gallery/2024-11/90wimage.png)
In CRM Module there are the following containers:
[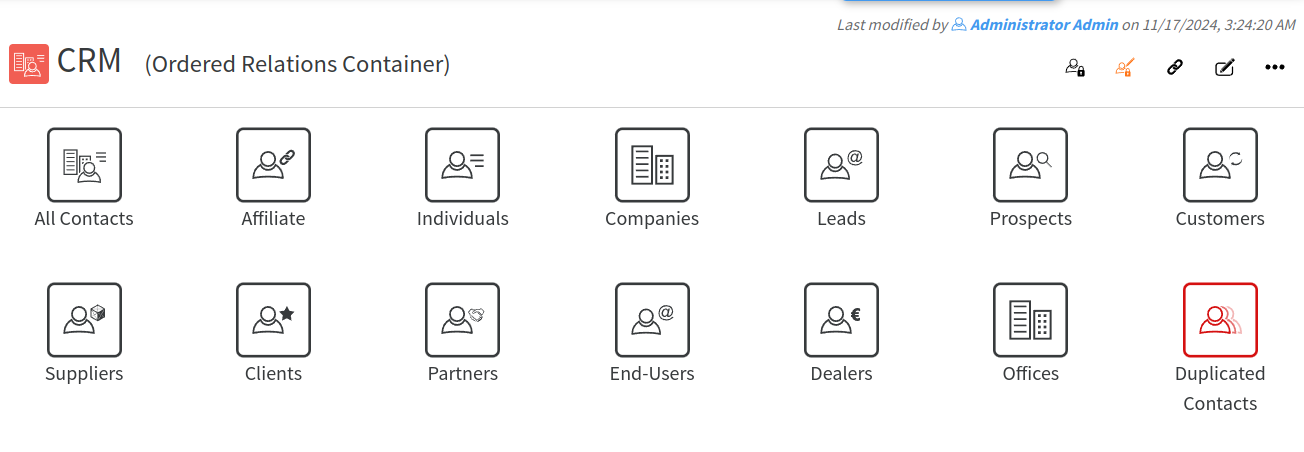](https://docs.profuzdigital.com/uploads/images/gallery/2024-11/tuDimage.png)
**All Contacts** is a container, which contains all kind of Contacts created in Lapis
## Creating Individual
Creating Individual can be done by opening **Individuals** and pressing **Create New Individual**:
[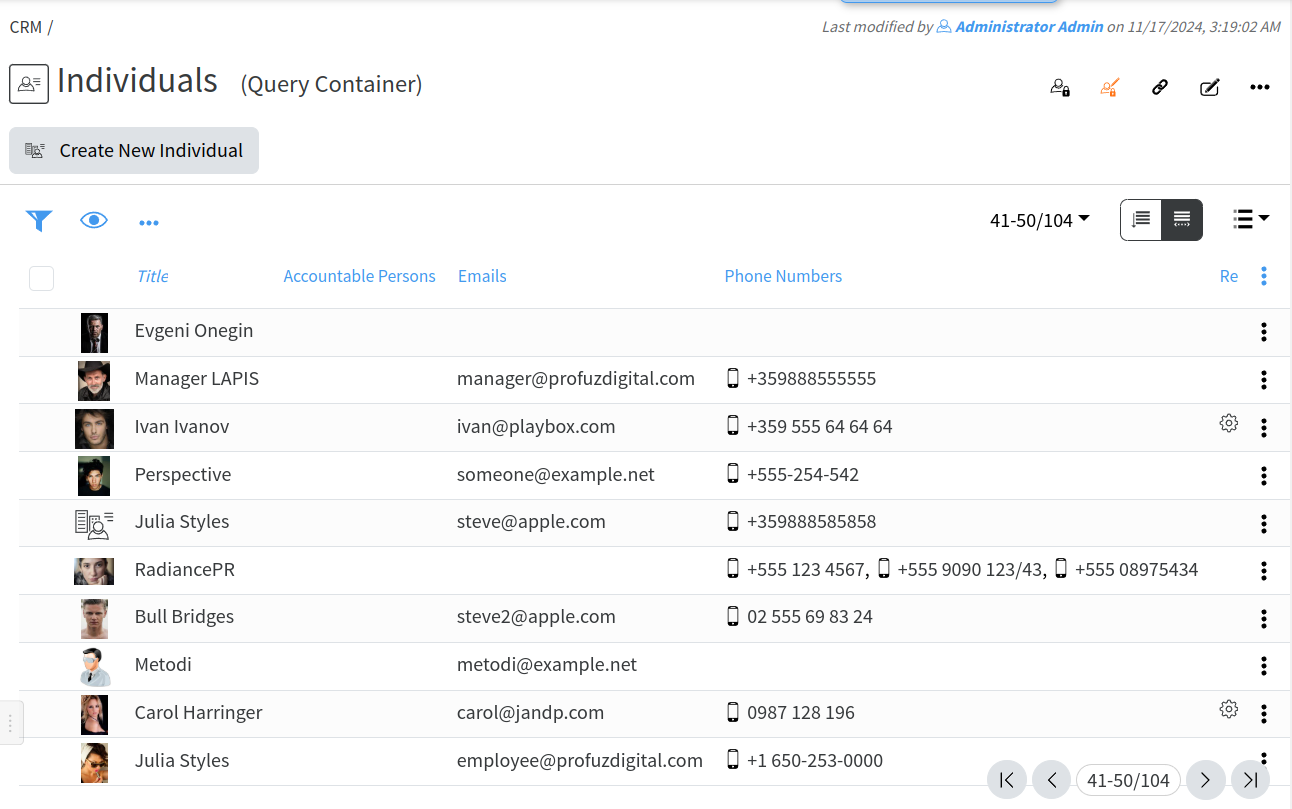](https://docs.profuzdigital.com/uploads/images/gallery/2024-11/F4Cimage.png)
The new window will Appear with details to be added, as only Full name is mandatory:
[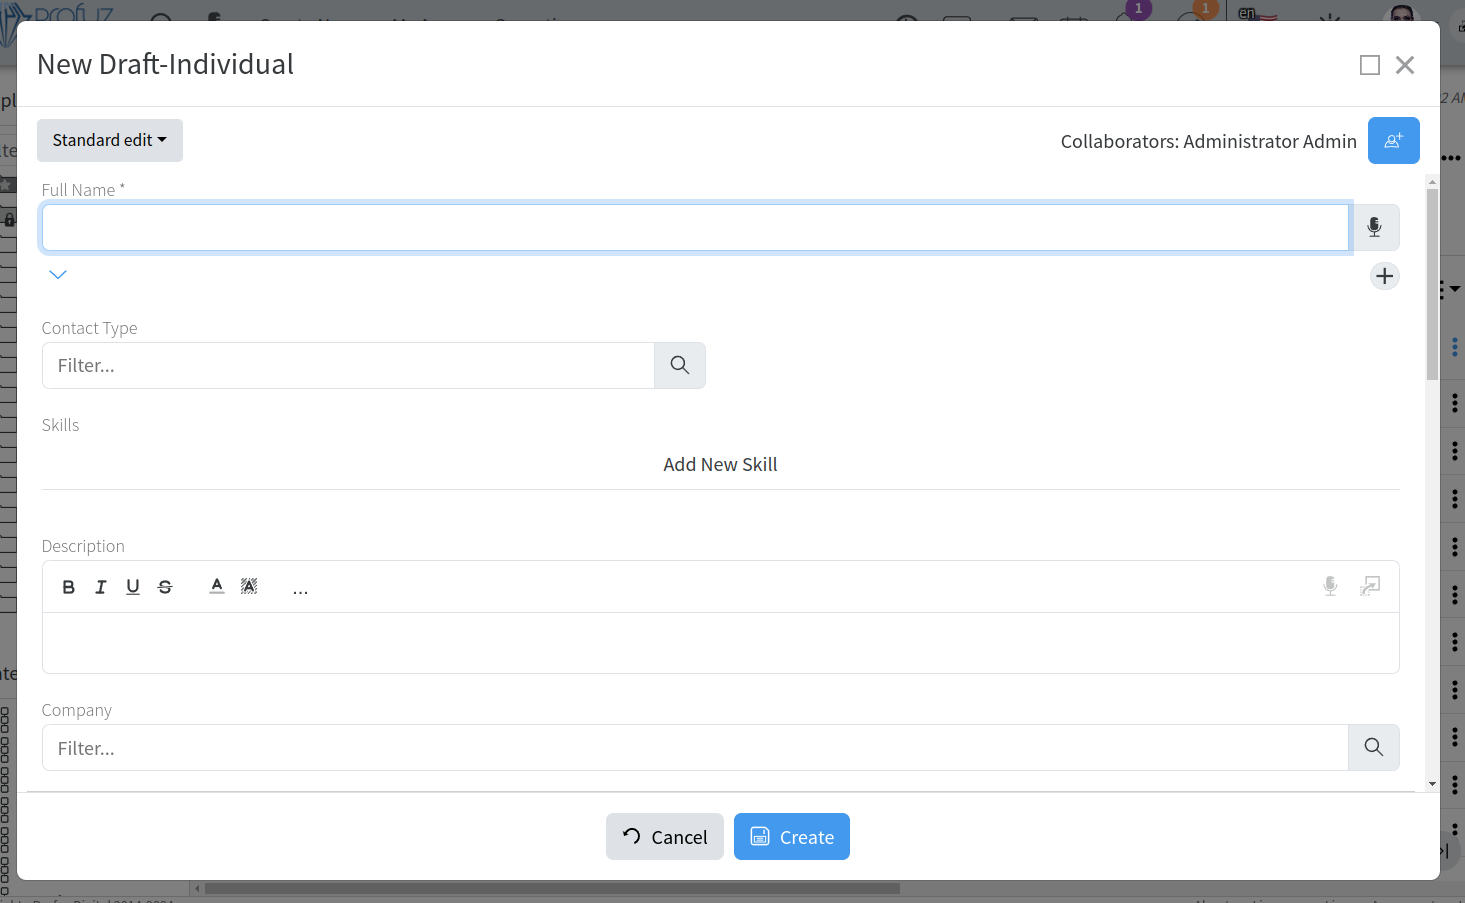](https://docs.profuzdigital.com/uploads/images/gallery/2024-11/NLoimage.png)
Contact Type shows if the Individual is Affiliate, (the one that is the owner of the system) or External, which is then defined further by Relationship Role - Client, Supplier, Partner or a combination of those.
**Note**: Please, have in mind Relationship Roles will appear, once the Contact Type is set to External, and Safe Draft button at the bottom of the screen is pressed.
[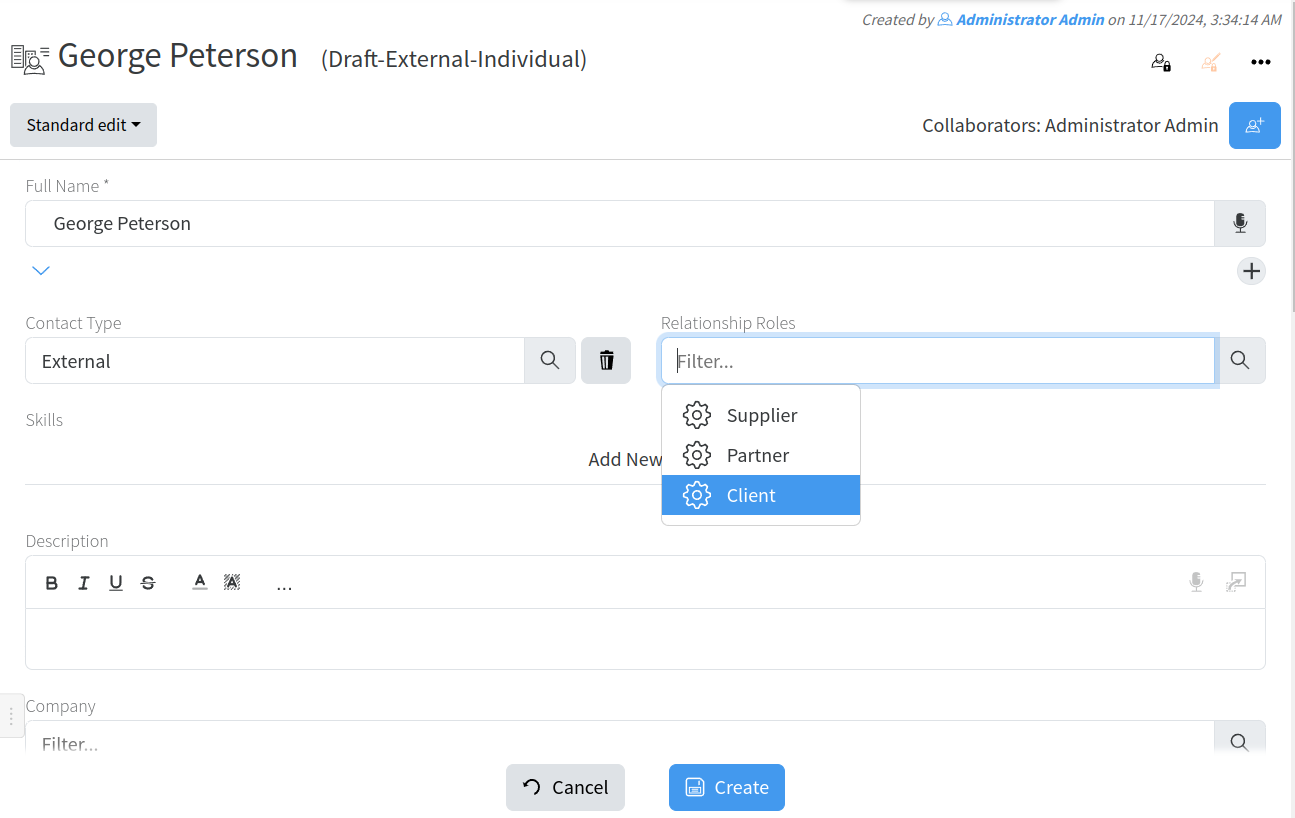](https://docs.profuzdigital.com/uploads/images/gallery/2024-11/cXLimage.png)
If Client is selected and Safe Draft pressed after that, then Sales Status can be defined:
[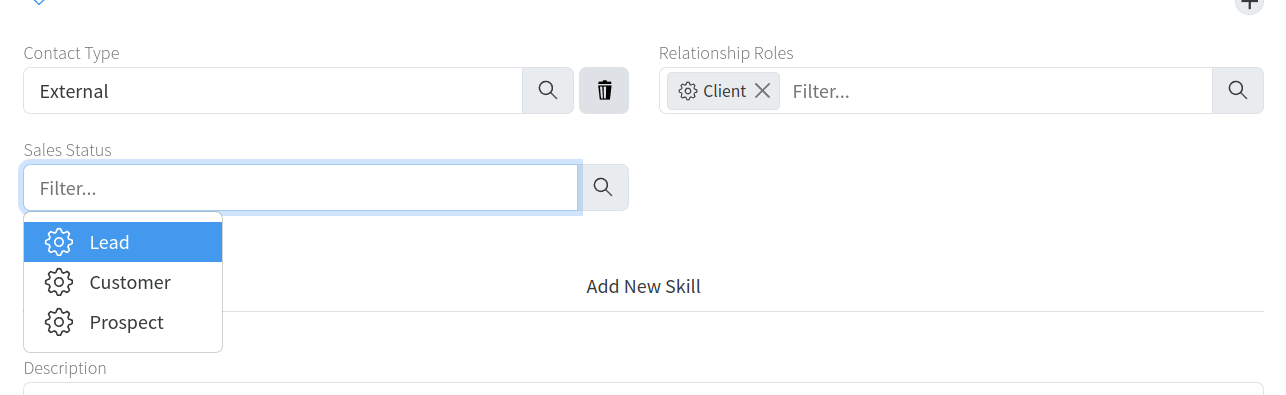](https://docs.profuzdigital.com/uploads/images/gallery/2024-11/LGximage.png)
Sales status can be used to choose marketing activities
By pressing Create the Individual is created.
[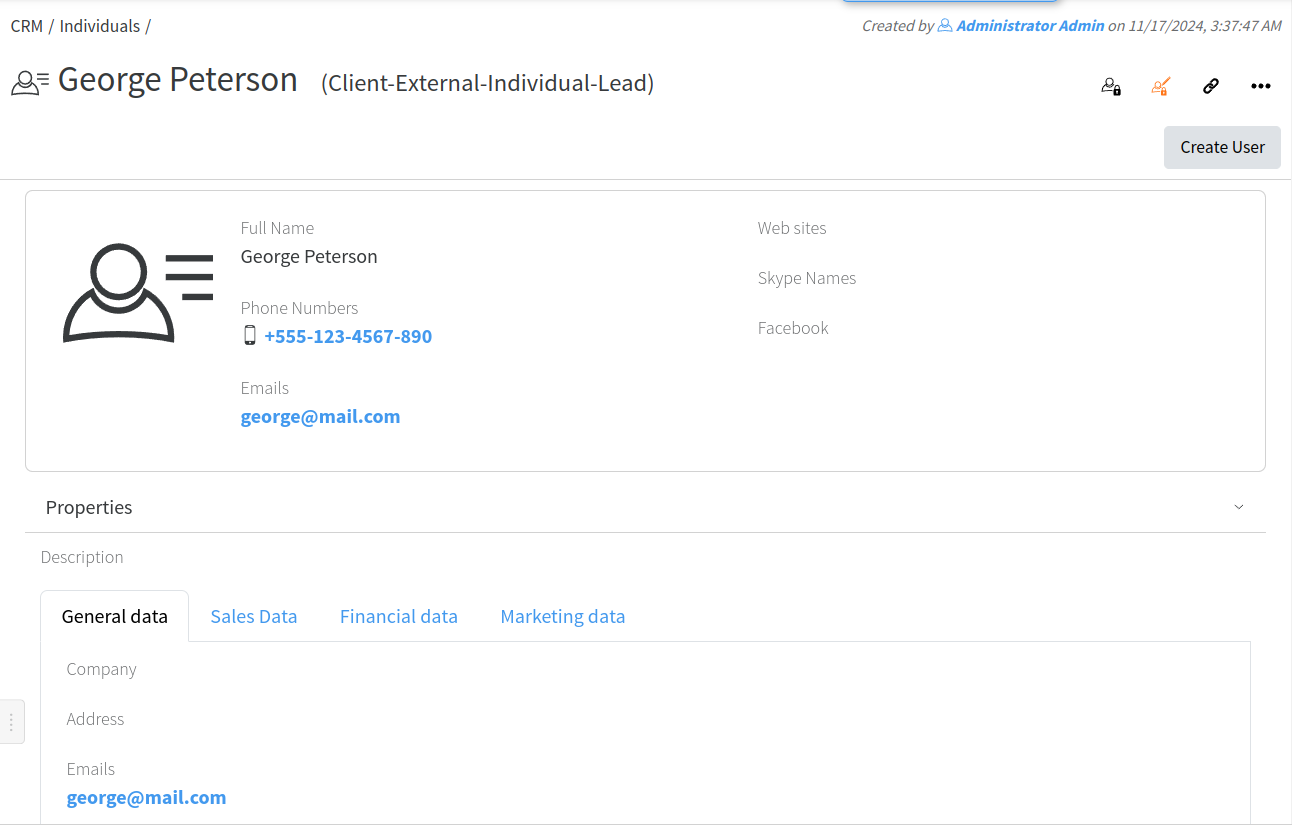](https://docs.profuzdigital.com/uploads/images/gallery/2024-11/eKvimage.png)
## Creating a Company
Creating new company can be done by Create New – Contact and Selecting type Company
[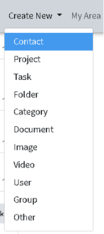](https://docs.profuzdigital.com/uploads/images/gallery/2024-11/Hqcimage.png)
[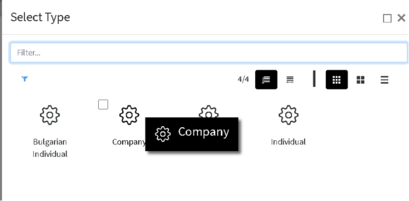](https://docs.profuzdigital.com/uploads/images/gallery/2024-11/cHaimage.png)
Once Company is selected, the new window will Appear with details to be added, as only Full name is mandatory.
[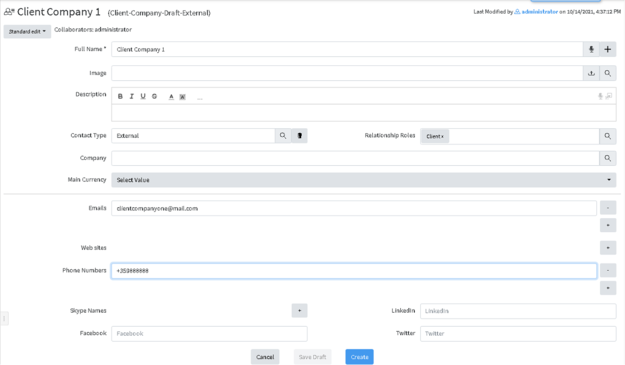](https://docs.profuzdigital.com/uploads/images/gallery/2024-11/oNAimage.png)
Contact Type shows if the company is Affiliate, which can be the Home company (the one that is the owner of the system or its affiliate) or External, which is then defined further by Relationship Role - Client, Supplier, Partner or a combination of those.
**Note**: Please, have in mind Relationship Roles will appear, once the Contact Type is set to External, and Safe Draft button at the bottom of the screen is pressed.
[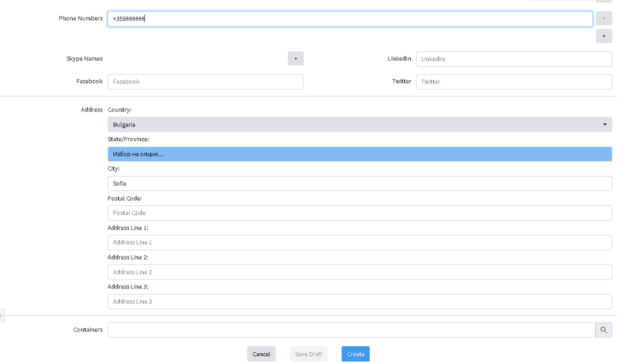](https://docs.profuzdigital.com/uploads/images/gallery/2024-11/Xo1image.png)
With Create the process is finishes and object is created.
[](https://docs.profuzdigital.com/uploads/images/gallery/2024-11/8sZimage.png)
Adding other properties such as VAT number, company ID, Accountable Person etc can be done in Actions – Edit and if not visible in the Standard Edit mode, chose Advanced Edit Mode.
[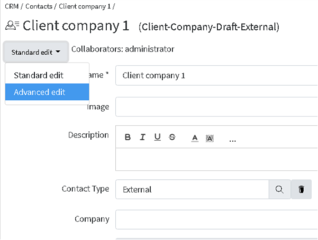](https://docs.profuzdigital.com/uploads/images/gallery/2024-11/d1bimage.png)
Managing Marketing Activities
As seen on the above sections, there are multiple parameters you can associate with the contacts. A part from the widely used and standard ones like Name, email(s), phone(s), address(es), social media accounts (Twitter, Facebook, LinkedIn, Skype, etc.), you can also set Company Positions, Departments, Hierarchical Managers and Skills (those are specific skill sets used in company specific business niche and required from internal and external human resources. In the contacts, you can also input data which to be used for the sales, marketing and financial operations with this contact. Such properties are:
- Sales parameters:
- Relationship role – client, partner, supplier
- If the contact is with a client relationship role, then you can set its sales status – lead, prospect, customer
This way you can differentiate between marketing leads, potential clients (prospects) and existing clients (customers).
- For marketing purposes and to comply with the GDPR and other data protection regulations you can track the e-mail marketing activities for which your clients have subscribed/unsubscribed. The default activities are:
- Newsletters
- Promotions
- Product Announcements
- Email Marketing
Marketing activities for each contact can be set or edit via Actions - Edit (Advanced Edit Mode) under Marketing Activities property
[](https://docs.profuzdigital.com/uploads/images/gallery/2024-11/fVDimage.png)
Adding new activities can be done by pressing Add New Marketing Activity and selecting options
[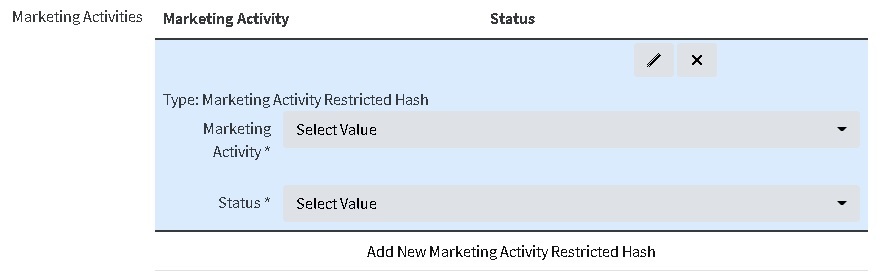](https://docs.profuzdigital.com/uploads/images/gallery/2024-11/dT6image.png)
[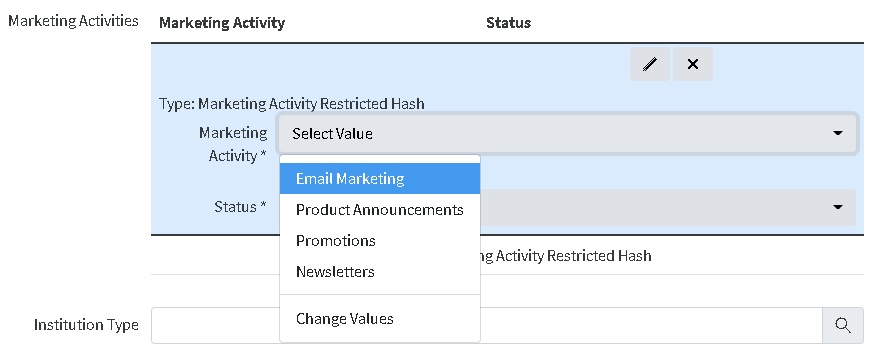](https://docs.profuzdigital.com/uploads/images/gallery/2024-11/RVjimage.png)
When finished press Safe.
It will appear in the contact info as follows:
[](https://docs.profuzdigital.com/uploads/images/gallery/2024-11/uOBimage.png)
# Project Management
# Project Management
Profuz LAPIS provides simple tasks handling as well as complex project management functionalities. The default installation contains Project Management Module with the following default containers and objects: Projects,Tasks and Resources.
[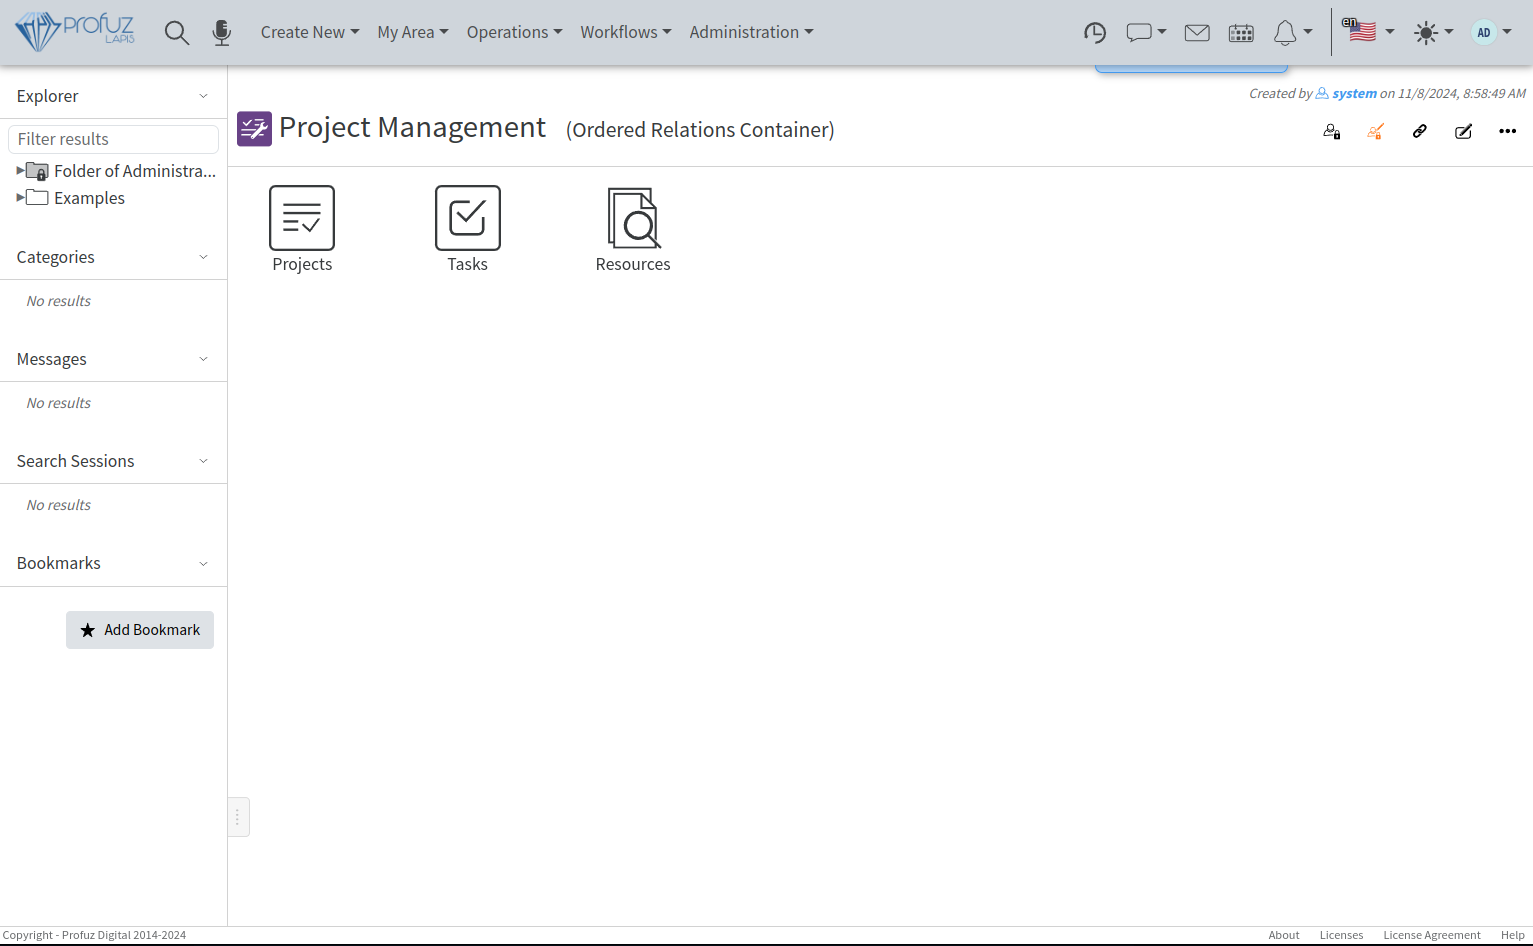](https://docs.profuzdigital.com/uploads/images/gallery/2024-11/ab9image.png)
There are different ways of visualizing the projects overview (different views) such as Icons view, Grid view, List view, Tree view, Preview Pane view and Calendar view. You can switch between them by selecting one of the icons in the upper right side of the screen.
[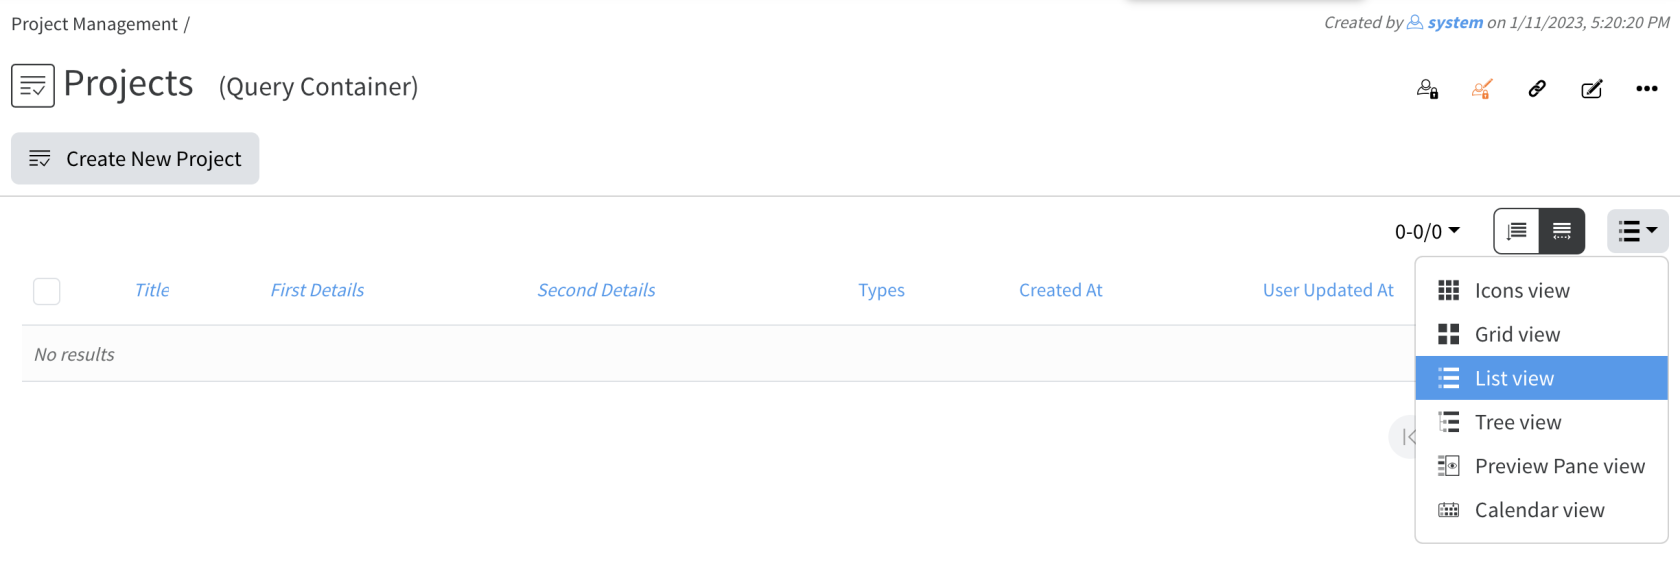](https://docs.profuzdigital.com/uploads/images/gallery/2024-12/image.png)
When in List or Tree view, you can filter by adding one or more filters in the filterable columns. To add a filter hover over the column's header and click the funnel icon.
[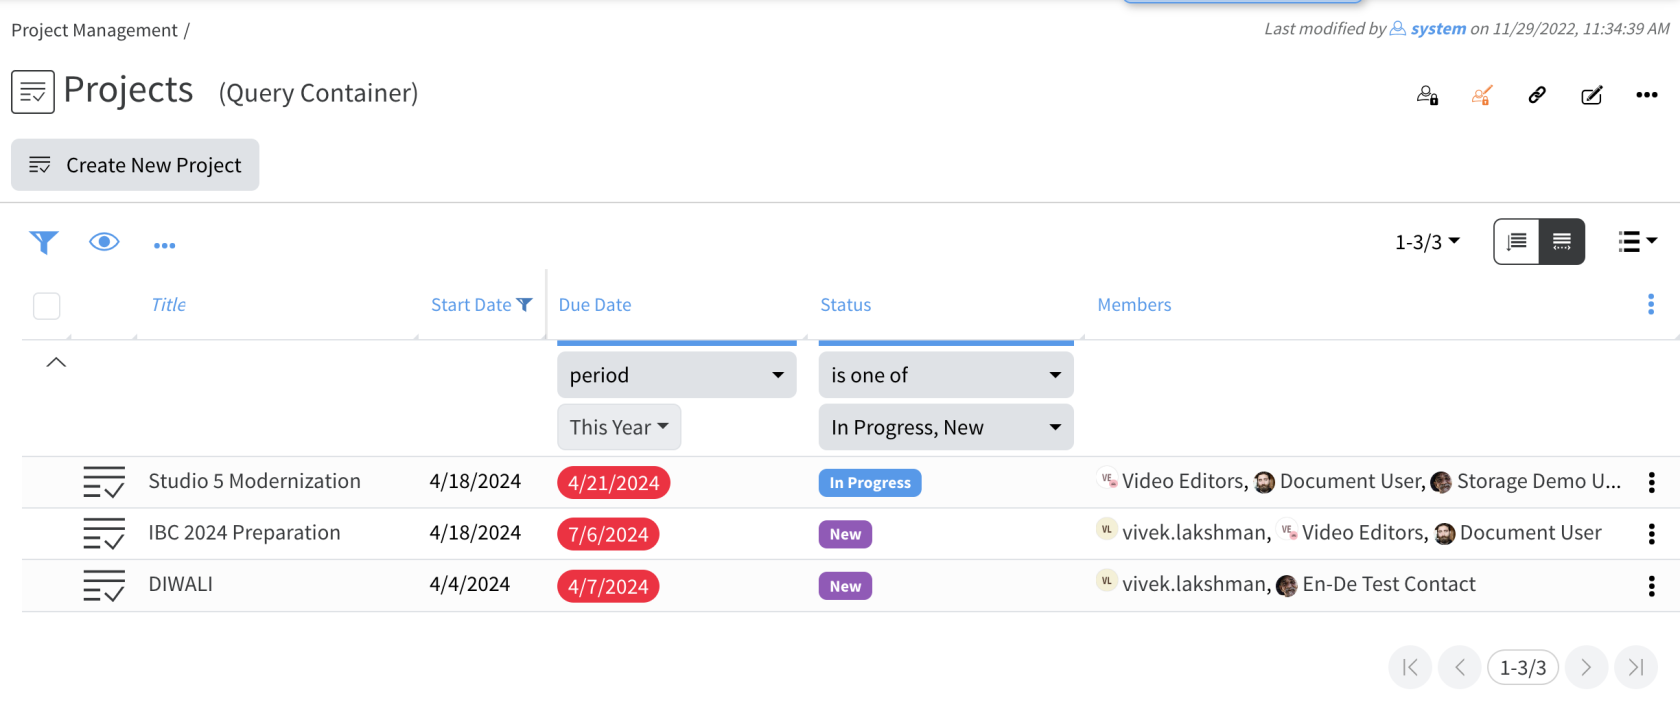](https://docs.profuzdigital.com/uploads/images/gallery/2024-12/8pNimage.png)
Projects have the following default **Properties:** Name, Description, Members, Status, Priority, Assignee, Start Date, Due Date, Progress, Parent Project. New properties can be added and configured additionally. Properties' placements can be changed for creating, editing and viewing a project.
## Creating a new project/task
Projects and tasks can be created from the Application’s Main Menu by clicking on Create New → Project and Create New→ Task as shown on the screenshot below:
[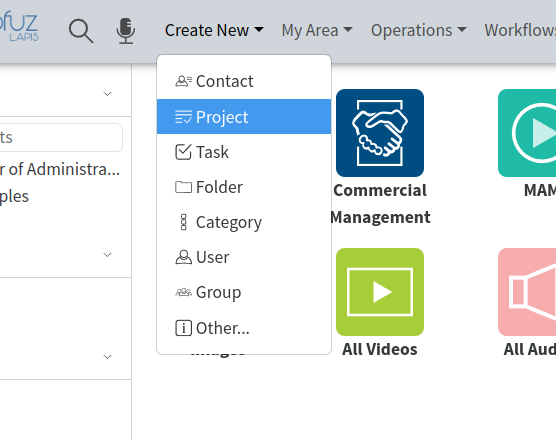](https://docs.profuzdigital.com/uploads/images/gallery/2024-11/O6Fimage.png)
or you can go to Project Management - Projects (or Tasks) and press **Create New Project** (or **Create New Task**) button:
[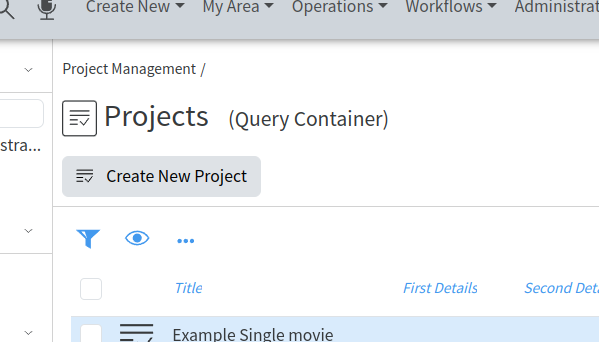](https://docs.profuzdigital.com/uploads/images/gallery/2024-11/yW8image.png)
If you are using Profuz LAPIS CRM module, you can also directly create project from the order by using the
operation Create Project From Order which is available in the Actions Menu when you are working with an Order. Please see the screenshot:
[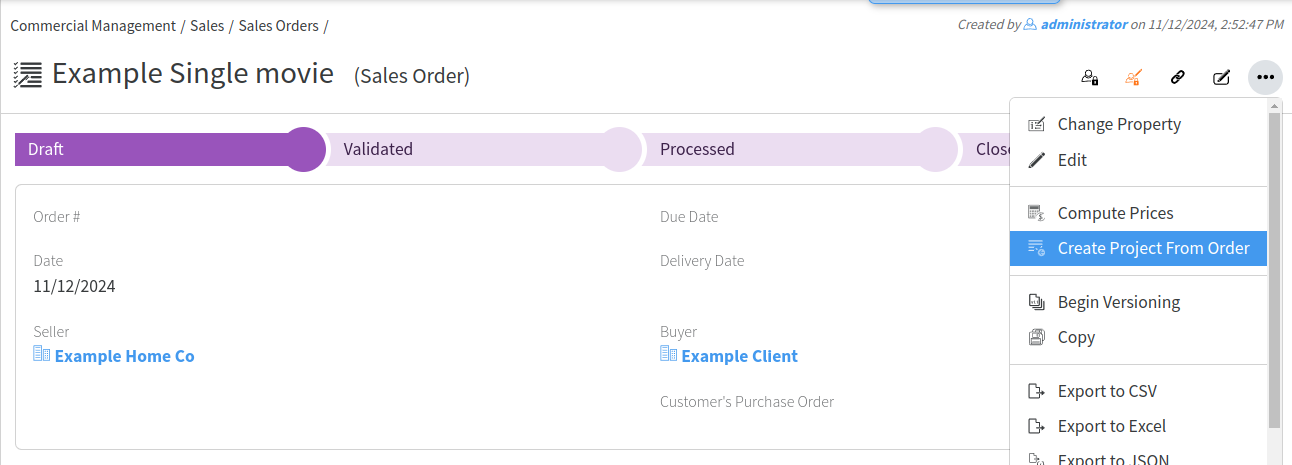](https://docs.profuzdigital.com/uploads/images/gallery/2024-11/tuvimage.png)
New Tasks can be created also from the Calendar by selecting the period from the start date to the due date as shown below:
[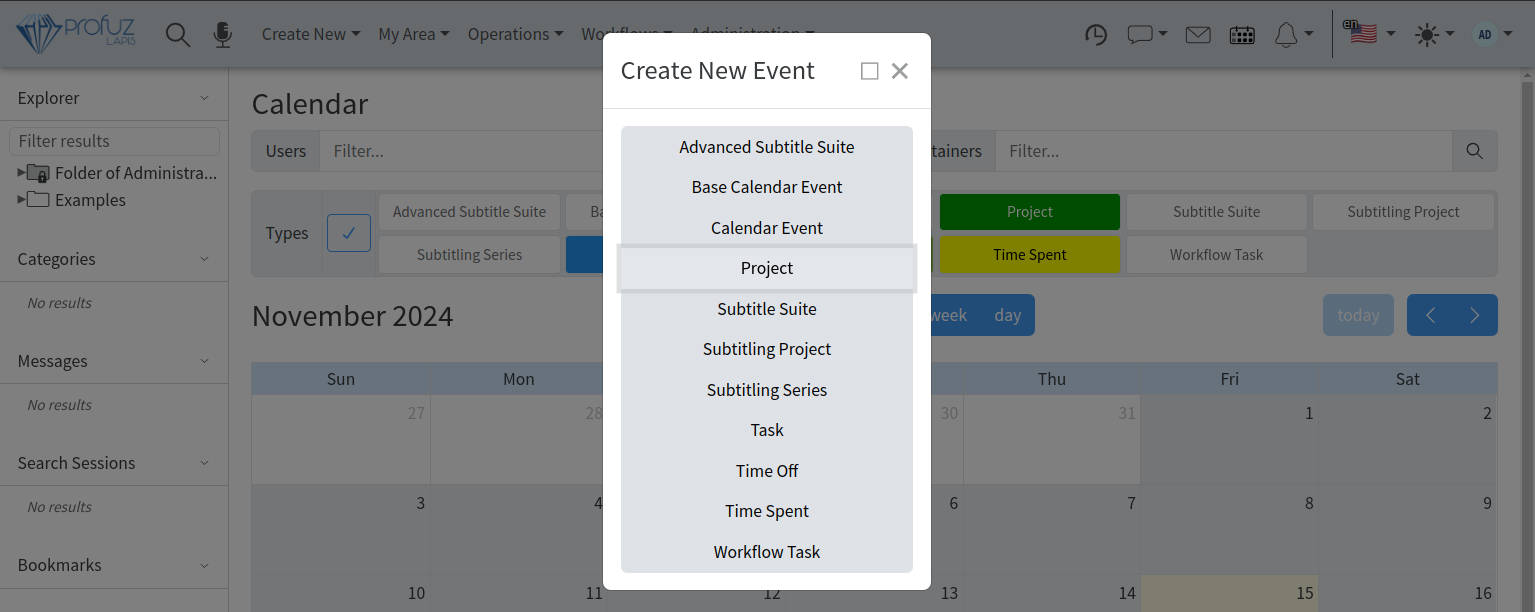](https://docs.profuzdigital.com/uploads/images/gallery/2024-11/Chzimage.png)
## Creating a Sub-project
How to create a Sub Project?
Sub-projects creation is a standard functionality in Profuz LAPIS PM. You can create sub-projects from the project's menu as shown below:
[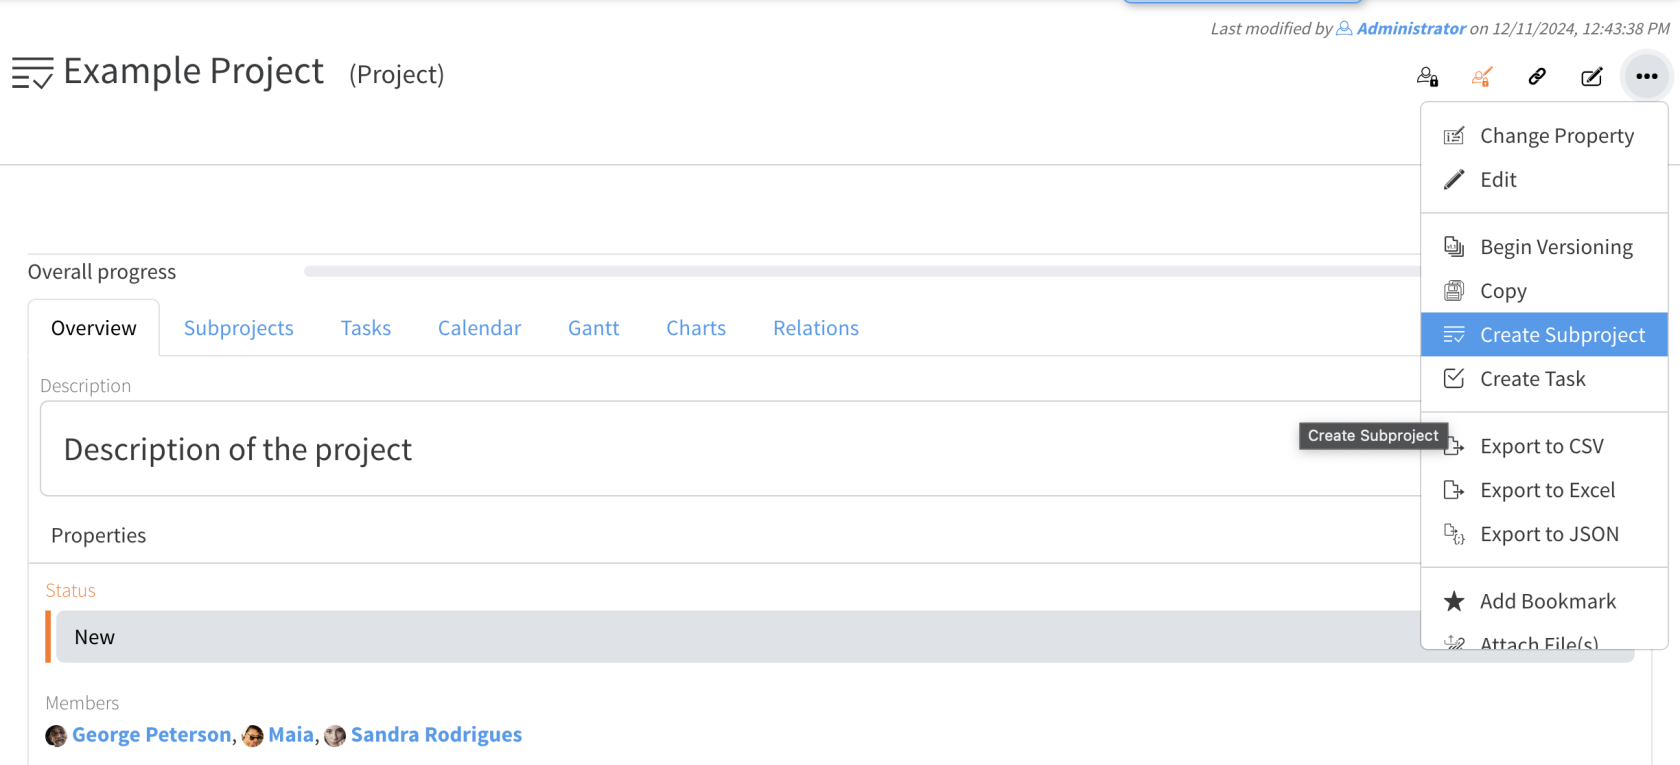](https://docs.profuzdigital.com/uploads/images/gallery/2024-12/J6wimage.png)
## Finding my projects/tasks or the projects/tasks I am involved?
All projects/tasks to which I am Owner, Creator, Member or Assignee will be listed in My Area accessible from Applications Main Menu:
[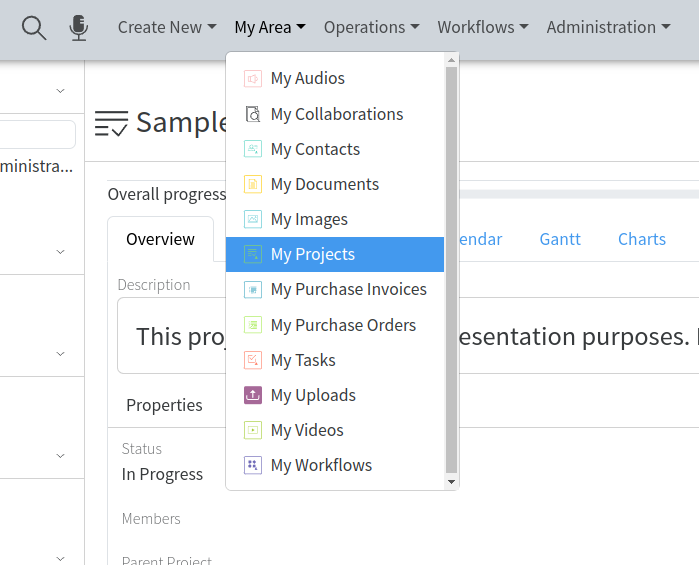](https://docs.profuzdigital.com/uploads/images/gallery/2024-11/I20image.png)
There is also a possibility to have a user specific dashboard where to list projects/tasks based on defined by the user criteria. An example of a personalized dashboard can be seen below:
[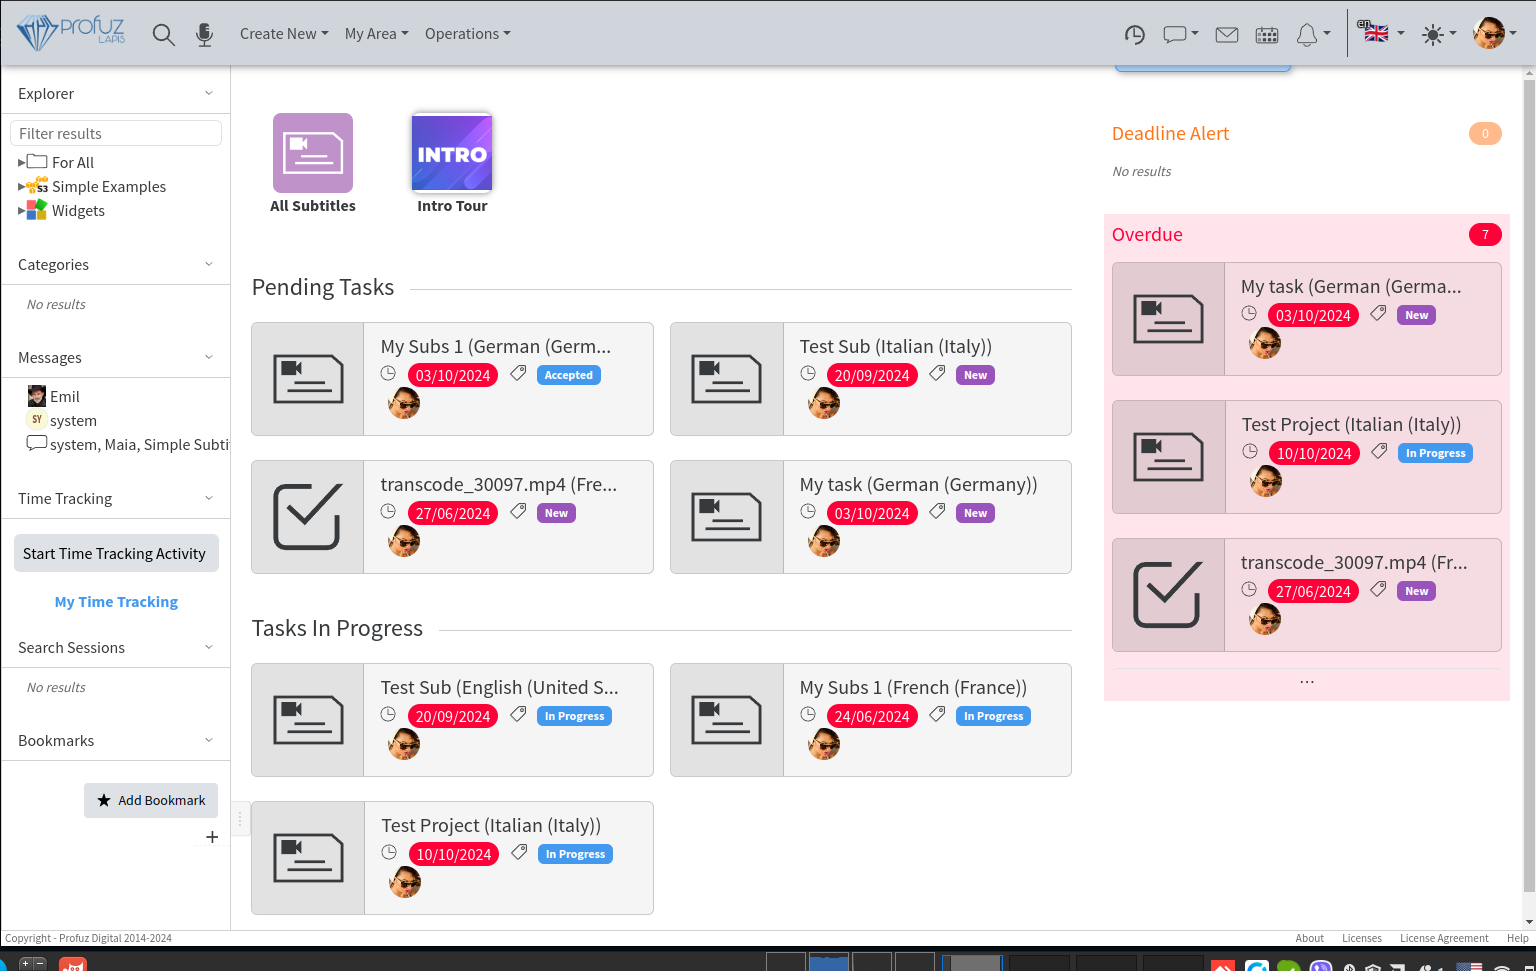](https://docs.profuzdigital.com/uploads/images/gallery/2024-11/vpMimage.png)
In addition to that, there is a possibility to have multiple task-specific or user-specific Project Views/Overviews. An example is shown below:
[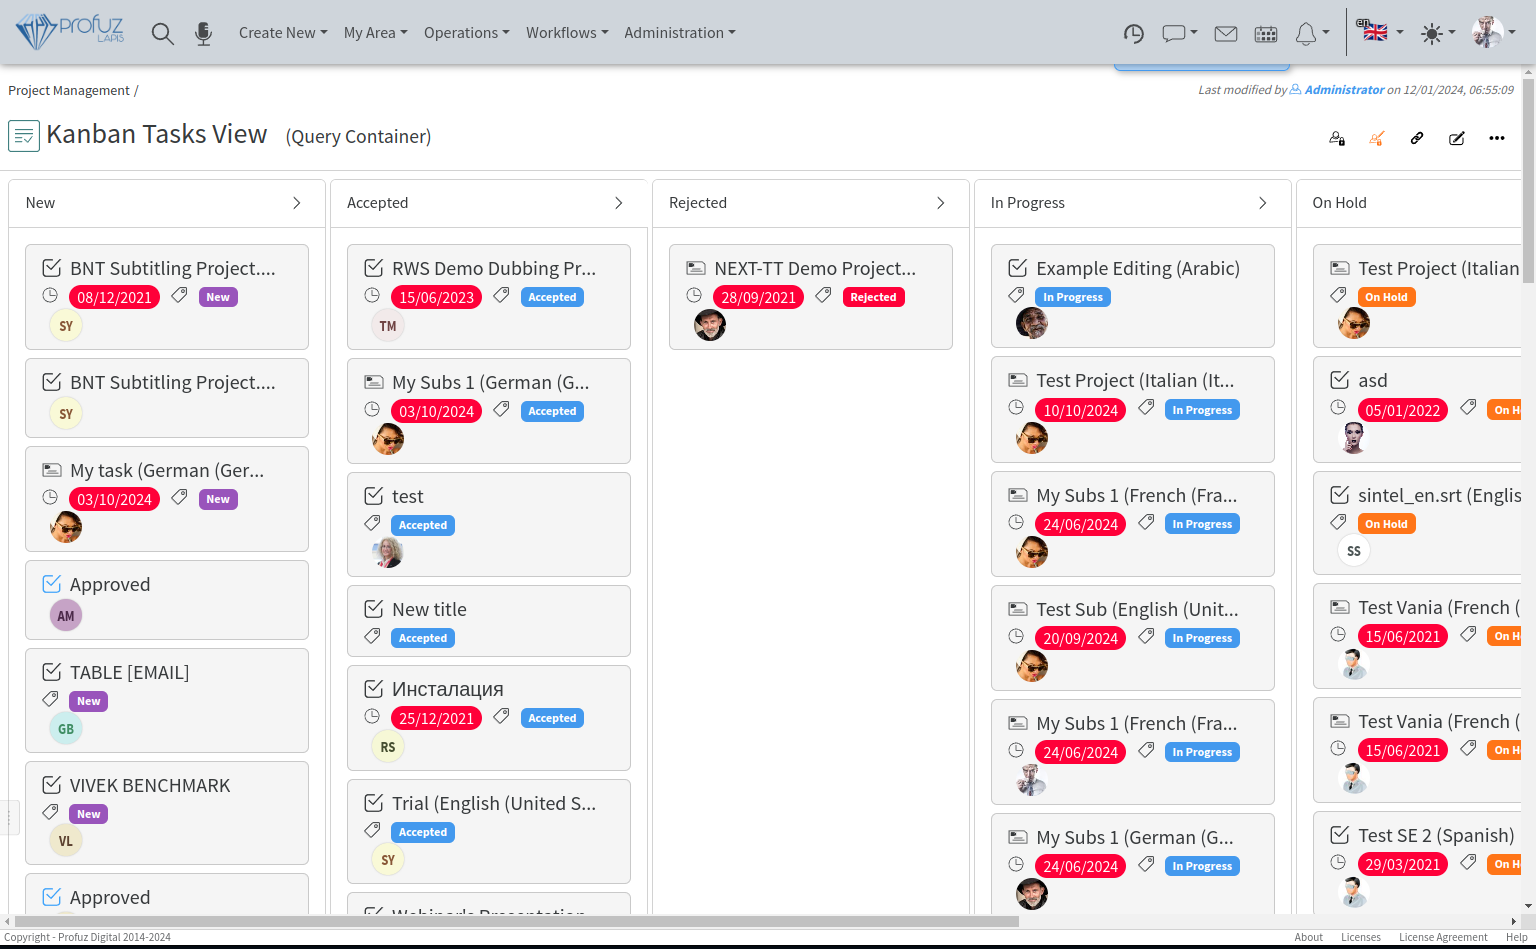](https://docs.profuzdigital.com/uploads/images/gallery/2024-11/jqaimage.png)
## Editing projects/ tasks
You can use the EDIT command from the Application’s Main Menu - > Actions like shown below:
[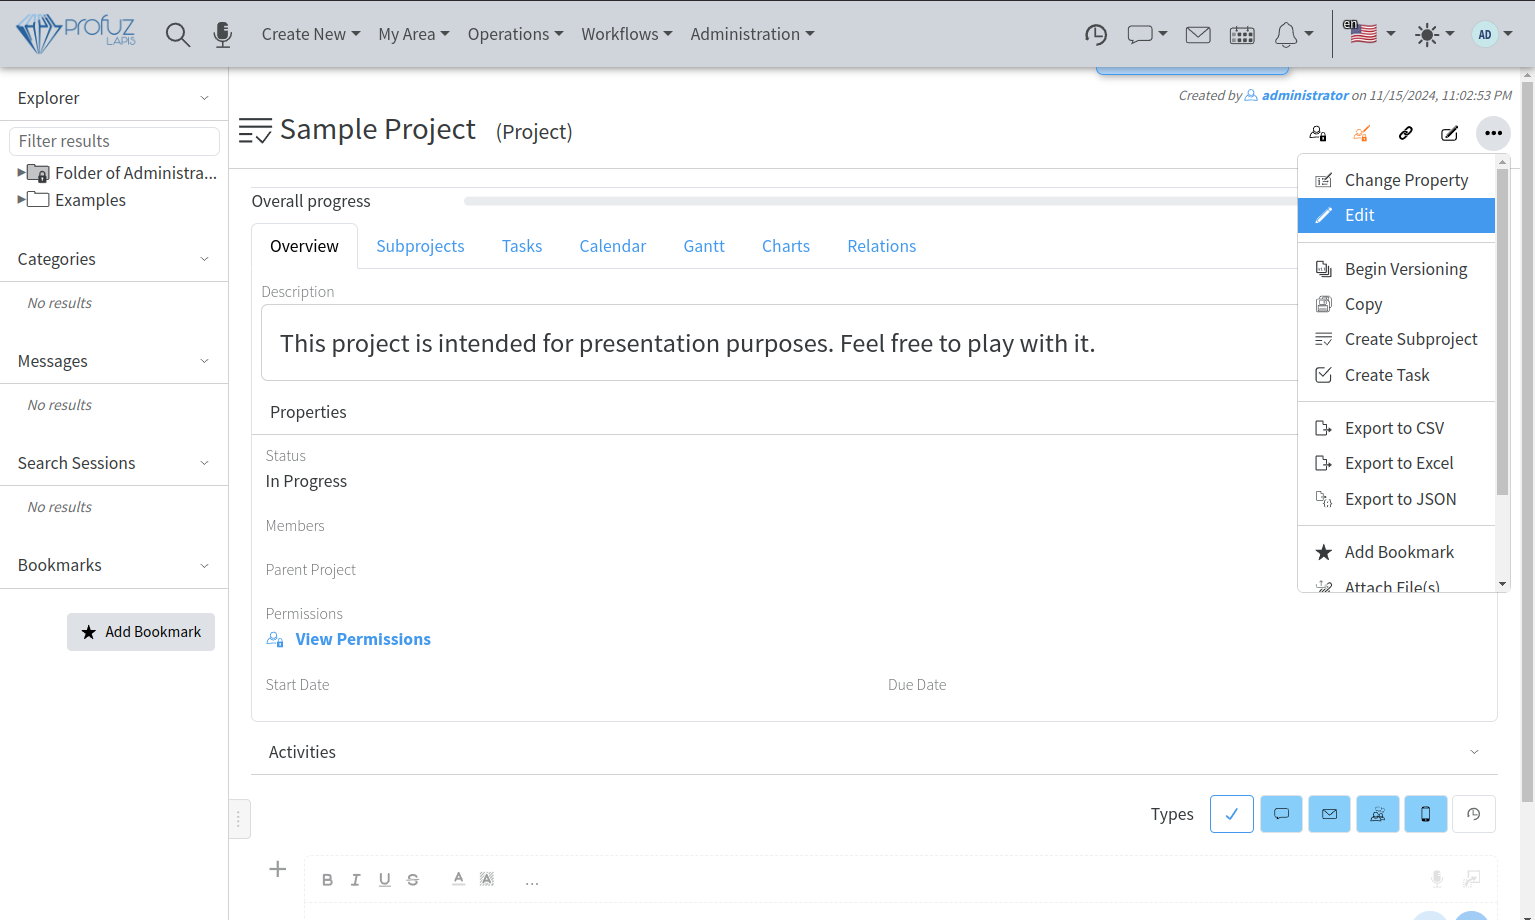](https://docs.profuzdigital.com/uploads/images/gallery/2024-11/lCbimage.png)
Every property (parameter) of the project or task can also be edited individually by using the edit icon appearing next to the property when you hover it.
You can also change quickly one and the same parameter of multiple projects or tasks by selecting the projects/tasks to which you want to make this change and use the Change Property command available in Selection Actions Menu at top of the application as shown here:
[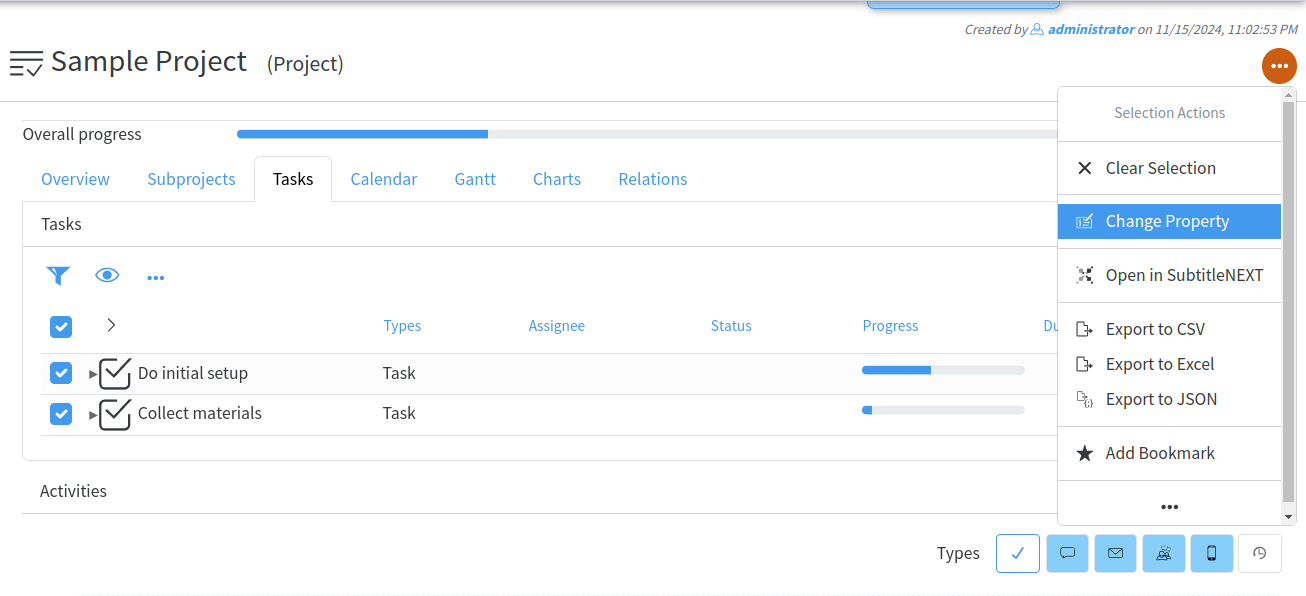](https://docs.profuzdigital.com/uploads/images/gallery/2024-11/x1Pimage.png)
This can be used to change Statuses, Members, Assignee, Owners, Start dates, Due dates, Priority, Progress, etc.
[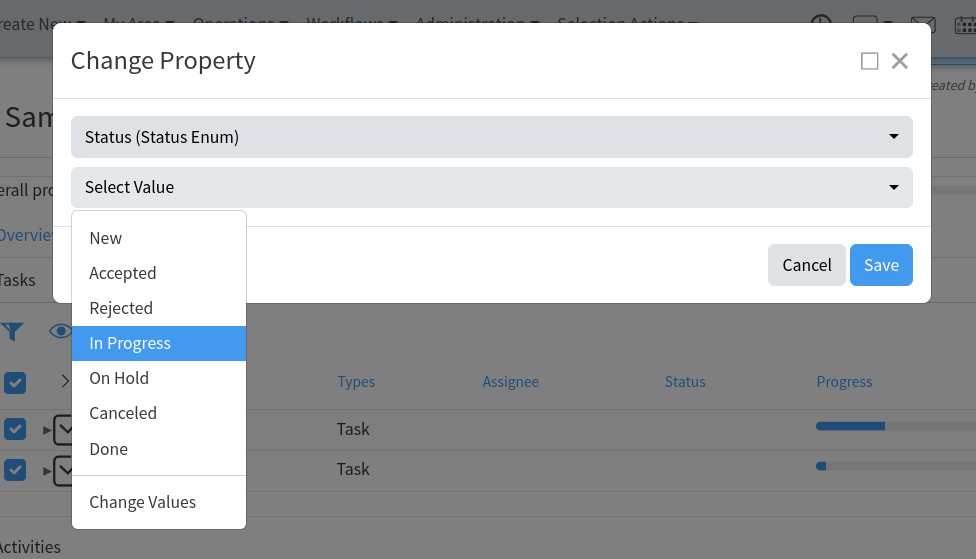](https://docs.profuzdigital.com/uploads/images/gallery/2024-11/1Niimage.png)
You can attach files to a project/task by using the same name command available in Actions Menu or by linking it through the Relations.
## Filtering parameters in the projects/tasks overview
When you use the List view of projects or tasks, you can click on the rack-wheel sign to see the available parameters, tick the ones you would like to see in the overview and close the window:
[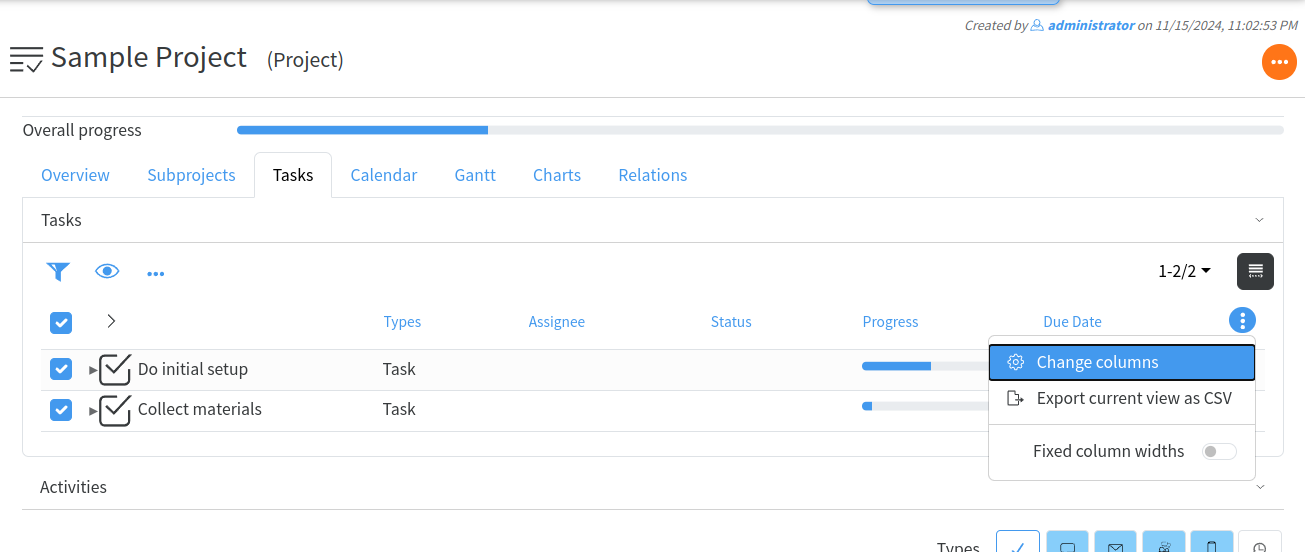](https://docs.profuzdigital.com/uploads/images/gallery/2024-11/9Ufimage.png)
[](https://docs.profuzdigital.com/uploads/images/gallery/2024-11/HROimage.png)
Once in list view, you can use the Filter sign to filter all the entries by a chosen parameters or you you can use the main filter to search for information in all parameters of the entries.
[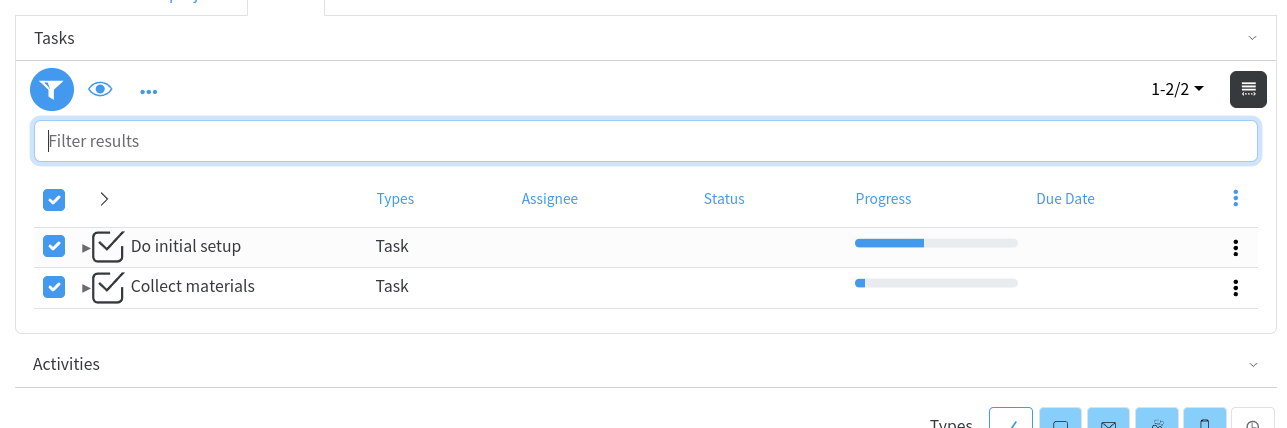](https://docs.profuzdigital.com/uploads/images/gallery/2024-11/n7zimage.png)
## Managing resources for the projects/tasks
Apart from the manual selection when you know in advance the name of the resource (individual or group) you would like to assign the task to, you can also have some suggestions from the system corresponding to your current project specifics and needs. It works in the following way:
1. In order a contact to become a resource for your projects, while creating it, you need to give it some additional parameters needed for their proper classification. We call those additional parameters “Skills”.
2. Skills are used to describe what specific characteristics this contact has and what type of specific jobs he can perform. These skills can vary depending on the type of business you do and the type(s) of projects you manage. We have defined some default Skills for the Translation industry, this way all contacts of the system who have Translation Skills assigned, become Translation Projects Resources.
[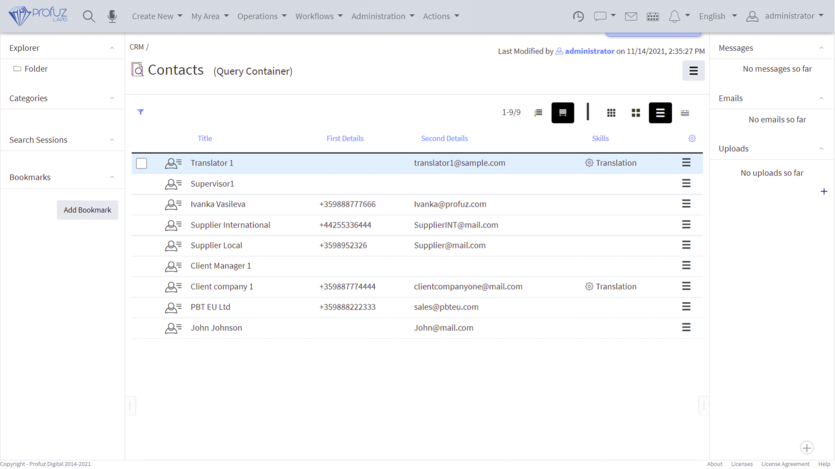](https://docs.profuzdigital.com/uploads/images/gallery/2024-11/TgBimage.png)
You can list all Resources from the Project Management’s main Query Container “Resources” as seen here:
[](https://docs.profuzdigital.com/uploads/images/gallery/2024-11/QJrimage.png)
Once you click on the Resources you will see a list of all resources available for all projects:
[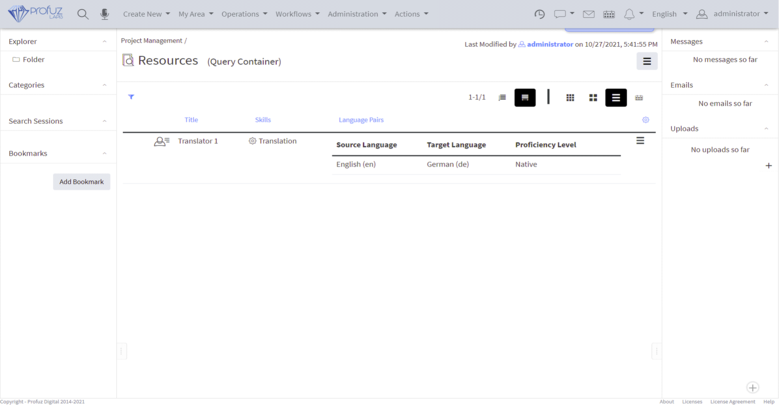](https://docs.profuzdigital.com/uploads/images/gallery/2024-11/SEMimage.png)
# Administration
# Connect data providers
Profuz LAPIS allows to connect local, network, FTP, Google Drive, Dropbox, S3 and many others storages
1. Open ~/apache-tomcat/production-cofig.json file in your favorite text editor
2. Add or edit the following entry in "providers" array:
```json
{
"storageId": 11,
"className": "com.profuzdigital.data_server.database.providers.vfs.VfsDataProvider",
"name": [ { "language": "en", "country": "US", "searchValue": "Storage Name" } ],
"enabled": true,
"authenticationDataProperties": {
"public": ["domain", "username"],
"sensitive": ["password"]
},
"indexPath": "data/vfs-blob-index",
"uri": "file:///DATA/DATA/DATA/",
"fileMonitorDelay": 3600000,
"rootAuthentication": {
"domain": null,
"username": "guest",
"password": ""
},
"defaultAuthentication": {
"domain": null,
"username": "guest",
"password": ""
}
}
```
Fields explanation:
- **storageId**: use unique number for each additional storage. Numbers below 7 are preserved by LAPIS
- **className**:
- for local file system (includded system mapped folders), SAMBA, NAS, FTP, WebDav, S3 and similar file storages use "com.profuzdigital.data\_server.database.providers.vfs.VfsDataProvider"
- for YouTube use "com.profuzdigital.data\_server.database.providers.you\_tube.YouTubeDataProvider"
- **name**: in searchValue put the name you want to see in LAPIS UI. For example change "Starage Name" to "My External Storage"
- **enabled**: if true it will be connected, else if false it will be skipped
- **authenticationDataProperties**: describe autentication parameters. In the above example both domain and username must be used and password is case sensitive.
- **uri**: put the uri to access your connected storage.
- for local file system: file:///path/to/the/folder
- for ftp: [ftp://ftp.example.com/optional/path/to/folder](ftp://ftp.example.com/optional/path/to/folder)
- for SAMBA: [smb://serveraddress/path/to/the/folder](smb://serveraddress/path/to/the/folder)
- for S3: [s3://server.example.com/path](s3://server.example.com/path)
- for Dropbox: dropbox:///
- for Guugle Drive: gdrive:///
- **fileMonitorDelay**: value in milisecods ro rescan remote file structure if needed
- **domain**, **username**, **password**: authentication parameters for the remote connection
Save and restart tomcat to apply the changes:
sudo systemctl restart tomcat.service
# SMTP Configuration
To configure SMTP server that LAPIS will use to send emals do the following:
- Open ~/apache-tomcat/production-cofig.json file in your favorite text editor
- Add or edit the following property:
```json
"smtp": {
"protocol": "TLS",
"host": "mail.example.com",
"port": 587,
"username": "youraccount@example.com",
"password": "you-passwors",
"sender": "no-reply@example.com"
},
```
- **protocol**: can be one of the following: SMTP, SMTPS or TLS
- **host**: address of your SMTP server
- **port**: port used by your SMTP server
- **username**: username to use for authentication
- **password**: password to use for authentication
- **sender**: set the address you want to be set as sender to emals that system sends
Restart tomcat to apply the changes:
`sudo systemctl restart tomcat.service`
# Server Address
To configure the server address that LAPIS will use when generating links in the emails it sends do the following:
- Open ~/apache-tomcat/production-cofig.json file in your favorite text editor
- Edit or add the following property:
```json
"serverAddress": "http://localhost",
```
Change "http://localhost" with your LAPIS server address, for example "https://lapis.example.com"
Restart tomcat to apply the changes:
`sudo systemctl restart tomcat.service`
# Backups
During the installation, a couple of cron-jobs are set up to backup the Mongo database and the PostgreSQL one. They are run at 3 in the morning and are put in `$HOME/backups`. These cron jobs can be modified as needed.
# Backup and Restore Strategy
## 1. System
In case of barebone installations we recommend the following multi-layered backup and recovery approach to ensure data protection and business continuity. Such infrastructure utilizes hardware-level redundancy combined with comprehensive software backup solutions.
### Hardware Redundancy
- **System Disks**: RAID 1 (Mirroring) for operating system and applications
- **Data Disks**: RAID 5 (Striping with Parity) for data storage with fault tolerance
- **Coverage**: Protects against single disk failures in both system and data arrays
- **Hot-swap Capability**: Failed disks can be replaced without system shutdown
In case of virtualized environment in addition to automatic snap-shots provided by most virtualization systems you can use also the provided below solution which can be used also to move to a different environment without hassle.
## 2. System Backup Strategy
### Relax-and-Recover (ReaR) Implementation
- **Backup Type**: Full system backup including OS, configuration, and applications
- **Output Format**:
- Bootable recovery ISO image
- Compressed tar.gz archive
- **Frequency**: Monthly (default, configurable to weekly/daily)
- **Storage**: Configured remote storage (NFS, S3, SFTP, etc.)
### Manual Backup Commands
```bash
# Check ReaR configuration
rear checklayout
# Perform manual backup
rear mkbackup
# Create rescue image only
rear mkrescue
# Verbose backup with debug information
rear -v mkbackup
```
### Recovery Scenarios
- **Automatic Restore**: When remote storage remains accessible during recovery
- **Manual Restore**: Requires manual remounting of remote storage if inaccessible
## 3. Database Backup Strategy
### Daily Backup Operations
- **Frequency**: Daily automated backups
- **Local Storage**: `~/backups/` (contains daily database dumps)
- **Scope**: All MongoDB and Postgres database instances
- **Replication**: Synchronized to remote location (typically same as system backups)
## 4. File-Level Backup Strategy
### Flexible Folder Backup
- **Target**: Configurable folders from data drives
- **Methods**:
- Default: rsync with incremental transfers
- Alternatives: rclone, duplicity, or custom scripts
- **Frequency**: User-configurable (daily/weekly/monthly)
- **Storage**: Remote location separate from system backups
## 5. Complete Restore Process for Hardware Failure
### Scenario A: Partial Hardware Failure (Hot-swap Recovery)
1. **Disk Replacement**: Hot-swap failed drives while system is running
2. **RAID Rebuild**: Automatic RAID reconstruction without service interruption
3. **Time Estimate**: 2-6 hours (depending on RAID array size and disk speed)
### Scenario B: Complete System Failure (Approx. 3-8 hours)
*Note: Time estimates exclude spare parts delivery, which depends on specific service agreements.*
#### Phase 1: Hardware Replacement (Approx. 1-2 hours)
1. Replace failed hardware components
2. Rebuild RAID arrays as needed
3. Verify hardware functionality
#### Phase 2: System Recovery (Approx. 1-2 hours)
Transfer recovery ISO bootup image and boot the system from it (make USB stick or DVD from if needed). In the boot screen choose either automatic or manual recovery.
**Automatic Recovery** (when backup storage is directly accessible):
```bash
# Boot from ReaR recovery media
# ReaR automatically detects backup location and initiates restore
# No manual intervention required
# Manual trigger if needed:
rear recover
```
**Manual Recovery** (when backup storage requires mounting):
```bash
# Boot from ReaR recovery media
# Manually mount backup storage (example for NFS):
mkdir -p /mnt/backup
mount -t nfs 192.168.1.100:/backups /mnt/backup
# Configure ReaR to use mounted backup:
cat > /etc/rear/local.conf << EOF
BACKUP_URL=file:///mnt/backup
OUTPUT_URL=file:///mnt/backup
EOF
# Execute recovery:
rear recover
```
#### Phase 3: Database Restoration (Approx. 30 mins - 1 hour)
```bash
# Navigate to backup directory
cd ~/backups/
# List available backups (organized by date)
ls -la
# Restore database from latest backup
# Specific commands depend on database type (PostgreSQL, MySQL, etc.)
# Example for PostgreSQL:
pg_restore -d database_name latest_backup_file.dump
```
#### Phase 4: File Restoration (Approx. 30 mins - 3 hours)
```bash
# Restore individual folders from remote backups
# Example using rsync:
rsync -avz user@remote-server:/backup/path/ /restore/location/
# Time varies based on data volume and network bandwidth
```
## 6. Estimated Total Recovery Time
- **Hot-swap Scenario**: 2-6 hours (RAID rebuild while system operational)
- **Complete System Failure**: 3-8 hours (excluding parts delivery)
- Hardware Replacement: 1-2 hours
- System Restoration: 1-2 hours
- Database Restoration: 30 minutes - 1 hour
- File Restoration: 30 minutes - XX hours - depending on volume
## 7. Key Configuration Files
### ReaR Configuration (/etc/rear/local.conf)
```bash
# Example configuration
BACKUP=NETFS
BACKUP_URL=nfs://192.168.1.100/backups
OUTPUT=ISO
BACKUP_PROG_COMPRESS_OPTIONS=--gzip
BACKUP_PROG_COMPRESS_SUFFIX=.gz
```
### Database Backup Location
- **Local Path**: `~/backups/`
- **Contents**: Daily automated database dumps with timestamped filenames
- **Retention**: Configurable (default: 30 days)
## 8. Maintenance and Monitoring
We recommend:
- Regular verification of backup integrity
- Monthly test restores to validate recovery process
- Monitoring of backup job success/failure
- Alerting for backup failures or storage capacity issues
## 9. Configuration Flexibility
All backup frequencies, retention policies, and storage locations are configurable to meet specific business requirements and compliance needs.
This comprehensive strategy ensures minimal data loss and rapid recovery in the event of hardware failure or system corruption, with hot-swap capability allowing most disk failures to be resolved without service interruption.