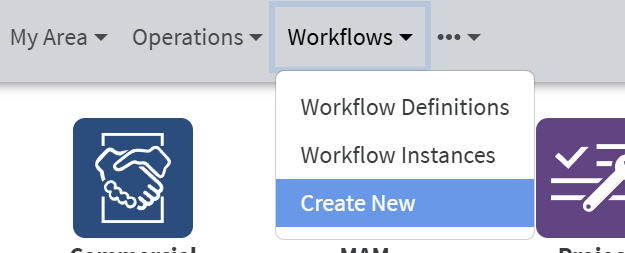
Workflows
Workflow creation and editing

Profuz LAPIS is using Business Process Model and Notation for creating and managing workflows. Creation of new workflows and automation can be done only with that scripting model language. In order to create a new workflow definition, go to Workflows → Create New from where it is possible to design an automation diagram and scripting. Workflows can be created also from existing BPMN files - Workflows → Create New and at the bottom of the page press Select BPMN button to choose an existing .bpmn file from your computer. Similarly you may update an existing workflow definition from a .bpmn file - go to the definition and from the object menu select "Update Content". Note that the .bpmn must have the same process ID. Any saved modification of a workflow definition will create a new version. Running instances of the same workflow definition will continue to use the version of the workflow definition with which they were started.
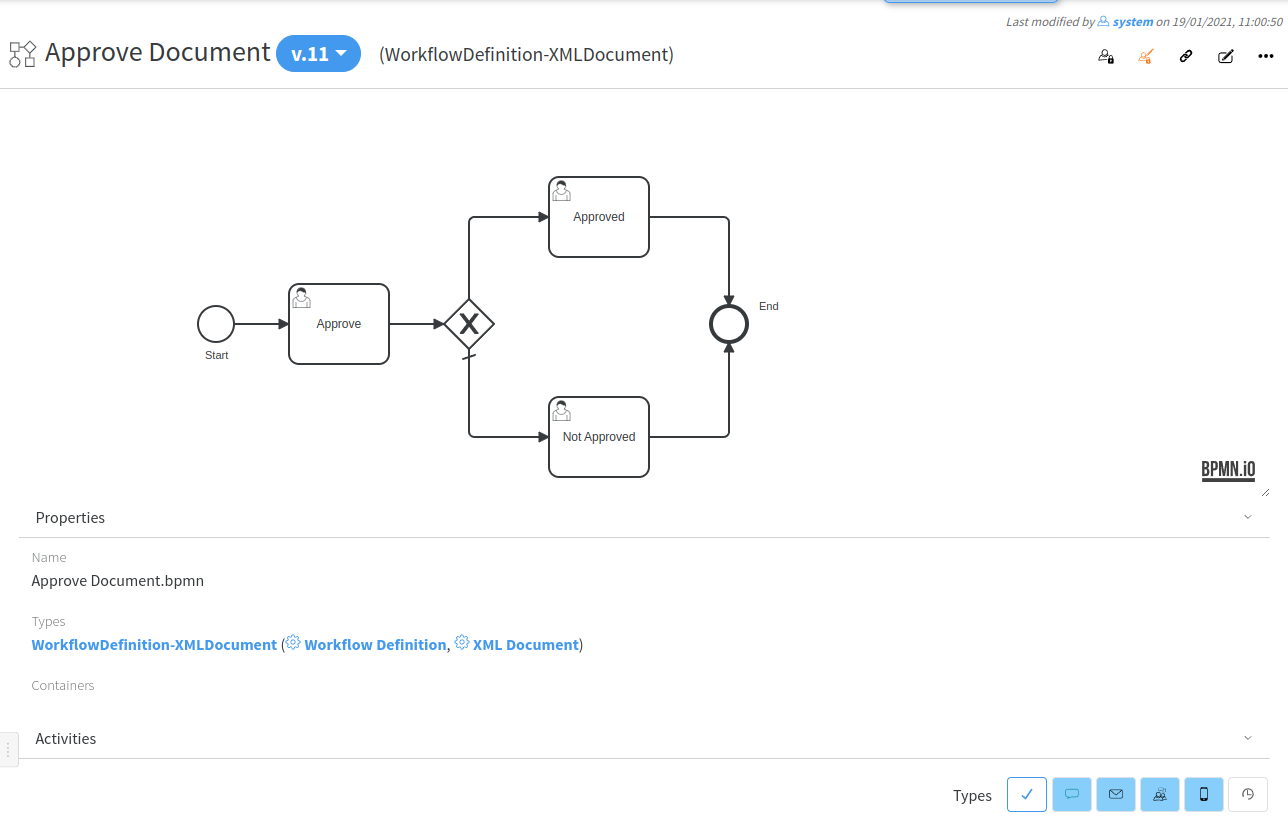
Example of an Approve Document process:
Hint: Please contact your supplier for any workflow automation assistance.
Profuz LAPIS uses Camunda 7 BPMN engine. You may read more in its documentation here.
For the integrated BPMN editor you may find more information here.
You may edit BPMN diagrams also offline in the Camunda Modeler desktop application. You can find it here.
Note that where forms are needed LAPIS uses its own UI types. There are two types of forms: Workflow Instance form and Workflow Task form. There are default base types for each of these types - Workflow Instance (type name: WorkflowInstance) and Workflow Task (type name: WorkflowTask). You can create subtypes of those base types, add additional properties, set the properties placement and even change the view and edit components to change their corresponding views in a way you need. In a BPMN diagram you may use the name of you newly created subtypes to tell LAPIS to use those types for the corresponding user tasks or the workflow instance itself. If no custom form is specified LAPIS will use the default base types. Read more in the examples.
Workflow Example 1
Create workflow definition
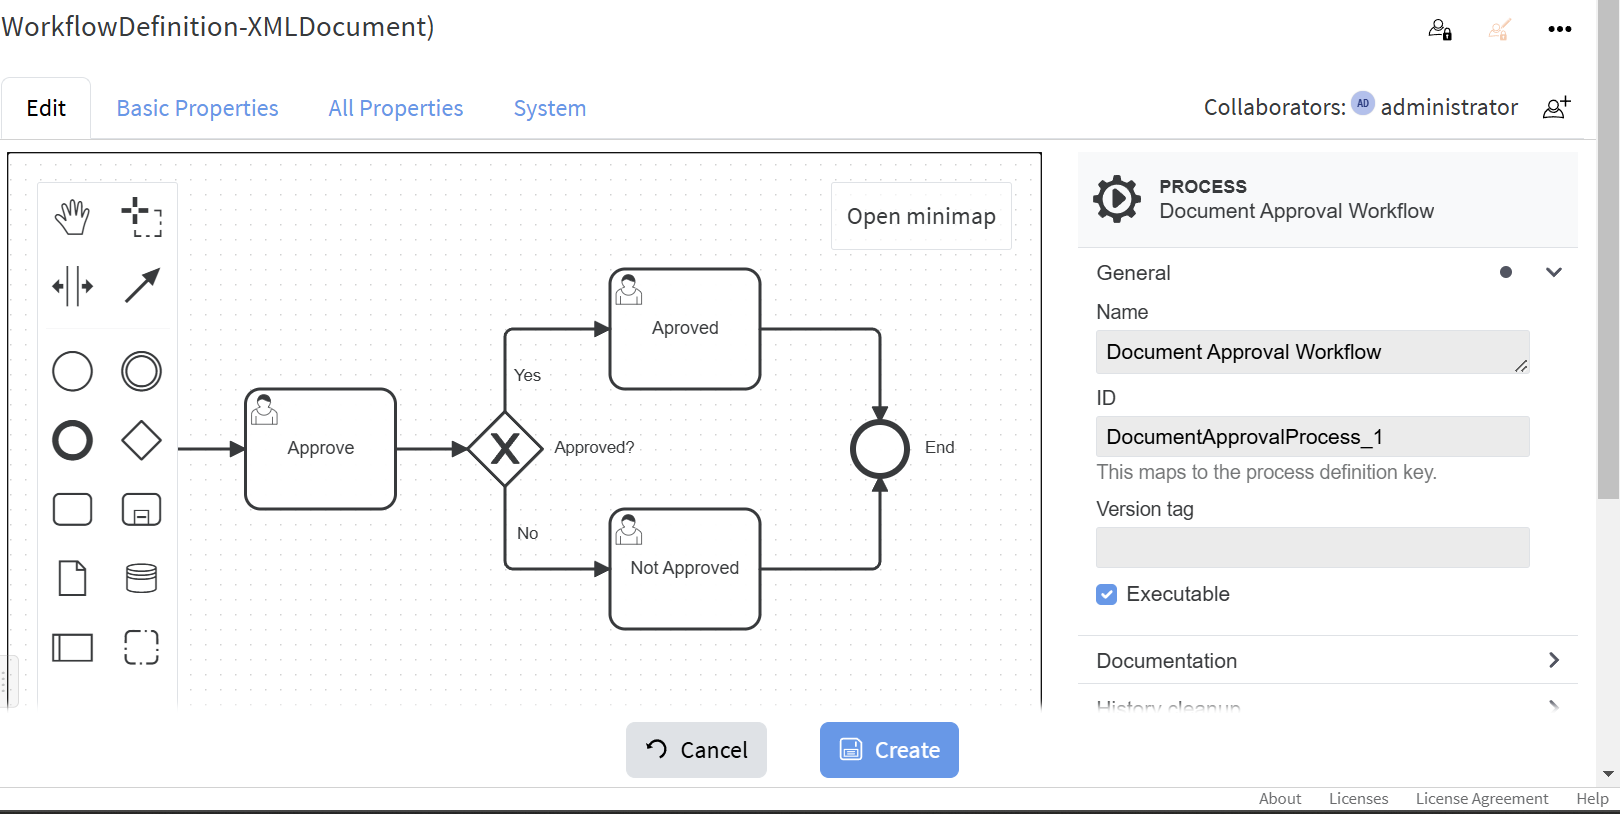
Let create a simple workflow for document approval. Its process will look like this:
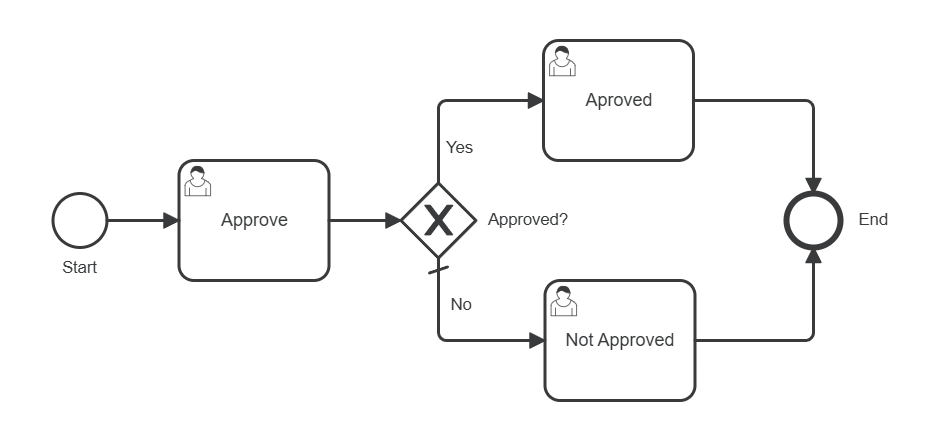
It will be started manually with either some provided documents for approval or it will prompt for the documents to be used for approval. The next step goes to a user responsible for the selected documents' approvals. The step after that is a decision gateway - it checks if the documents are approved or not. If they are approved the flow goes to the Approved user task step, which are assigned to the approval requested user. In not, it goes to the "Not Approved" user task. After the corresponding last step is completed the process ends.
Follow these steps to create this workflow:
- We will need a custom workflow instance type and two types of workflow tasks: Workflow Approve Task and Workflow Approval Done Task.
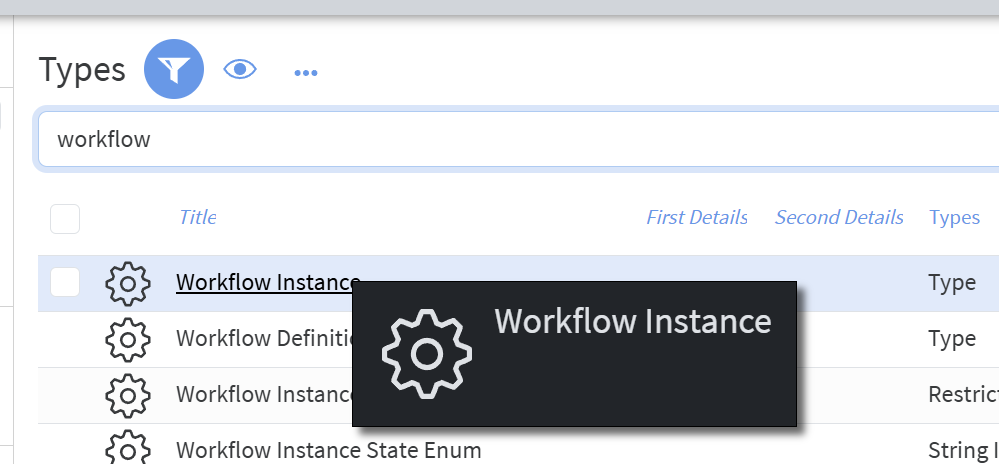
- For this go to Administration/Types and search for workflow instance:

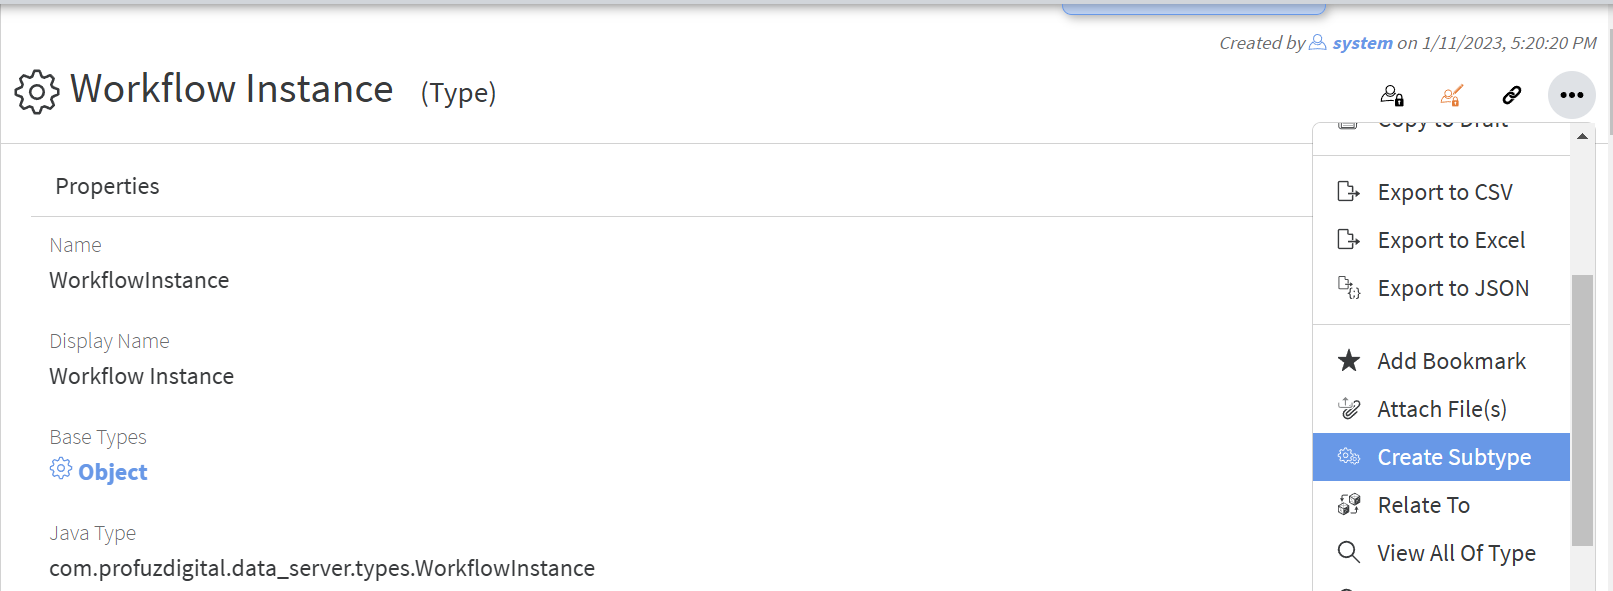
- Click on it and from there execute "Create Subtype":

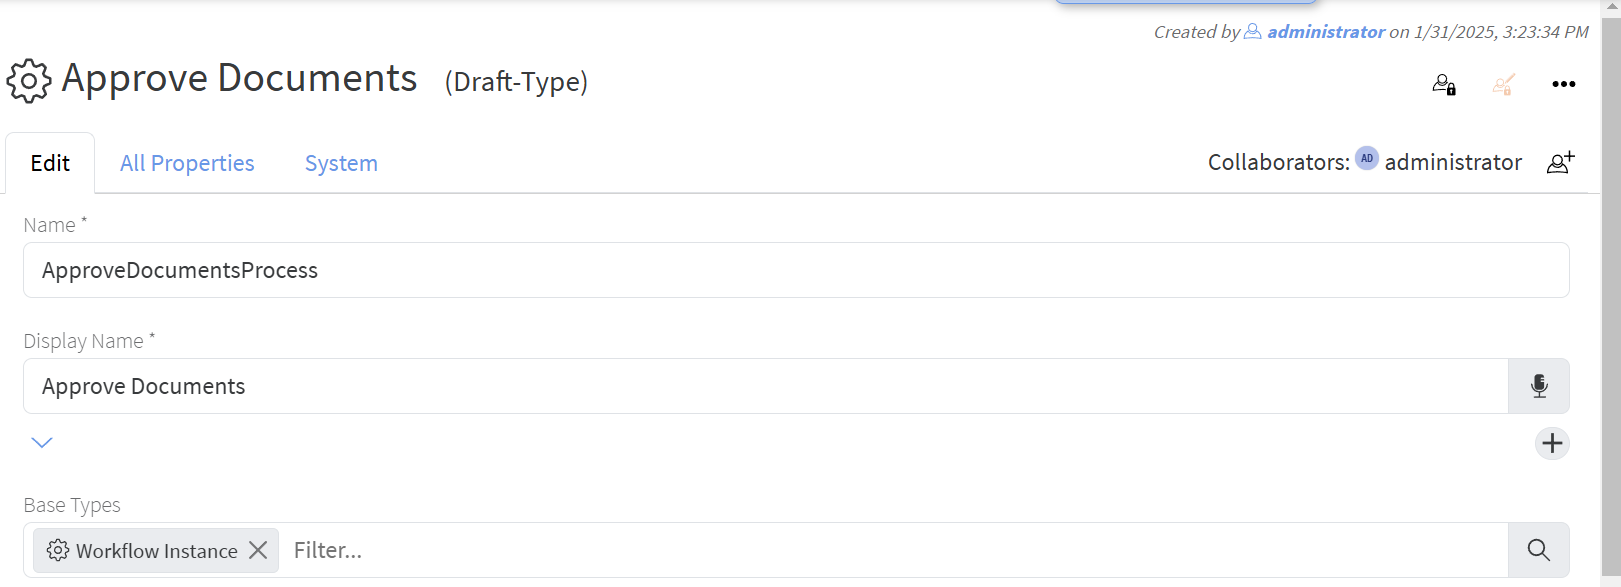
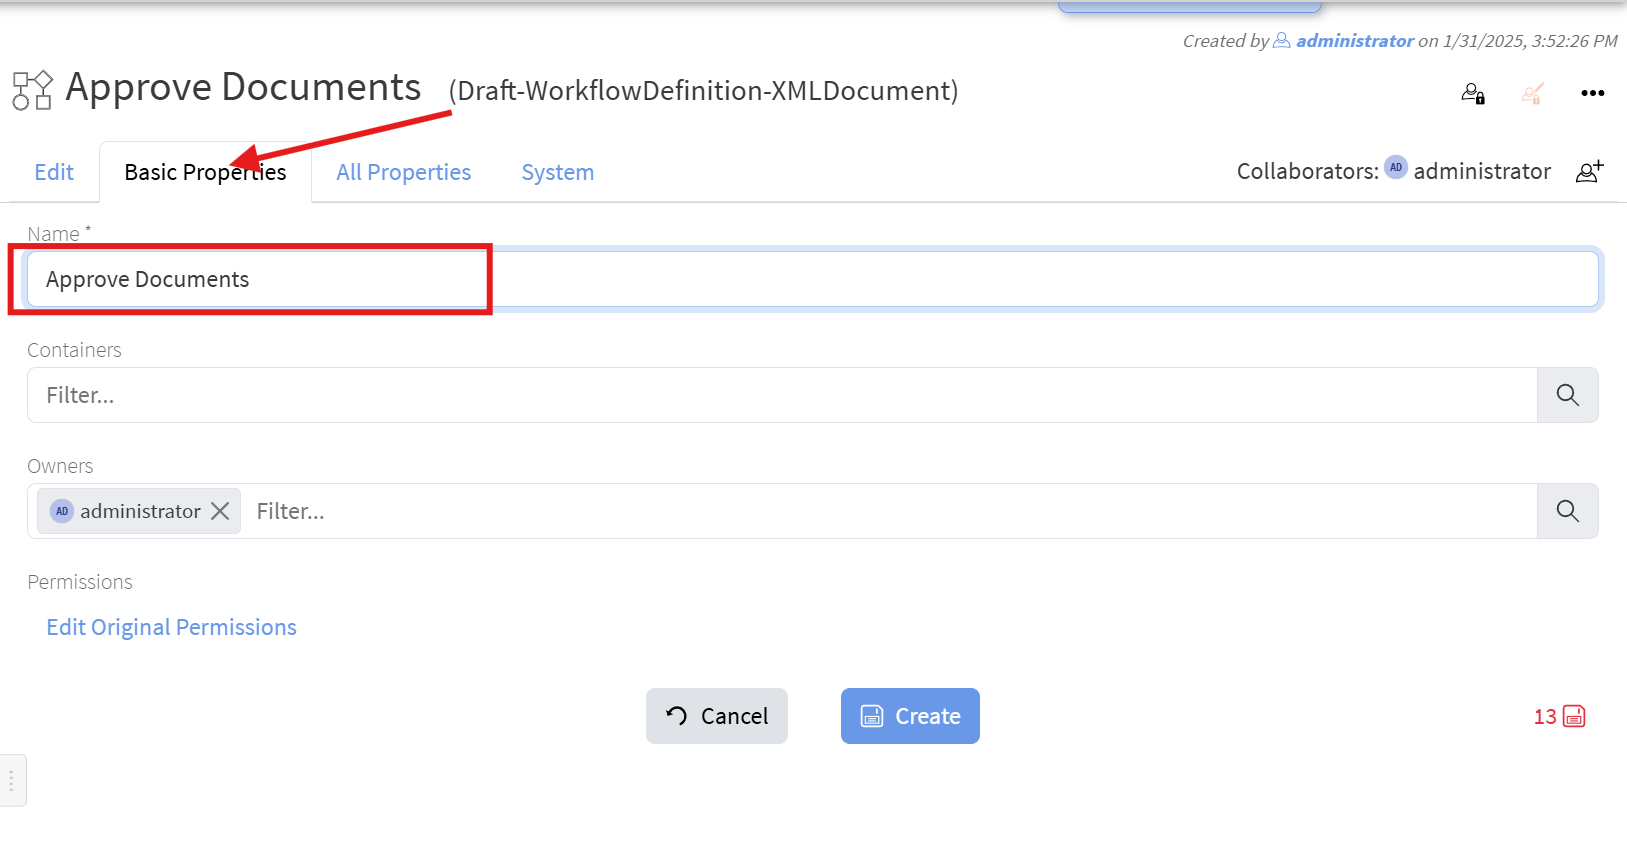
- Name it "ApproveDocumentsProcess" with display name "Approve Documents":

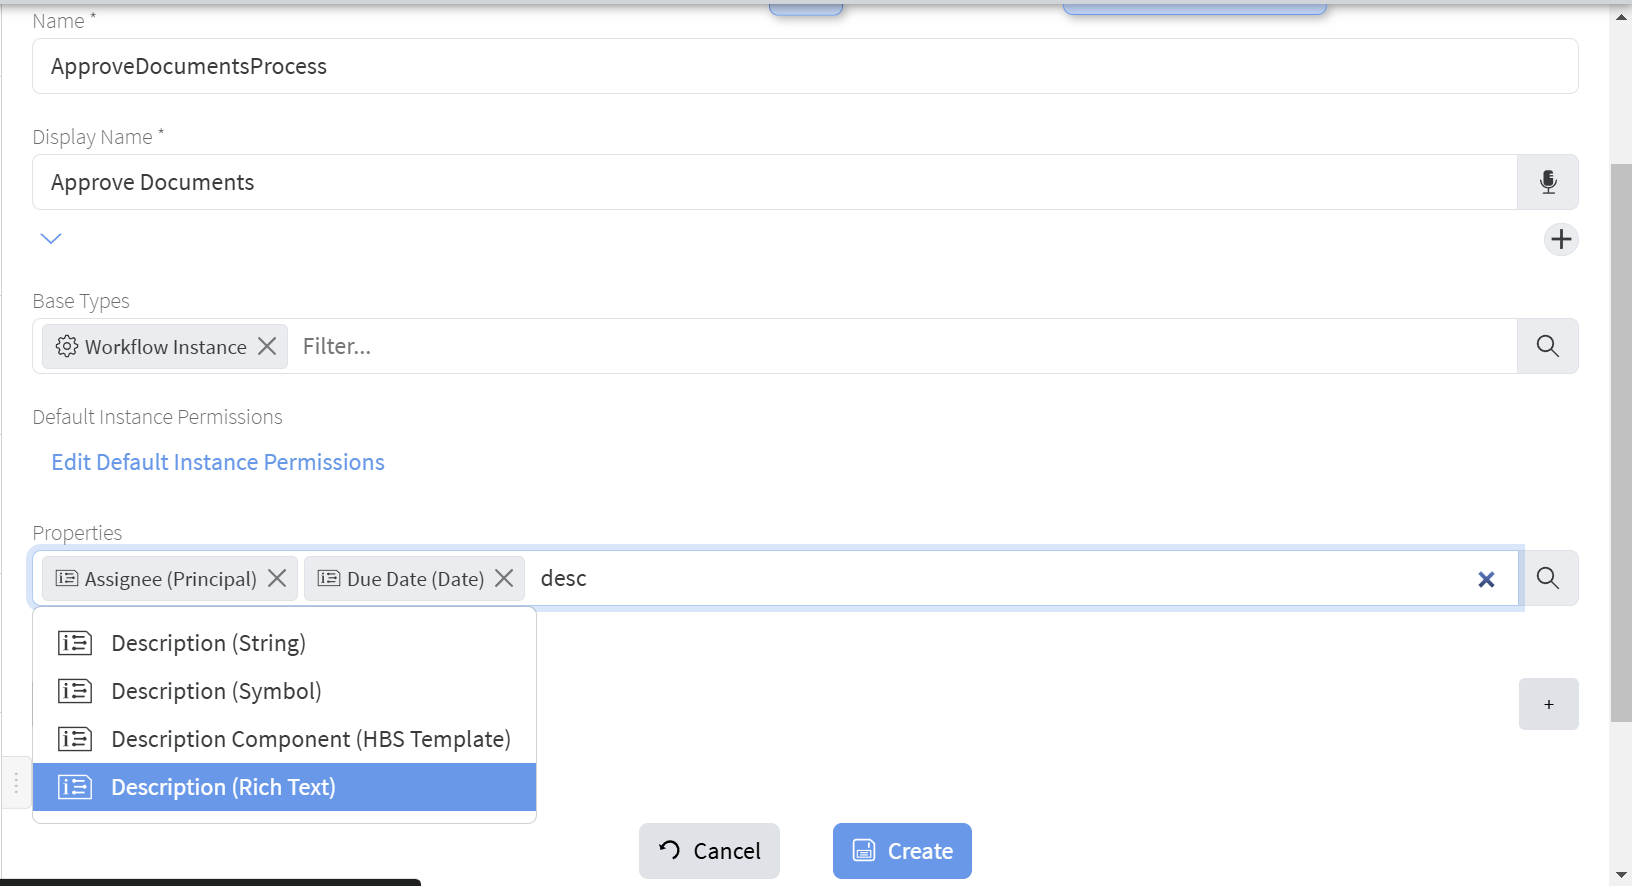
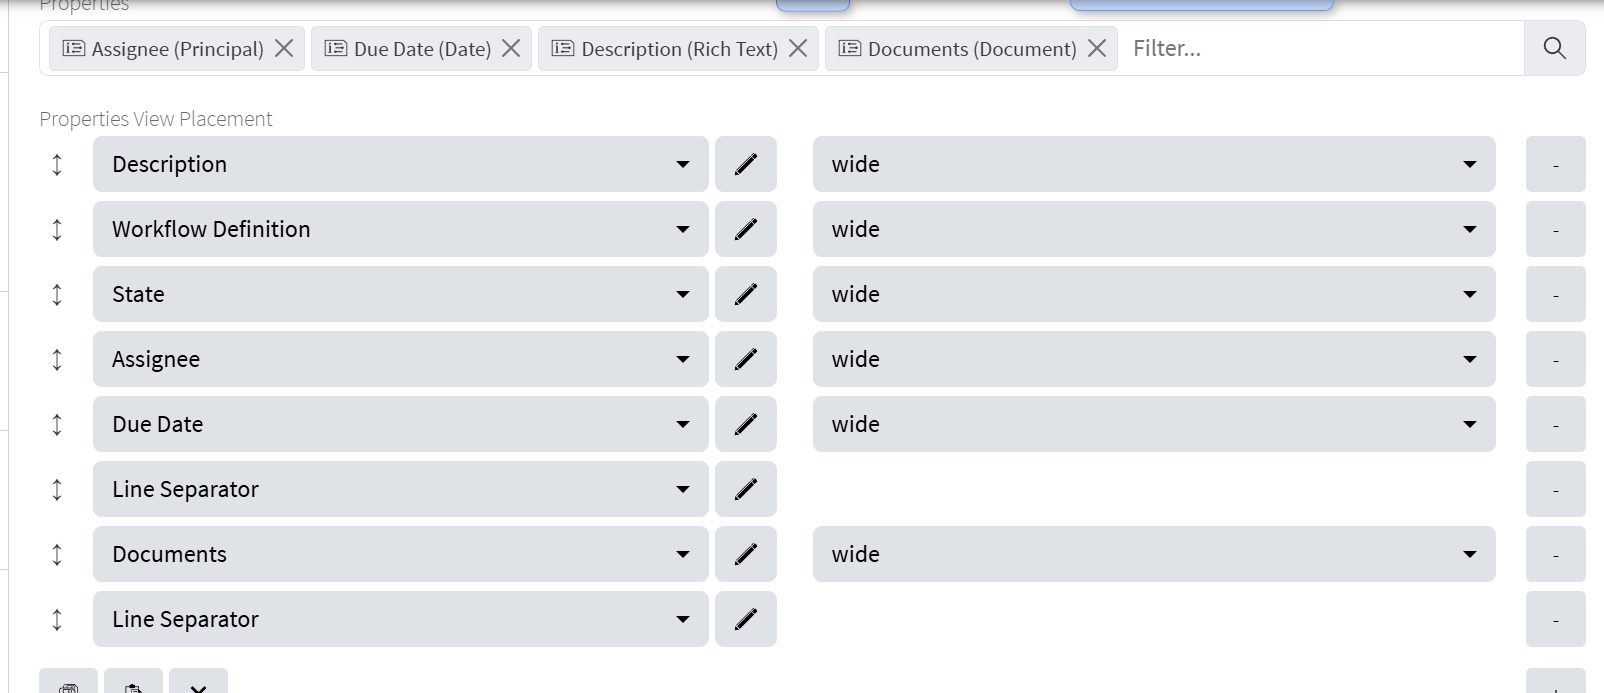
- In the properties add existing properties Assignee, Due Date and Description:

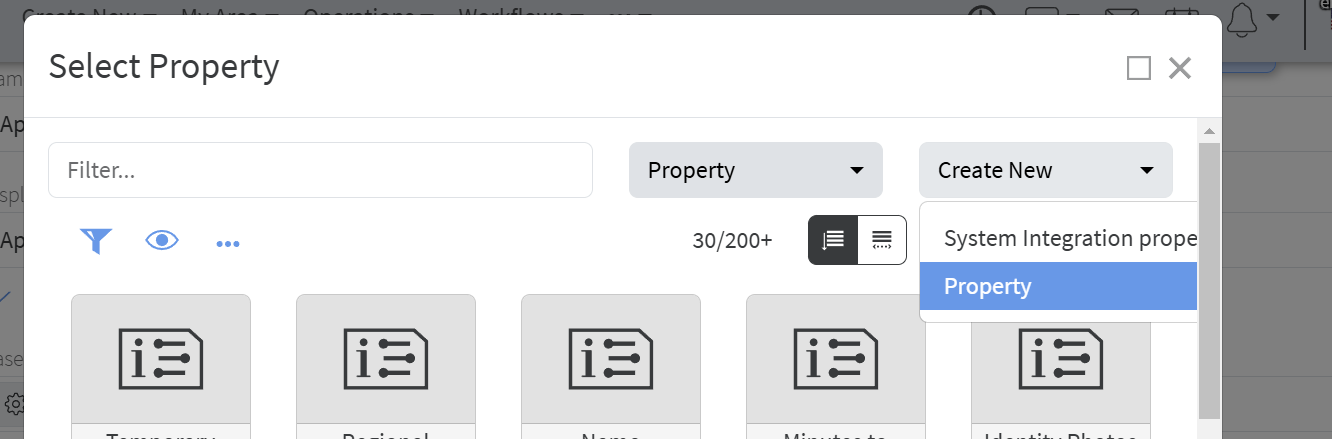
- Click the "Lens" button next to the Properties field and click "Create New" -> "Property":

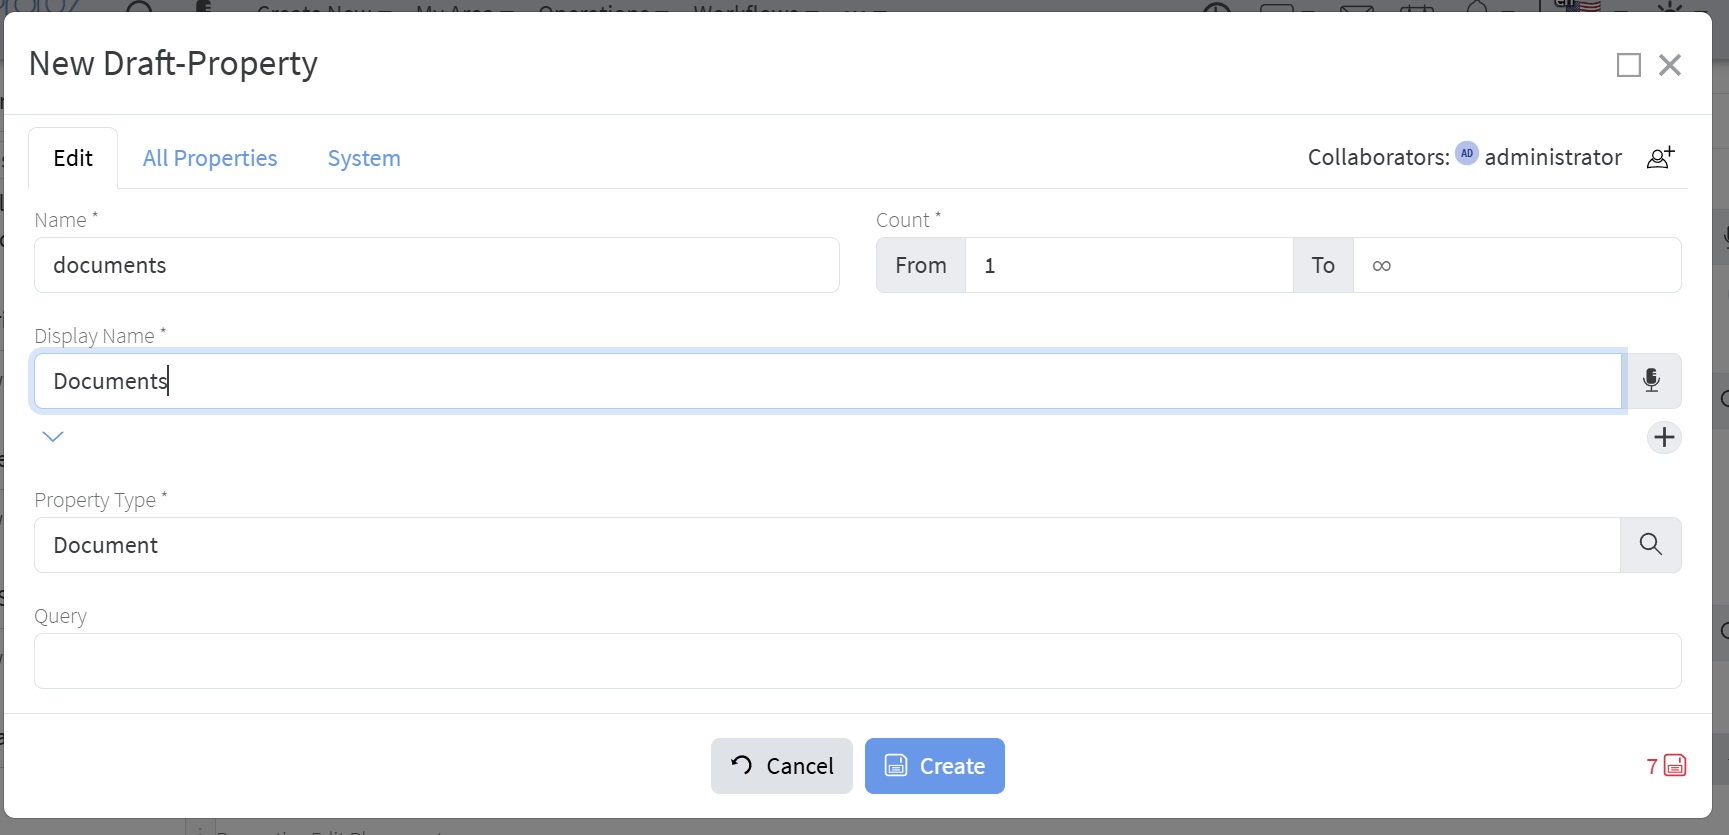
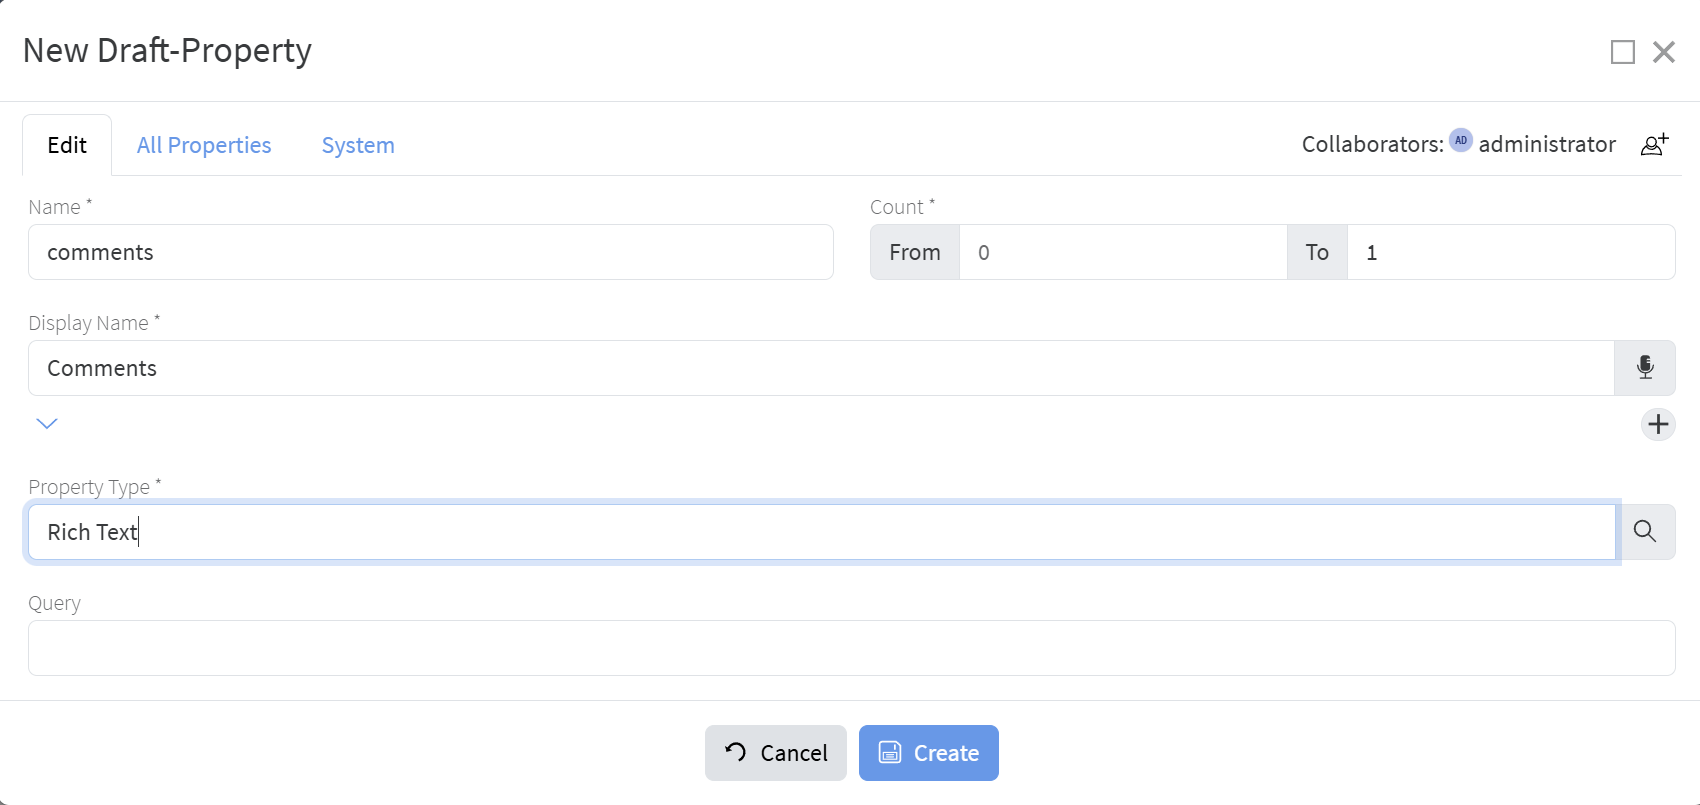
- Fill the following details (name: documents, count: 1 or more, property type: Document):

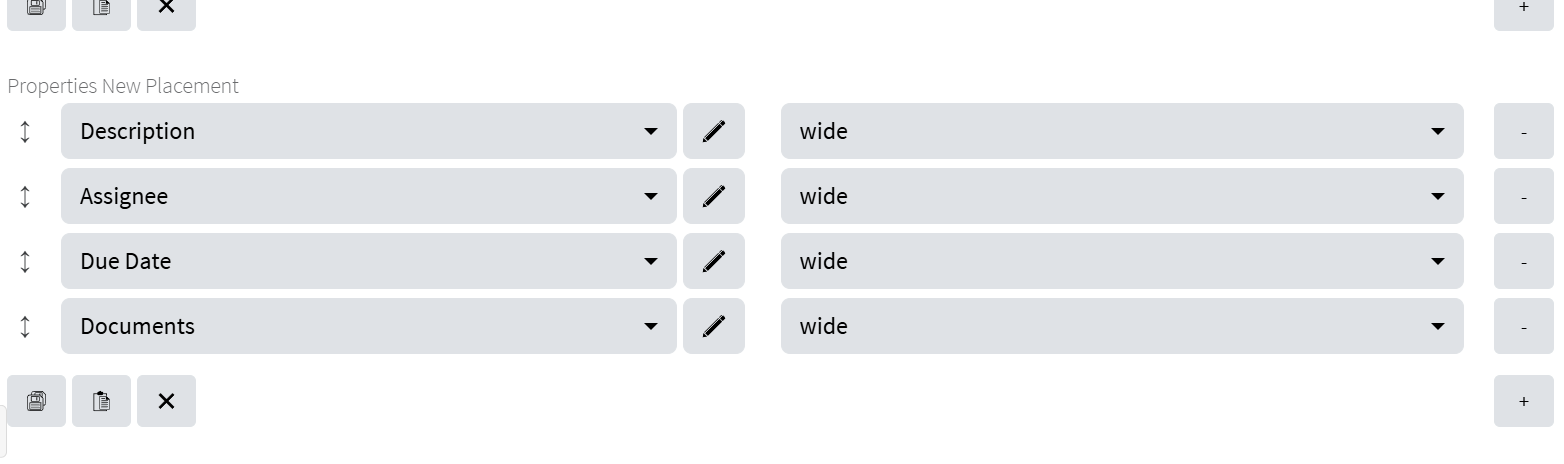
- Edit property placements to your likeness:


- Click the "Create" button.
- For this go to Administration/Types and search for workflow instance:
- Similarly create types for the two approval tasks:
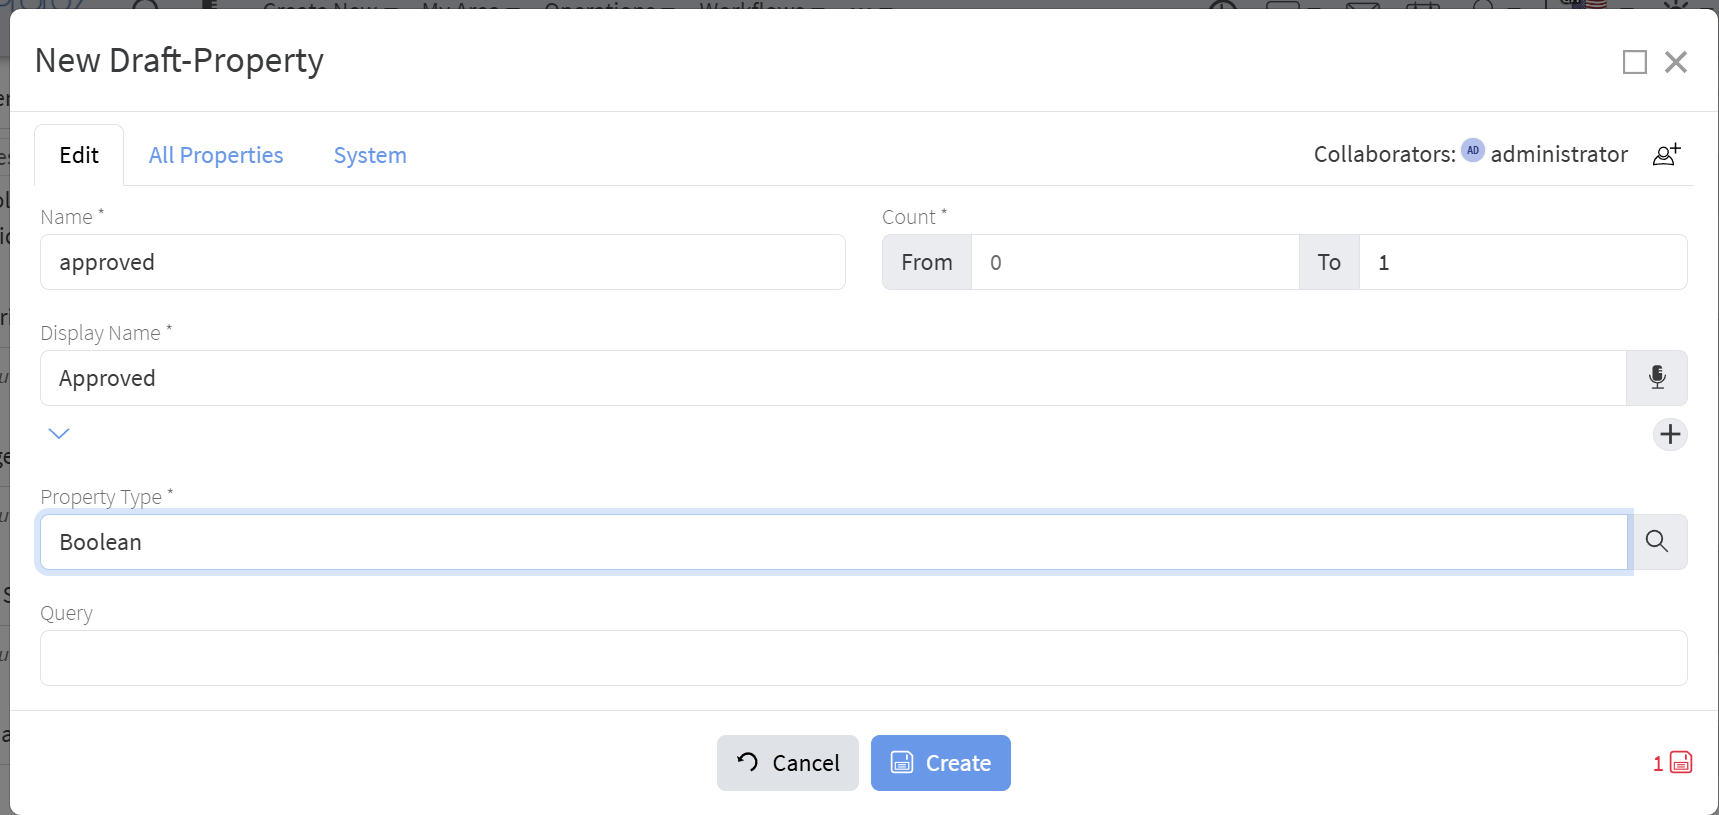
- You will need two new properties - Comments and Approved:


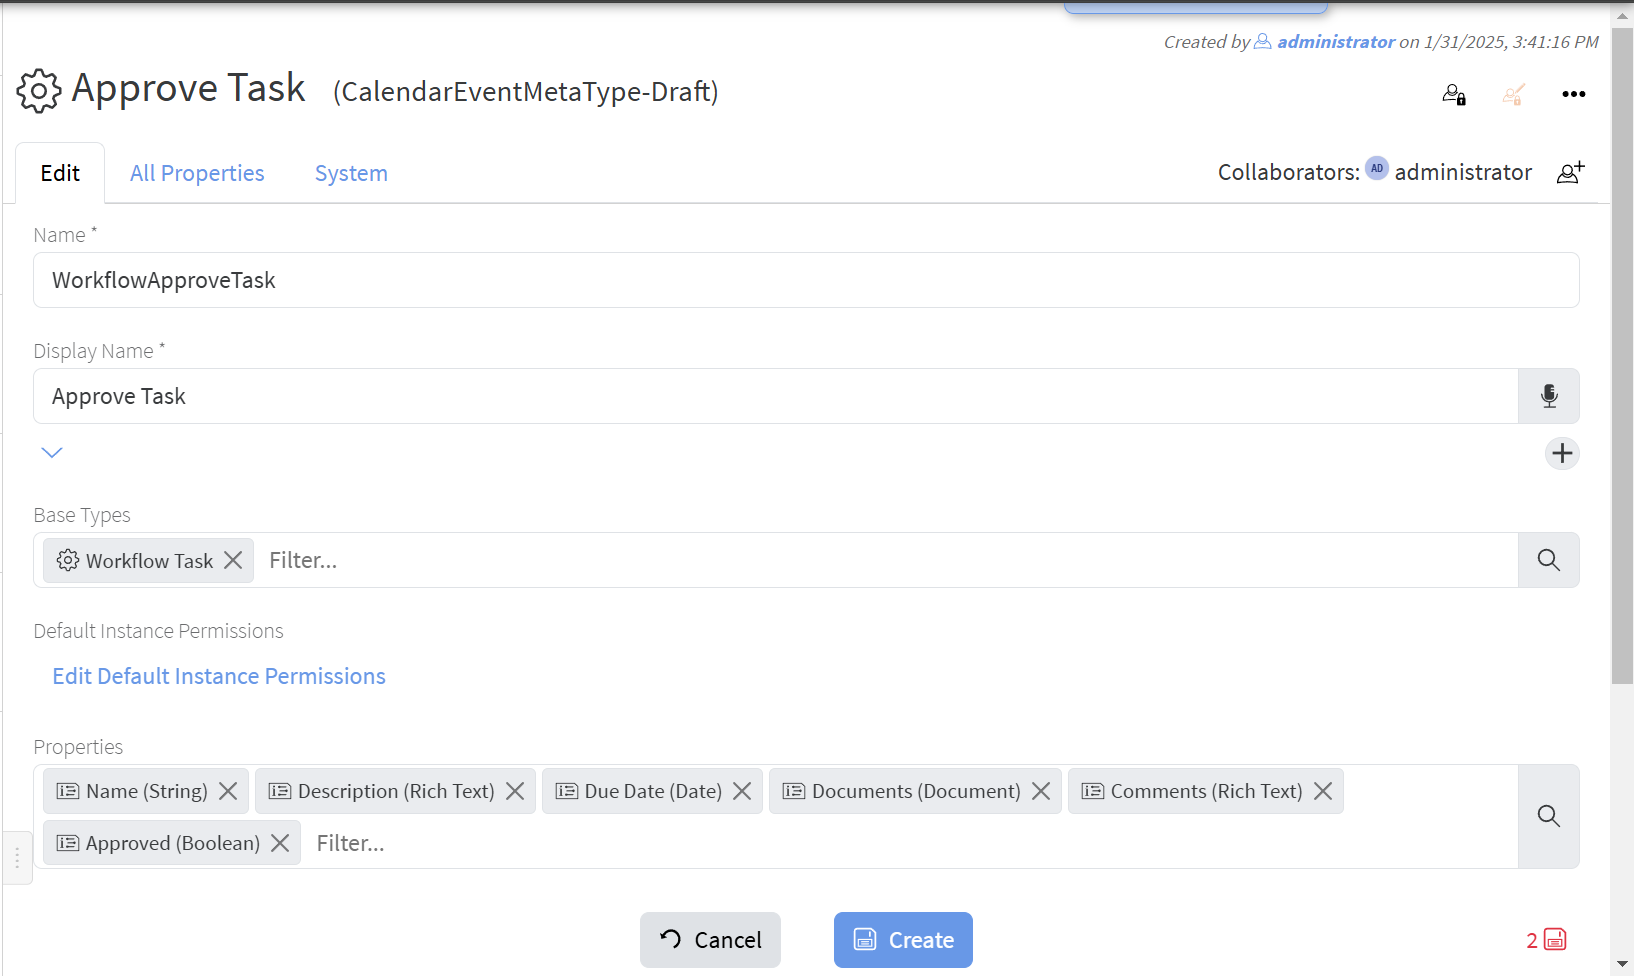
- The Workflow Approve Task:

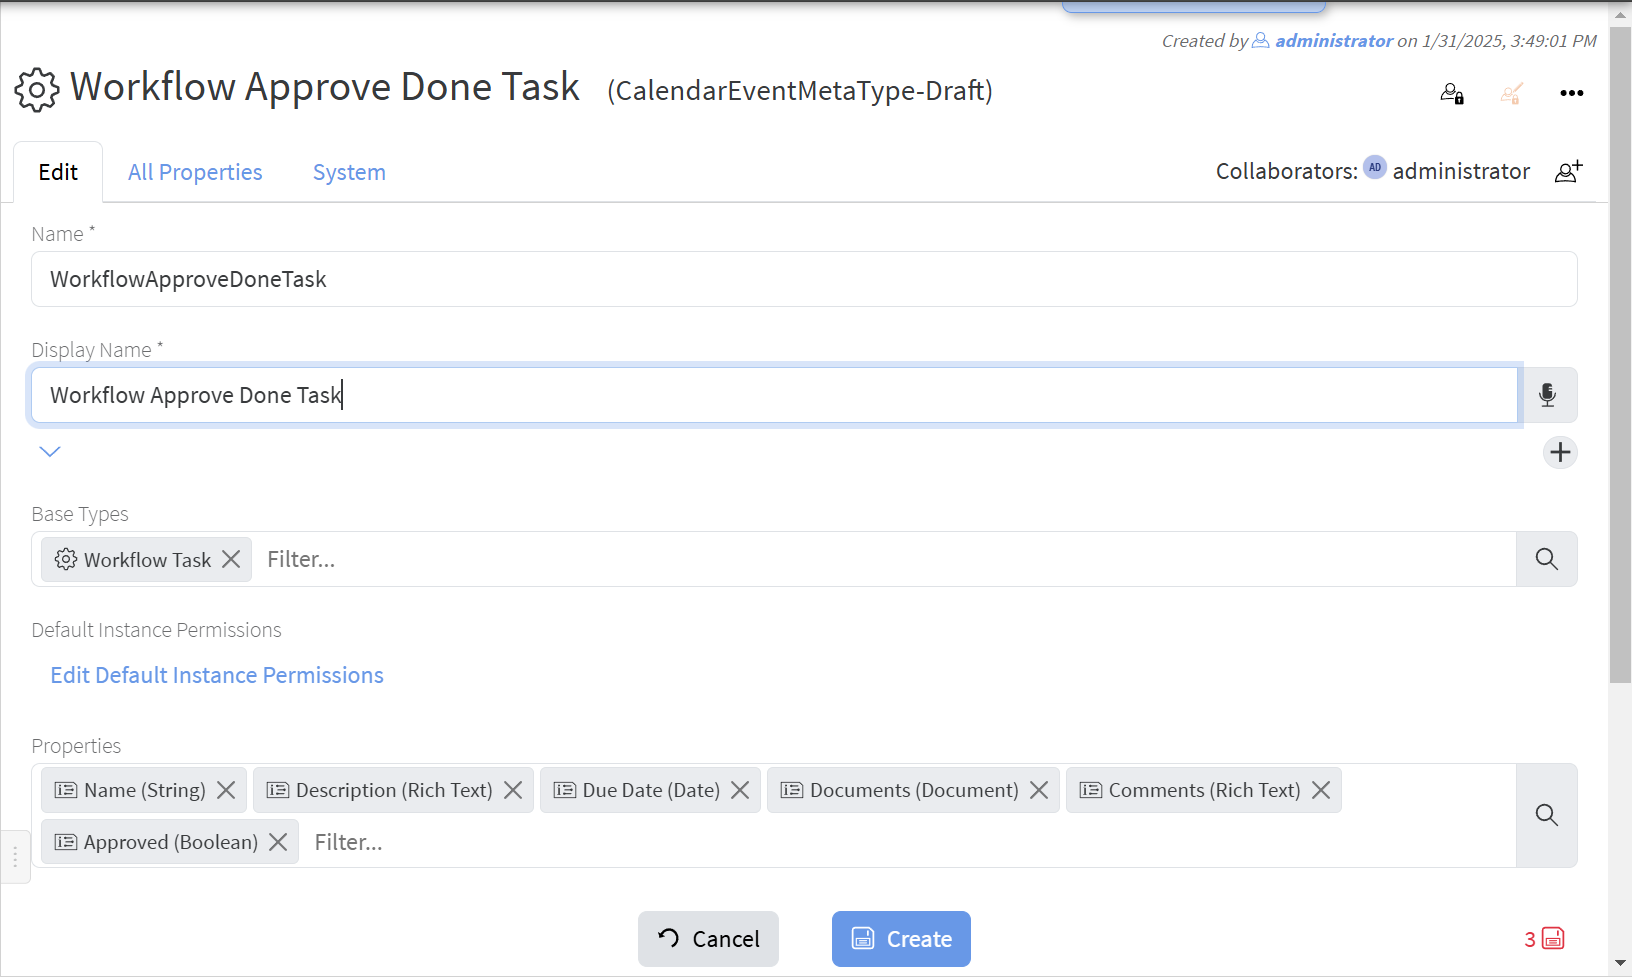
- Workflow Approve Done Task:

- You will need two new properties - Comments and Approved:
Now we are ready to create the workflow definition:
- From the Workflows dropdown menu select "Create New":

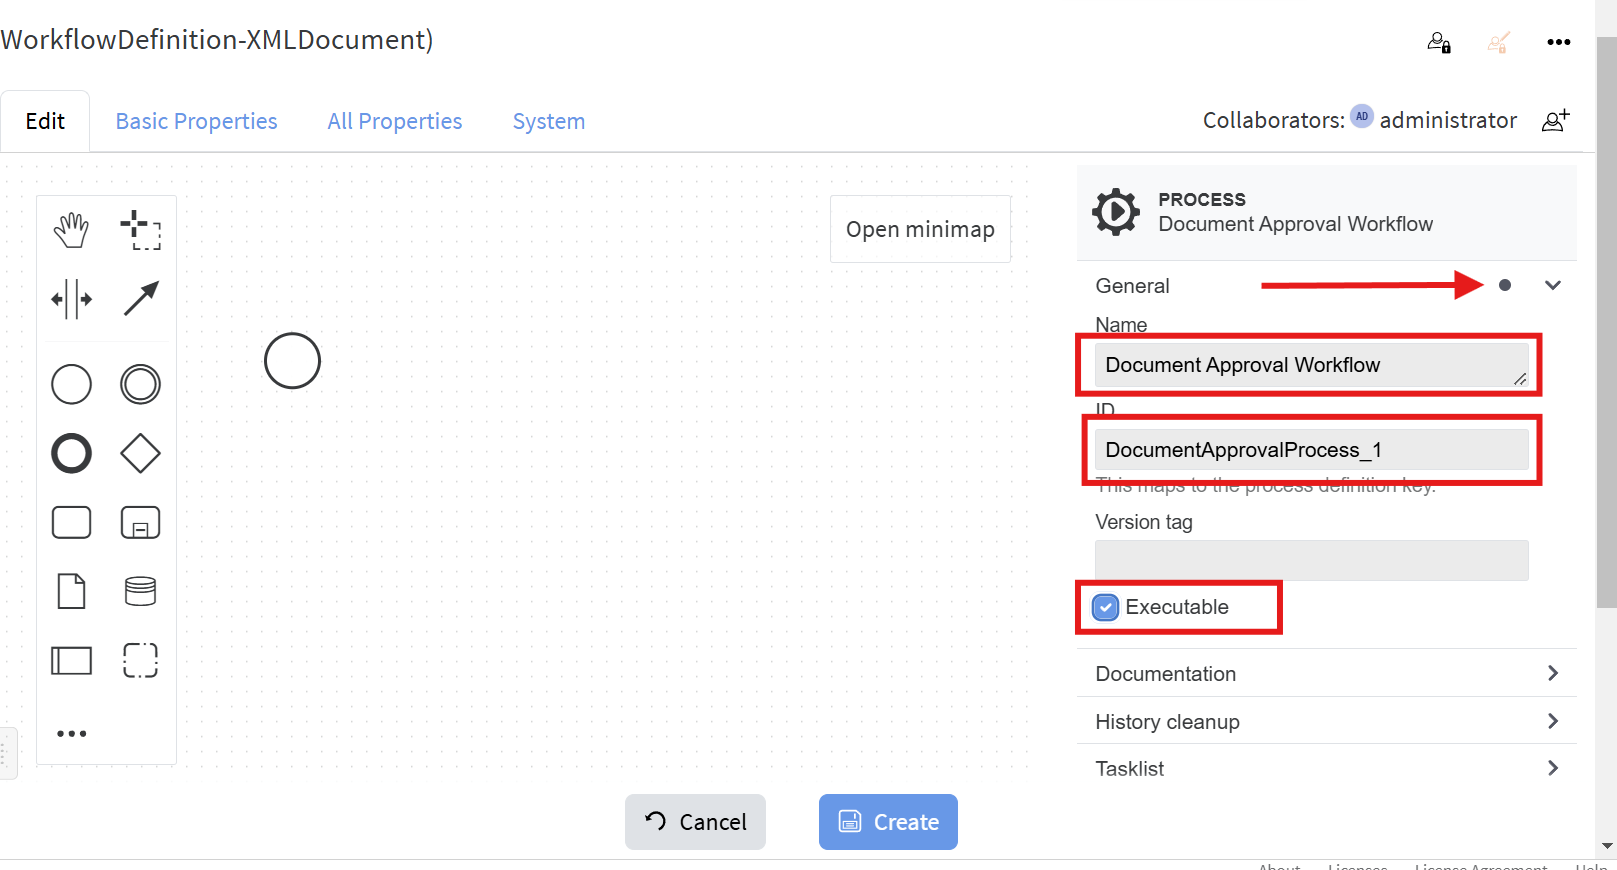
- Set the properties of the process. Expand "General", fill Name and ID (must be unique in your installation) and check "Executable":

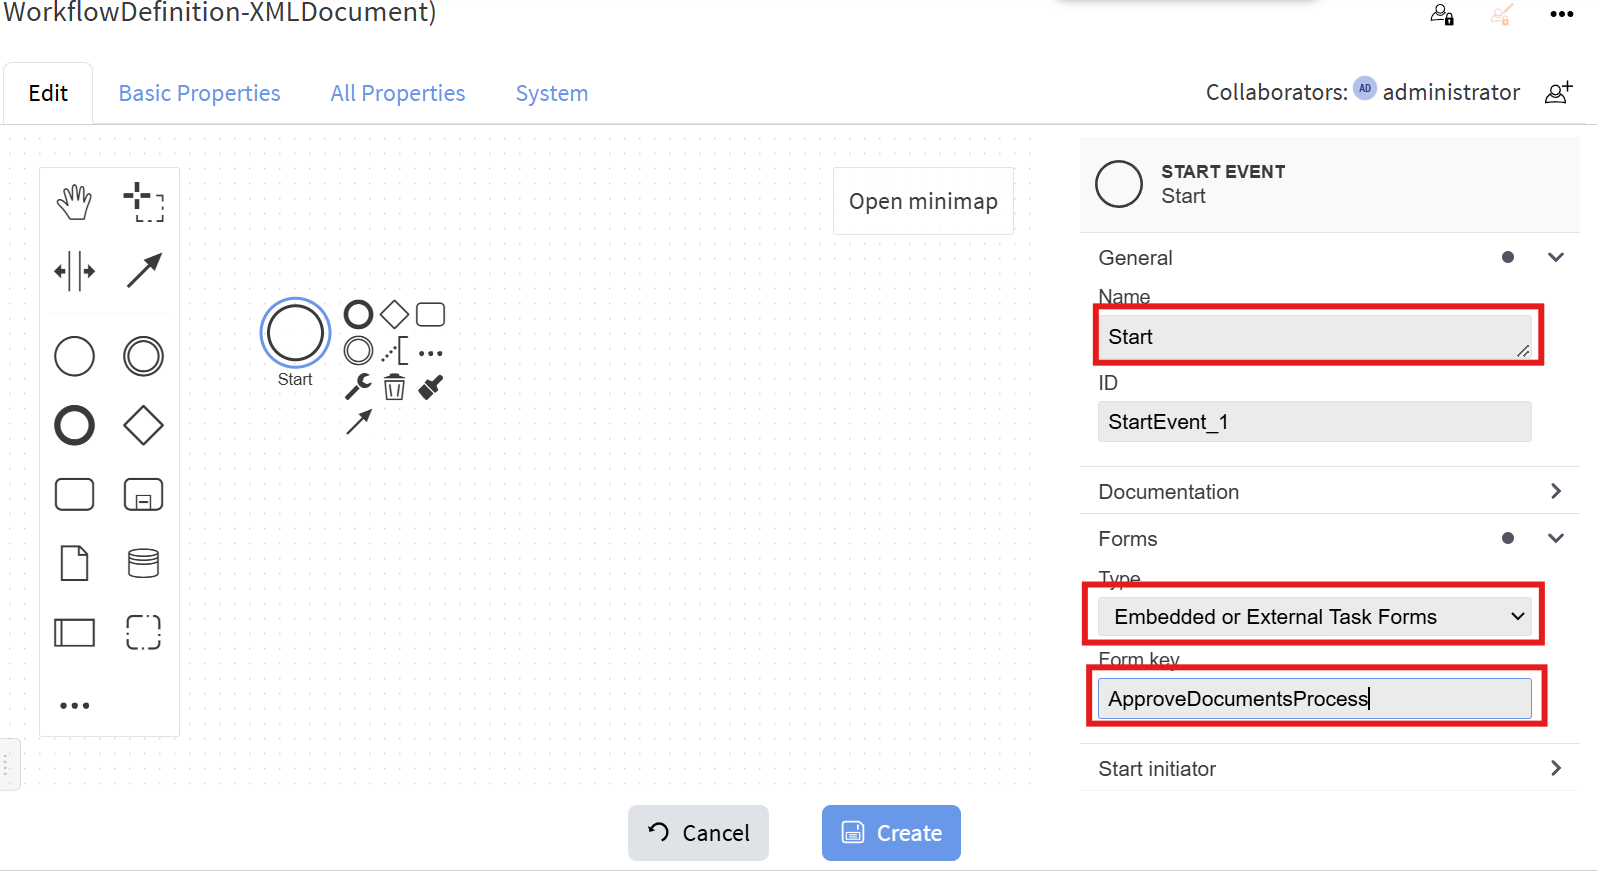
- Select the start event (the only circle in the process diagram) and fill its properties. For the Form key put the name of newly created Workflow Instance's subtype "ApproveDocumentsProcess":

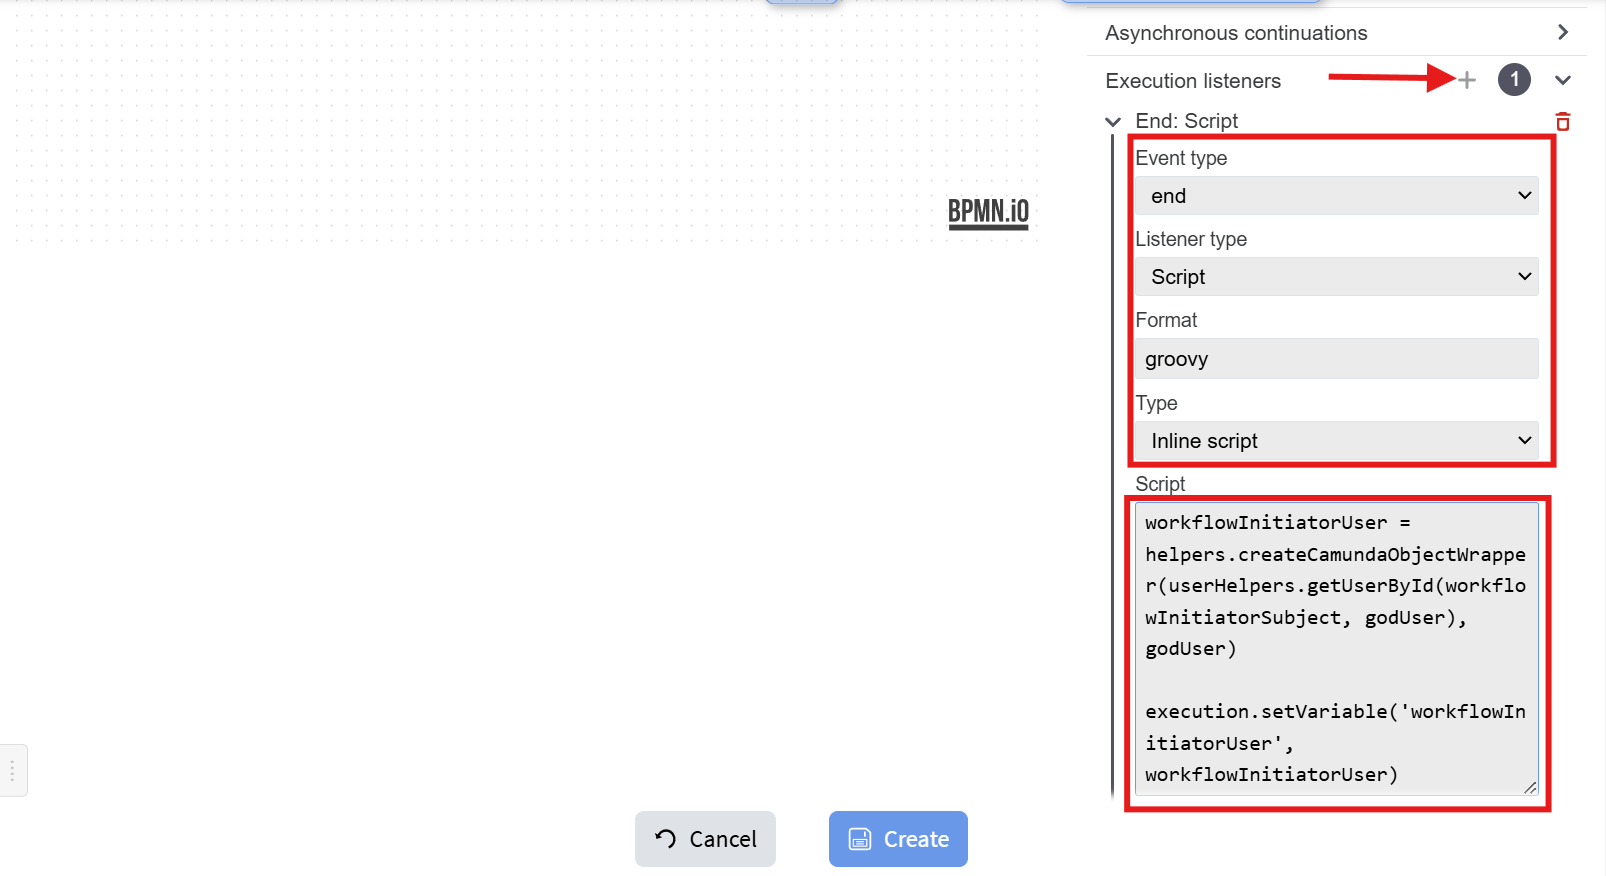
- Create two Execution listeners for start and complete and put the corresponding inline Groovy scripts to each of those:
The script is:
def workflowInitiatorUser = helpers.createCamundaObjectWrapper(userHelpers.getUserById(workflowInitiatorSubject, godUser), godUser) execution.setVariable('workflowInitiatorUser', workflowInitiatorUser)It sets the variable workflowInitiatorUser which will be used in other parts of the workflow.
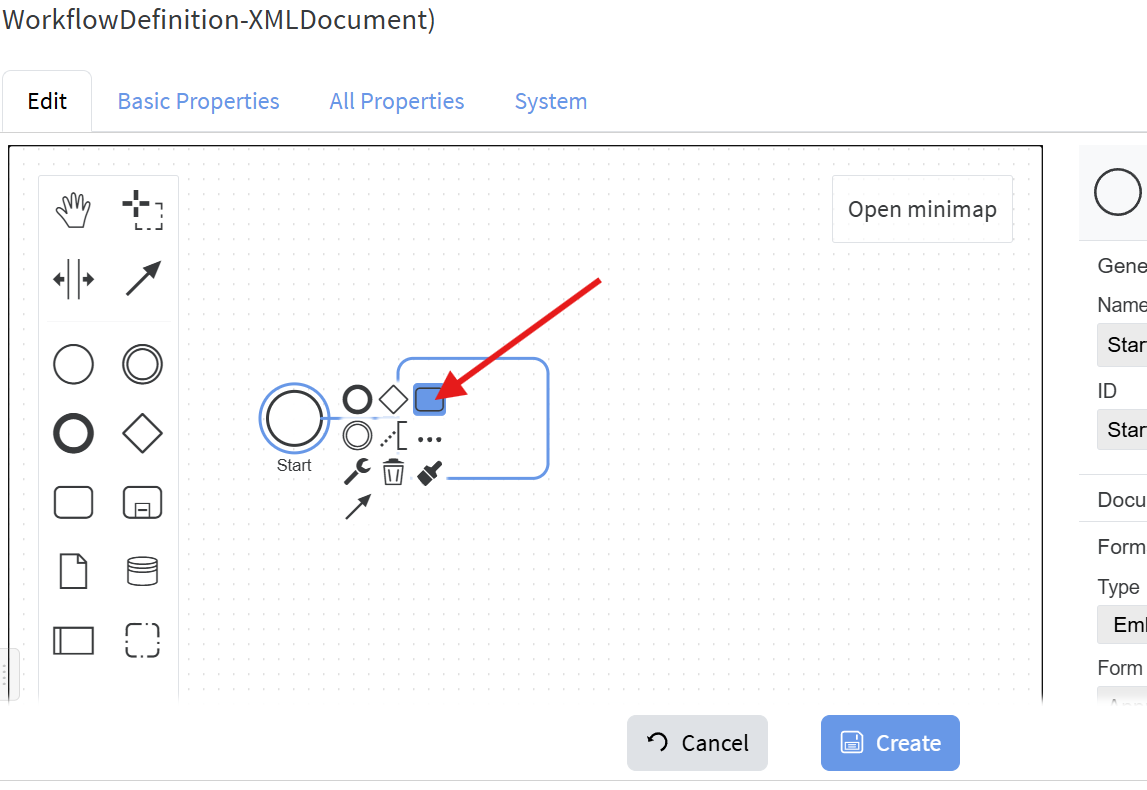
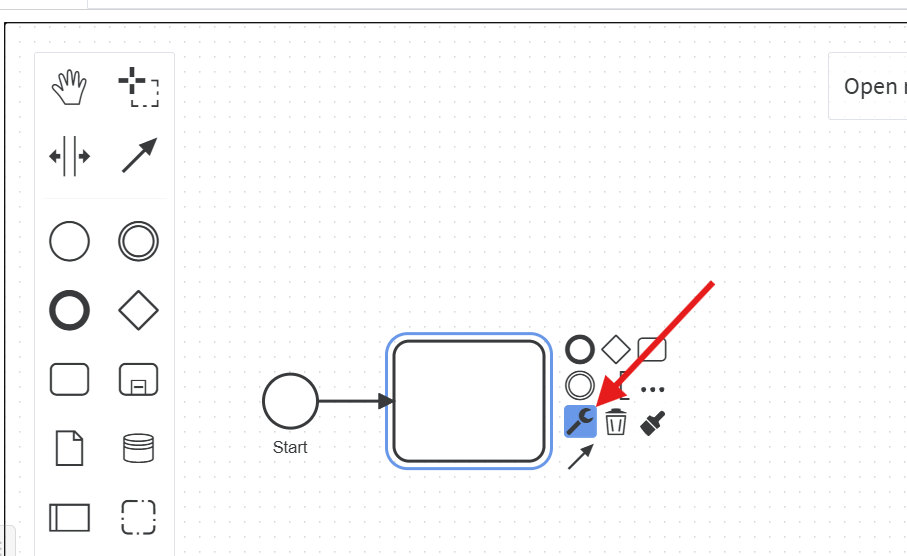
- Click on "Append Task" next to the Start event to create the next step:

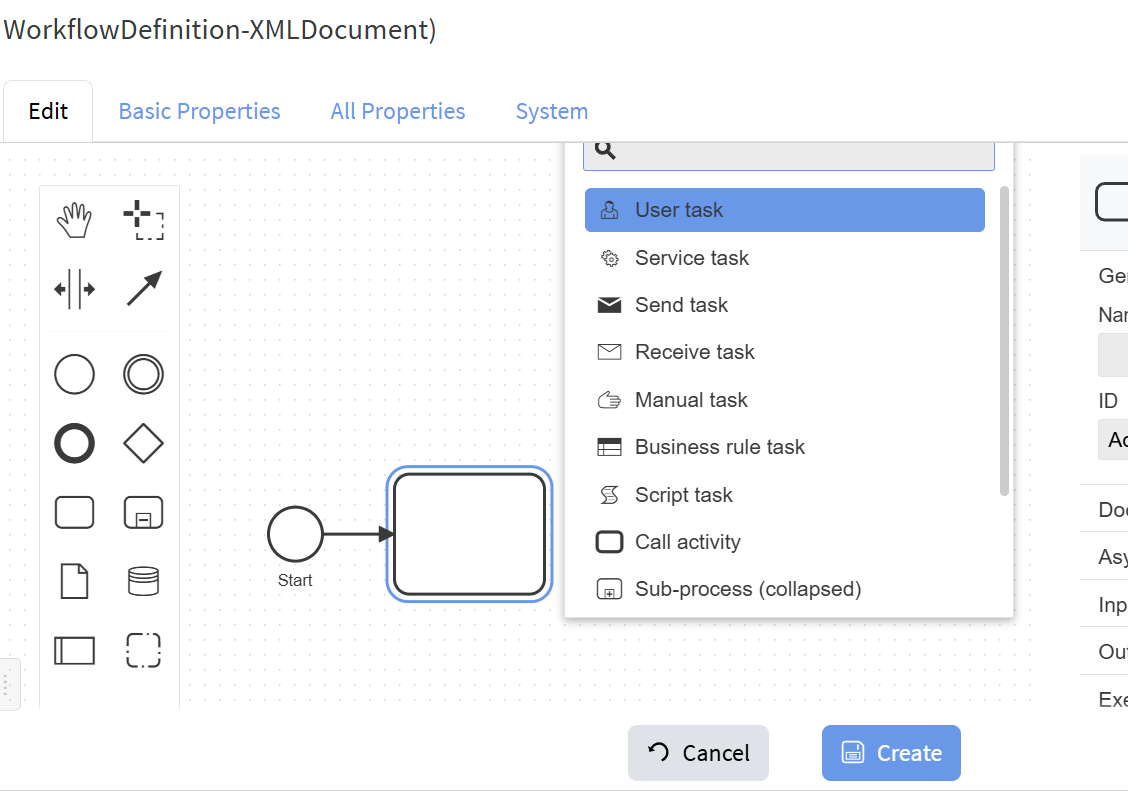
- Click "Change Element" and select "User Task":


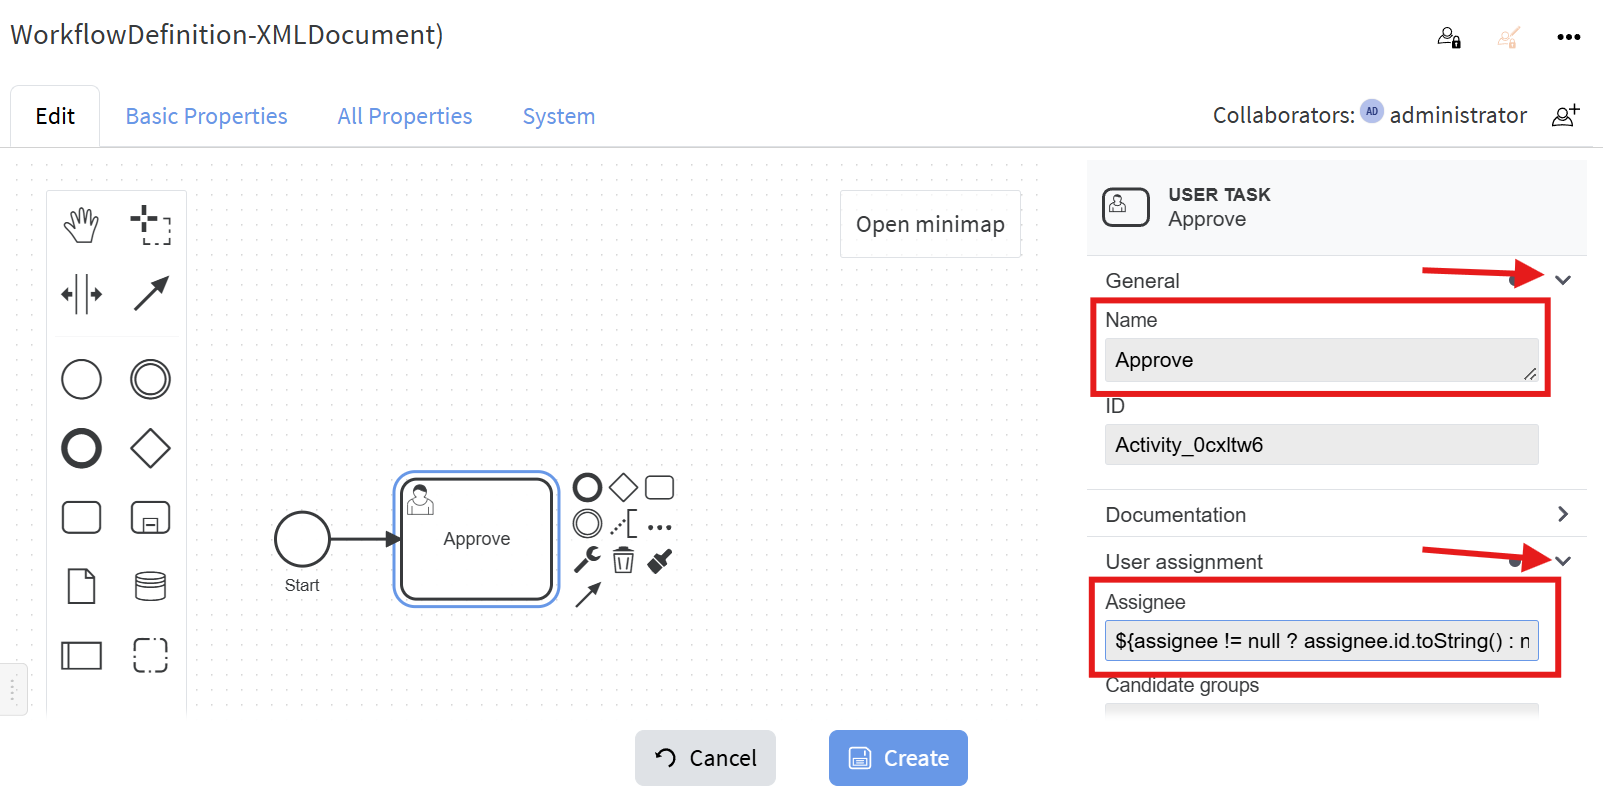
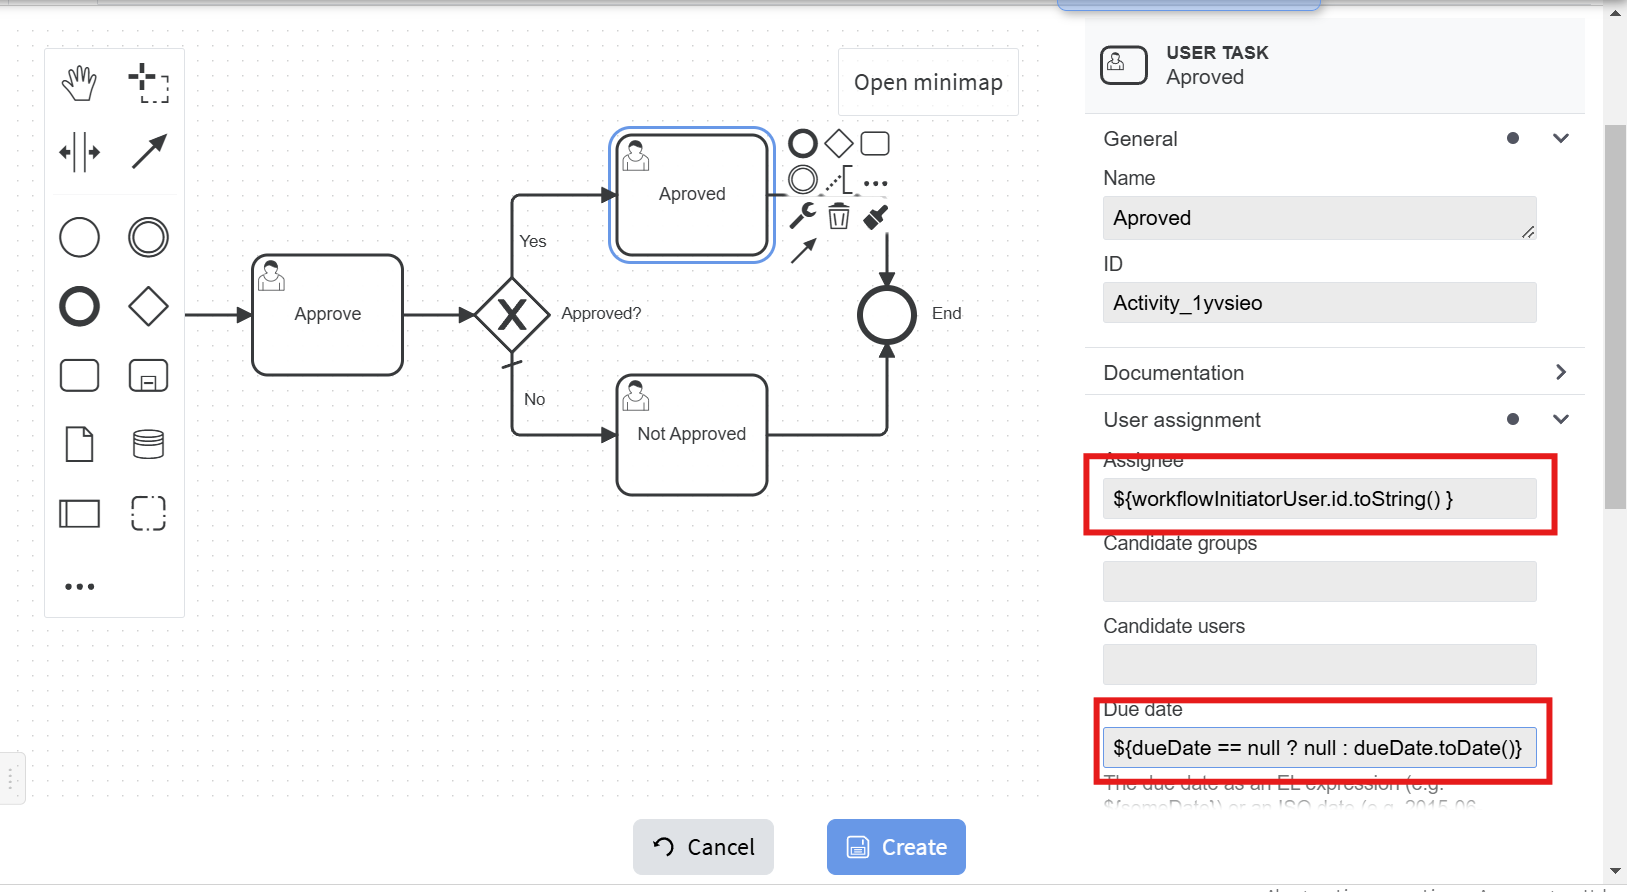
- Set the properties of the step:
For Assignee enter:
${assignee != null ? assignee.id.toString() : null}. For Due Date enter:${dueDate == null ? null : dueDate.toDate()}.
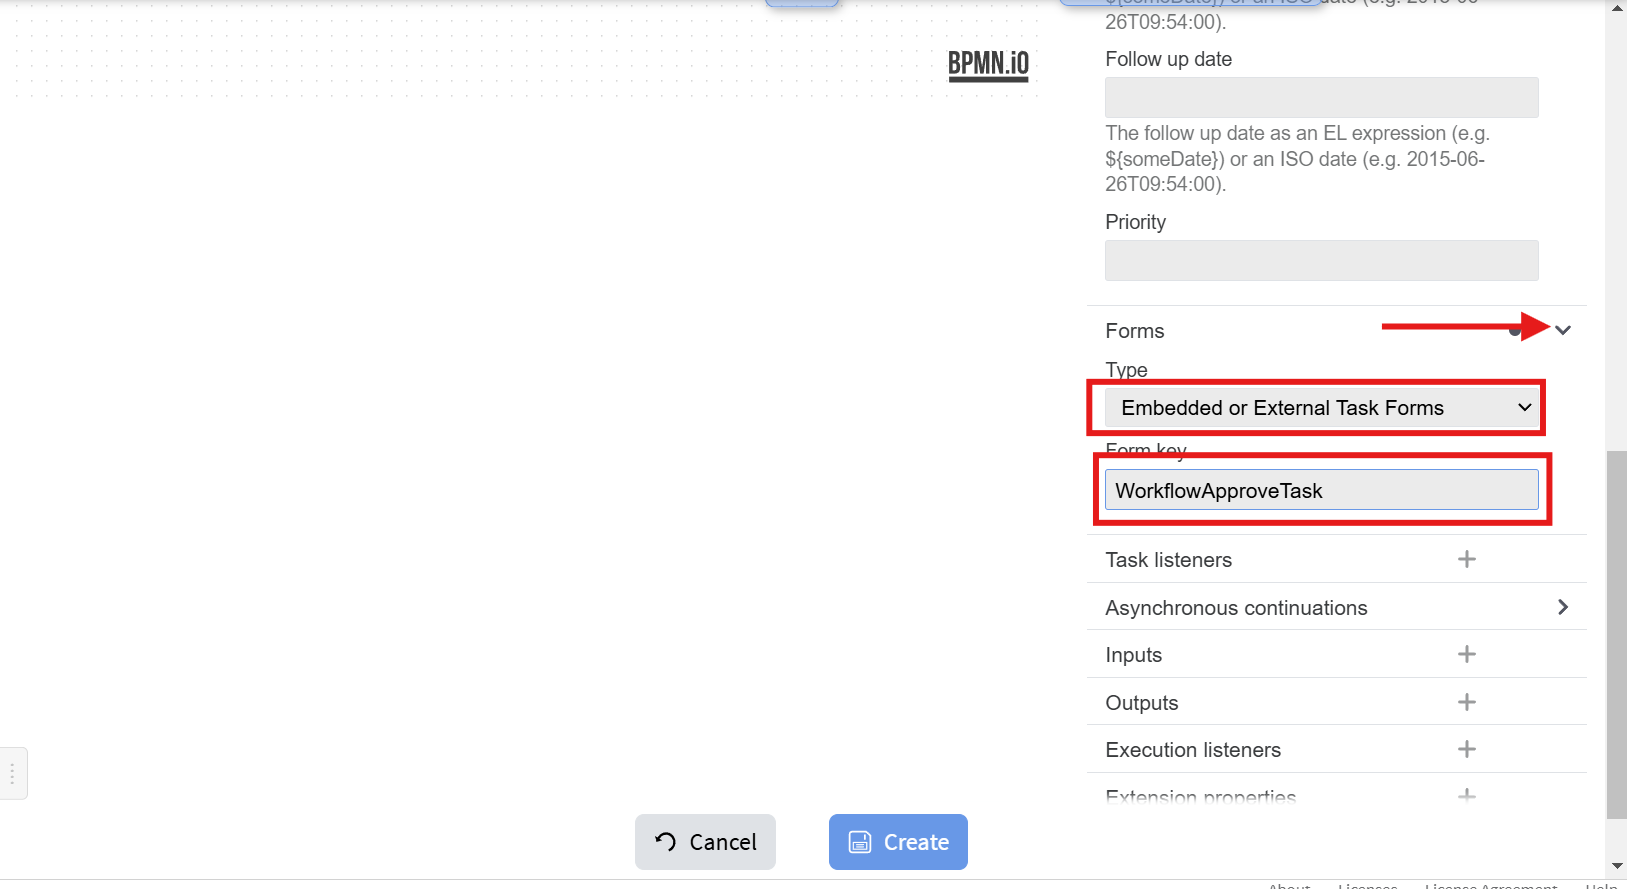
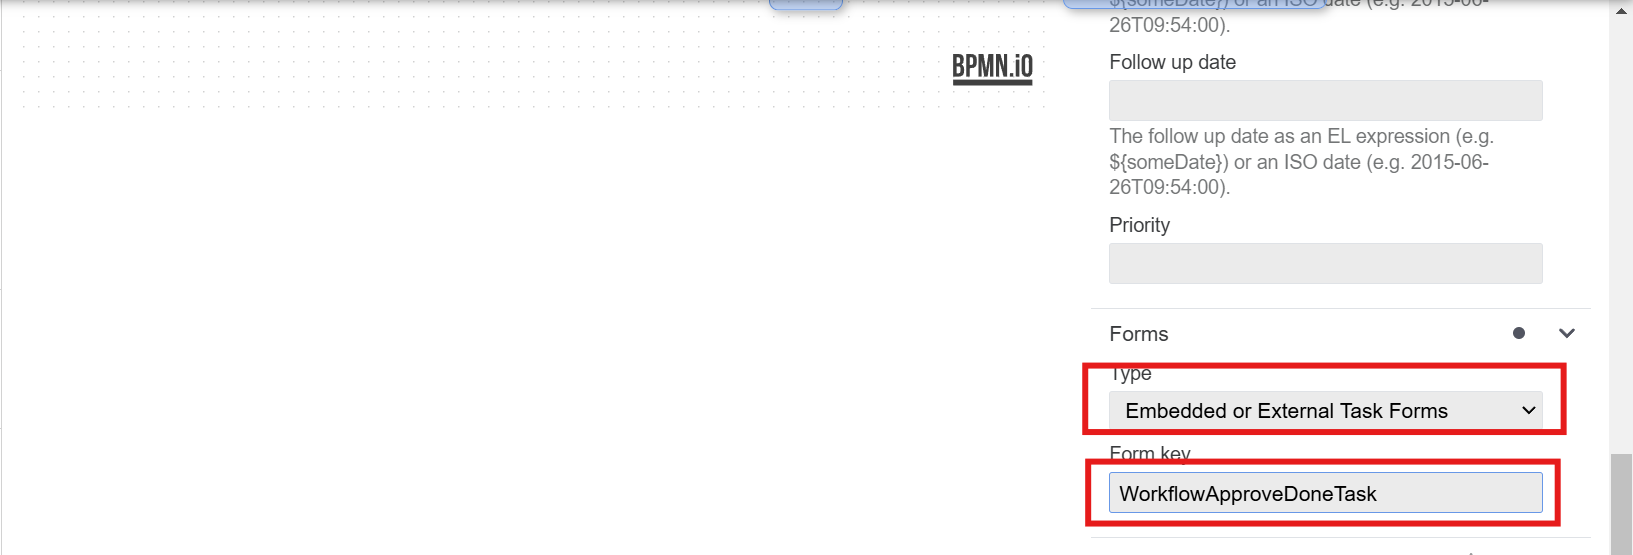
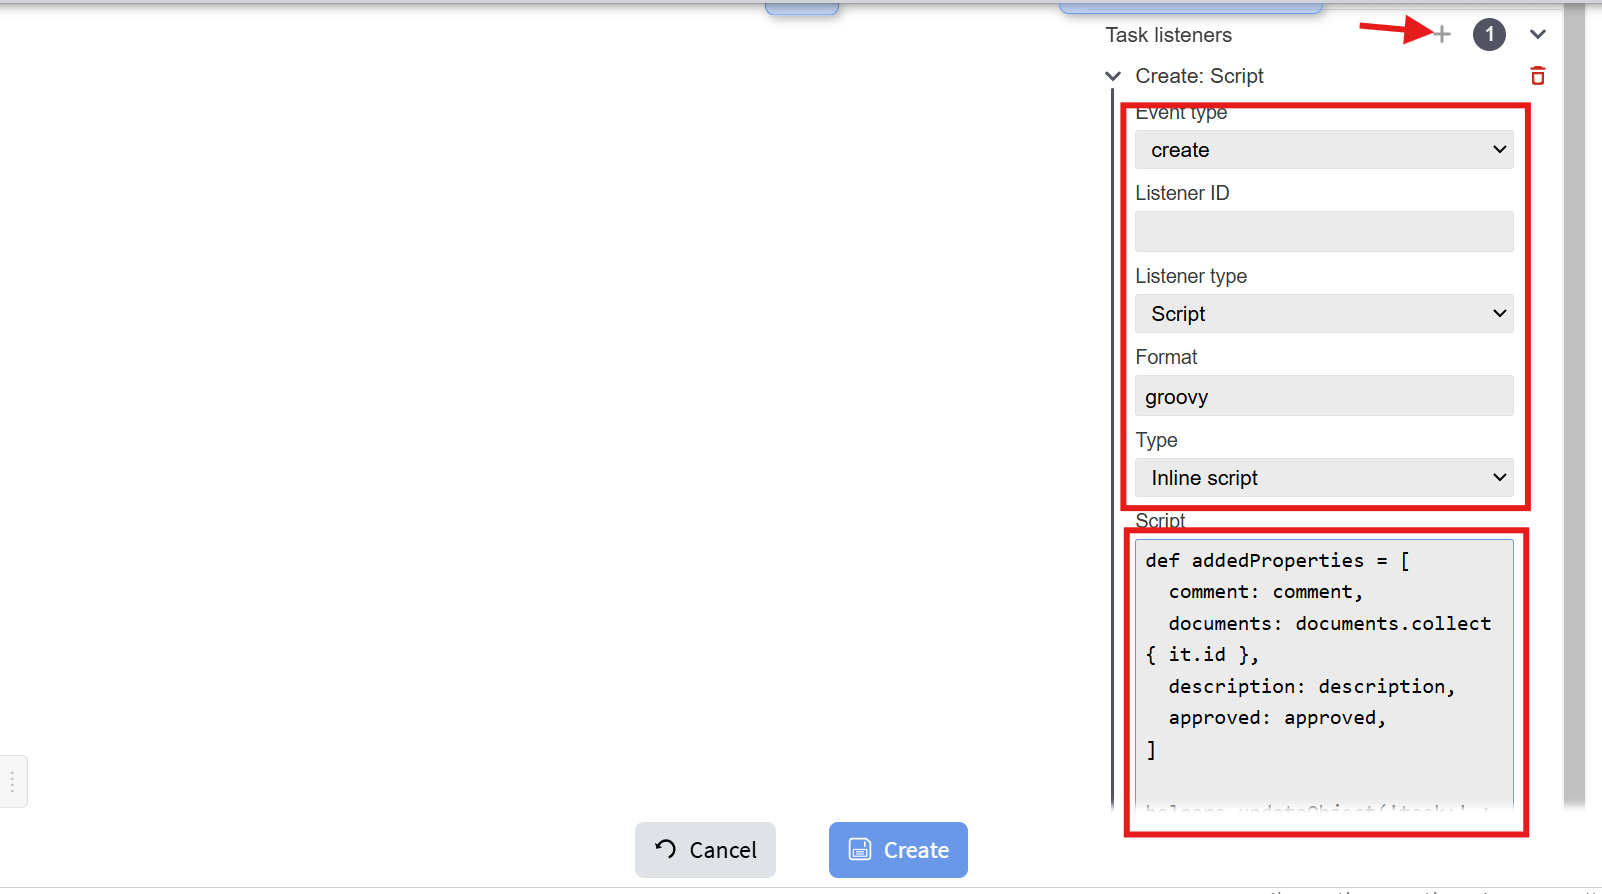
For Form Key use the name of the newly created workflow task type WorkflowApproveTask. - Add two Task listeners for create and complete events:
Script is:
def addedProperties = [ description: description, documents: documents.collect { it.id }, ] helpers.updateObject('task:' + task.id + '@6', godUser, addedProperties)which sets the description and documents properties to the task.

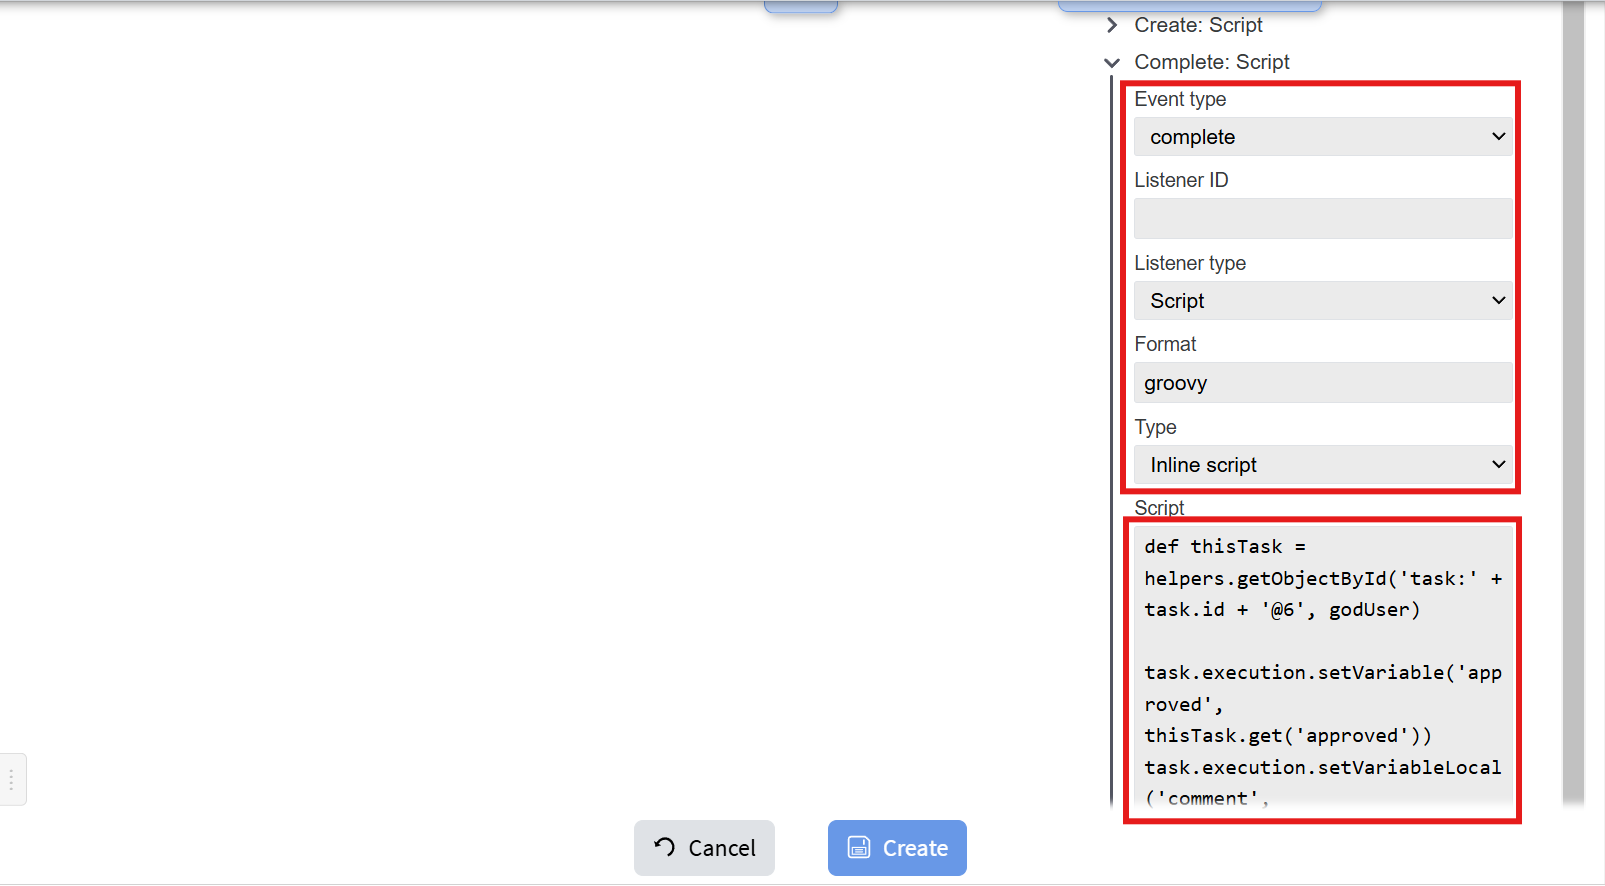
Script for the complete event is:def thisTask = helpers.getObjectById('task:' + task.id + '@6', godUser) task.execution.setVariable('approved', thisTask.get('approved')) task.execution.setVariableLocal('comment', thisTask.get('comment'))which sets the approved and comment properties to the process.
- Add and connect the next steps, and fill their properties:

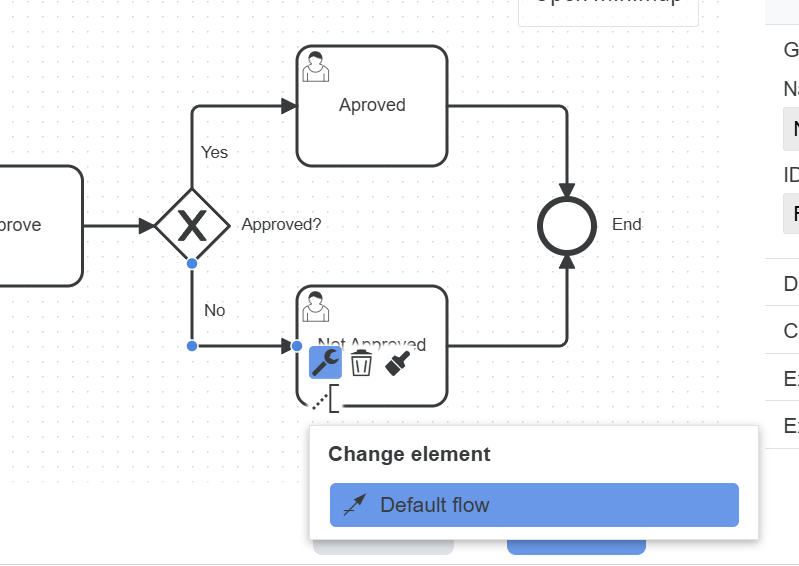
- Select the "No" path and set it as "Default flow":

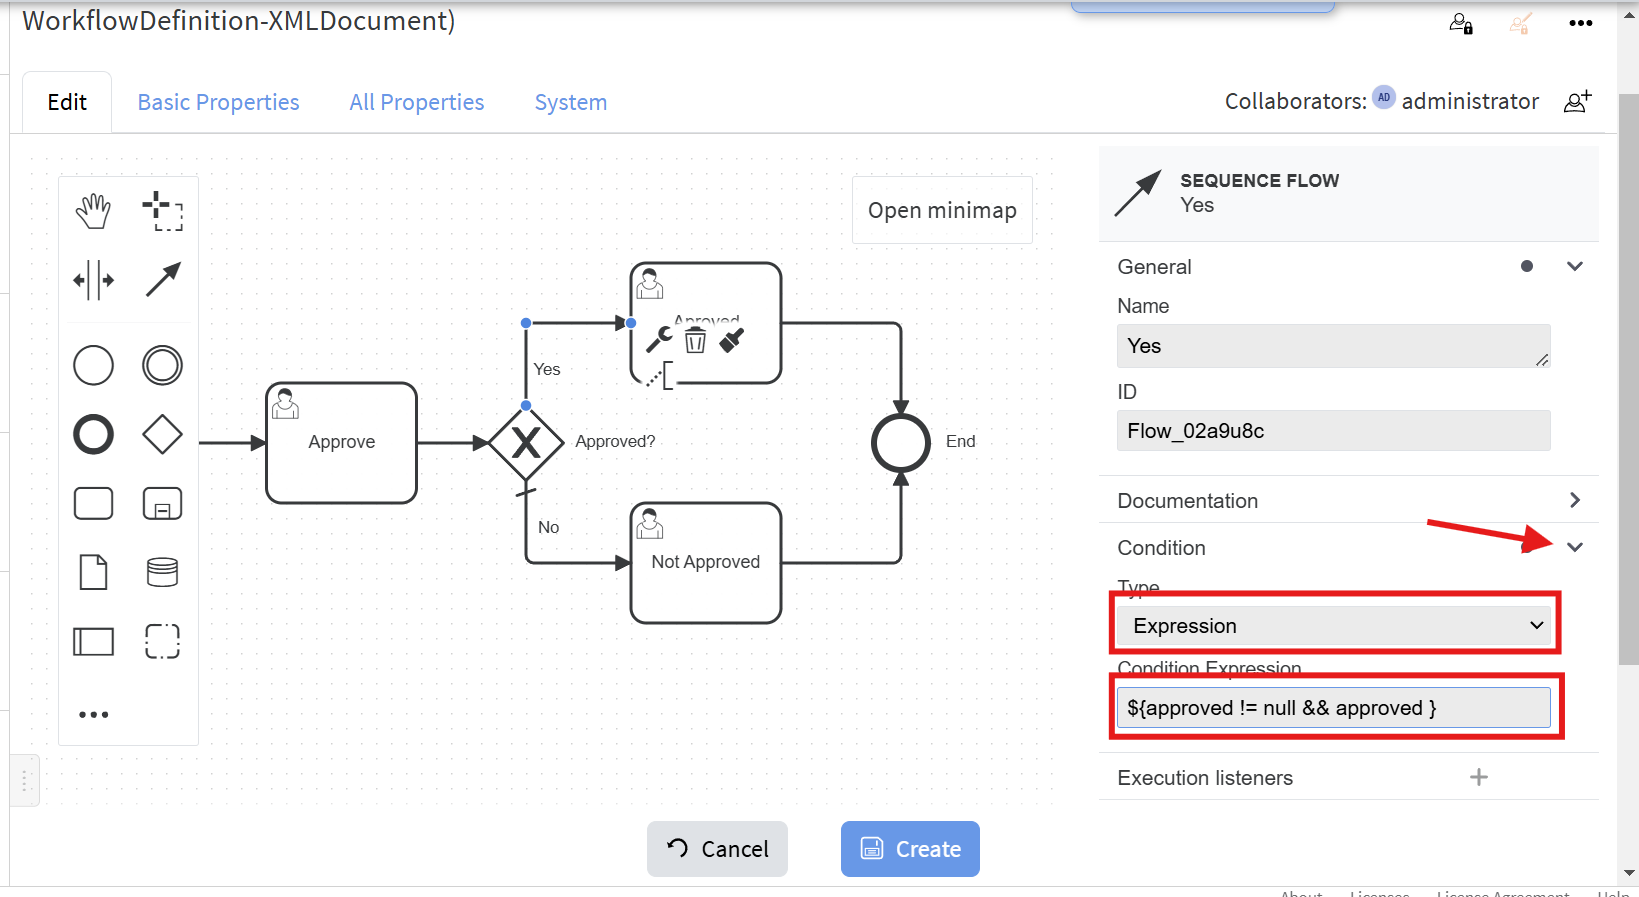
- Select "Yes" flow and set its properties:
Condition expression is:
${approved != null && approved}, i.e. this path is taken only when the approved is set to true in the Approve task. - Similarly to the Approve task set properties of the "Approved" and "Not Approved" tasks:


For inline script use:
def addedProperties = [ comment: comment, documents: documents.collect { it.id }, description: description, approved: approved, ] helpers.updateObject('task:' + task.id + '@6', godUser, addedProperties)which sets the corresponding properties from the process to tasks.
- Enter the name of the workflow:

- Click the "Create" button and your new workflow definition is ready and can be used to create instances based on it.

You can download the BPMN of the above example from here. The types and properties created for the above example can be downloaded from here and then can be imported through Operations -> Import/Update from JSON.
Test the new workflow
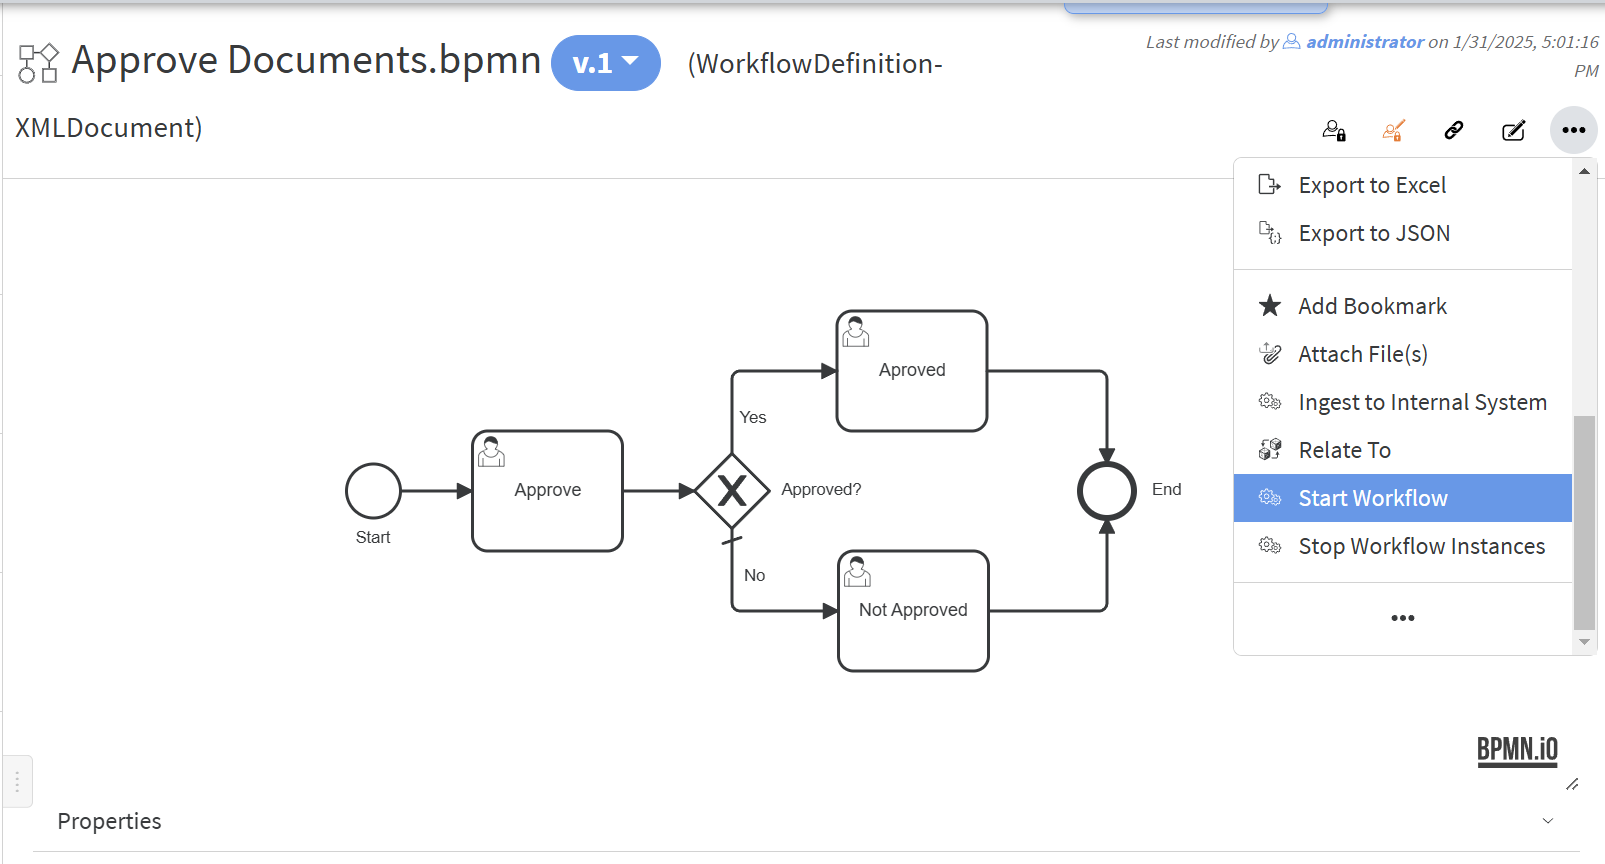
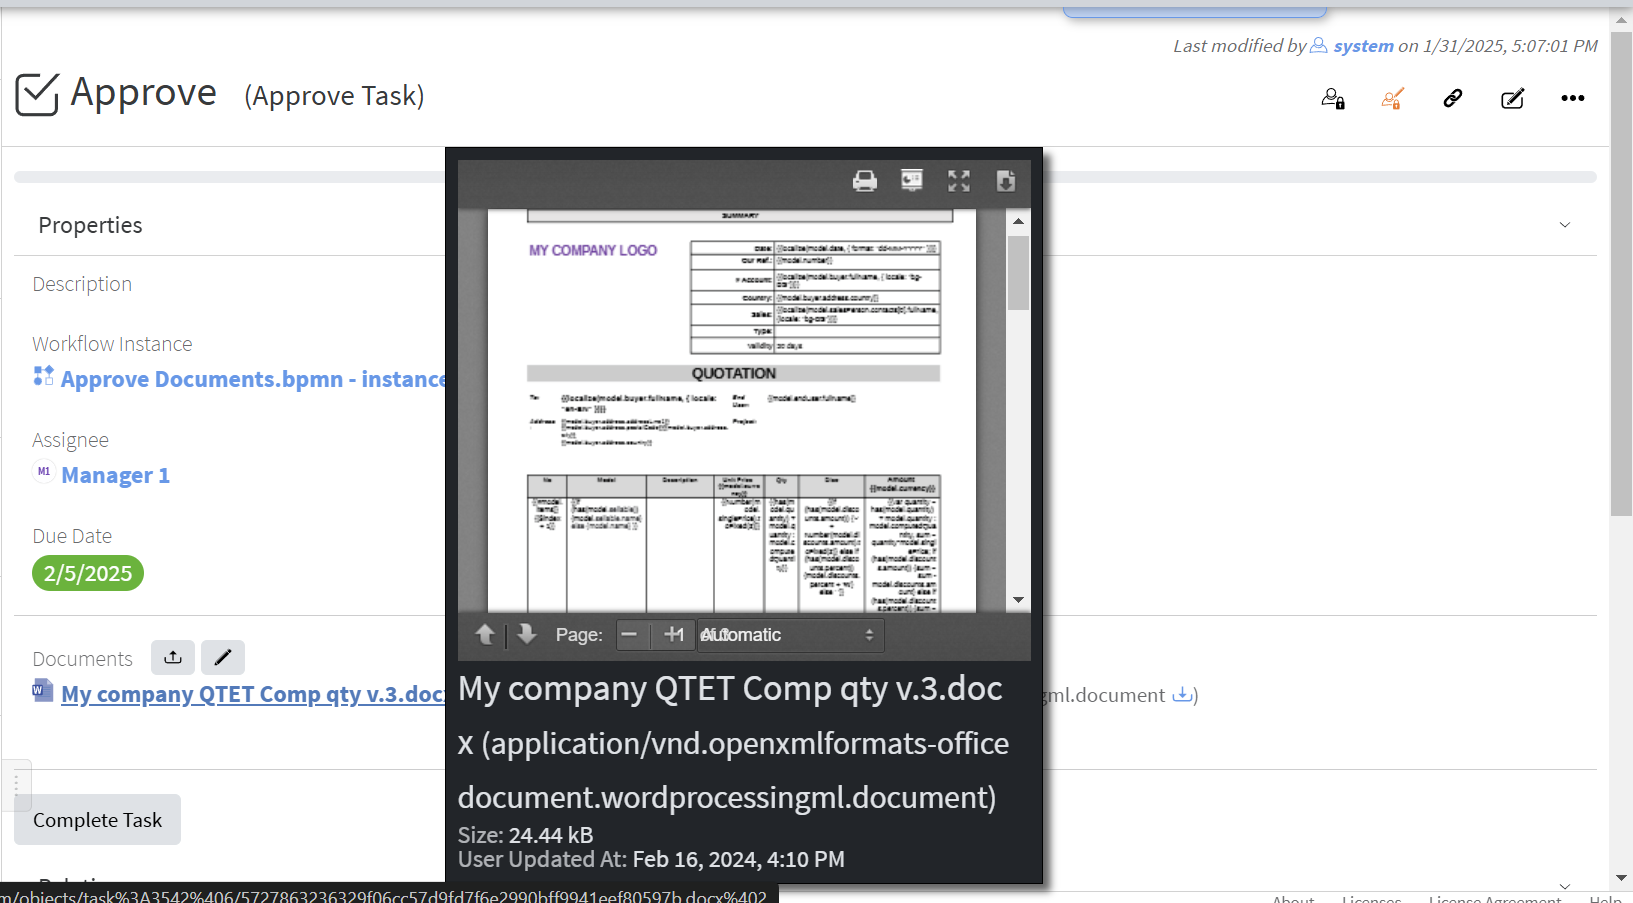
- From the Approve Documents workflow definition's object menu select "Start Workflow":

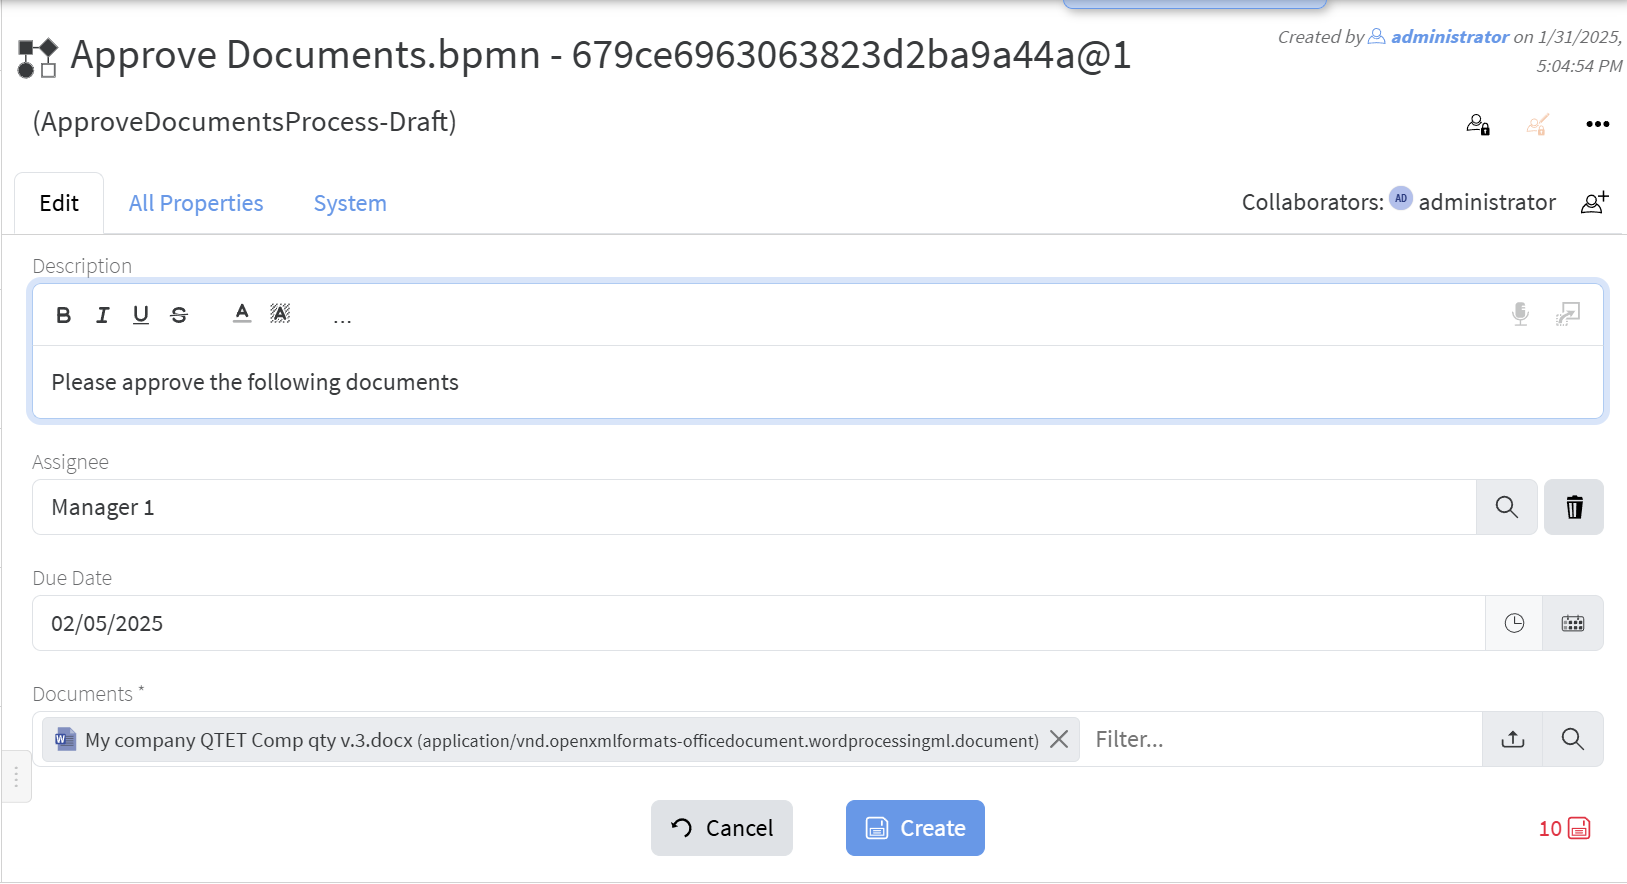
- The form from the "ApproveDocumentsProcess" type will be shown to enter appropriate properties:

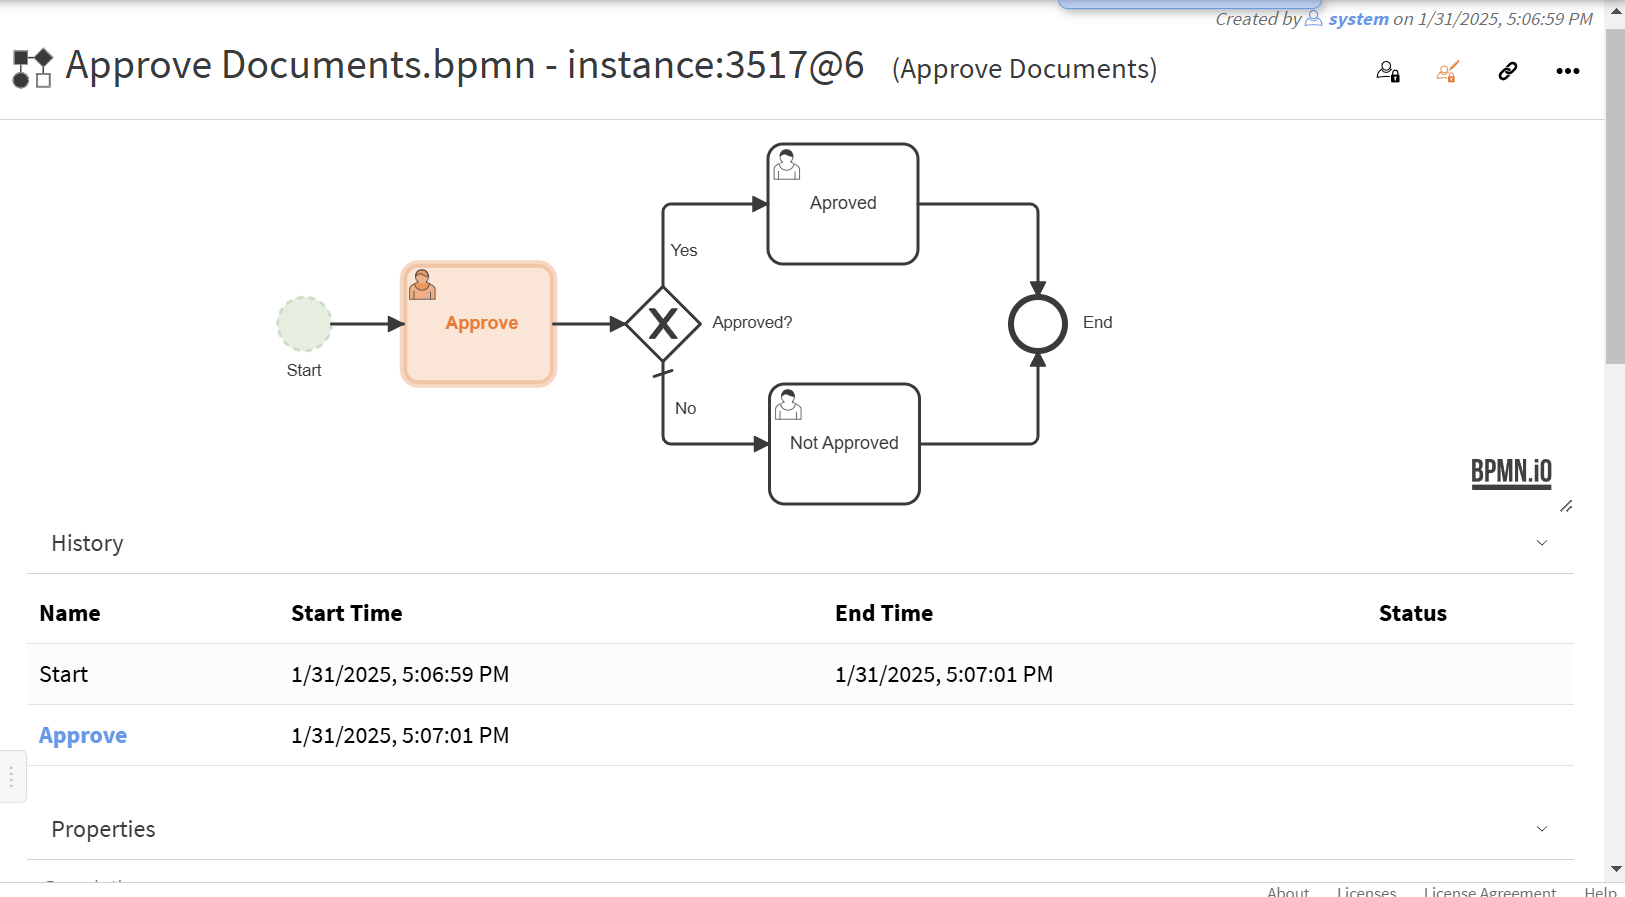
- The newly created instance of the workflow will be shown where you can observe the active steps and the history of the process:

- In history you can click an active step to go to it and observe its status (if you have rights of course):

Add a button in the header of Document objects to start approval process with the above workflow
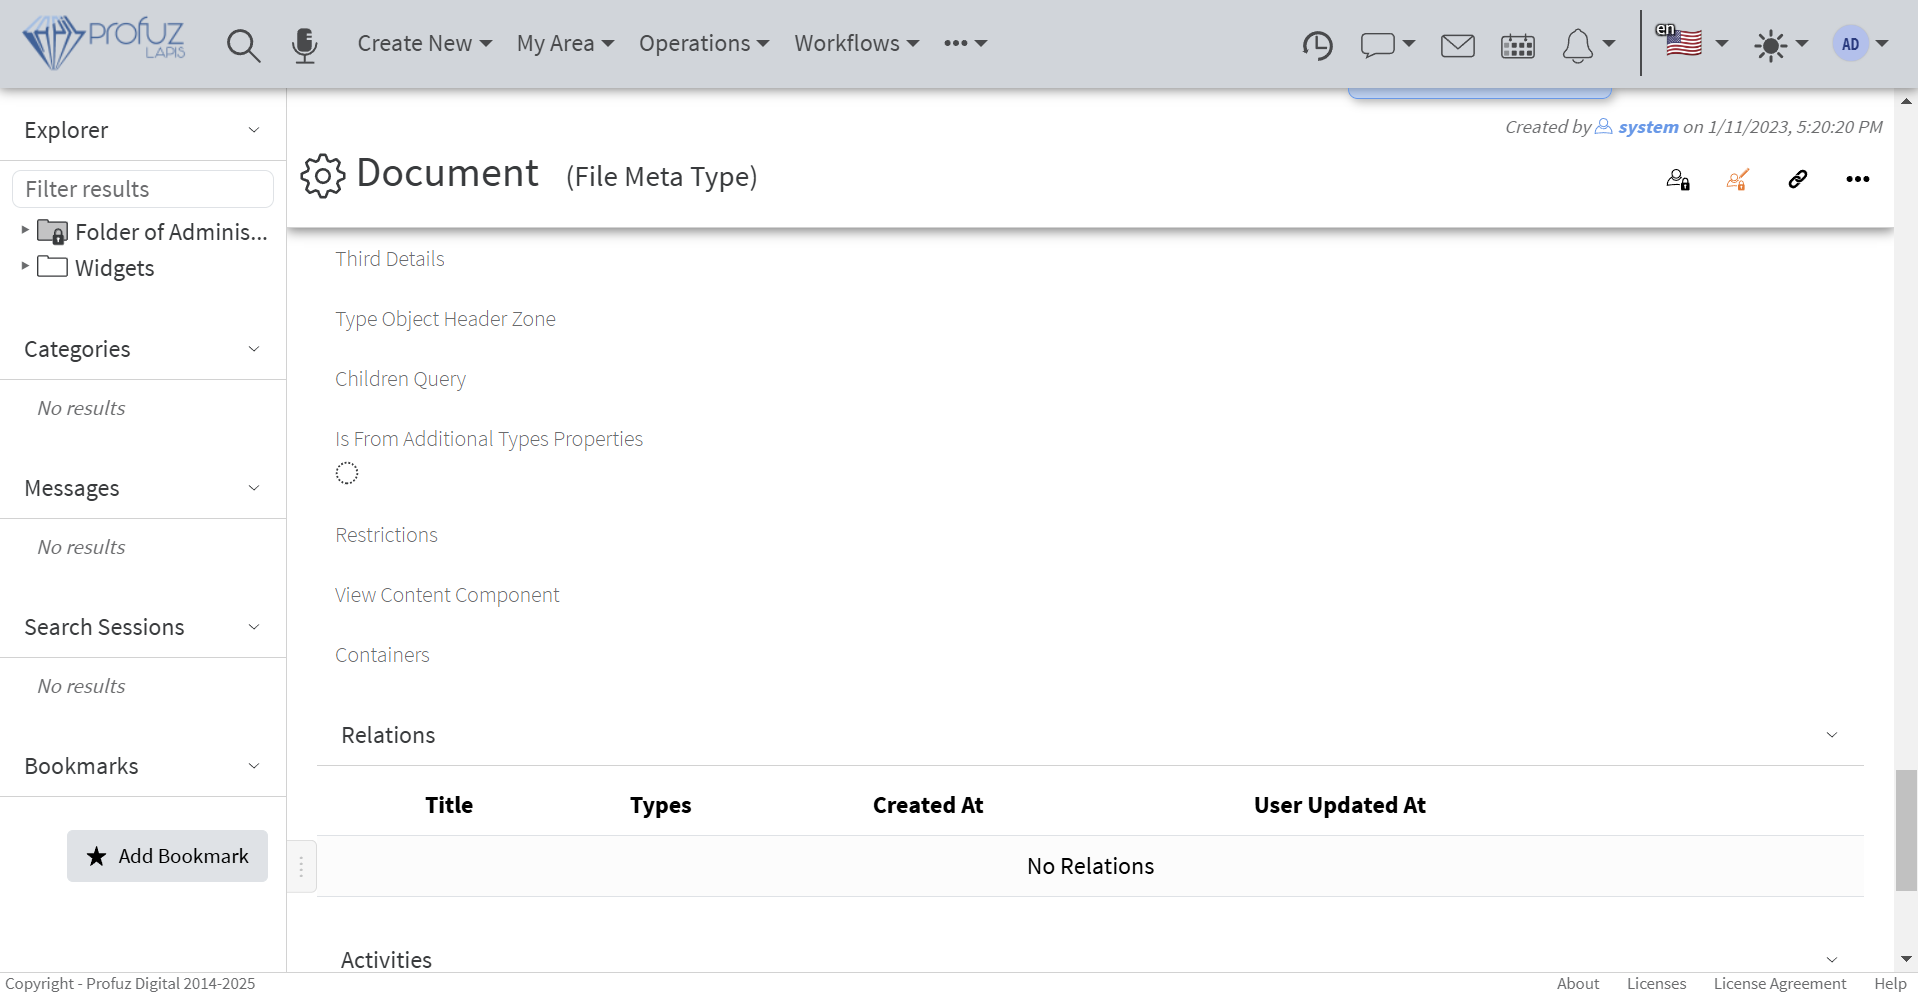
- Go to Document type:

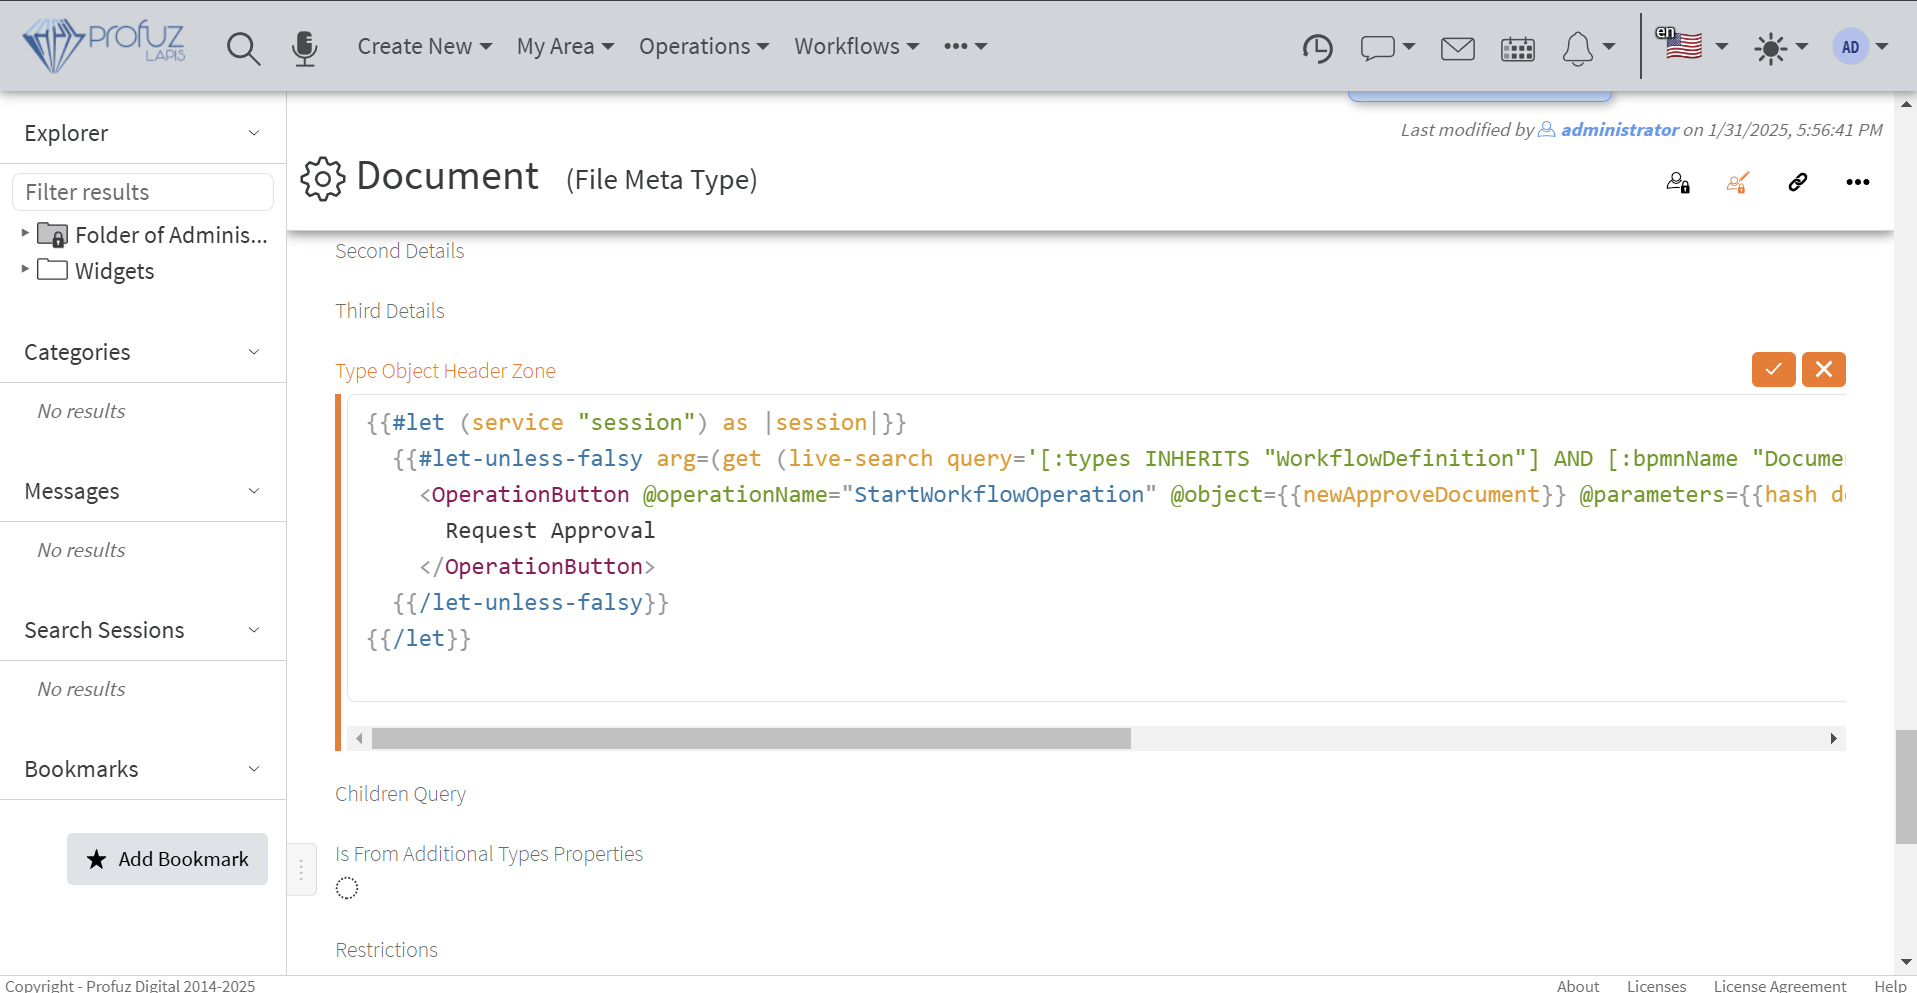
- Enter the following in Type Object Header Zone:

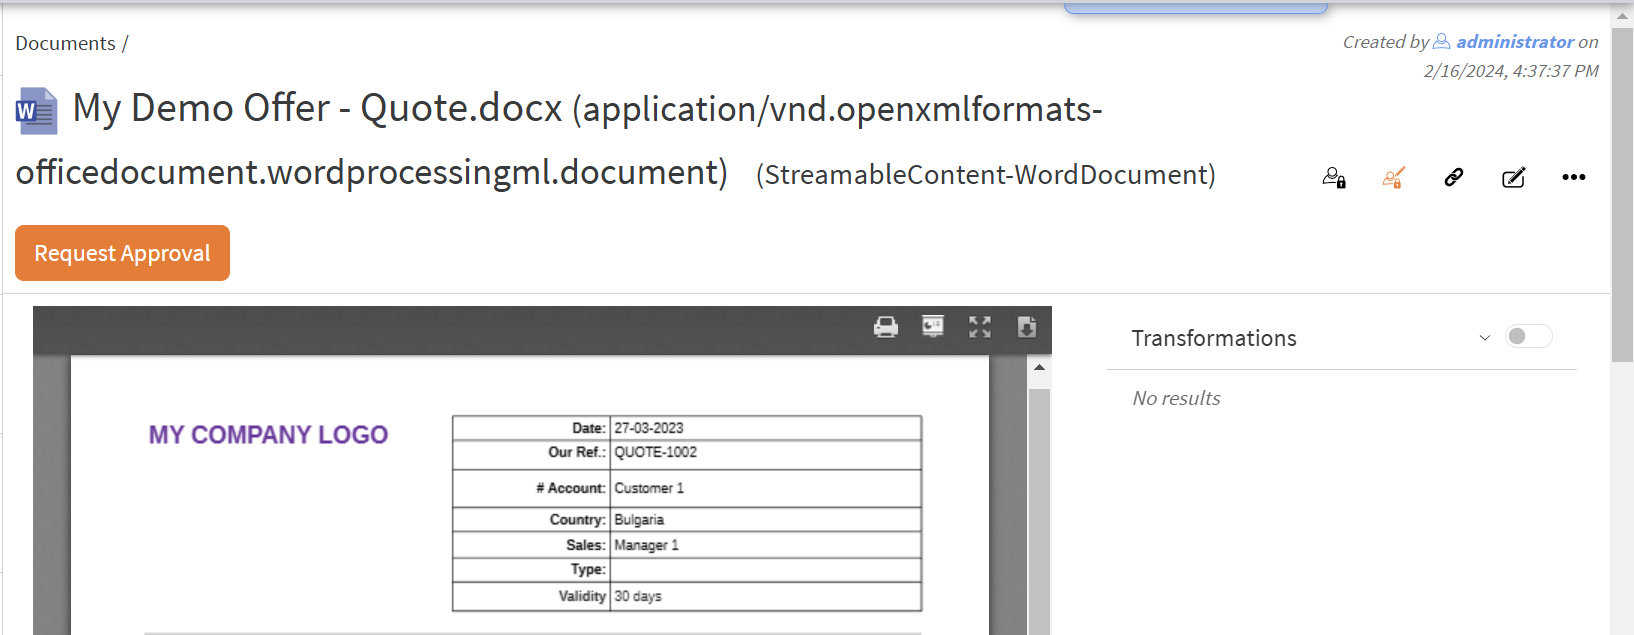
The code is:{{#let (service "session") as |session|}} {{#let-unless-falsy arg=(get (live-search query='[:types INHERITS "WorkflowDefinition"] AND [:bpmnName "Document Approval Workflow"] SORT BY :name ASC LIMIT 1') 0) checkForEmptiness=true as |newApproveDocument|}} <OperationButton @operationName="StartWorkflowOperation" @object={{newApproveDocument}} @parameters={{hash documents=(array @model.id)}} @buttonClass="btn btn-warning"> Request Approval </OperationButton> {{/let-unless-falsy}} {{/let}} - On your document's header the following button will be shown from which you directly can start the approval workflow:

Workflow Example 2
Create Workflow Definition
Let's create a workflow that monitors specified folders and when a video file appears in some of them transcodes it with a selected transcoding template.
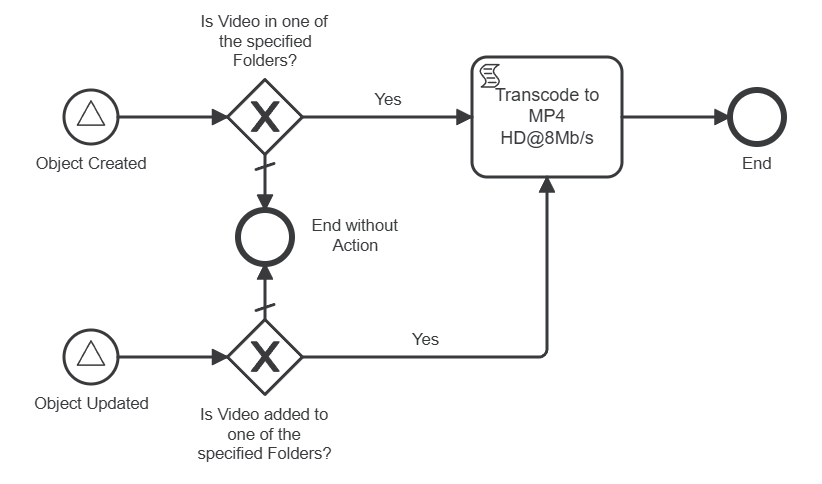
LAPIS emits BPMN signals related to an object's lifecycle. The workflow will monitor two specific signals using Signal Start Events:
-
objectCreated – Triggered when a new object is added to the system.
-
objectUpdated – Triggered when an existing object is modified.
When an object is created, the workflow will verify whether it is linked to one of the monitored folders. Similarly, when an existing object is modified, the workflow will check if it is linked to any of the monitored folders.
Let assume we have some folders:
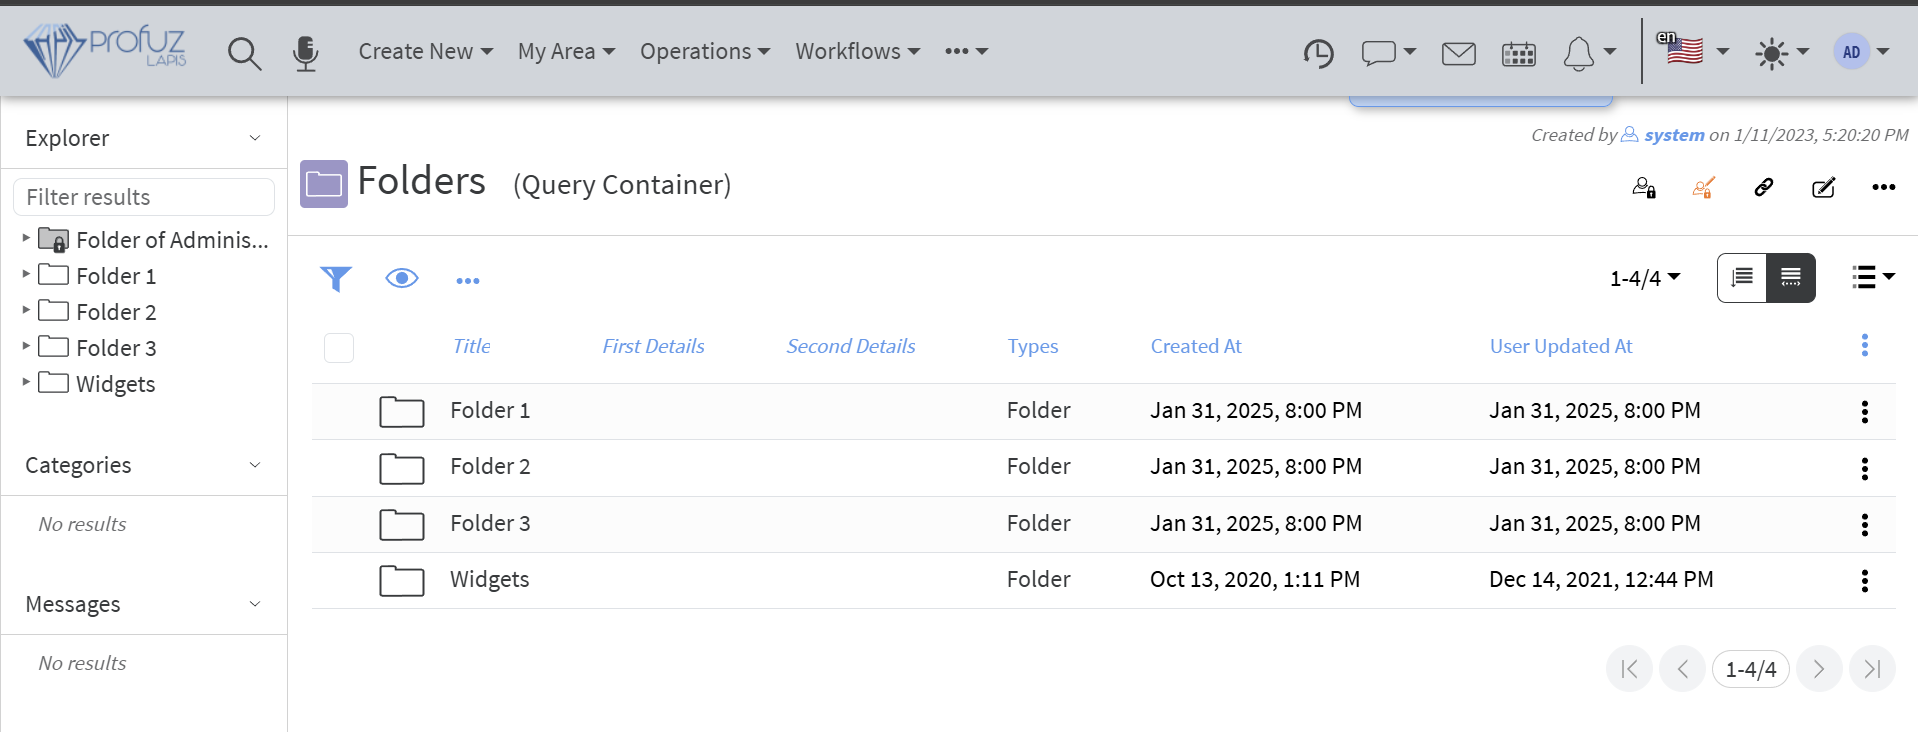
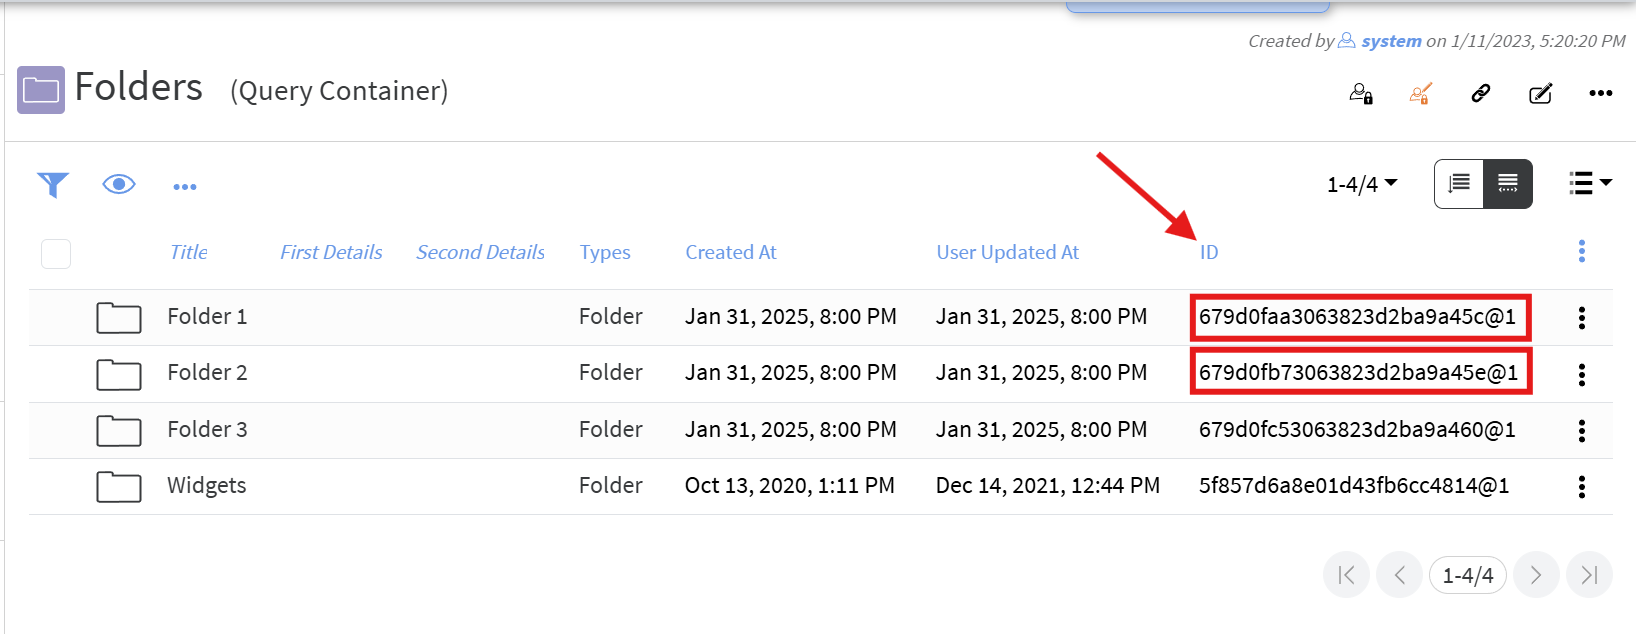
For this example we will monitor "Folder 1" and "Folder 2". We will need their IDs which we can get by displaying the ID column:
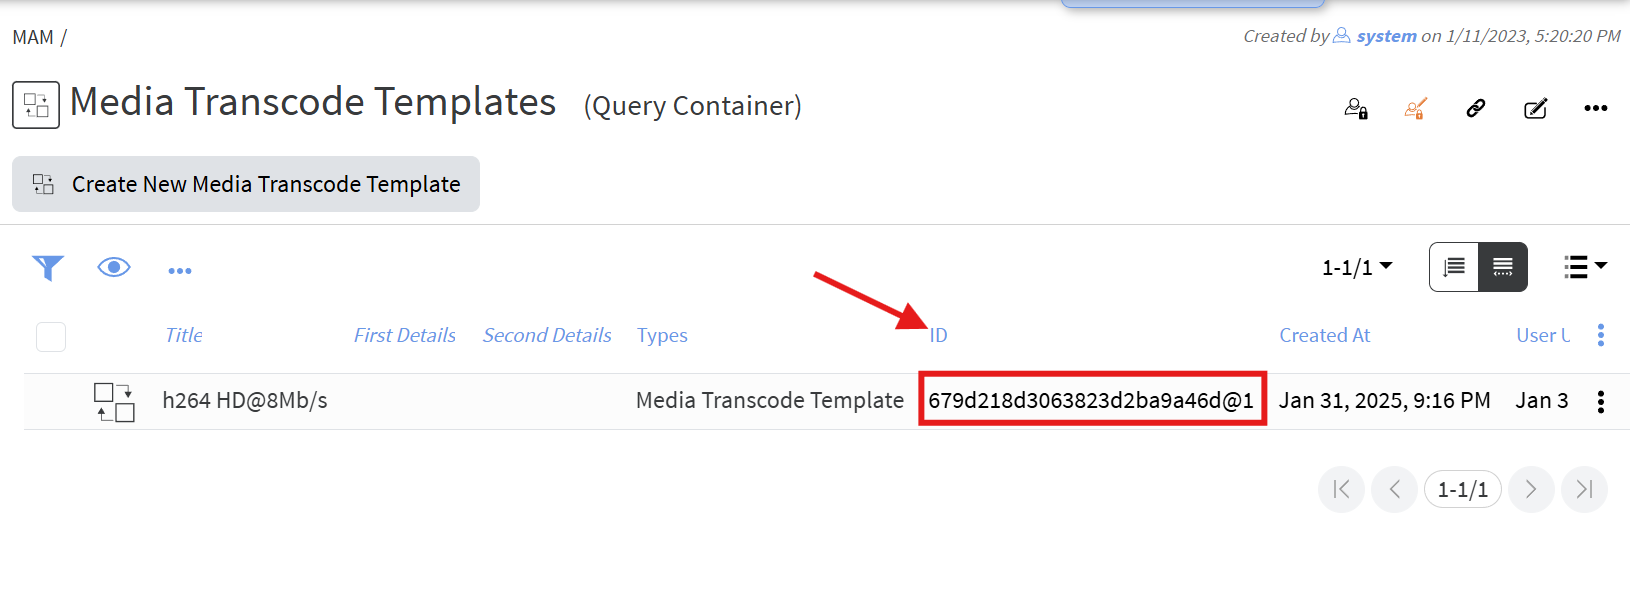
We will also use a Transcoding Template holding the transcoding parameters, so get its ID, too:
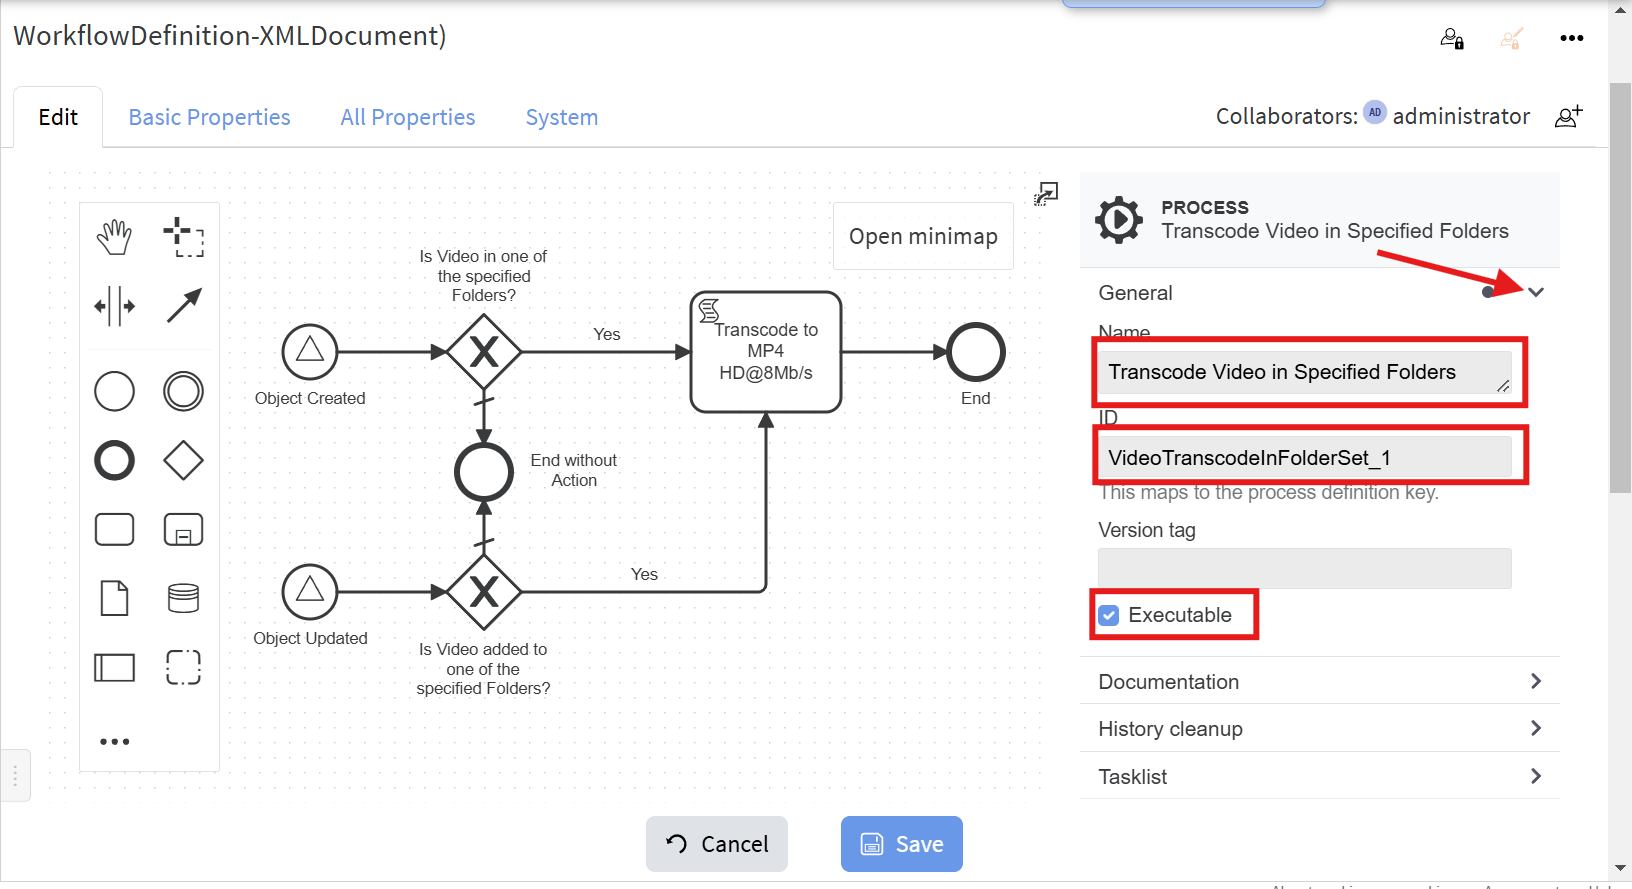
Now let's create a new workflow definition as shown:
- Set general properties Name, ID and Executable:

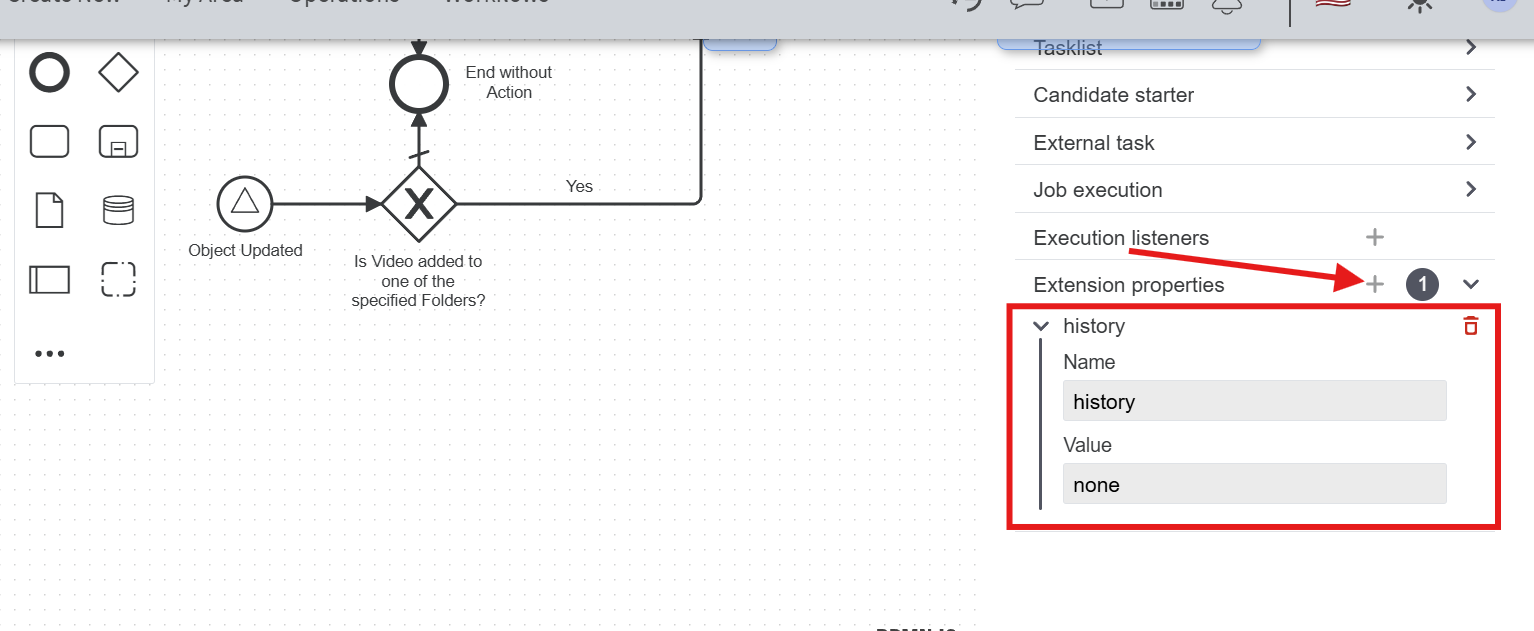
- Important is to also add the following "Extension Property", so that workflow history is not flooded with all workflow instances that are created for any object creation or modification:

- Set the properties for the Object Created signal start event:

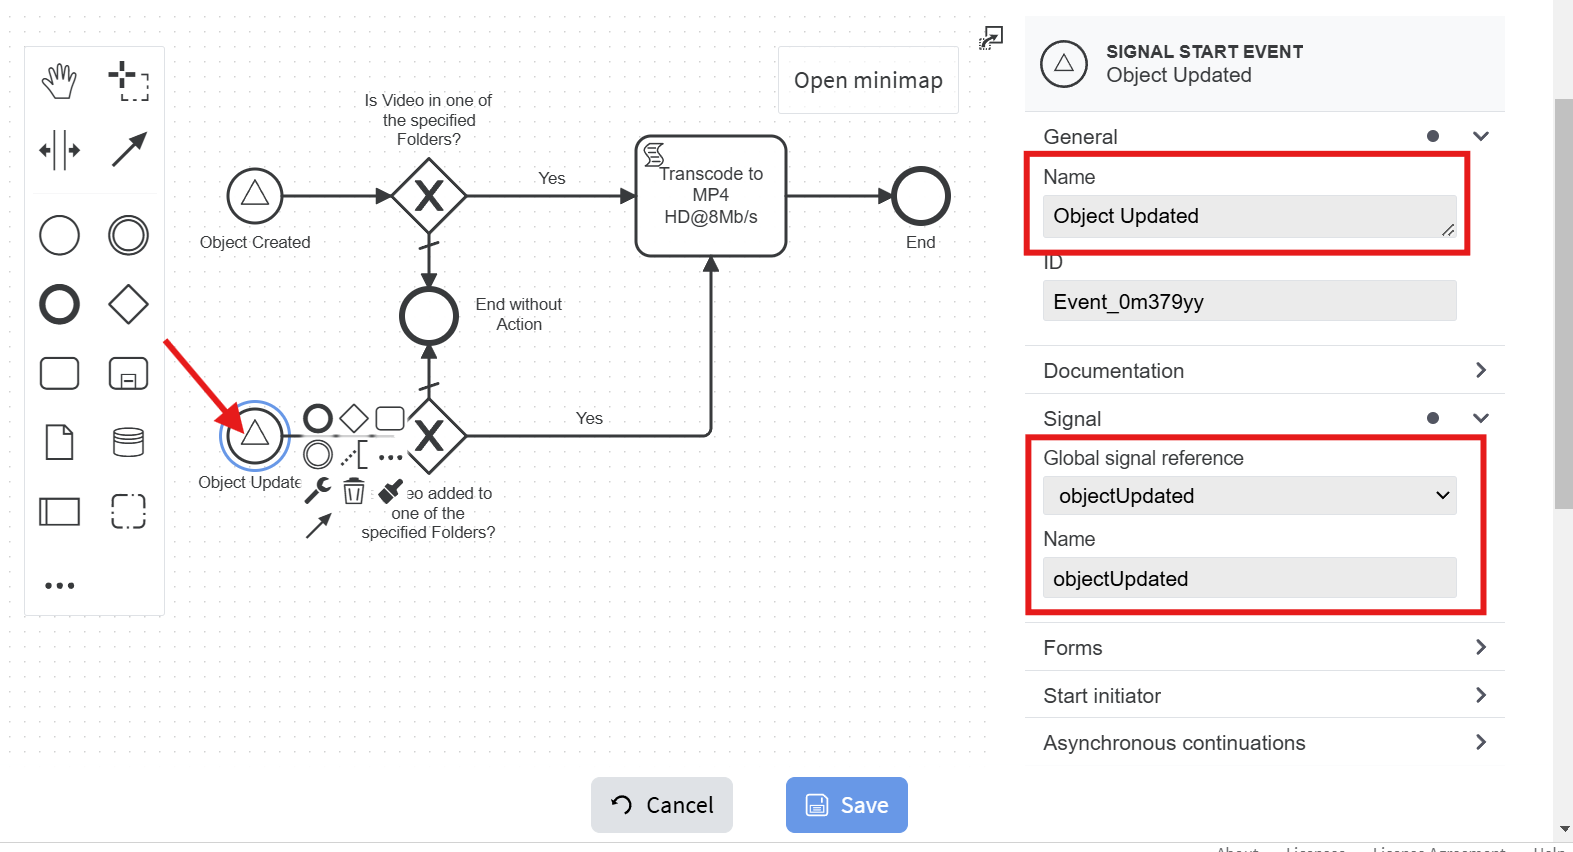
- Set the properties for the Object Updated signal start event:

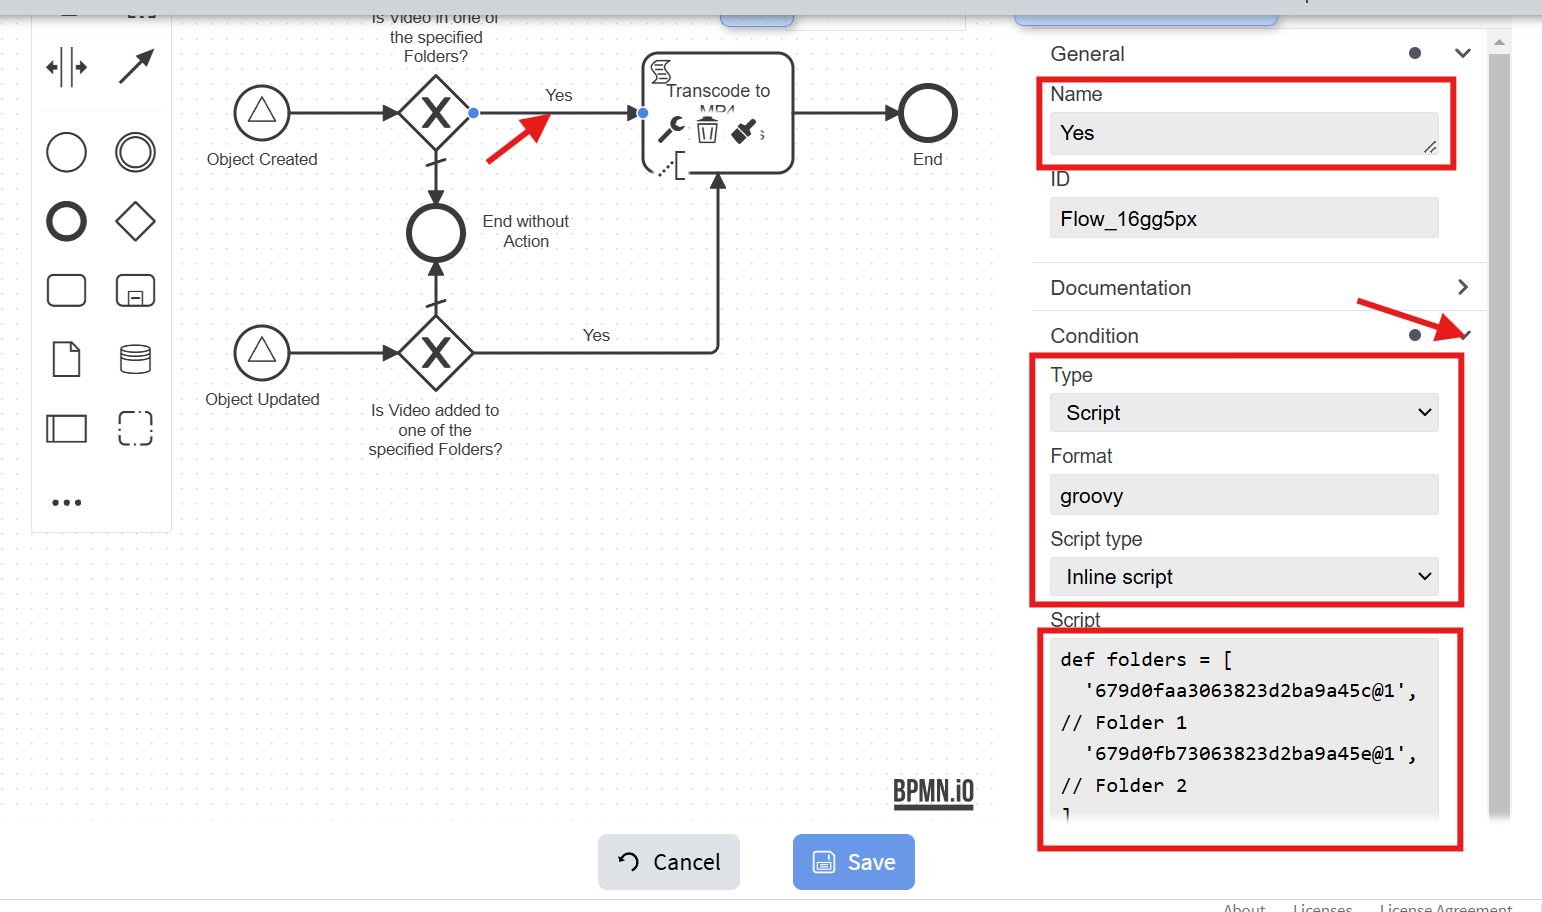
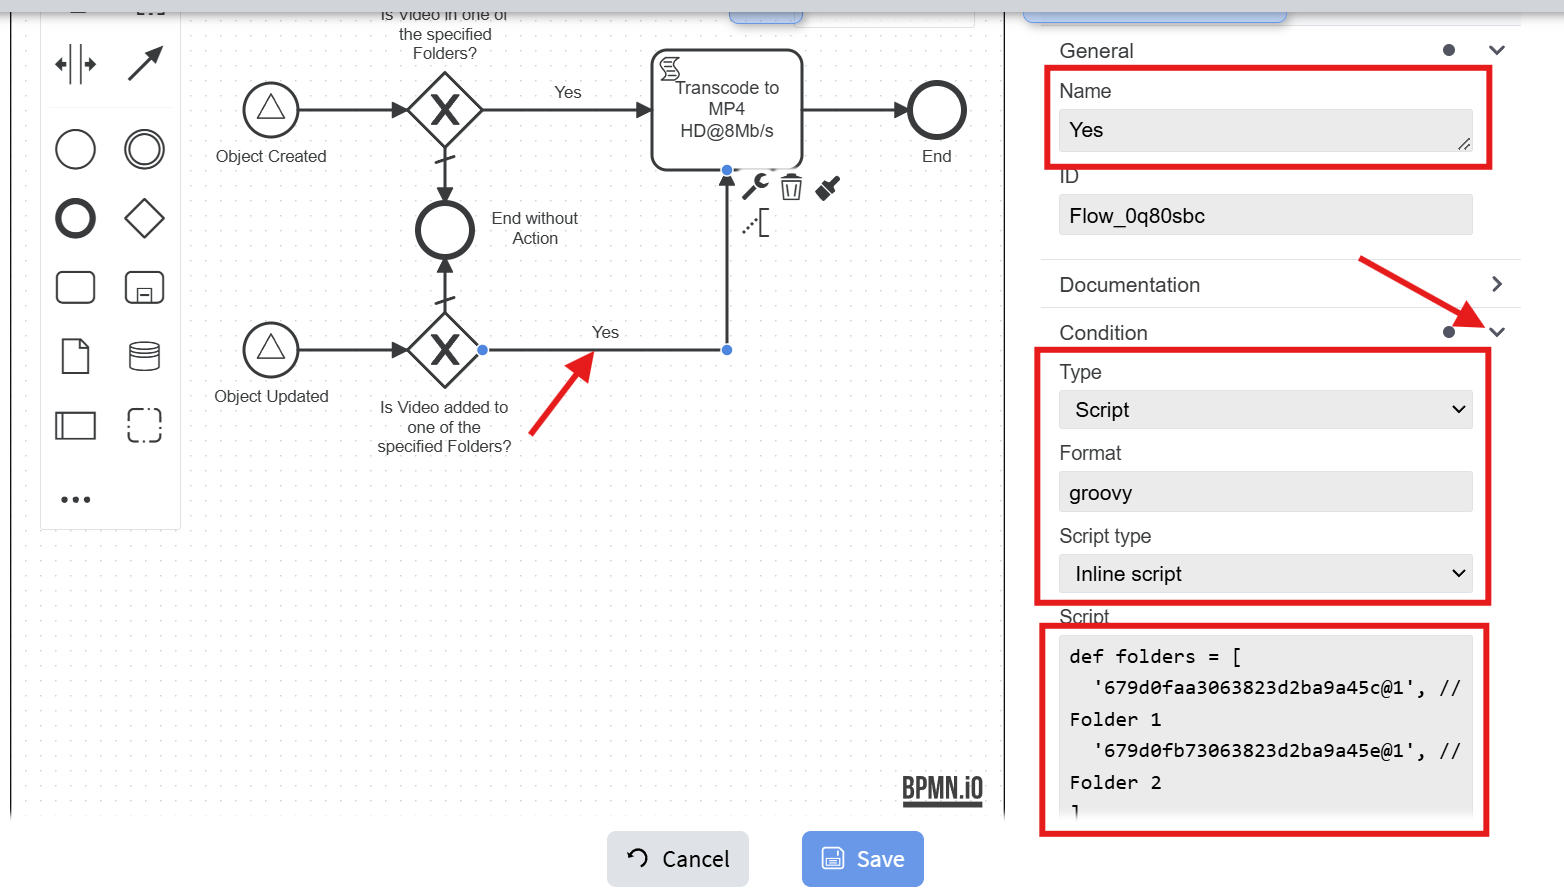
- Set the following properties to the object-created Yes flow:
The script is:
Replace/add IDs of the folders you want to be monitored in the folders variable.def folders = [ '679d0faa3063823d2ba9a45c@1', // ID of "Folder 1" '679d0fb73063823d2ba9a45e@1', // ID of "Folder 2" ] def containers = (object.get('containers') ?: []).collect { it.id.toString() } def addedToAnyFolder = folders.intersect(containers) (object.unwrap().isInstanceOf('Video')) && !['draft', 'newObjectDraft'].contains(object.get('lifeCycleStatus')) && object.get('containers') != null && addedToAnyFolder
The object variable is defined for workflow instances that trigger either the objectCreated or objectUpdated signal events. By using
object.get(), you can retrieve any property value from the object, including non-existent or undefined properties. If querying a property doesn't exist or has no value,get()will returnnull.Similarly, you can inspect and act upon other object properties as needed. For instance, in this example, the containers property contains IDs of folders (and/or other containers) that are linked to the current object.
The final script statement must evaluate to a Boolean value, which determines the outcome of the condition check. In this example, the script checks the following:
-
Whether the newly created object is of type 'Video'.
-
Whether the object is not in the process of being created (e.g., autosaves during data entry will have this state).
-
Whether the object is linked to one of the monitored folders (as required in this example).
-
- Set the following properties to the object-updated Yes flow:
The script is:
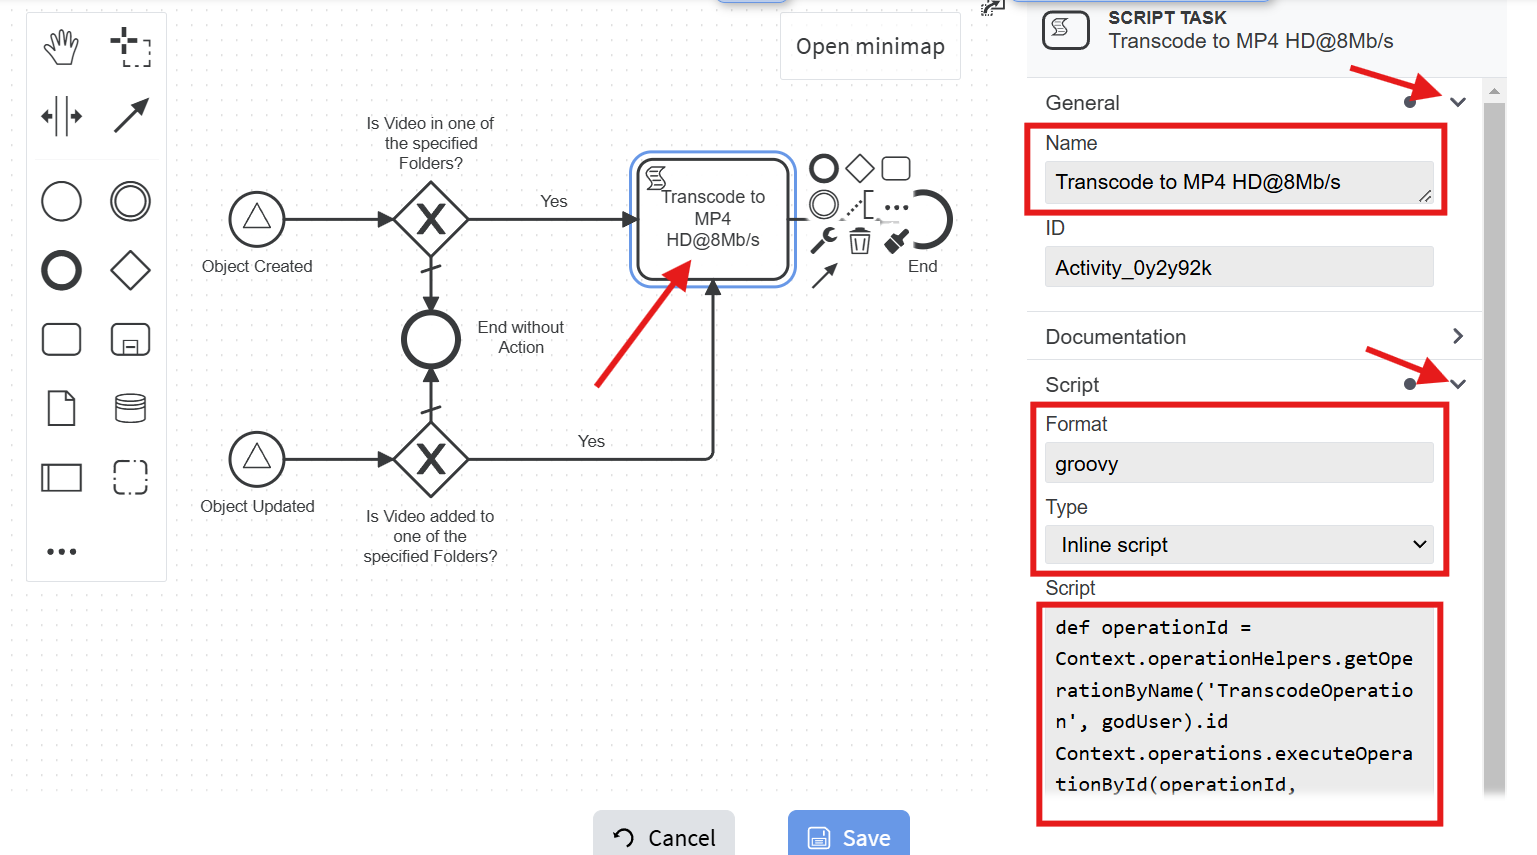
Match the folders variable to the previous script. (Note that there is way to set this variable ones in the workflow and use it on other places, but for simplicity we have put it in both scripts).def folders = [ '679d0faa3063823d2ba9a45c@1', // ID of "Folder 1" '679d0fb73063823d2ba9a45e@1', // ID of "Folder 2" ] def originalContainers = (originalObject.get('containers') ?: []).collect { it.id.toString() } def containers = (object.get('containers') ?: []).collect { it.id.toString() } def intersectOriginal = folders.intersect(originalContainers) ?: [] def intersectNew = folders.intersect(containers) ?: [] def addedToAnyFolder = intersectOriginal.size() == 0 && intersectNew.size() > 0 execution.hasVariable('originalObject') && (object.unwrap().isInstanceOf('Video')) && !['draft', 'newObjectDraft'].contains(object.get('lifeCycleStatus')) && addedToAnyFolder - Set the following properties to the scripting task:
The script is:
def operationId = Context.operationHelpers.getOperationByName('TranscodeOperation', godUser).id def templateId = '679d218d3063823d2ba9a46d@1' // ID of the transcoding template Context.operations.executeOperationById(operationId, [object.id].toImmutableList(), helpers.getSubject(subject), [ templateId: helpers.relationFromString(templateId), ].toImmutableMap(), null)Change the templateId variable with your own ID.

You can download the BPMN of the above example from here.
Test the new workflow
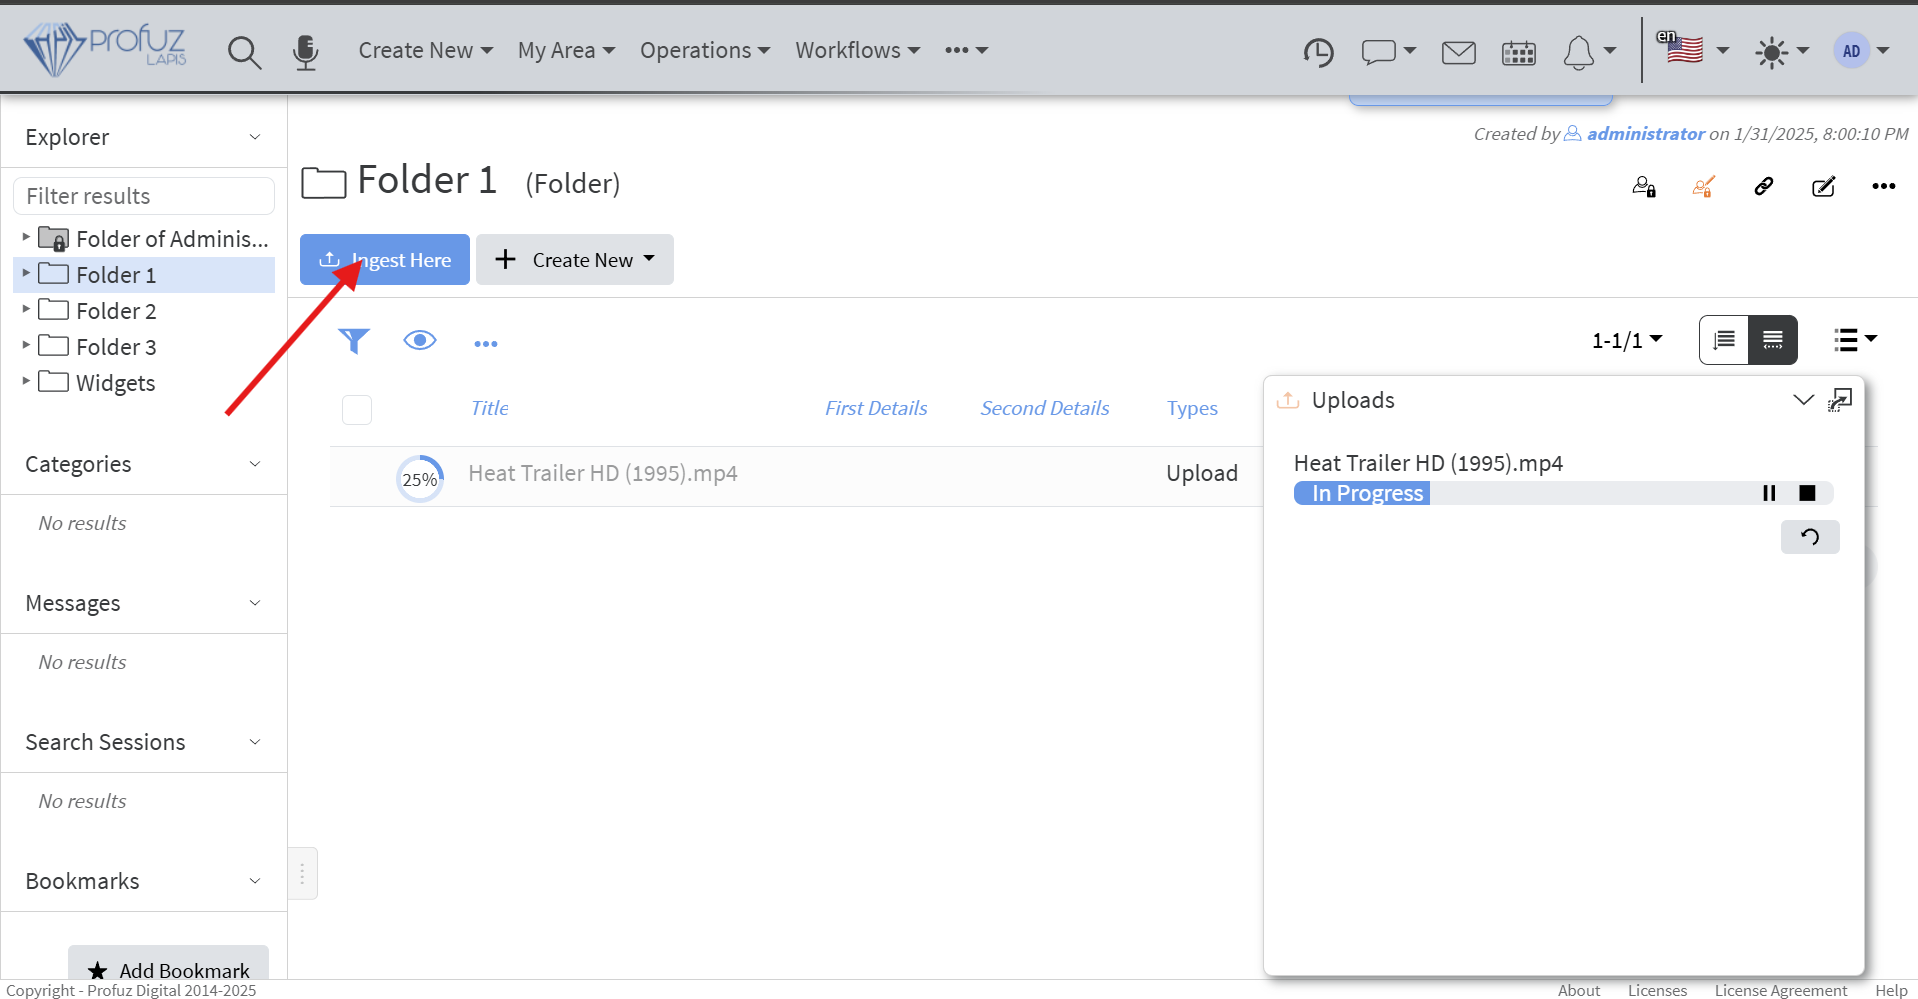
- Upload a video file to one of the monitored folders:

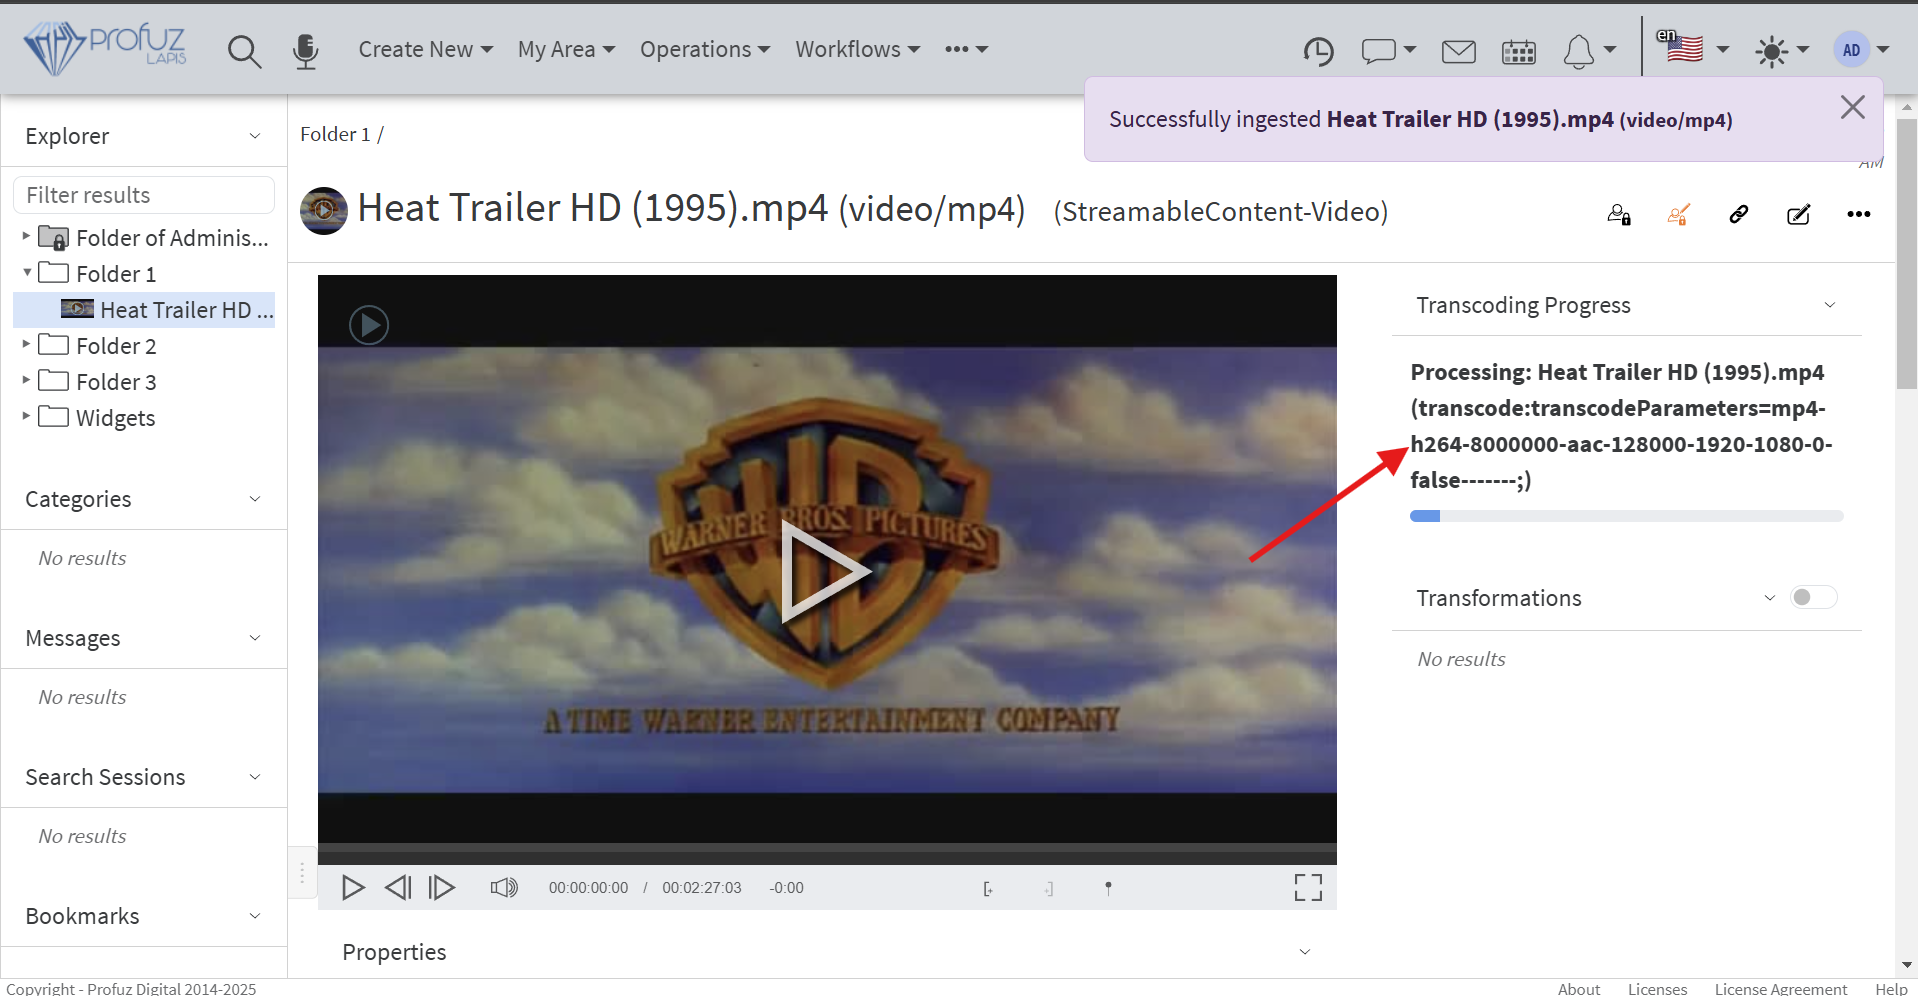
- The transcoding should start after upload is finished:

- You can also drag and drop an existing video into one of the monitored folders, and the workflow will automatically initiate the transcoding process for it.